All 2 available source parts are included below.
Part 1
THE NEEDLEBAR Archive at ISMACS International
Online Manuals Section
*** DIRECTIONS ***
FOR OPERATING
Bradbury & Company's
B2 & B4 Rotary Shuttle Machines
(Part One)
Be sure to Read this before Operating the Machine
Bear this one fact in mind, that a thorough understanding of the contents of this Direction Book will enable you to become complete master of the Sewing Machine, as it gives more elaborate instructions than any other that you may receive
The first thing to understand is the treadle motion. First lift the presser-foot from the feed by the lift-handle, place the feet upon the treadle, disengage the fly-wheel, and run the loose wheel towards you, allowing the feet to move freely with the motion thus given for a time, until the motion becomes easy; then put the machine in motion with the fly-wheel, and again run it a little when all is in motion.
The next important to this is the threading of the Machine and shuttle; then setting the needle; then selecting the needles and thread to be used with the fabric intended to be sewed; then regulating the tensions on the threads; then regulate the length of the stitch; then to put the work in and take it out of the Machine; then the proper pressure of the presser-foot on the cloth; then oiling the Machine; then to wind the bobbin; then the names of all the important parts of the Machine and their functions.
The Machine will sew in almost any condition of the tensions, but to do absolutely first-class sewing on all classes of work, a thorough knowledge of the tensions, and the proper sizes of needles and thread, and length of stitch suitable to the fabric intended to be sewed, is necessary.
Do not fill the bobbin quite full of thread. Oil the Machine thoroughly and frequently - it will last longer and stand harder usage.
Illustration A
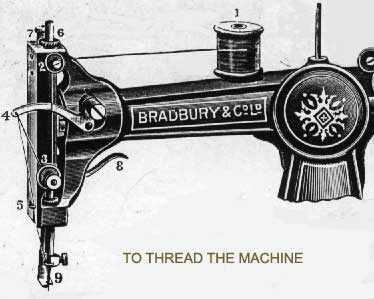
Place the spool of thread on spool spindle (1), then pass the thread between the washers (2), down and between the tension washers (3), then through the small spring, in front of the tension washer (3), and take-up (4), behind the wire staple (5), inside wire guide on needle clamp (9), and lastly through the eye of the needle from left to right.
No. 7 is a milled head screw for altering the pressure on the work being sewn. No. 8 is the lift-handle for the presser-foot.
BOTTOM SIDE OF SHUTTLE -- SHUTTLE TENSION
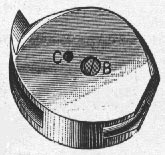
The screw B is for applying a light tension on the reel (by the finger A in illustration below), and to prevent the thread getting over the flange of reel.
It seldom requires altering after leaving the factory, but if necessity should arise it can be increased by turning the screw slightly to the right, and to the left to decrease the tension.
TO TAKE THE REEL OUT OF THE SHUTTLE
Take the shuttle in the left hand; and with the thumb nail or screwdriver lift the tongue A as shown at illustration B; the reel will then be easily taken out.
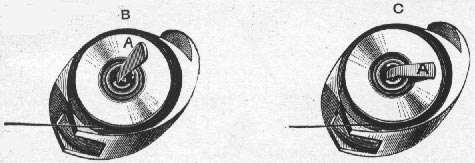
After winding the reel, as directed at page 4, take it in the right hand with the tongue A of the shuttle B uplifted in the left hand; place the reel in the shuttle, taking care that the thread comes off the reel exactly as shown in the two illustrations; then press down the tongue A on the reel as shown at C; The shuttle is then ready for placing in its position in the machine, taking care to leave about three inches of thread off the reel to commence sewing with.
TO TAKE OUT AND PUT IN THE SHUTTLE
First withdraw the shuttle cover to the right hand, then take out the shuttle with the finger and thumb. The proper position for removing the shuttle is when the needle bar is a little short of being at its lowest point. After placing the shuttle in its position take care to close the slide before commencing to sew. The presser-foot lifter should be up when not working.
TO SET THE NEEDLE
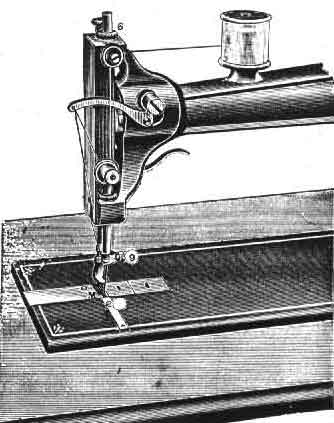
Place the needle in the needle bar with the short groove towards the shuttle, and the long groove on the left hand, see that the eye of the needle is from right to left and in a line with the mark A engraved on the shuttle cover slide, and when the eye is level with the steel needle plate, the mark on the top of the needle bar must be level with the top of the arm; when it is in its right position secure it firmly by the screw (No 9).
A more exact way of fixing the needle is by putting a fine pin through the eye of the needle, letting it rest across the plate; then move the Machine till the mark at the top is level, then secure it; if the needle is properly set a good loop will be made, if not set right miss-stitches will occur.
MISSING STITCHES
If the needle is improperly set it may throw the loop to one side, so that the shuttle will pass by instead of through the loop. Take note to have the eye in a line with the mark A engraved on the shuttle cover slide, and the eye of the needle level with the plate when the mark on the needle bar is level with the top of the arm, or the mark above the tension is in a line with the bottom of the needle cam. Miss-stitches will sometimes occur if the needle is too large or too small for the thread being used, or by the point of the needle having become blunted.
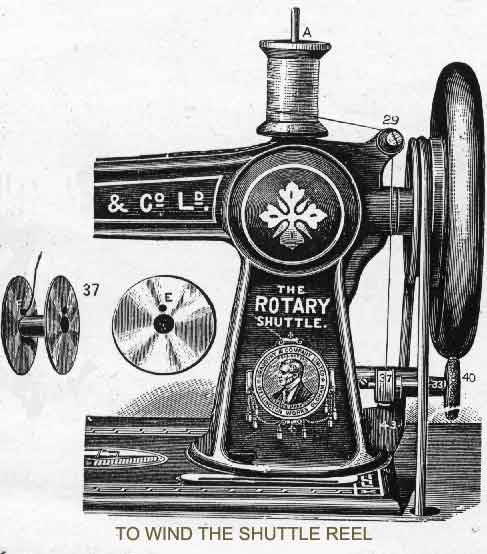
Illustration E
 .
.
Place the spool of thread to wind from on the spindle A, then pass the thread between the tension washers (No. 29), disengage the fly-wheel by the piston in same, put the winder ring in contact with the fly-wheel by lifting up at No. 33, press down the presser spring (No.43), place the reel to be filled on the spindle, the small hole at E fitting a small pin on the winder spindle, pass the thread through the small hole on the opposite side, as shown in F, leaving about an inch of thread through; before commencing to wind tighten the thread, then commence by running the wheel in the opposite direction to that when sewing; do not quite fill the reel full of thread, but leave two or three coils short of being full; take off the reel and push down the winder (33) to be out of contact with the wheel when sewing.
TO COMMENCE SEWING
Three or four inches of thread are drawn through the eye of the needle and held with the left hand loosely, while the needle is moved down into the shuttle race, and as it returns a loop is formed and the shuttle passes into it; then by pulling on the thread in the left hand it draws the shuttle thread up through the needle hole in the thread plate. THE MACHINE IS THEN READY FOR OPERATION.
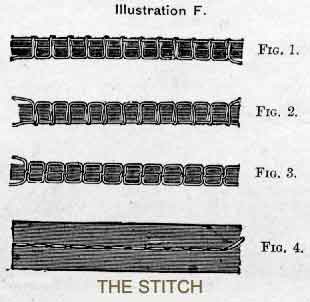
To regulate the stitch, the tension on the shuttle being given and seldom requiring alteration, the top thread must be regulated so as to produce sewing like figures 3 and 4.
The top tension is turned to the right for a tight tension, and to the left for a loose tension. But a very slight turn is necessary to make a great alteration in the tension. If the top tension is too strong, the bottom thread will be pulled through to the top, as shown at Fig. 1.
If it is not strong enough, the top thread will lay on the underside, as shown at Fig. 2.
If both tensions are right, the threads will make a stitch the same as shown at Figs. 3 and 4.
NEEDLE PLATES
Two of these are sent with each Machine, having a large and small needle hole; the smaller one is generally sent fixed in the Machine, and can be used with needles up to No. 2 1/2; if larger than this is used, the plate with the larger hole must be used, or breaking of threads and bad work will be the result.
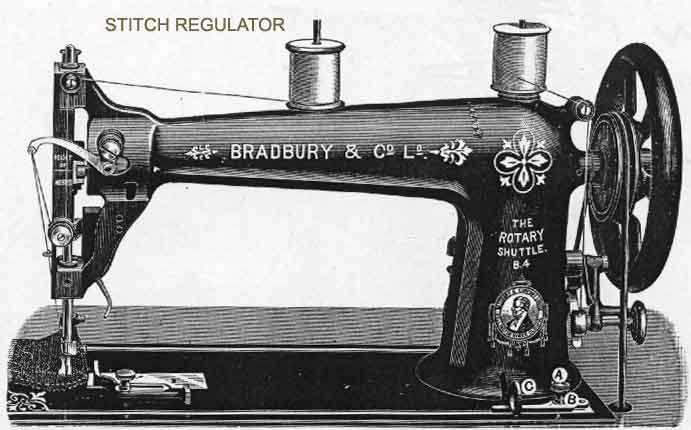
For a long stitch loose the screw A, move the finger B away from the arm the required length, pulling the lever C so that it bears on the finger B, then tighten the screw A. By pushing the lever C nearer the arm of the machine a short stitch is made.
TO REVERSE THE FEEDER, push the lever C as close to the arm as it will go.
Part Two | |
Part 2
THE NEEDLEBAR Archive at ISMACS International
Online Manuals Section
*** DIRECTIONS ***
FOR OPERATING
Bradbury & Company's
B2 & B4 Rotary Shuttle Machines
(Part Two)
VIBRATORS can be supplied to either the No. 2 or No. 4
Rotary Machines AT AN EXTRA COST OF TEN SHILLINGS
********************************
All the parts of the Rotary Machine are pinned securely together, thus making the adjustment absolutely permanent, and the Machine capable of being run at a higher rate of speed than any other Machine without getting out of order.
TO OIL THE MACHINE
Slip the belt off the driving-wheel, turn the Machine back on its hinges, and oil all the working parts. Then raise the plate at the bottom of the peg A (in illustration E) and oil the pitman.
Then bring back the Machine to its proper position and replace the belt. Oil the three holes on the top of the arm, fly-wheel, winder,take-up lever, top end of needle bar; when the shuttle cover is withdrawn a few drops in the sponge near the shuttle.
After oiling, run the Machine a few minutes, then wipe off all surplus oil, so as not to soil the thread or material being sewn.
NOTE -- If the Machine is in constant use it requires to be well oiled twice a day in all the places enumerated above, and also on the following places:-- each side of the treadle where it rests on the traverse bar, both ends of the wooden pitman, one hole in stand side.
The Machine should be kept properly oiled. We have a good quality of oil, manufactured especially for our trade, and put up by ourselves, with our name blown in the bottle, which should invariably be used. A poor quality of oil will "gum up" the machine and make it run heavy.
BRADBURY & CO.'S SPECIALLY PREPARED OIL
Operators should by all means use this oil, warranted not to gum up the Machines, and it does not stain the work or fingers. All our Depots and Agents keep it. Very clear and without smell. Price 2d., 4d., 5d., and 6d per bottle.
Illustration G
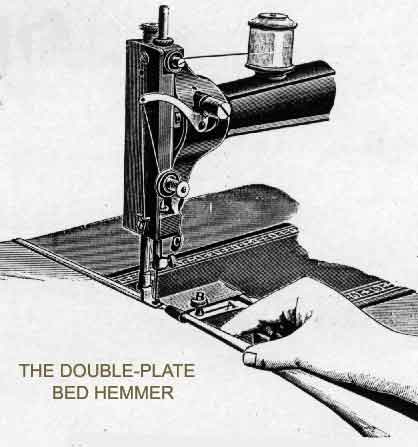
Fix either end of the hemmer as may be desired on the table by the thumbscrew B, adjust it to its proper position so that the needle strikes on the edge of the hem, as shown by the dotted lines.
Having thus fixed it for use, take the material in hand, place it in at the front of the hemmer the part to be hemmed, taking care to fill the cone with the material, so that in its passage through to the needle the hem becomes folded, and thus stitched.
TO TAKE THE WORK OUT
Be particular to have the needle to the highest point, and then draw about four inches of slack thread from the top spool; then draw the goods to the left and cut the thread close to the cloth; by doing so the shuttle thread will remain up through the throat plate. BE CAREFUL NOT TO BEND OR SPRING THE NEEDLE.
Illustration H
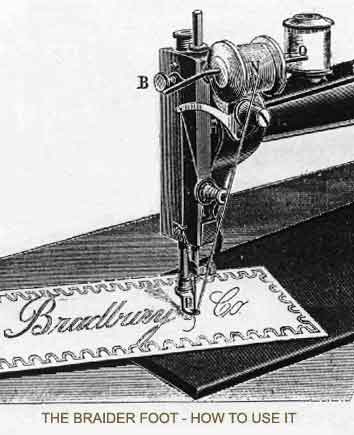
Braiding is the act of stitching braid on a piece of cloth in any desired form or pattern, as indicated by the illustration above.
B is the thumbscrew for holding the braid holder O. N is an ordinary reel upon which the braid must be wound. P is the braiding foot which must be put on in place of the ordinary sewing foot.
In commencing, pass the end of the braid through the hole at the front of the foot, leaving a short length of braid to commence with so that the feed can take hold of it, have the Machine threaded up and properly tensioned, put the Machine in motion and guide the material according to the pattern already marked out; when turning square corners, have the needle halfway down.
Illustration I
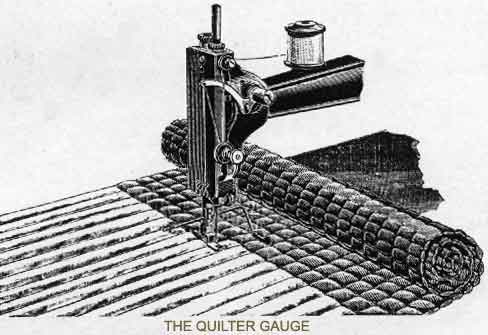
Move the quilter gauge E out from the needle for a wide space and in for a narrow space; after moving it tighten it with the screw behind F in the presser-bar. Very large pieces of quilting should be quilted on the Machine in sections. The quilter is not used except for spacing straight lines of stitching.
ACCESSORIES SUPPLIED WITH EACH MACHINE
|
1 Straight Guide 1 Screw for Straight Guide 1 Braider Foot 1 Extra Winder Ring
|
1 Braider Arm 1 Double Hemmer 12 Needles (assorted) 1 Bottle of Oil |
1 Oil Can 1 Screw Driver 4 Shuttle Reels 1 Book of Instructions |
N.B. -- We do not supply a double hemmer, braider-foot, or a quilting guide with the No. 4 Rotary Machines
Illustration J
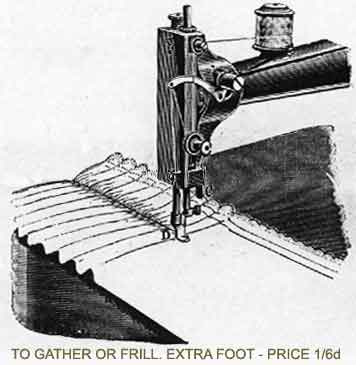
Take off the ordinary sewing foot and put on the one with the surface reduced at the bottom. Place the material right side upwards and begin to sew as for ordinary sewing. If more fulness is required it can be obtained by making a large stitch and tightening the tension.
By putting a strong cotton on the top, a great amount of tension can be had, which will add more fulness to the frilling.
IF THE FRILLING REQUIRES TO BE PUFFED it can be done so by pressing the material with the finger underneath upwards.
Illustration K
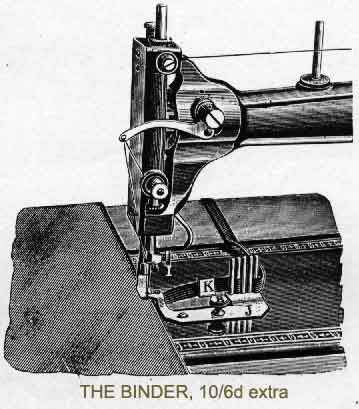
The above Binder is for the purpose of binding the edges of any material, such as Rugs, Stays, Trousers, Coats, Vests, Mantles, &c. The work is more durable, besides having a neater and more finished appearance than when done by hand, and the saving of time it effects is considerable.
The Guide is fastened on the plate, having vertical pegs in it, between which the tape is passed to give the necessary tension.
The internal block swivels on a pin, so that it can be adjusted slightly to the varying width of tape. To do perfect binding the tape and thickness of material to be bound is required to be sent to us.
IMPORTANT REMARKS
ALWAYS TURN THE HAND WHEEL OF THE MACHINE TO YOU
Persons not accustomed to use a Sewing Machine should draw the thread from the eye of the needle, and then work the Machines with the presser-foot raised until they become accustomed to its movements. If the Machine will not "feed" or carry the material along, it is because the stitch is too short.
If the cloth draws down through the hole in the cloth plate, the needle is blunt or too large, or the stitch is too short, or there is not enough tension to draw up the slack thread.
The Machine will skip stitches if the needle is bent, or set up too high or too low.
If the thread breaks, it is not of good quality, or may be too fine or too coarse for the needle; it may also break if the tension is too tight.
Sometimes the needle passes so close to the edge of the presser-foot that the square edge of the presser-foot cuts the thread off, and when such is the case it is because the presser-foot is not properly adjusted, or the needle is crooked.
Be particular to have the proper pressure on the cloth, which is regulated by turning nut 7 (see illustration A) down to make a heavy pressure and up to make it light; too much pressure on fine cloth will pucker it, and not enough pressure on heavy or hard cloth will cause the presser-foot to raise up as the needle is withdrawn from it.
Care and judgement should be exercised in adjusting the presser-foot and attachments to the presser-foot bar, for they may be so adjusted that the needle will pass so close to the edge of the slot as to cut the thread.
TO TIGHTEN THE BELT -- If the belt turns without driving the machine, or does not force the needle through hard goods, it has become too loose and needs tightening, which can be done by cutting off a small piece and readjusting the ends.
************************************
The Rotary Shuttle Machine has taken the First Prize at every Exhibition at which it has been shown; Gold Medals at Adelaide and Perth (W. Australia) Exhibitions 1881; Ten First Prizes during 1882; Gold Medal, Huddersfield 1883; Gold Medal, Inventions Exhibition, 1885; and Highest Award, Liverpool 1886