All 4 available source parts are included below.
Part 1
THE NEEDLEBAR Archive at ISMACS International
Manuals Section
DIRECTIONS
FOR OPERATING
BRADBURY & CO.'S
WELLINGTON HAND LOCK-STITCH
Shuttle Sewing Machine
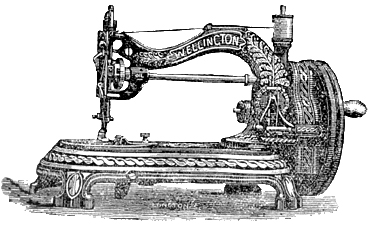
BRADBURY & CO. LIMITED,
WELLINGTON WORKS, OLDHAM
PART ONE
INSTRUCTIONS
TO THE LEARNER
On receiving the machine, notice particularly the way it is threaded up for sewing - this is very important to beginners. Read the instructions carefully, to make yourself familiar with the different parts of the machine before commencing to sew; don't be hurried; but master every detail; success will be certain. If you purchase the machine from an Agent near, take care that he gives thorough instructions, and if any difficulties arise, apply to him at once for assistance; but this will not be necessary if you follow out the directions carefully.
TO OIL THE MACHINE
This is an important matter, and should be attended to. It is safe to oil every part where there is any friction. There are some parts that require special attention, viz: the shaft bearings, needle cam, shuttle cam, needle bar, and stud for driving wheel. After oiling the parts thoroughly, wipe the lower end of the needle bar and needle, also any other part that is likely to be touched with the hands or by the work, otherwise it may become soiled.
TO SET THE NEEDLE
The needle will have two grooves in it, one long and one short. In placing it in the needle bar, see that the short groove be next to the shuttle. As a guide for the operator, a mark is cut near the top of the needle bar, and when the needle is properly set, its eye will be level with the cloth plate, and the mark on the bar be level with top of frame. Make the needle secure in this position by the needle screw or nut. The needle should then descend in the centre of needle plate hole; if it does not do so, spring it a little with the thumb till it passes in the centre.
TO THREAD THE NEEDLE
Place the reel of thread on bobbin pin, pass the thread through the wire guides, then down the front, between the tension washers, up and through the hole in the end of the take-up lever, down and through the hole at bottom of front plate, and lastly, through the eye of the needle from left to right, leaving about three inches of thread through to commence sewing with.
COMMENCING TO SEW
Place the material to be sewn on the cloth plate; lower the presser foot by the lift handle; turn the handle so that the wheel runs from you - this will give the proper motion - always taking care the presser foot is up when not sewing, and down when sewing.
TO TAKE OUT THE SHUTTLE
Draw back the slide in cloth plate, and turn the wheel until the shuttle be at the opening at the back, it can then easily be taken out by taking hold of the thread, if any; if empty, by using a pin or other small article in the hole at its heel.
TO REGULATE THE STITCH
Slacken the milled head nut at the right hand of table; to make a shorter stitch, move it to the left; for a longer stitch, move it to the right, as indicated on the table; again secure it by screwing it fast for the desired length of stitch.
TO REGULATE THE TENSIONS
This is simply done by turning the small screw in the nose of the shuttle to the left for a slacker, or to the right for a tighter tension; after an even tension is obtained it will seldom require altering.
A special small screw driver is provided for this purpose.
The stitch, to be perfect, must have the same appearance on both sides, thus:

If the shuttle thread is too tight and the needle thread too slack, the under thread will lie straight, thus:

Tighten the top tension by screwing the milled but towards you; on the other hand, if the shuttle thread is too slack, or draws off too easily, and the upper thread too tight, the shuttle thread will be drawing up through the fabric, and the upper side will lie straight, thus:

The tension of the shuttle thread is regulated by a screw near the point of the shuttle. Care should be taken that it is not too tight, but that it pulls freely, yet not too slack. Glazed cotton should not be used in either needle or shuttle.
TO USE THE PATENT SELF-ACTING REEL WINDER
First disconnect the fly-wheel by withdrawing the milled head pin near the handle, and slightly turning it a little, the machine will thus be motionless during the process of winding; then place the bobbin to wind from on the wire arm behind the machine, pass the thread over to the front washers and between the two tension washers, and under the wire guide on the radial arm; place the reel in its position by pushing down the presser plate and turning it a little to the left; pull at the loose piston by the small milled nut, then place the reel end into the spindle - the hole fitting the small pin - put the thread through the hole in the reel end at the left hand, leaving about an inch of thread through. Then put the presser plate in position between the two collars of the reel; then push the winder in gear with the large wheel; commence to wind, taking care to turn the same way as when sewing (or you can wind whilst the sewing is being done), commencing at the left-hand side of the reel. Continue to wind without touching the thread till the reel is full, then pull the winder from out of gear, take out the reel; it is then ready for the shuttle.
TO THREAD THE SHUTTLE
Insert the reel first at the pointed end of the shuttle, then press the other end into place. Having the thread coming upwards from the underside of the reel on the screw side, pass it behind the bar, down the slot in the flat spring inside the shuttle, then under the spring on the outside, at the heel end of the shuttle, leaving about two inches of thread out to commence sewing with.
TO PLACE THE SHUTTLE IN ITS POSITION
Draw back the small slide in cloth plate, turn the wheel until the shuttle carrier comes to the opening at the back, put the shuttle in the carrier (with the point towards your) leaving about three inches of thread out of the shuttle, then close the slide.
TO BRING UP THE SHUTTLE THREAD
Before commencing to sew, it is necessary to bring up the shuttle thread (the needle being threaded). Take hold of the handle with the right hand, and the needle thread with the other, keeping it slack, so as not to print the needle; turn the wheel till the needle has gone down and up again; this will have brought up the shuttle thread through the needle hole, after which it is then ready for work.
Part Two | Part Three | Part Four
Part 2
THE NEEDLEBAR Archive at ISMACS International
Manuals Section
DIRECTIONS
FOR OPERATING
BRADBURY & CO.'S
WELLINGTON HAND LOCK-STITCH
Shuttle Sewing Machine
PART TWO
HOW TO BRAID
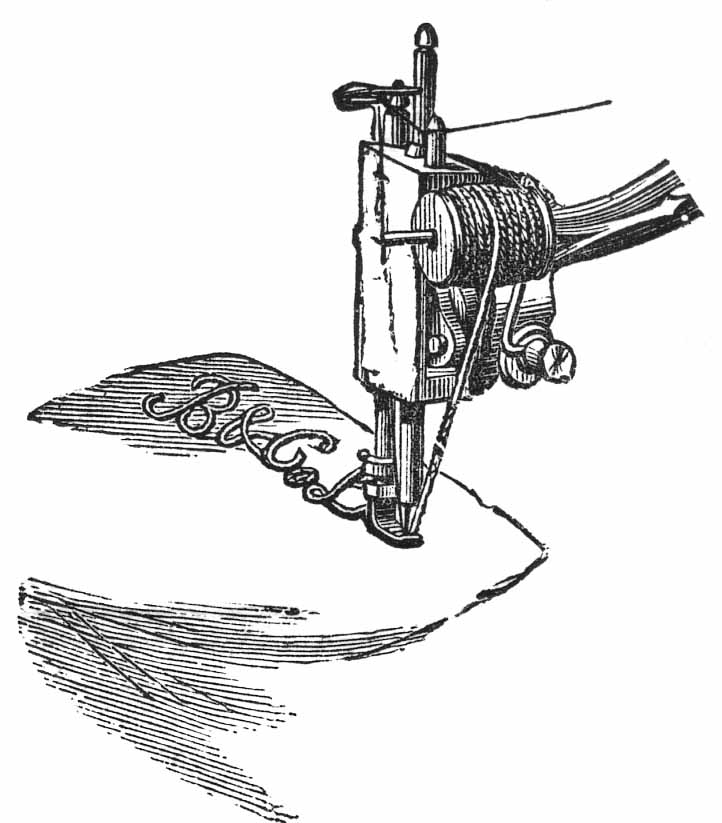
With the braid upon an ordinary reel, straight and even, without twisting; insert the braiding arm through the small hole attached to presser bar; place the reel upon it; pass the end of the braid under the wire bar and through the hole in the presser foot. When sewing, the needle will pass through the centre of the braid; stamp or trace the work to be braided to any design; turn the work as may be necessary to follow the lines (however elaborate) upon shawls, mantles, jackets, slippers, smoking caps, &c., &c.
HOW TO QUILT
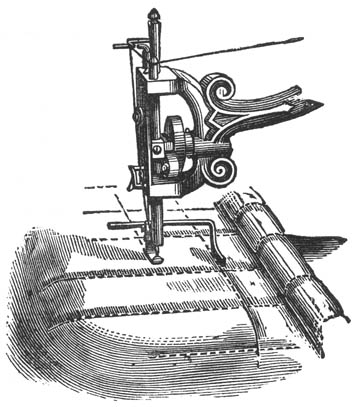
Insert the quilting gauge through the small hole attached to the presser bar, as per drawing; adjust it to any distance from the needle as may be desired between the lines of sewing. To form the squares or diamonds you commence by creasing the material a short distance from the corner; follow the crease for the first line of sewing, then the guide on the different lines afterwards. Commence the cross lines of stitching to form the squares or diamonds as at the commencement, by a crease.
TO REMOVE THE WORK
Allow the needle to rest at its highest point, press down the needle thread between the tension discs and the thread guide, until you have about three inches of slack thread, and with the left hand draw the fabric towards the back about three inches, then cut both the threads near the fabric sewn, and not close to the needle.
Part One | Part Three | Part Four
Part 3
THE NEEDLEBAR Archive at ISMACS International
Manuals Section
DIRECTIONS
FOR OPERATING
BRADBURY & CO.'S
WELLINGTON HAND LOCK-STITCH
Shuttle Sewing Machine
PART THREE
GENERAL REMARKS
The wheel must always run from the operator, otherwise the thread will break and the machine will not sew.
The presser foot must never be let down on the feed, only when you are sewing and have cloth under it.
Should there be at any time miss stitches, it is owing to the needle being improperly set, or its having been bent away from the shuttle, or its being too small for the thread, or the point of it may have become accidentally blunted. If it misses when sewing lime-dressed goods, in such case wash them, or rub the surface where it is to be sewed with hard white soap. If the thread is not properly twisted, it may throw the loop towards one side instead of square into the shuttle race; in that case the needle should be slightly turned in the opposite direction to counteract this tendency. When using very find needles, and also when stitching heavy work, be sure that the points of the needles are sharp. An imperfect needle may cause the best machine to miss stitches and be condemned.
When operating the machine, take care that the slide over the shuttle race is in its place and closed, otherwise serious damage may be the result. The operator is requested not to alter the main screws, or in all probability it will become disarranged, and cause considerable difficulty. Never push or pull the work being sewn; leave it entirely to the feed, except guiding it. By a little care in the needle and shuttle tensions, a perfect stitch will be attained.
The operator should be careful to use proper threads, suitable for the needle. The scale opposite will serve as a guide, and should be consulted when commencing on any particular fabric.
When needles, accessories, or parts are required, whether for this or any other system of machines of our make, in ordering please state distinctly for what machine, and if possible send a sample.
Machines sent to us for repairs must have the name of the sender inside the box, and the charges prepaid, or they will not be received. All machines sent to us for repairs, or otherwise, must be at owner's risk.
~ ~ ~ ~ ~ ~ ~ ~ ~ ~ ~ ~ ~ ~ ~ ~ ~ ~ ~ ~ ~ ~ ~ ~ ~ ~
BRADBURY & CO.'S PREPARED OIL
The best Prepared Oil can be obtained from any of our Depots or Agents. Price 2d., 4d., 5d., and 8d. per Bottle.
ACCESSORIES GIVEN WITH EACH MACHINE
|
1 Instruction Book 6 Needles 6 Shuttle Reels 1 Oil Can 1 Double Hemmer |
1 Edge Gauge & Screw 1 Quilter 1 Braid Arm 2 Screw Drivers |
Bradbury & Co. Limited make the greatest variety of Sewing Machines for both manufacturing and domestic purposes.
Machines for Tailors.
Machines for Shoemakers.
Machines for Saddlers.
Machines for all Classes of Domestic Work.
THE FOLLOWING TABLE
INDICATES THE SIZES OF THE THREADS AND
NEEDLES WHICH SHOULD BE USED TOGETHER.
In transmitting orders for Needles, to prevent mistakes and delay, always
specify the size required, and say for
Bradbury & Co's New Wellington Hand Machine
|
Size of Needle |
Class
of Work to Sew
|
Sizes of Cotton, Linen, or Silk. |
|
0
|
Very fine Muslins, Cambrics, Linen, &c. Tucking and Stitching. |
80 to 100 Cotton. |
|
1
|
Very fine Calicoes, Linen, Linen Shirtings, fine Silk Goods, &c. Tucking, Hemming, and Stitching. |
60 to 80 Cotton. 24 to 36 Silk Twist. |
|
1-1/2
|
Shirtings, Sheetings, Bleached Calicoes, Muslins, Silks, and General Domestic Goods. All classes of General Work. |
50 to 60 Cotton. 24 to 30 Silk Twist. |
|
2
|
All kinds of heavy Calicoes, light Woollen Goods, heavy Silks, Seaming, Stitching, &c. |
40 to 50 Cotton. 24 to 30 Silk Twist.
|
|
2-1/2
|
Tickings, Woollen Goods, Trousers, Boys'
Clothing, Corsets, Cloaks, Mantles, &c. |
30 to 40 Cotton. 60 to 80 Linen. |
|
3
|
Heavy Woollens, Tickings, Bags, heavy Coats, Trousers, &c., and heavy Clothing generally. |
20 to 30 Cotton. 60 to 80 Linen. |
|
4
|
Bags, Coarse Cloths, heavy Goods of any texture.
|
40 to 60 Linen. Very Coarse Cotton or Silk. |
Always use good unglazed Cotton, because it makes better work, and is the cheapest in the end.
Purchase the Needles at our Establishment or Agencies, to ensure their being of the best quality.
We keep in stock superior drilled-eyed Needles, Machine Oil, &c., manufactured expressly for our Sewing Machines. Needles and small articles can be sent by post to all parts of the country, on receipt of Post Office Order in payment; stamps only for small sums under Five Shillings.
Cheques and Post Office Orders made payable to
BRADBURY & CO. LIMITED, Oldham,
Or to any of our Depots.
Part One | Part Two | Part Four
Part 4
THE NEEDLEBAR Archive at ISMACS International
Manuals Section
DIRECTIONS
FOR OPERATING
BRADBURY & CO.'S
WELLINGTON HAND LOCK-STITCH
Shuttle Sewing Machine
PART FOUR
STAND FOR THE WELLINGTON HAND MACHINE
To Work the Machine by Hand or Foot.
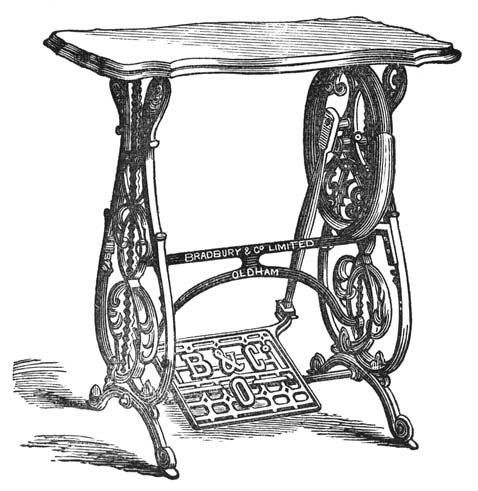
Price ........................................ £1 10s.
This class of Machine has become very popular for ladies' use, because of its portability, being always ready for work. With the above stand it is as complete as any, and is well adapted for the work of a family.
~ ~ ~ ~ ~ ~ ~ ~ ~ ~ ~ ~ ~ ~ ~ ~ ~ ~ ~
CASES FOR HOLDING THE WELLINGTON MACHINE.
|
£
s. d.
|
|
| Handsome and Substantial Walnut Case, with Lock | |
|
and
Drawer.......
|
1
0 0.
|
| Do. Stained and Polished |
0 7 6 . |
|
Detailed
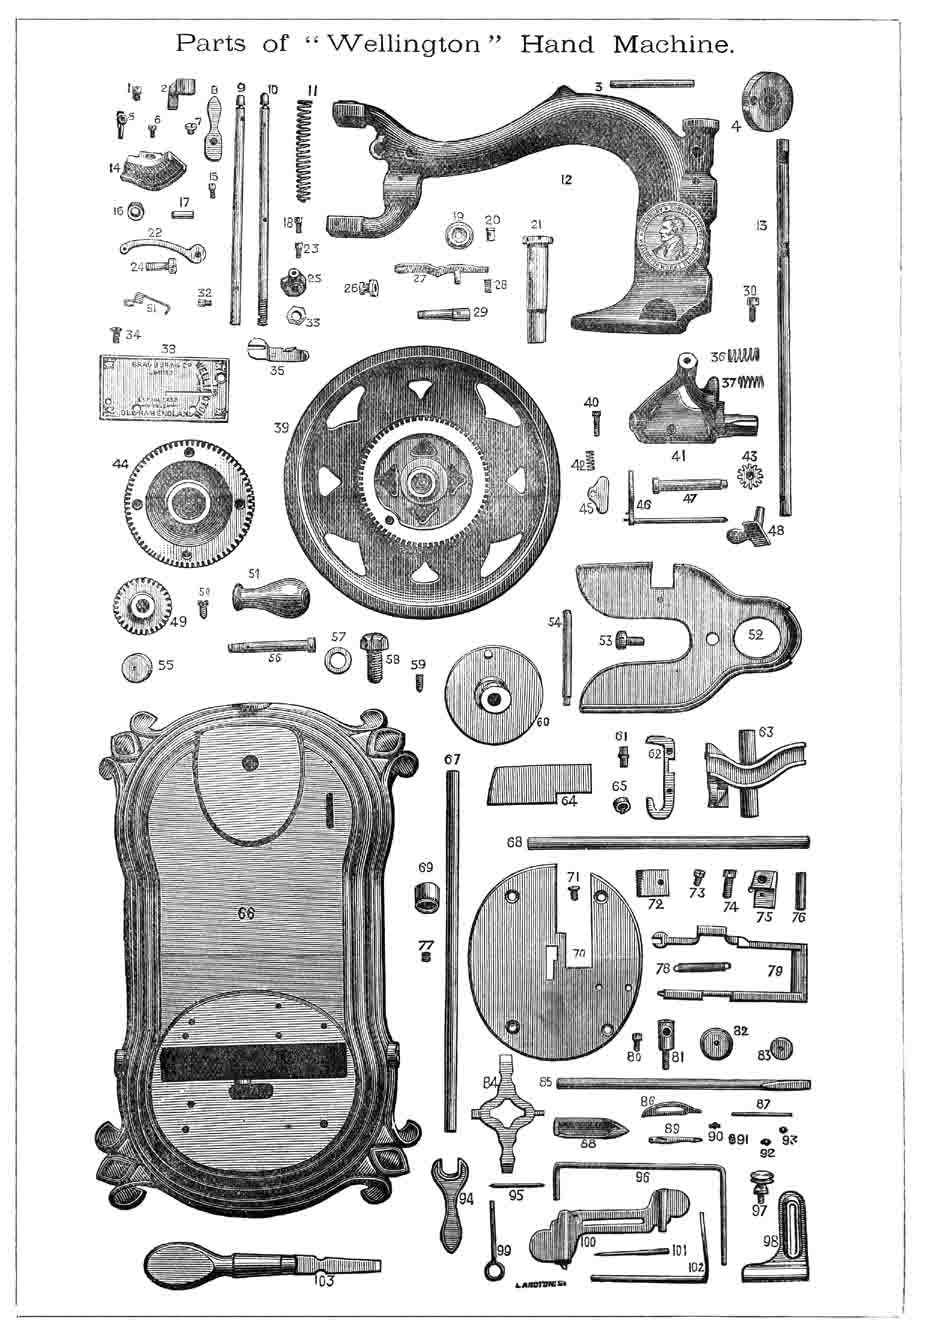
Price List of Parts for BRADBURY & CO.'S WELLINGTON MACHINE.
|
|||||
|
No. in Ill'd List |
Name of Part |
R'tl Price s. d. |
No. in Ill'd List |
Name of Part |
R'tll Price s. d. |
| 1 | Screw for Lift Handle Bracket | 0 1 | 54 | Bobbin Peg for Winder |
0 1 |
| 2 | Lift Handle Bracket | 0 6 | 55 | Cork Rests for Bed of Machine | 0 1 |
| 3 | Bobbin Peg | 0 1 | 56 | Stud for Fly Wheel Handle | 0 2 |
| 4 |
Disc for Driving Shaft |
1 6 | 57 | Was'r for Set Screw for Top Arm | 0 1 |
| 5 | Wire Thread Guide | 0 1 | 58 | Set Screw for Top Arm | 0 2 |
| 6 | Screw for Needle Cam | 0 1 | 59 | Set Screw for Shuttle Disc | 0 1 |
| 7 | Lift Handle Stud | 0 2 | 60 | Feed and Shuttle Disc | 2 6 |
| 8 | Lift Handle | 0 4 | 61 | Stud for Bowl of Shuttle Disc | 0 4 |
| 9 | Needle Bar | 2 0 | 62 | Shuttle Picker | 0 6 |
| 10 | Presser Bar | 1 6 | 63 | Shuttle Carrier | 2 0 |
| 11 | Presser Spring | 0 1 | 64 | Shuttle Race Slide | 1 0 |
| 12 | Top Arm | 7 6 | 65 | Bowl for Disc Shuttle | 0 8 |
| 13 | Needle Shaft | 1 6 | 66 | Bed of Machine | 12 6 |
| 14 | Needle Cam or Heart Motion | 0 6 | 67 | Shuttle Shaft | 1 6 |
| 15 | Screw for Lift Handle Bracket | 0 1 | 68 | Shuttle Race Bar | 0 9 |
| 16 | Bowl for Needle Cam | 0 8 | 69 | Set Hoop for Shaft | 0 6 |
| 17 | Stud for Bowl | 0 4 | 70 | Cloth Plate | 4 0 |
| 18 | Screw for Filbow | 0 1 | 71 | Screw for Cloth Plate | 0 1 |
| 19 | Tension Disc | 0 1 | 72 | Serrated Feeder | 1 0 |
| 20 | Stud for Tension Disc | 0 2 | 73 | Screw for Feeder | 0 1 |
| 21 | Stud for Driving Wheel | 1 6 | 74 | Screw for Feed Bracket | 0 1 |
| 22 | Check Lever | 0 2 | 75 | Cap for Feed Lever | 0 6 |
| 23 | Screw for Quilter | 0 1 | 76 | Pin for Feed Lever | 0 1 |
| 24 | Check Lever Stud | 0 2 | 77 | Screw for Set Hoop | 0 1 |
| 25 | Filbow | 0 3 | 78 | Spring for Feed Lever 0 1 | |
| 26 | Brass Thumb Nut for Tension | 0 3 | 79 | Feed Lever | 2 6 |
| 27 | Tension Spring and Screw | 0 6 | 80 | Screw for Shuttle Race Bar | 0 1 |
| 28 | Screw for Fly Wheel Stud | 0 1 | 81 | Stud for Stitch Regulator | 0 6 |
| 29 | Piston for Driving Wheel | 0 3 | 82 | Thumb Nut for Stitch Regulator | 0 3 |
| 30 | Screw for Winder | 0 1 | 83 | Washer for Stitch Regulator | 0 1 |
| 31 | Check Lever Spring | 0 1 | 84 | Screw Key | 0 6 |
| 32 | Screw for Needle | 0 1 | 85 | Stitch Regulator Rod | 0 9 |
| 33 | Hex Nut for Presser Bar | 0 2 | 86 | Spring for Outside of Shuttle | 0 6 |
| 34 | Screw for Front Plate | 0 1 | 87 | Side Bar for Shuttle | 0 1 |
| 35 | Presser Foot | 1 0 | 88 | Shuttle, complete | 2 6 |
| 36 | Spring for Winder | 0 1 | 89 | Tension Spring for Shuttle | 0 6 |
| 37 | Spring for Winder Presser Plate | 0 1 | 90 | Screw for Shuttle Tension | 0 1 |
| 38 | Front Plate | 1 0 | 91 | Back Centre for Shuttle | 0 2 |
| 39 | Fly Wheel | 4 0 | 92 | Front Centre | 0 2 |
| 40 | Screw for Swing Lever Plate | 0 1 | 93 | Spring for Shuttle Action | 0 1 |
| 41 | Winder Frame | 0 9 | 94 | Wrench | 0 3 |
| 42 | Spring for Winder Tension | 0 1 | 95 | Shuttle Reel | 0 1 |
| 43 | Pinion for Winder | 0 9 | 96 | Braid Arm | 0 3 |
| 44 | Driving Tooth Wheel | 2 0 | 97 | Thumb Screw for Edge Guide | 0 2 |
| 45 | Flat Tension Spring for Winder | 0 1 | 98 | Edge Guide......plated, 6d.; plain | 0 3 |
| 46 | Swing Lever for Winder | 0 6 | 99 | Screwdriver for Shuttle | 0 1 |
| 48 | Winder Presser Plate and Stud | 0 9 | 100 | Double Hemmer | 1 0 |
| 49 | Pinion for Needle and Shuttle Shafts | 1 6 | 101 | Needles : each, 1d.; ..............per doz. | 1 0 |
| 50 | Screw for Pinion | 0 1 | 102 | Quilting Gauge | 0 3 |
| 51 | Wood Handle for Fly Wheel | 0 3 | 103 | Screwdriver | 0 4 |
| 52 | Guard for Wheels | 1 6 | Winder, complete | 4 0 | |
| 53 | Screw for Guard | 0 1 | Box of Extras | 4 0 | |
When Needles, Accessories, or Parts of machines are required, to save delay and inconvenience, send sample or sketch of the part.
Highest Award - Gold Medal, Paris, 1872
Highest Award - Gold Medal, Lyons, 1872
Highest Award - Grand Medal of Progress, Vienna, 1873
Highest Award - Gold Medal, London, 1874
Highest Award - Gold Medal, Manchester, 1874
Highest Award - Gold Medal, Paris, 1878
Highest Award - Gold Medal, Paris, 1879
Seven Awards at Melbourne Exhibition, 1881
Highest Award - Gold Medal, Adelaide, 1881
Highest Award - Gold Medal, Perth, W. Australia, 1882
Ten First Prize Medals at Local Exhibitions during 1882.