All 2 available source parts are included below.
Part 1
THE NEEDLEBAR Archive at ISMACS International
Online Manuals Section
INSTRUCTIONS FOR USING THE NEW SILENT AND LIGHT RUNNING
DAVIS VS SEWING MACHINE
Part One
GENERAL DIRECTIONS
Before the machine leaves the factory, it has been carefully inspected and adjusted, and tested with various sizes of thread, and found to work perfectly in every respect.
Never run the machine with the presser foot resting on the feed, and no cloth between, as the sharp teeth of the feed would injure the foot and the feed teeth will be dulled.
Never run the machine with the race covers open, except to turn the wheel very slowly by hand, or the shuttle will catch and cause serious injury to the machine.
Practice on strips of cloth and do not attempt practical sewing until you can guide the material and produce a regular motion.
Do not try to help the feed by pulling the work lest you bend the needle. The machine will feed without assistance.
Do not run the machine when threaded up unless there is cloth under the presser foot, or the thread will snarl and tangle, and perhaps bend or break the needle.
Do not allow lint or dust to accumulate in the shuttle or under the shuttle tension spring, as any substance inside the shuttle will prevent the proper action of the bobbin, or under the spring will interfere with the tension.
To turn a corner, stop the machine with the needle half way in the work, raise the presser foot, and turn the work, using the needle as a pivot.
When ordering needles, shuttles or parts of any kind always give the plate number of the machine stamped on the upper side of front race cover or slide directly in front of the needle.
OILING THE MACHINE
One of the most important points in the use of a sewing machine, is keeping it thoroughly oiled, as care in oiling insures ease of motion and prevents wear. Use nothing but the best quality of oil.
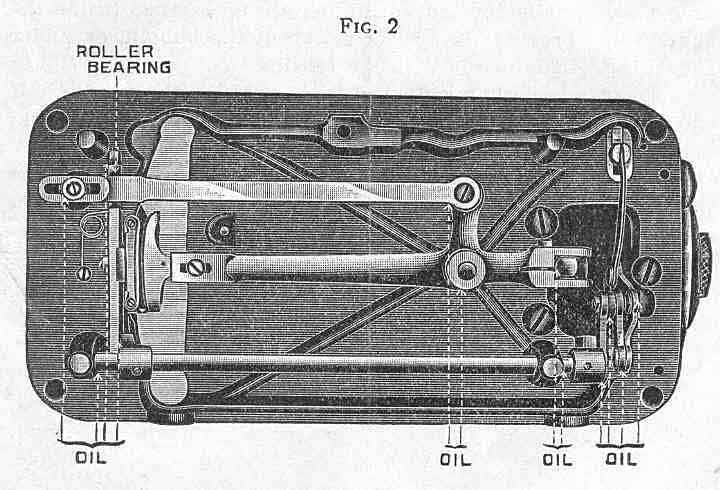
Each place requiring oil is indicated by the word "oil" with dotted lines running to the point where oil must be applied. Oil holes will be found for all the bearings which cannot be reached without them.
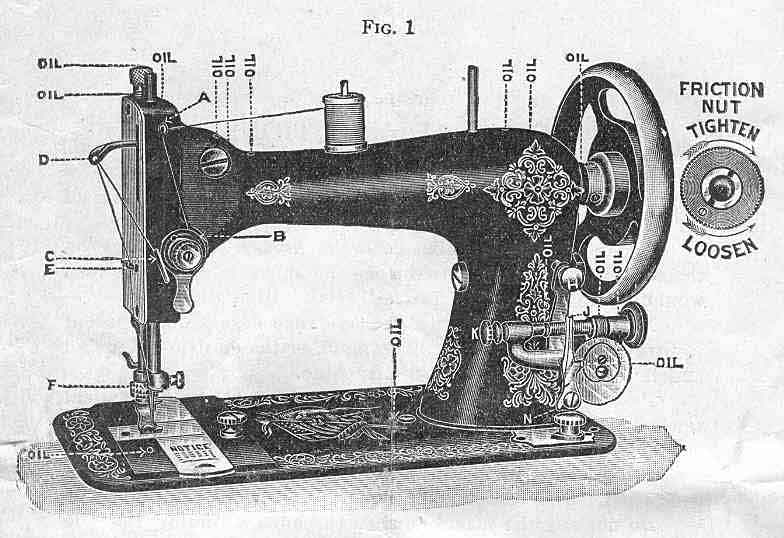
To oil the parts inside the head: Raise the needle bar to its highest point, put one drop of oil in each of the oil holes in the bed plate and arm, as indicated.
To oil the under part of the machine: Throw off the belt, turn back the head on its hinges and apply oil at each bearing point.
The places on the stand requiring oil, are the journal of balance wheel, the bearing each end of pitman, and the bearings of the treadle on each side.
After oiling run the machine swiftly several revolutions, to distribute the oil and then wipe carefully. Be sure that every part is clean before commencing to sew.
If the machine runs hard, it is certain that some bearing is not properly oiled. If the machine is gummed from poor oil, or from long standing, use a little kerosene or benzine which will soon remove the gum. Then run the machine rapidly, wipe clean and oil thoroughly with good sewing machine oil.
THREADING THE MACHINE
(See Fig. 1)
First raise the needle bar to its highest point. Place the spool of thread on the spool pin; draw the thread through the hook "A" and down between the tension discs "B"; then up under the hook "C", up through the takeup eye "D"; then back of the staple "E" in the face plate, drawing the thread forward through the staple; then through the hook on the needle clamp "F"; then through the eye of the needle, leaving the thread about three inches long.
TO THREAD THE SHUTTLE
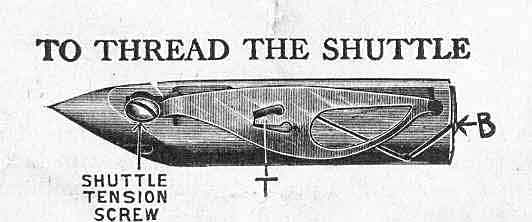
Hold the shuttle in the left hand, with the point toward you; drop the bobbin into the shuttle so that the thread draws from the left side of the bobbin as it is put in; then draw the thread into the open slot B toward you, at the same time putting a little pressure with your finger on the bobbin, so that it can not turn; the thread will then be forced under the point T of the shuttle spring. The shuttle is then ready of use.
The shuttle tension is tightened by means of the screw with the small screw driver - turn this screw to the right to increase and to the left to diminish the tension on the thread.
When the machine leaves the factory, the tension in the shuttle has been set right for all ordinary kinds of work and thread, and therefore needs no alteration. The bore of the shuttle should be kept clear of lint so the end of the bobbin does not project outside the shuttle.
TO PLACE SHUTTLE IN THE MACHINE
Withdraw the front race cover and place the shuttle in the carrier with the point toward the operator; then close the slide. It is sometimes more convenient to withdraw the back race cover and put the shuttle in its place when the carrier is at the back part of the race. This is especially the case when some of the attachments are in place.
THE SHUTTLE RACE
The face of the shuttle race must be kept clean and free from dirt or gum. To do this, rub occasionally with a piece of cloth having a drop of oil on. Afterwards wipe it with a dry, clean cloth. If through neglect the race has become very gummy, first clean it with a cloth saturated with kerosene, then use an oiled cloth, and a dry, clean cloth as above. The cotton waste in the oil well in shuttle race should be kept well saturated with oil. Breaking of thread and skipping of stitches are frequently caused by failing to keep the shuttle race clean.
WINDING BOBBINS
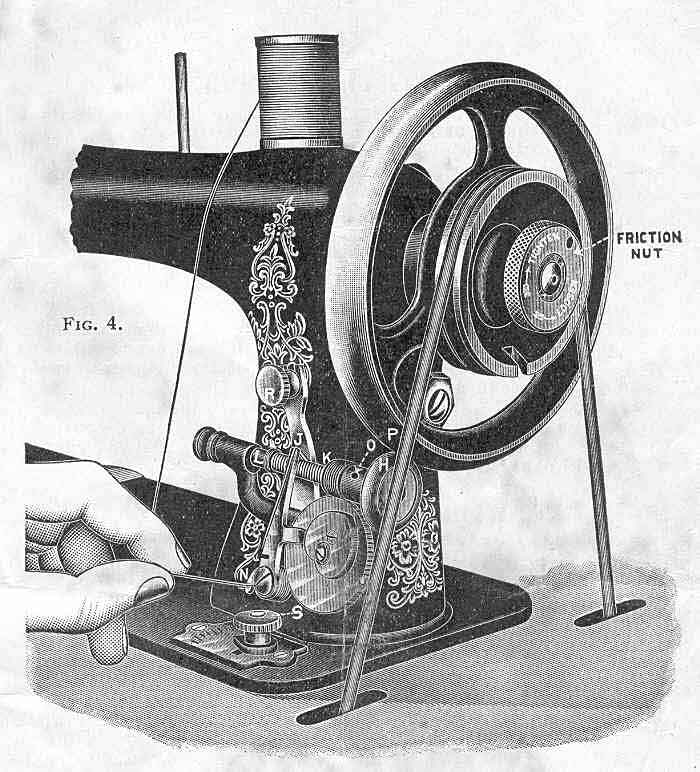
The hand wheel friction nut has a right hand thread.
To loosen the hand wheel pulley for winding the bobbins, hold the hand wheel with the left hand, and with the right hand turn the Friction Nut to the left or toward you as indicated by the arrow on the nut preceding the word "LOOSEN". When through winding the bobbin tighten the hand wheel pulley so that the machine will operated by turning the "Friction Nut" to the right as indicated by the arrow preceding the word "TIGHTEN".
After loosening the pulley, draw the spooler whirl rubber (H) in contact with the rim of the hand wheel (P) by turning the Thumb Screw (R) to the right just far enough to cause the bobbin winder to operate.
Place one end of the bobbin in the socket of the revolving spindle (K) on the right side and the other end in the socket of the step (L) on the left. Place the end of the thread between the brass head of the bobbin and spindle socket (K) on the right side. Draw the thread through the slot (J) on the end of the distributing lever, then down under hook (N) at the lower end of the lever. Hold the thread between the thumb and forefinger as illustrated, but NOT TOO TIGHT. A minute drop of oil should be placed on the left end of the bobbin (L) and the spindle should be oiled through the oil hole (O). An evenly and smoothly wound bobbin is necessary for good work. Do not wind the bobbin too full, if so it will not revolve freely in the shuttle.
When the bobbin is wound, back the bobbin winder rubber from the hand wheel by turning the thumb screw (R) to the left and tighten the "Friction Nut" as instructed above and the machine is ready to sew.
SETTING THE NEEDLE
Raise the needle bar to its highest point; hold the needle between the thumb and first finger of the left hand, pass the shank up into the groove in the needle bar as far as it will go, with the flat side toward the bar. Secure the needle firmly with the needle clamp screw.
If Linen, Silk or very coarse Cotton is to be used, the needle may be set a little lower than the directions indicate.
BREAKING OF NEEDLES
If the needle breaks, it is more than likely your own fault, caused by pulling the goods to or from you, or in such a manner that the needle strikes the throat plate, and is bound to break. The needle may, however, break in trying to sew extremely heavy seams when the pressure on the presser foot is not heavy enough. To create more pressure upon the goods, turn the nut on top of the presser bar to the right; to decrease the pressure, turn it to the left. A blunt or hooked point needle will cause trouble and bad work.
TO ALTER LENGTH OF STITCH
(See Fig. 4)
The stitch regulator indicator is on the bed plate in front of the base of arm. On the stitch regulator plate will be found a scale of numbers indicating the length of stitch or the number of stitches to the inch (from 7 to 24). To change the stitch, loosen the thumb nut (S) (Figure 4), by turning to the left and slide the point to the figure indicating the length of stitch desired. No. 7 gives the longest and No. 24 the shortest stitch. When the indicator point is placed at (O) the feed is turned entirely off and the machine will refuse to sew.
Any desired length of stitch can be obtained by setting the indicator point at or between the figures on the indicator plate.
Be sure to set the nut tight when the desired length of stitch has been obtained.
Part Two |
Part 2
THE NEEDLEBAR Archive at ISMACS International
Online Manuals Section
INSTRUCTIONS FOR USING THE NEW SILENT AND LIGHT RUNNING
DAVIS VS SEWING MACHINE
Part Two
COMMENCING TO SEW
The machine being threaded correctly above and below, as directed, raise the presser bar and raise the needle to its highest point. Place the goods under the presser foot with the needle directly over the point where you wish to begin stitching. Lower the presser foot by the presser bar lifter and start the machine by turning the hand wheel toward you. In sewing heavy or hard fabrics, greater pressure is needed on the presser foot than for light goods. The pressure is regulated by the adjusting nut on top of the presser bar. Turn this nut to the right to increase the pressure, or to the left to decrease it.
THE TENSIONS
The object to be attained is to have the stitch alike on both sides of the fabric. This is accomplished by the tensions, or strain upon both threads. The tension upon both threads should be as nearly alike as possible, and tight enough only to make a smooth firm seam. If the threads are of the proper size for the material used, and both tensions right, the threads will be drawn and locked together in the center of the goods, thus:

If the upper tension is too loose (or the lower one too tight) the lower thread will lie straight along the under side of the goods, thus:
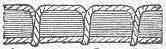
the upper thread showing in loops on the under side. On the contrary, if the upper tension is too tight (or the shuttle tension too loose), the upper thread will lie straight on the upper side of the goods, thus:
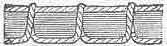
the lower thread showing in loops on the upper side.
TO TIGHTEN THE UPPER TENSION turn the tension nut to the RIGHT.
TO LOOSEN THE UPPER TENSION turn the tension nut to the LEFT.
As the shuttle tension has been set for general work when the machine leaves our hands, as before explained, any needed regulation of the stitch in this respect, should ordinarily be made by changing the upper tension.
If, however, when the upper tension is regulated so the lock is in the center of the goods, both threads appear to be loose, and the stitches and seam not smooth and firm, the shuttle tension is too loose, and should be tightened by turning the tension screw to the right; tighten the upper tension accordingly.
If the under thread cannot be properly drawn up without having the upper tension so tight that the thread breaks, or if, when the tensions are evenly balanced, the goods are "drawn" or "puckered" (this will occur only in sewing very light and "slazy" fabrics) the shuttle tension is too tight and should be loosened by turning the shuttle tension screw to the left; then loosen the upper tension to correspond.
The above particular explanation is given that every operator may fully understand the principles of the tensions.
TO REMOVE THE WORK FROM THE MACHINE
Stop the machine with the needle at its highest point, raise the presser foot by means of the lifter at the back, place the right thumb on the tension release lever on front of arm of machine to free the upper thread and with the left hand draw the work out directly back from the needle.
USE GOOD NEEDLES AND THREAD
Do not use inferior thread or needles. Any good thread will work well, but you must not expect to make a smooth, even stitch with cheap, rough thread, nor can you expect a machine to work well with an inferior grade of needles, made in imitation of ours. As our interest is to maintain the reputation of the machine, it is evident that we will always supply the best. If you cannot secure the right kind of needles from a dealer in your locality, send to us by mail, enclosing a money order or stamps sufficient to cover the cost and we will fill the order promptly by mail or express. When ordering, state sizes or needles desired, and give the plate number of your machine which you will find on the front shuttle race slide, directly in front of the needle.
RELATIVE SIZES OF NEEDLES AND THREAD
| Size of
Needle |
Sizes of
Thread |
Class of
Work |
| Cotton |
Silk |
||
| No. 2 |
100 to 200 |
000 to 00 |
Fine Linen
and Silk |
| No. 3 |
70 to 100 |
00 to 0 |
Muslin and
Shirtings |
| No. 4 |
50 to 70 |
A and B |
Dressmaking
and General Work |
| No. 5 |
30 to 50 |
B, C and
D |
Heavy Wool
and Cotton Cloth |
| No. 6 |
Coarse |
|
Extra Heavy
Cloth |
TO REMOVE THE PRESSER FOOT
Raise the presser foot to its highest point, unscrew the nut just above the presser foot by turning to the left, until the foot is loosened, when it can be drawn off towards you.
NARROW HEMMING
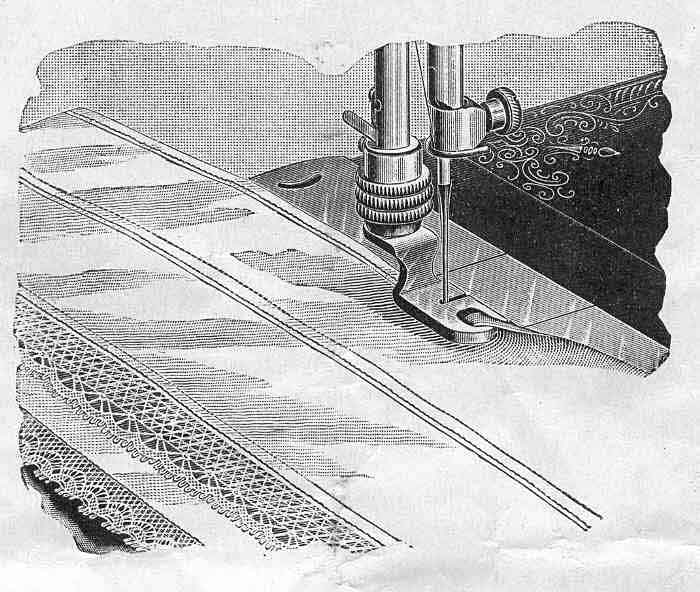
Attach the hemmer foot in place of the presser foot, taking care that it stands true, and straight with the feed. Raise the hemmer by means of the lifter, clip off the right hand corner of the cloth, and turn up the edge about one-fourth of an inch. Insert it in its scroll (or mouth) of the hemmer, and push it forward to the needle.
Then let the hemmer down and start the machine, gently holding back on the work to keep it smooth, allowing the edge of the goods to pass between the thumb and forefinger of the right hand while it is being hemmed, keeping the scroll of the hemmer just full, as it will leave a raw edge and make a rough and clumsy hem if there is too much turned in, and too little will not turn under.
In hemming a curve, flannel or slazy goods, draw gently on the edge being hemmed, resisting the feed, and guide the work carefully.
The stitch may be laid close to the edge of the hem, or away from it by setting the hemmer to or from the needle, by swinging the hemmer to the right or left. Practice is necessary with both hemming and felling before a neat seam can be produced.
FELLING
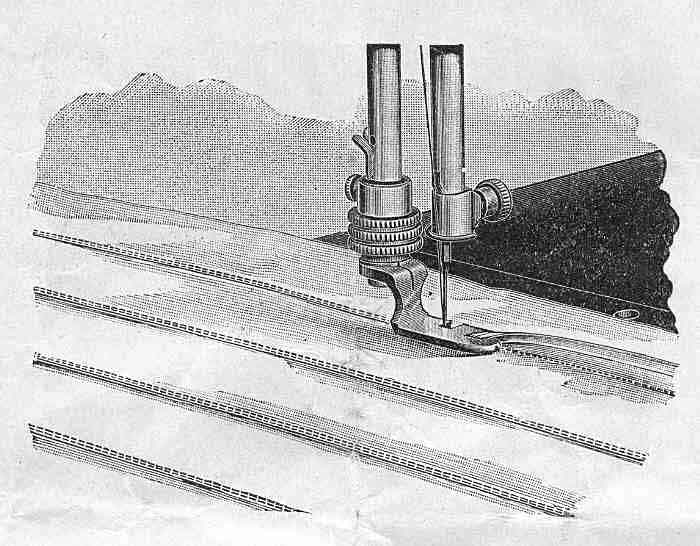
The foot hemmer and feller is attached in place of the regular presser foot as shown above, and is the same attachment used for narrow hemming as described. If the hemmer and feller is attached it can be used in the place of the presser foot in running up the seam, the under edge of which should project about one-fourth of an inch beyond the upper, then trim off the edges, if necessary, so as to leave just seam enough to fill the feller. Open the work flat, wrong side up, and trim the corner of the seam slightly, and then push it in to the feller until it reaches the needle, lower the feller on the feed and start the machine. The feed will carry the seam without helping it, and makes a complete fell from the beginning.
The feller may be adjusted to the right or left, so as to sew close on the edge of the fell, or away from it as desired.
The illustration above shows a completed felled seam in the middle of the work.
MAKING WIDE HEM WITH HEMMER AND FELLER
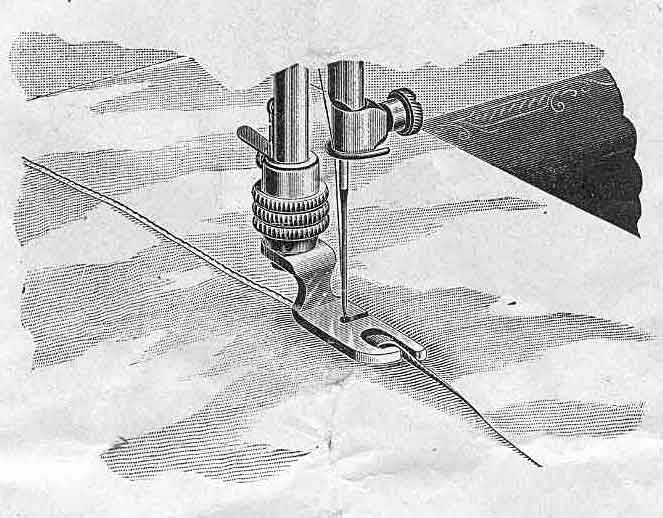
If a wider hem is desired than can be made with any of the hemmers, proceed as follows:
Adjust the hemmer and feller as described.
Fold the cloth the width of the hem desired and place the fold to the right of the needle so that the edge of the folded part will easily enter the scroll of the hemmer and feller. Proceed as in ordinary narrow hemming, as described, taking care to keep the fold smooth by holding the edge of the fold between the thumb and fingers of the right hand.
WIDE HEMMING
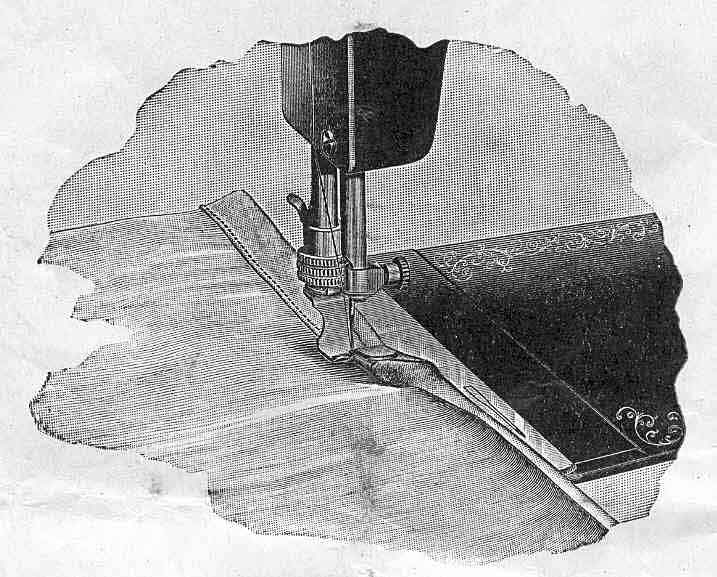
Four widths of hemmers accompany each machine.
Fold the goods by hand the width of hem required, turning one fold only, adding about one-eighth of an inch, which will be turned under by the hemmer. Then insert the goods in the hemmer, forcing it back until the needle will catch the edge of the goods. Lower the presser foot and sew as usual. Slightly press on the goods with the two forefingers of the left hand. If more goods is required to fill the hemmer and turn the edge properly, slightly carry the goods to the right. If too much goods is taken, carry to the left.
The line of stitching can be adjusted to the edge of the hem by moving the hemmer to the right or left.
TUCKING
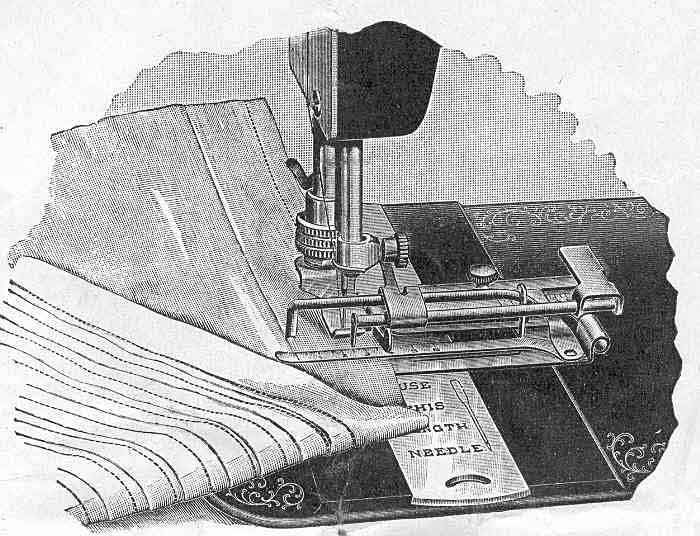
Raise the presser bar to its highest point. Remove the presser foot and attach the tucker in its place so that the needle passes down through the center of the round hole in the foot of the tucker, then fasten it securely in this position.
To regulate the size of tuck, loosen the thumb screw on top of tucker and place the gauge for any desired width, moving to the right for wide space and to the left for narrow tuck.
To regulate the space between tucks, move the marker to the left for wide space and to the right for narrow.
The figures on the scale on the back side of the tucker show the width of tuck, and those on the scale in front show the width of space.
By adjusting the two gauges so that the scale indicators will point to the same figures it will make the tucks just meet. When the above adjustments have been made, be sure and turn screw down tight.
TO COMMENCE TUCKING - Fold the cloth for the first tuck and place it beneath and under the spring lip in front of the creaser with folded edge against the gauge. Drop the presser foot and sew as usual.
The marker makes a crease in the cloth as it passes over the blade; after the first tuck is completed, fold the cloth on the crease for the required number of tucks.
BIAS BINDING
Remove the presser foot and attach the bias binder in its place. The small end of the scroll of the binder should rest on the needle plate, with the upper scroll of the binder on a line with the needle.
Pass the binding through the scroll of the binder and draw it back under the needle. Place the edge of the material to be bound between the upper and lower scrolls, then lower the presser bar and sew as usual. Guide the cloth with the left hand, and let the binding glide easily through the fingers of the right hand to keep it straight. If the stitching should be too near or too far from the edge of the binding, the binder can be moved to the right or left, until exactly right. For bias binding, goods of any description can be used, and the binding should be cut seven-eighths of an inch wide, and uniform in width.
To turn a square corner when binding, stop the machine at the corner, with the needle in the goods, raise the presser foot and turn the work on the needle. Then before starting the machine tuck in the folds of the binding, using the small screw driver for that purpose.
TO MAKE FRENCH FOLDS
Pass the binding through the binder and sew as usual, stitching the edges together. A double French fold may be made by folding a narrow strip of cloth and passing the raw edges through the scroll of the binder.
TO USE THE UNDER BRAIDER
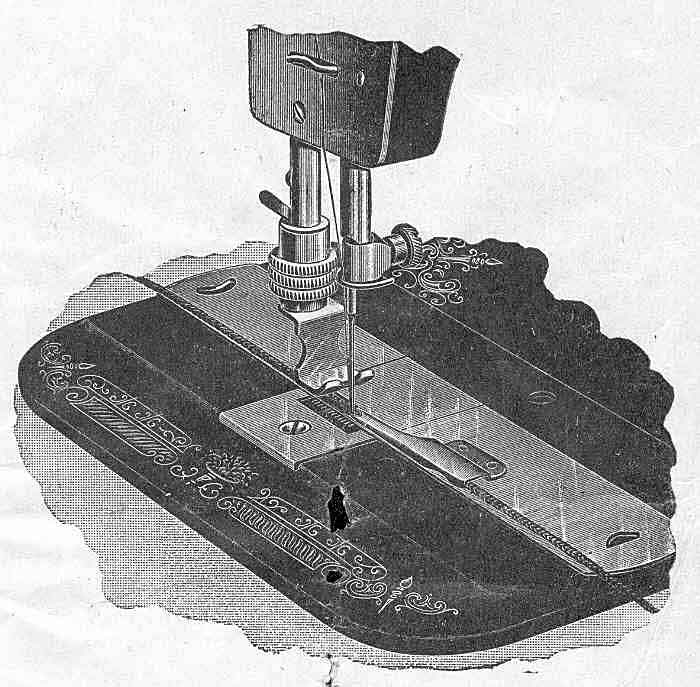
Remove the front race cover and slide the braider in its place, as shown above. Take off the regular presser foot and put on the special foot with two short prongs. Draw the braid through the braider tube, as shown in cut, raise the presser foot, and see that the needle passes through the center of the braid.
Use a No. 4 needle, and about 16 length of stitch. The pattern should be marked or stamped on the wrong side of the material. Place the goods on the braider and under the presser foot with the pattern side up and with the point where the braiding should begin directly under the needle. Lower the presser foot and sew as usual following the pattern.
DIRECTIONS FOR USING RUFFLER
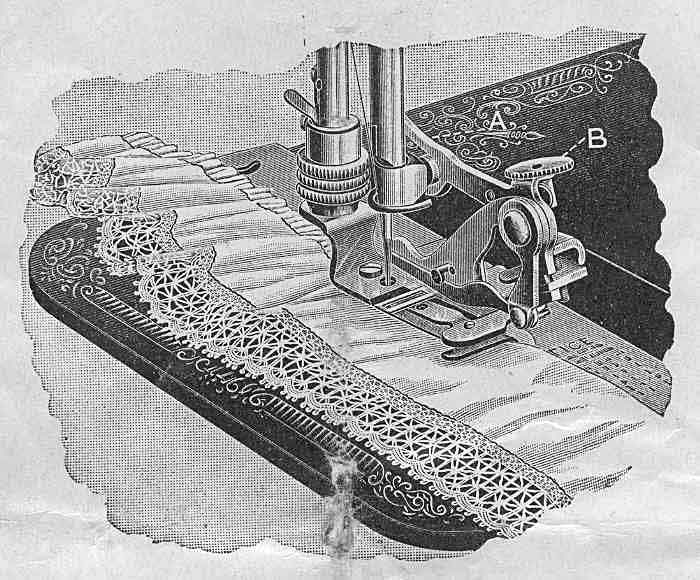
Remove the presser foot and attach the ruffler in its place on the presser bar with the fork of the lever over the needle nut "A". Place the goods to be gathered between the steel blades or springs. If the ruffle is to be attached to a band, place the band below the lower blade.
To make a fine gather, shorten the stitch and turn the adjusting nut "B" to its highest point.
To make plaits, turn the adjusting nut "B" downward to the desired point and lengthen the stitch.
For full gathers, adjust the ruffler the same as in making plaits, using a short stitch.
The length of the stitch should match the size of the gather or plait, so the folds will lie even and not pile up on each other or be too far apart.
For shirring, remove the lower blade and put to the shirring slide in its place, pushing it in as far as it will go.
Never use the ruffler without either the ruffler or shirring plate in place. Never run the machine with the ruffler on without goods between the steel blades, as the movement of the teeth on the upper blade against the lower blade will dull the teeth and soon make the ruffler useless.
Part One |