All 2 available source parts are included below.
Part 1
 -
THE NEEDLEBAR
-
THE NEEDLEBAR
Online Manuals Section
-
Directions for Operating
JONES'
FAMILY or HAND
CYLINDER SHUTTLE
SEWING MACHINE
(1893)
Part One
The TWO OIL HOLES marked in Dotted Circles are behind the Head of the Machine, and must be oiled OFTEN whilst Needle Bar is at its highest point. TAKE COVER OFF BACK OF TOP ARM to oil Feed Regulator.
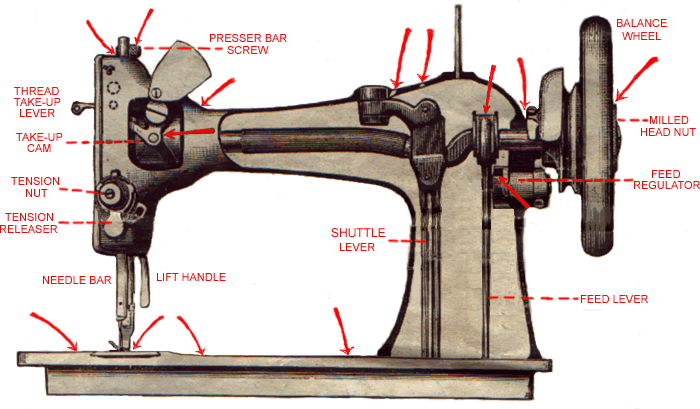
Fig. 1
Be sure and Oil the Cotton in the Hole under Front Shuttle-race Slide. The Arrows show where the Machine is to be oiled.
The Arrows show where the Machine is to be oiled
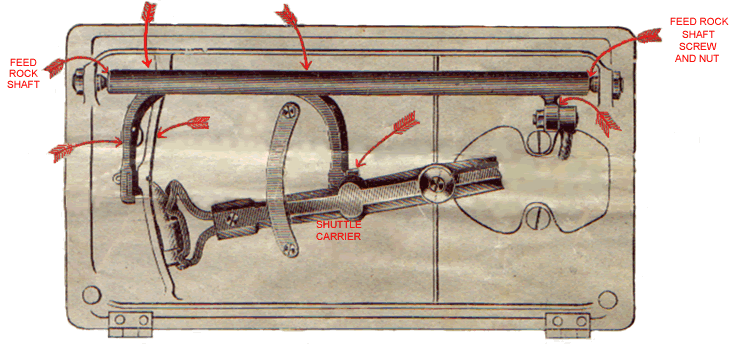
Fig 2
The Arrows show where the Machine is to be oiled
It is cheapest to use the BEST SPERM OIL ONLY. If the Machine or Stand runs heavy after standing, use Paraffin Oil [US = kerosene. AQ], run the Machine at a quick speed for a few minutes then clean the Paraffin Oil off and oil the Machine well with good Sperm Oil.
-
OILING THE STAND
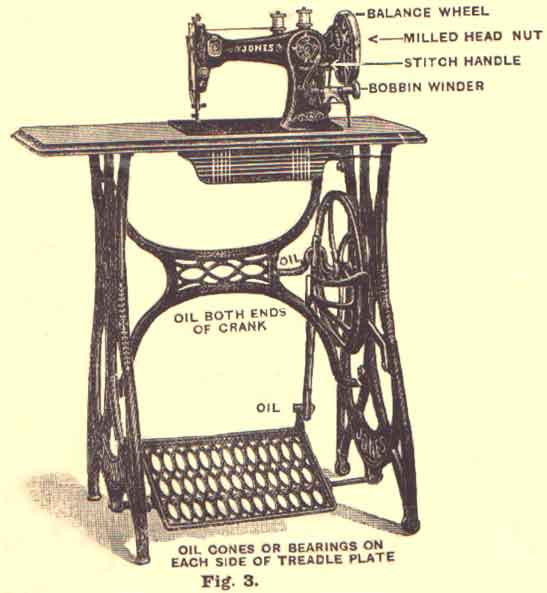
IF THE MACHINE OR STAND RUNS HEAVY AFTER STANDING, use PARAFFIN OIL, run the Machine at a quick speed for a few minutes, then clean the Paraffin Oil off, and oil the Machine well with GOOD SPERM OIL
USE NON BUT THE VERY BEST SPERM OIL; IT IS BY FAR THE CHEAPEST IN THE END
Oil both ends of the Fly-wheel Crank Centres; oil Pitman (top and bottom); oil Cones or Bearings on each side of Treadle Plate.
The balls in the ball-bearing stand should be kept clean and free from dirt, so that they will work freely. This can be done by occasionally cleaning them with paraffin.
Do not have the Belt too tight, it makes the Machine run heavy. If the belt becomes too slack, cut a little off the end.
-
THE TREADLE MOTION
At the end of the Shaft near the Balance Wheel (see illustration, Page 1, Fig. 3), will be found a Milled Head Nut. By turning this Milled Head Nut towards you this will disconnect the Balance Wheel.
[Note -- This type of friction clutch is only found on the earliest Jones CS machines. From 1895 on this was replaced with a catch plate lever. A.Q.]
Place the feet lightly upon the Treadle, then turn towards you the Balance Wheel on the top of the Machine, allowing the feet to move freely with the motion thus given. Continue this motion, by pressing with the heel and toe alternately until a regular movement is acquired.
Make yourself thoroughly familiar with the treadle motion before attempting to use the machine, and take particular notice that the Balance Wheel must turn towards you.
The following table indicates the sizes of Needles and Threads which should be employed together, and in transmitting orders for Needles, to prevent mistakes and delay, always specify the size required, and state for
JONES' C.S. MACHINE
|
SIZE OF NEEDLE
|
CLASS OF WORK TO SEW
|
SIZES OF COTTON< LINEN OR
SILK
|
|
1
|
|
200 Cotton
|
|
2
|
Very Fine Calicoes, Linen, Linen Shirting, Fine Silk
Goods, Tucking, Hemming, &c.
|
100 to 150 Cotton
|
|
3
|
Underclothing, Collars, Fine Shirts, Handkerchiefs,
&c.
|
80 to 100 Cotton, 24 to 30 Silk
|
|
4
|
Dressmaking, Quilting, Bleached Calicoes, and General
Domestic Sewing.
|
60 to 80 Cotton, 24 to 30 Silk
|
|
5
|
Heavier Grades Dressmaking, and Boys Clothing, &c.
|
40 to 60 Cotton, 24 to 30 Silk, 80 to 100 Linen.
|
|
6
|
Light Tailoring, Mantle-making, &c.
|
30 to 40 Cotton, 16 to 24 Silk, 70 to 80 Linen
|
|
7
|
Heavy Coats, Trouserings, Tickings, &c.
|
24 to 30 Cotton, 60 to 80 Linen
|
Part Two
Part 2
THE NEEDLEBAR Archive at ISMACS International
Online Manuals Section
Directions for Operating
JONES'
FAMILY or HAND
CYLINDER SHUTTLE
SEWING MACHINE
(1893)
Part Two
SETTING OR ADJUSTING THE NEEDLE
The Needle in this Machine is self-setting, the operator simply
pushes the Needle up the hole in the Needle Bar as far
as it will go, with the long groove to the
left hand; secure the Needle firmly with the Needle
Screw and the Needle 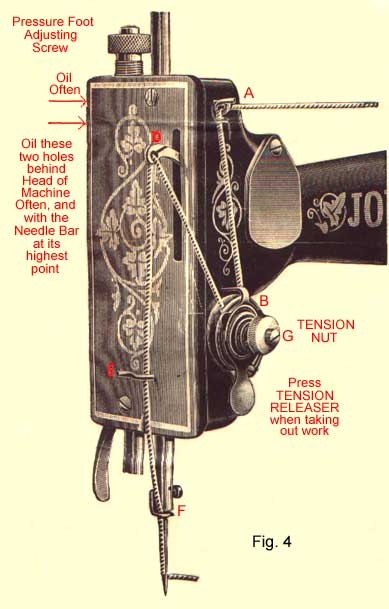 is
perfectly set.
is
perfectly set.
Be sure the Needle point is sharp not blunt. This is very important, particularly so when sewing fine goods.
-TO THREAD THE MACHINE
Place the spool of thread on the Spool Pin, pass the thread through the Eye marked A, then between the Tension Discs B, and into the slot in the Take-up Lever D, behind the Guides E and F, and through the Needle Eye, the thread running through the Needle Eye from left to right.
The Needle or Top Thread Tension is adjusted by means of the Milled-head Tension Nut G (see illustration).
By turning the Nut G to the right hand, the tension is tightened or increased.
By turning the Nut G to the left hand, the tension is slackened or decreased.
Always be sure that there is some tension on the top thread, or it may tangle round the Shuttle.
TO WIND THE SHUTTLE BOBBIN
First disconnect the Balance wheel by turning the large Milled Head Nut at the end of the shaft (Fig 1) towards you, this will enable you to wind the Bobbin without running the machine, and avoids the necessity of having to take the work from under the machines, or break the thread.
Place the end of the Bobbin in the Winder Centre A, forcing the Winder-Centre to the left far enough to allow the other end of the Bobbin to go into the Cup-end of spindle B. You will notice the Cup-end of Spindle is hollowed out, so that you may easily see the Pin that goes into the hole in the end of the Bobbin.
Be sure that the hole in the end of the Bobbin is right opposite the Pin in the Cup-end of the Spindle B. Then push the Bobbin Winder up aginst the the Balance Wheel, which will drive the Winder whilst winding. Place the spool of thread on the Spool Pin and pass the thread through the Eye A, (see Fig 4), then through the Eye just above the Bobbin Winder and thence to the Winder.
SIMPLE -- SELF-ACTING --EFFECTIVE
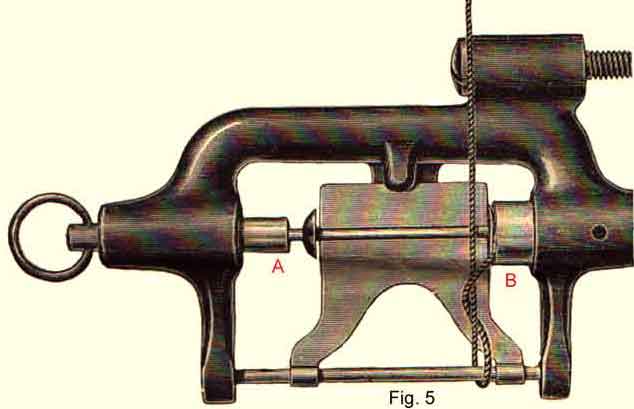
View of Spool Winder showing correct position of Thread before commencing to wind
This Winder is self-acting, and winds the thread on to the Bobbin as evenly and as regularly as an ordinary spool of thread. It is the most simple and effective Bobbin Winder ever invented.
TO TAKE THE SHUTTLE OUT OF THE MACHINE
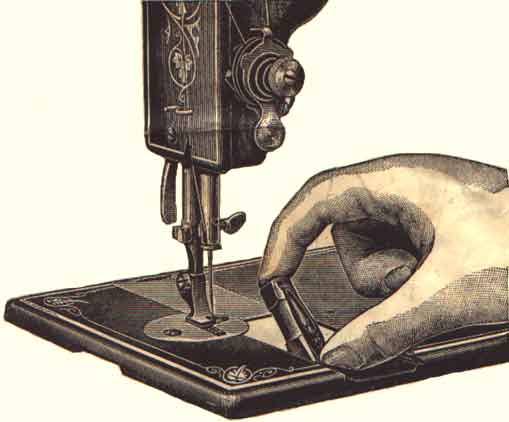
Never attempt to turn the Machine over for oiling with the Back Shuttle Cover Slide part way out, or you will damage the Machine.
Withdraw the Front Shuttle Cover Slide. Turn the Balance Wheel until the Shuttle Carrier is as near to the front of the Machine as it will come.
 Press
down the Point of the Shuttle with the Thumb
and it will lift the back end of the Shuttle clean out of the Shuttle Carrier
(as illustrated)
Press
down the Point of the Shuttle with the Thumb
and it will lift the back end of the Shuttle clean out of the Shuttle Carrier
(as illustrated)
NEVER attempt to lift the Shuttle out of the Carrier BY THE SPRING, or you may damage the Shuttle Tension.
-
TO THREAD JONES' CYLINDER SHUTTLE
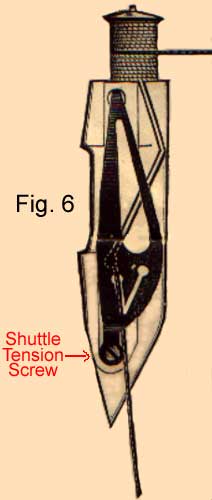
Take the Shuttle in the left hand, between the thumb and the two first fingers, with the Shuttle point towards you. Fig 6 shows you how to put the Bobbin into the Shuttle. Be sure that the thread runs off the top side of the Bobbin (as illustrated). This is very important.
Press the end of the Bobbin down to the bottom of the Shuttle and hold it there with the fore-finger, and with the right hand pull the thread down the slot in the shuttle as far as it will go (see Fig 6).
Now pull the thread back again towards the back end of Shuttle (as shown in Fig 7), and the Shuttle is threaded without having to pass the thread through a single hole -- in fact, this Shuttle is really, and absolutely, SELF-THREADING.
-
When the Front Shuttle Cover is withdrawn, be sure you Oil the Cotton in the cup that lubricates the Shuttle and the Shuttle-race. This is important.
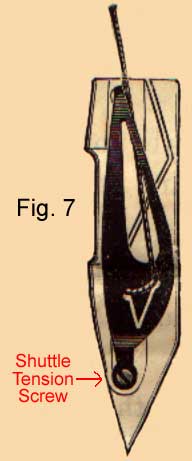 TO
REGULATE THE SHUTTLE TENSION
TO
REGULATE THE SHUTTLE TENSION
Always use the special small Screw Driver, so as not to damage the Shuttle Tension Screw.
By turning this Screw to the right, you increase or tighten the Shuttle Tension.By turning this Screw to the left, you decrease or slacken the Shuttle Tension.
The Shuttle Tension should never be as tight as the Needle or Top Tension.
BEFORE COMMENCING TO SEW
Withdraw the Front Slide that covers the Shuttle. Turn the Balance Wheel until the Shuttle Carrier is in the position for you to place the Shuttle into the Carrier. The Balance Wheel should always turn towards you.
TO PULL THE SHUTTLE THREAD UP THROUGH THE NEEDLE-PLATE HOLE
Hold the end of the Needle or Top Thread between the thumb and finger of your left hand, then turn the Balance Wheel towards you, until the needle moves down and up again to its highest point, and you will find the Needle or Top Thread will catch and pull the Shuttle Thread up through the Needle-plate hole.
Now close the Front Slide, place both ends of the threads, also the material to be sewn, under the Presser-Foot; then lower the Presser-Foot, turning the Balance Wheel towards you, and commence sewing.
In sewing soft, thin fabrics, the Tension should be light and easy; on thick and heavy goods it should be tight.
Insewing seams where strangth is required, the Tension should be alike on both threads, in order that the lock may be in the centre of the goods, thus -----

If the lower thread lies straight on the underside of the goods, thus -----

the Shuttle Tension is too tight, or the Needle or Top Tension too loose.
If the upper thread lies straight, the Needle or Top Tension is too tight, or the Shuttle Tension too loose.

In stitching goods which are too thin to conceal the lock of the threads in the centre, the lock may be thrown in the direction of what is to be the "wrong " side of the finished work so as to present a better appearance on the "right" side.
WHEN REMOVING THE WORK
Always have the Needle Bar at its highest point. With the forefinger of the right hand, lift the Presser-Bar, and at the same time press with the thumb upon the Tension Releaser (Fig 4); this liberates or slackens the thread in the Tension, and you can easily draw the work from under the Presser-Foot without any fear of bending the Needle or breaking the threads. Then cut the threads, leaving the ends long enough to recommence sewing.
TO ALTER THE LENGTH OF STITCH
(See Stitch Handle close to Balance Wheel, Fig 5)
By lifting this Handle upwards, you make the stitch longer.
By pulling the Handle down, you make the stitch shorter.
CAUTION -- If you pull this Handle down as far as it will go, the machine will not feed or carry the work forward at all.
TO ALTER THE PRESSURE ON PRESSER-FOOT
(So as to put more pressure on the material)
Turn the Milled-Head Presser-Foot Adjusting Screw (Fig 4) at the top of the Presser-Bar to the right, to increase the pressure; or to the left, to decrease the pressure. For ordinary domestic sewing it is very seldom necessary to alter the pressure on Presser-Foot, but on thin soft fabrics the pressure should be light, on thick materials it should be heavier.
******************************************
SPECIAL NOTES
Be sure and take particular notice that the Balance Wheel must turn towards you.
Sharp pointed Needles. It is of the utmost importance that the Needle has a good sharp point.
If the Needle thread breaks when the Needle is adjusted properly it is caused by the Top Tension being too tight, or the eye of the Needle being too small for the thread, or the eye of the Needle being rough or sharp; or the Shuttle, or Shuttle Carrier, being rough or damaged.
If the Shuttle Thread breaks, slacken the Shuttle Tension, by unscrewing the small Shuttle Tension Screw at the point of the Shuttle.
The Needle must be pushed up the hole in the Needle Bar as far as ever it will go, and then it is sure to be in the right place.
Missed Stitches are caused by the Needle being bent away from the Shuttle, or by a crooked Needle, or if the Needle Eye is too large for the thread.
If the thread is improperly or too tightly twisted, it may throw the loop towards one side, instead of throwing the loop square into the Shuttle-race. In that case the Needle should be slightly turned in an opposite direction to counteract this tendency to throw the loop away from its proper position.
Always use the best soft finished cotton, because it makes better work and is the cheapest in the end.