All 5 available source parts are included below.
Part 1
THE NEEDLEBAR Archive at ISMACS International
Online Manuals Section
I N S T R U C T I O N S
FOR THE USE OF
FRISTER AND ROSSMANN'S
Automatic Chainstitch
Sewing Machines
PART ONE
THE
SEWING MACHINE MANUFACTURING CO.,
LATE
FRISTER AND ROSSMANN,
S. LOEWE, Sole Agent
49 Fore Street, London, E.C.
I N D E X
_._._._._._._._._
DIRECTIONS FOR USING THE MACHINE
| Description of Machine | 1 | Selecting Cotton or Silk | 7 |
| Notes and Cautions about Oiling | 2 | The Automatic Tension | 7 |
| Places to be Oiled | 2 | To Place the Work and Begin Sewing | 7 |
| Setting the Needle | 3 | To Fasten off Seam and Take Out Work | 8 |
| To Take Out the Needle | 5 | To Take Out Seam | 9 |
| To Tighten the Strap | 5 | To Turn a Corner | 9 |
| To Thread the Machine | 5 | Accidents to the Machine | 9 |
| To Regulate Length of Stitch to Size of Thread | 6 |
DIRECTIONS FOR USING THE ACCESSORIES
| List of Accessories | 09 | Narrow Hemmer | 14 |
| The Guide | 10 | To Make Hem and Sew on Trimming at the Same Time | 15 |
| To Braid | 11 | The Feller and Wide Hemmer | 16 |
| The Quilter | 11 | To Make a Wide Hem | 16 |
| The Gatherer | 12 | To Make a Felled Seam | 16 |
| To Gather and Sew on Band at the Same Time | 13 | Hints for Beginners .................Inside Cover | |
| To Embroider | 13 |
_._._._._._._._._
SPECIAL NOTICE
Perfect sewing is always secured by suing appropriate size of needle and thread for the length of stitch employed, as shown by the Table on the Cloth Plate (see page 6).
R E P A I R S
All our Machines are thoroughly tested before being sent to Customers, so that, with fair usage, they do not need any attention for years.
However, in the event of the Machines requiring repairs through accident or want of knowledge, it is essential that they should get into proper hands, and therefore we employ a staff of skilled mechanics at our depot in London.
Besides, all the parts of our Machines are interchangeable, and are always kept in stock, so that repairs are executed by us in the most efficient manner, and at the lowest cost.
On receiving one clear day's notice, an instructress will attend at Customer's House, free of charge - Customer paying Second Class Return Fare.
In making appointments for instruction, please give one clear day's notice, and mention nearest railway station.
Instructions for Use
OF
FRISTER & ROSSMANN'S
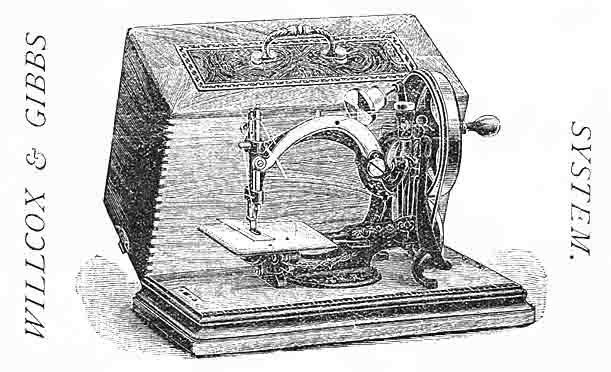
WILLCOX & GIBBS SYSTEM
SEWING MACHINES
The Machine is fastened, by a Thumb Screw to the Wooden Base, from underneath. Place the Machine exactly square on the Base, so
the strap connecting the small Wheel and Fly Wheel may work correctly.
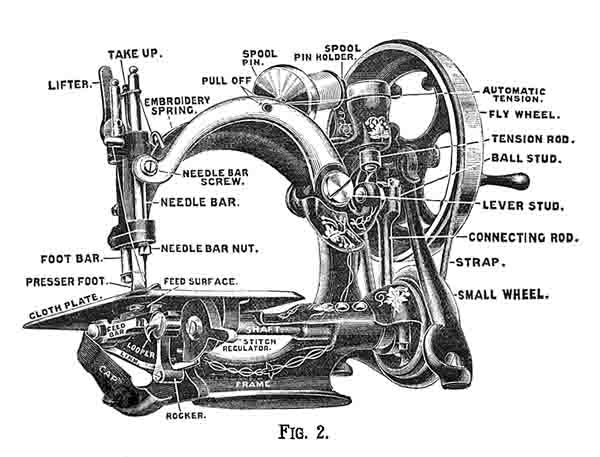
Fig. 2 shows the principal parts of the Machine, to which reference is made through the course of these directions.
NOTES AND CAUTIONS ABOUT OILING
When only used occasionally, the Machine should be oiled and wiped. If in constant use it should be oiled every day.
The Oil supplied by us and by our Agents is the best oil for the sewing machine. It has the highest lubricating power; it never thickens, hence it does not clog the Machine, but keeps it in readiness for immediate working.
Should the Machine run hard, from long disuse and neglect, apply a little benzine instead of oil, and after working until it runs freely, wipe the Machine and again apply oil.
The Machine should be covered when not in use.
Never put oil in or about the Automatic Tension.
PLACES TO BE OILED
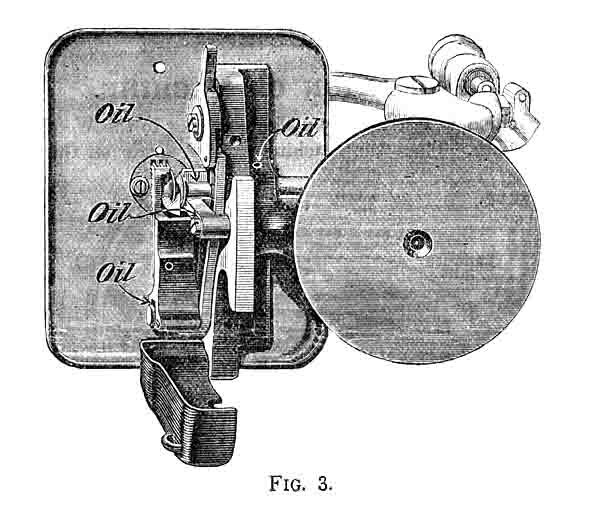
The Shaft, where it passes through the Frame (oil hole).
Eccentric, which operates Feed Bar. Fig. 3
Lower end of Rocker. Fig. 3
Feed Bar stud and slot at back end of Feed Bar. Fig. 3
Needle Bar (two places) and Foot Bar (two places) above each bearing. Fig. 4
Needle Bar screw. Fig. 4
Shaft (oil hole). Fig. 4
Hub of Large Wheel (oil hole). Fig. 4
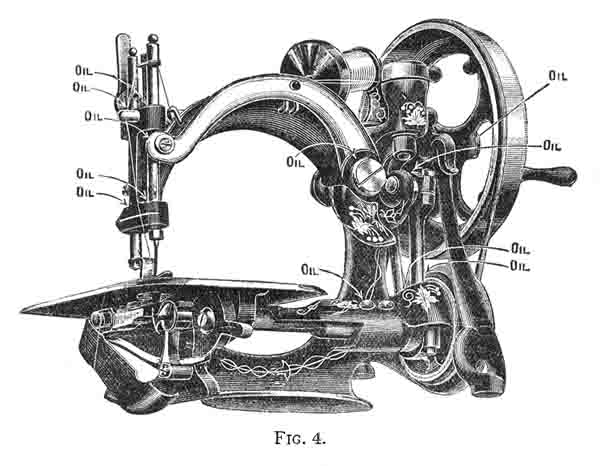
Lower end of Connecting Rod (oil hole). Fig. 4
Lower end of Tension Rod (oil hole). Fig. 4
Upper end of Connecting Rod (oil hole). Fig. 4
Run the Machine rapidly for a few moments, to work the oil into the bearings, taking care to raise the Presser Foot.
Carefully wipe the superfluous oil from every part of the Machine.
Part Two
| Part Three | Part
Four | Part Five
Part 2
THE NEEDLEBAR Archive at ISMACS International
Online Manuals Section
I N S T R U C T I O N S
FOR THE USE OF
FRISTER AND ROSSMANN'S
Automatic Chainstitch
Sewing Machines
PART TWO
SETTING THE NEEDLE
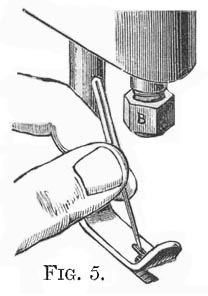
The needle has a continuous groove running from the end of the eye, and the end of the Needle Bar has a corresponding mark upon which the groove fits and slides; the object is to ensure the Needle being properly placed, namely, with the groove always to the left; and any attempt to force in a Needle without a groove, or with the groove in the wrong direction, will result in
 |
 |
| Inserting or Taking Out the Needle |
Pushing Up the Needle
|
damaging the Needle Bar, and will prevent the Machine from working.
Let the Presser Foot down on the Cloth Plate by turning the Lifter to the right; raise the Needle Bar to its highest point by turning the
 |
|
Fastening the Needle
|
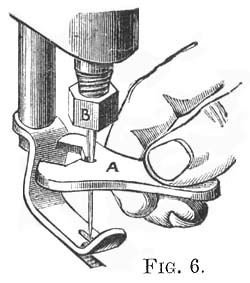
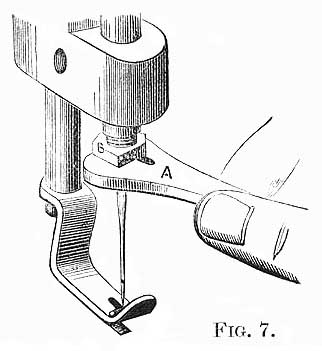
large wheel; then, holding the Needle between the thumb and first finger )Fig. 5) with the groove towards the left, insert the point of the Needle Hole in the Cloth Plate until the shank of the Needle is able to be inserted into the opening in the Needle Bar. Holding the Needle Wrench (A) provided (Fig. 7) between the right thumb and first finger, gradually turn the Needle Bar Nut (B) to the right, until the Needle is firmly bedded in its place.
Do not use a blunt needle; as it cannot do good work, and is liable to bend or break in going through the material. Never use a bent needle; it will cause dropped stitches and damage the Looper.
TO TAKE OUT THE NEEDLE
Let down the Presser Foot and raise the Needle Bar to its highest point. Unscrew the Needle Bar Nut with Needle Wrench, by making a quarter turn to the left.
TO TIGHTEN THE STRAP
When the Strap requires tightening, which it may do after the machine has been some time in use, proceed as follows:-
Take off the Strap, cut a small piece off one end, make a fresh hole, and again connect the ends by means of the hook.
TO THREAD THE MACHINE
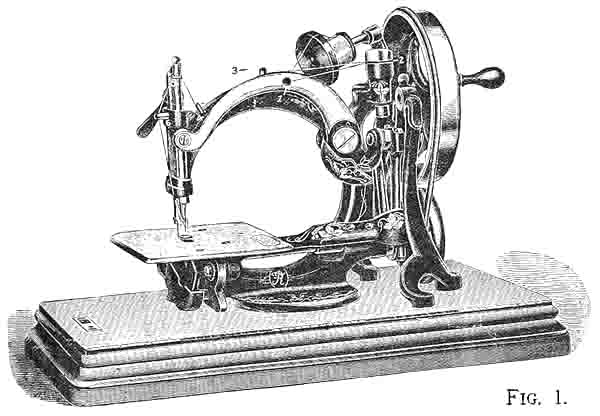
The Threading of the Machine is shown in Fig.1.
In Threading, first pull out the Spool Pin, and place the Reel upon it. Replace Spool Pin. Raise the Needle Bar to its highest point, by turning large Wheel, and then proceed as follows:
1. Thread from the back toward you, through the two staples and hole in lever known as Pull-off (1, Fig.1). Pull through about six inches of thread. It facilitates threading to double and twist the end of the thread, it can be more readily passed through Pull-off and following places, when threading.
2. Then carry the thread between the Reel and Automatic Tension, drawing the thread into the slot under the cap of tension (2, Fig. 1).
3. Thread from right to left through the Thread Pin on top of the Frame (3, Fig.1).
4. Take the Thread from right to left through Wire Staple (4, Fig.1). Do not thread through loop of Spring under this Staple, unless embroidering.
5. Take the thread between thumb and finger of both hands, passing it between the Needle Bar and Take-up, and press it from you into the opening at the top of the Take-up (5, Fig.1)
6. Take the thread downwards through the Thread Pin (6, Fig.1).
7. Then through the Needle Eye from left to right (Fig.1).
TO REGULATE LENGTH OF STITCH TO SIZE OF THREAD OR SILK USED
|
Thread
|
Silk
|
Needle
|
Stitch
|
|
20
|
E
|
4
|
12
|
|
30
|
D
|
3
|
14
|
|
40
|
C
|
3
|
16
|
|
50
|
B
|
3
|
18
|
|
60
|
A
|
2
|
20
|
|
70
|
0
|
2
|
22
|
|
80
|
00
|
2
|
22
|
|
90
|
000
|
1
|
24
|
|
100
|
-
|
1
|
27
|
|
120
|
-
|
0
|
27
|
|
150
|
-
|
0
|
30
|
Sizes of Silk corresponding to those given in the Table stamped on Cloth Plate.
|
E silk equals No. 10
|
A silk equals No. 24.
|
|
D silk equals No. 12.
|
0 silk equals No. 30.
|
|
C silk equals No. 16.
|
00 silk equals No. 36.
|
|
B silk equals No. 20.
|
000 silk equals No. 40.
|
The above Table, corresponding to that stamped on the Cloth Plate of the Machine, shows the proper size of Needle and length of stitch for each size of cotton or silk. For example: For No. 70 cotton or 0 silk - equal to No. 30 silk - use a No. 2 needle, and 22 stitches to the inch. To the right of the Needle Plate is a slot, showing the number of stitches to an inch. To make the length of stitch required, move handle of Stitch Regulator until the proper number appears through the slot. The length of stitch indicated by the Table should always be used, as the proper elasticity will then be secured in all seams. A strict adherence to the Table will always ensure good and durable work.
SELECTING COTTON OR SILK
Cotton or silk for machine sewing may generally be three sizes finer than that used in hand sewing; as it is strong enough and better adapted to the work. For instance, where 40 cotton would be used in hand sewing, use 60 or 70 cotton on the Machine. The following rules on this subject may be useful:--
| No. | |
| For calico, long cloth, &c. ............... | Use Cotton 60 to 80 |
| For fine lawns, nainsooks, &c. ....... | Use Cotton 100 to 150 |
| For fine linens................................... | Use Cotton 80 to 120 |
| For light woolens, flannels, &c. ...... | Use Cotton 40 to 60 |
| For heavy woolens........................... | Use Cotton 20 to 40 |
| For dressmaking.............................. | Use Cotton 50 to 70 or Silk Nos. 24 or 30 (equal to A or O in the Table) |
| For hemming silk, &c. ..................... | Silk Nos. 36 (equal to OO in the Table) |
| For embroidery*............................... | Silk Nos. 8 to 10 (equal to F or E in the Table) |
| For braiding...................................... | Silk Nos. 30 (equal to O in the Table) or Cotton No. 70 |
Any good cotton works well on the Machine, except very fine numbers of soft finished. For black or coloured cottons use only glacé finished. Soft finished black and coloured cottons will often break or work unsatisfactorily. Use glacé cotton in place of linen thread.
Part One
| Part Three | Part
Four | Part Five
Part 3
Online Manuals Section
I N S T R U C T I O N S
FOR THE USE OF
FRISTER AND ROSSMANN'S
Automatic Chainstitch
Sewing Machines
PART THREE
THE AUTOMATIC TENSION
The Automatic Tension is not liable to get out of order. It will remain perfectly adjusted and self-regulating, if not tampered with.
Note: - Bits of thread or a deposit of lint in the tension may sometimes cause breaking of the cotton or irregularity in the sewing. Should this occur, raise the needle bar to its highest point, and, with a fine cambric needle, push apart the washers of the tension, and pick out the obstructions.
We repeat the caution: Do not Oil the Tension.
TO PLACE THE WORK AND BEGIN SEWING
Raise the needle to hits highest point, also Presser Foot. Place work under point of Needle. Two or three inches of thread are drawn through the eye of the Needle,* but there must be no slack thread between the Needle-eye and the Tension. Pass the thread under the Presser Foot, towards the Left. Let down the Presser Foot, the thread being held between the Presser Foot and the material, but not drawn tight.
The thread may be held under the finger lightly, instead of being passed under the Presser Foot. In this case, hold it to the right until two stitches are made. If held too tightly the thread will break at the first stitch. If it should snap twice in succession, it is probably wound round the Looper, and must be removed before starting afresh.
Note: - If the material is very hard and difficult to penetrate, the line of seam should be rubbed with curd soap.
TO FASTEN OFF THE SEAM AND TAKE OUT THE WORK
To Fasten Off at End of Work - Sew beyond the end of seam two stitches. More than this may leave the seam unlocked. Always stop with the Needle at its highest point. With the left hand catch the thread between the Needle and Thread Pin (6, Fig. 1), and pull some slack through the Tension*. With the right hand, draw the slack through the eye of the Needle, and pull it upwards from the work till it breaks. Lift the Presser Foot. Pull the work from you, and the end of the thread will be drawn through the loop. Pull the end of thread to tighten the knot.
To Fasten Off in the Work - Stop with Needle at highest point, break the thread as above and take out the work, then pull the thread back on the seam to tighten. Or, stop the Needle in the work as it is rising, place the finger on the work close to the Presser Foot to prevent work from moving, raise the Presser Foot, and make one more stitch in the last hole made.
To Fasten Seam to be afterwards Cut (as in Fitting Garments.) - Seams that require to be cut from the finishing end should be fastened by sewing back in the same row of stitching a little beyond the point of cutting; or the stitching may be done from each end. If it is necessary to cut the finishing end of a seam that has not been fastened as above, immediately after cutting, re-lock the seam by inserting a pin through the loop on the underside of the goods, pulling the end of the thread through, and drawing it back up upon the seam.
TO TAKE OUT THE SEAM
It is one of the decided advantages of this Machine, that the sewing can be taken out, if required, without injuring the material, by simply unlocking the seam at any point, and drawing out the thread.
The seam can be taken out only in one direction, viz., towards the point of starting. It is, therefore, well to begin all seams from the end most exposed.
TO TURN A CORNER
Stop with the Needle raised to its highest point; raise the Presser Foot and turn the work, the thread only acting as a pivot. Should the work become displaced, re-adjust it so that the Needle will enter at the proper distance from the last stitch; let down the Presser Foot and proceed.
ACCIDENTS TO THE MACHINE
In case of accident, pack the Machine tightly in a small box so that it will not get shaken about in transit, and send it to the Head Office, 49, Fore Street, London E.C., for repair. Tie a card (giving name and full address) to the Machine, and advise particulars, stating the number of the Machine. Do not send the thumb-screw or accessories.
*** Never use a screw-driver upon the Machine, or allow an unskilled mechanic to tamper with it.
Part One
| Part Two | Part
Four | Part Five
Part 4
Online Manuals Section
I N S T R U C T I O N S
FOR THE USE OF
FRISTER AND ROSSMANN'S
Automatic Chainstitch
Sewing Machines
PART FOUR
THE GUIDE
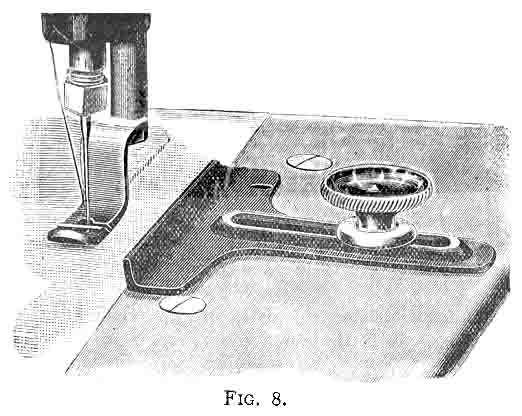
Fasten the Guide to Cloth Plate by Guide Screw, as far from the Needle as you wish the sewing to be from edge of the work.
TO BRAID
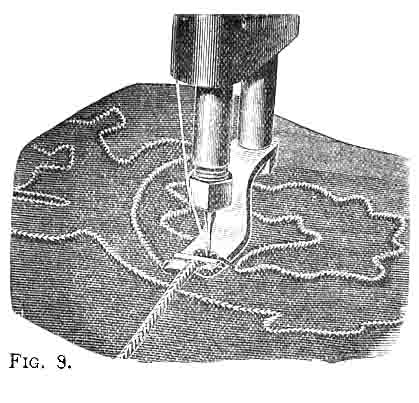
In the upper side of the Presser Foot you will find a groove crossed by a small wire; insert the braid in this groove under the wire, and draw the end from you under the Presser Foot. All that is now necessary is to turn the cloth, so as to follow any desired pattern, as shown in the above cut (Fig. 9), and the braid will draw through the groove, and be sewed down by the needle and thread. In turning square corners (see direction "To Turn A Corner", page 9), draw up the braid a little before approaching the corner. Use from 16 to 20 stitches to the inch.
THE QUILTER
Fasten Quilter to frame, from behind the Foot Bar, by means of the Guide Screw, and set the blade at such a distance from the Needle as to make the desired space between the rows of stitching, and sufficiently above
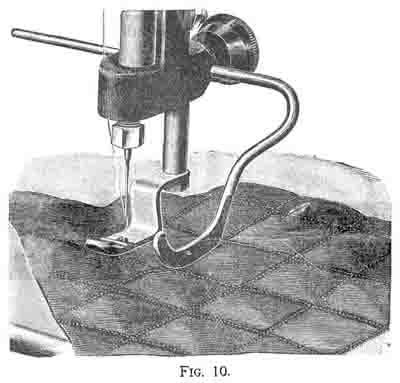
the Cloth Plate to allow the work to pass freely; crease the goods on a true bias through the centre of the work, and sew the first row of stitching on the crease. Move the work to the right until the line of stitching is under the blade of the Quilter, which serves as a guide for the distance between rows.
For Squares, again crease it through the centre on a true bias and proceed as before.
For Diamonds, the cross rows of stitching should be parallel to the edge of the goods.
The Quilter is also used as a top guide for stitching three-ply tucks.
THE GATHERER
Place the Gatherer on the Presser Foot, until it touches the Wire on the upper side, as shown above.
Use stitch from 12 to 16 to the inch.
Use No. 40 Cotton (glacé preferred). See that the Reel turns freely on the Spool Pin.
To Thread (for gathering) leave the cotton out of Pull-off (Fig. 1, No. 1), and draw it direct from the Reel into the groove of the Automatic Tension (Fig. 1, No. 2), then Thread the Pin (Fig. 1, No. 3), &c., as usual.
Place the work in the ordinary way, and allow it to feed freely.
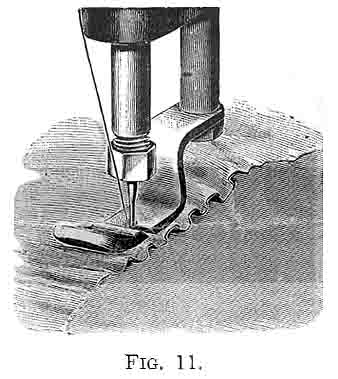
If it does not gather full enough, lengthen the stitch; or increase the tension, by taking hold of the thread between the Automatic Tension (2, Fig. 1), and the Thread Pin (3, Fig. 1), and, winding it once oftener in groove of Tension - with Needle at highest point - not more than three times in all. If too full, shorten stitch, or unwind extra coil of thread from Tension.
The fulness of gathering depends on softness of goods, length of stitch and tightness of tension.
For Nainsook, sixteen stitches to the inch, and no extra turns of thread around Tension, or at most one turn, will answer.
For Calico, twelve stitches to the inch, and three turns around Tension may be required.
TO GATHER AND SEW ON BAND AT THE SAME TIME
Put gatherer on Presser Foot. Thread as for ordinary sewing, with No. 60 or 70 cotton, using twelve stitches to the inch. Put the piece to be gathered under the band, holding band with right hand and under piece with left.
Hold back band, so that feed can only make short stitches.
The fulness and regularity of gathering depend entirely upon the skill of operator in holding band.
TO EMBROIDER
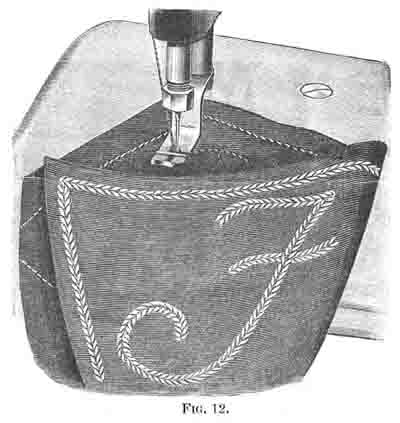
Use a No. 4 needle and E or F silk.* Thread as usual, but pass the thread from back to front through the Embroidery Spring, after threading through the Staple (4, Fig. 1).
* E silk is equal to No. 10. See page 6.
When the fabric is very thin, 12 stitches to the inch may tend to pucker the work; if so, shorten to 13 or 14. With very thin material, it is well to trace the pattern on paper and tack it to the work on the wrong side.
NARROW HEMMER
Fasten the Narrow Hemmer to the Cloth Plate with the Hemmer Nut. Raise Presser Foot, and, without any folding, pass the edge of fabric to be hemmed between the blades. With a Needle push forward
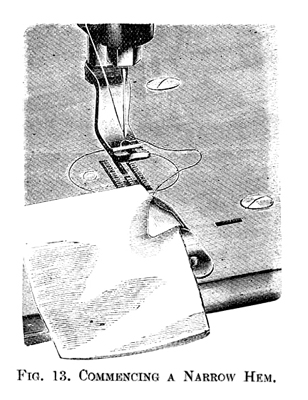
the goods, until the front edge is under the needle. Let down the Presser Foot, and proceed, keeping the edge of the goods against the edge of the Hemmer.
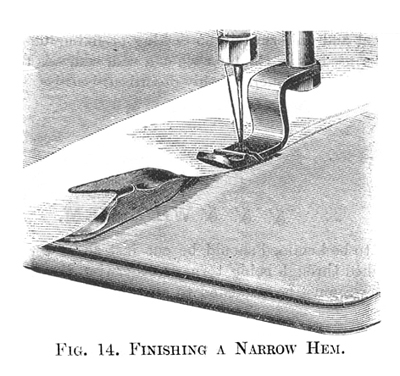
As the fabric passes through the Hemmer, the fingers placed against it, it makes it run out straight to the end of hem.
If it is necessary to take the material out of the Hemmer before
finishing, without letting it feed through, raise the Presser
Foot and pull the work from you; not backwards or sideways, or you will
injure the Hemmer.
In hemming, use the next larger stitch to that indicated by the "table" on the Cloth Plate, thus for 70 cotton use 20 stitches to the inch, instead of 22, as the feeding is retarded somewhat by the Hemmer.
The Hemmer Blades should never be bent.
TO MAKE NARROW HEM AND SEW ON TRIMMING AT THE SAME TIME
Place edge of trimming between hem and feed surface, guiding with the finger, so as to stitch edge fast beneath hem; or, place edge of trimming over the Narrow Hemmer and through the opening in the Presser Foot, thus stitching the trimming to the top of the hem.
THE FELLER AND WIDE HEMMER
The Feller is useful in making underclothing, as it turns a beautifully neat and uniform fell, no tacking or fixing being required. It may also be used as a Hemmer when a wider hem is required than those turned by the Hemmers already described.
TO MAKE A WIDE HEM
The edge to be hemmed should be cut instead of torn; for if the edge is stretched through being torn, or otherwise, the material where the seam is sewn must be stretched to an equal length. The material
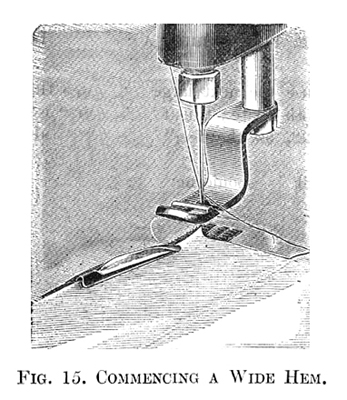
must be folded down evenly, and distinctly creased with a wider than the width of hem desired. The edge is then placed in the Hemmer (Fig. 15), the lower fold entering under the upper blade and upper fold passing over it. The edge of the material is kept up against the turn of the blade during the process of stitching the hem.
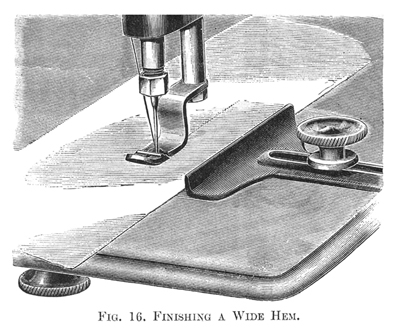
This is generally done by the aid of the guide, as shown in Fig. 16, which serves to guide the work, and holds the edge in the Hemmer.
TO MAKE A FELLED SEAM
Lay the two pieces one upon the other, the under piece projecting beyond the upper. Sew them together with the Machine, allowing for a hem of such width as will be suitable to the material. Turn the work over, open it out and crease the seam down with the narrow edge inside. Then attach the Feller and insert the edge as in Fig. 15; hold the seam, where it is joined, well up against the side of the blade of the Feller (Fig. 17); keep it in this position, as the work passes through, guiding it gently against the blade of the Feller with the first finger of the right hand; at the same time with the left hand keep the work smooth, and gently guide it towards the left.
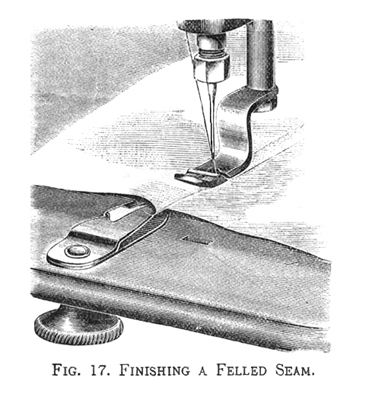
The first seam of a fell on the bias should always be begun from the narrow end of the work.
If the Feller does not turn in all the raw edge of the material, the seam is too wide.
Part One
| Part Two | Part
Three | Part Five
Part 5
Online Manuals Section
I N S T R U C T I O N S
FOR THE USE OF
FRISTER AND ROSSMANN'S
Automatic Chainstitch
Sewing Machines
PART FIVE
Special Accessories for the use of Manufacturers and others, such as Corders, Banders, &c., are made to order.
___________________________
HINTS FOR BEGINNERS
If Cotton Breaks, probable causes: -
| 1. Machine not properly threaded (p.5) | 6. Threads caught on Presser Foot. |
| 2. Cotton held too tight at starting (p.8) | 7. Obstruction in the Tension (p.7) |
|
3. Cotton around Looper (p.8) |
8. Cloth caught on Hemmer or other accessory. |
|
4. Cotton caught on Spool Pin. |
9. Goods too hard and require soaping (p.8) |
| 5. Use of inferior or unsuitable cotton (p.7) |
If Machine Runs Hard:-
| 1. Needs oiling with Benzine (p.2) | 3. Needle blunt (p.5) |
| 2. Not placed square on Base (p.1) | 4. Threads between Wheel & Connecting-rod |
If it Drops Stitches: -
| 1. Needle bent or not fully in place (p.4) | 4. Use of inferior cotton (p.7) |
| 2. Use of bad needles. | 5. Wheel turns backwards. |
| 3. Goods too hard and need soaping (p.8) |
If Belt Slips: -
Unless Machine runs hard from causes mentioned above, the belt needs tightening (p.5).
If Belt Comes Apart: -
Connect the ends as per instructions on page 5.
________________________
Oil the machine before using; run it rapidly for a few moments, and wipe it clean.
FRISTER & ROSSMANN'S
SEWING MACHINES
IMPROVED SINGER (Lockstitch),
WILLCOX & GIBBS (Chainstitch),
ARE SOLD BY THE
LEADING DRAPERS
AND THUS AT
A REDUCTION OF FROM THIRTY TO FORTY PER CENT.
ON PRICES CHARGED BY DEALERS ON THE HIRE SYSTEM.

Part One
| Part Two | Part
Three | Part Four