All 4 available source parts are included below.
Part 1
INSTRUCTIONS FOR OPERATING THE
HAND
SEWING MACHINE
~~~~~~~~~~~~~~~~~~~~~~~~~~~~~~~~~~~~~
Jones' Sewing Machine Co. Limited,
GUIDE BRIDGE,
Near Manchester.
Part One
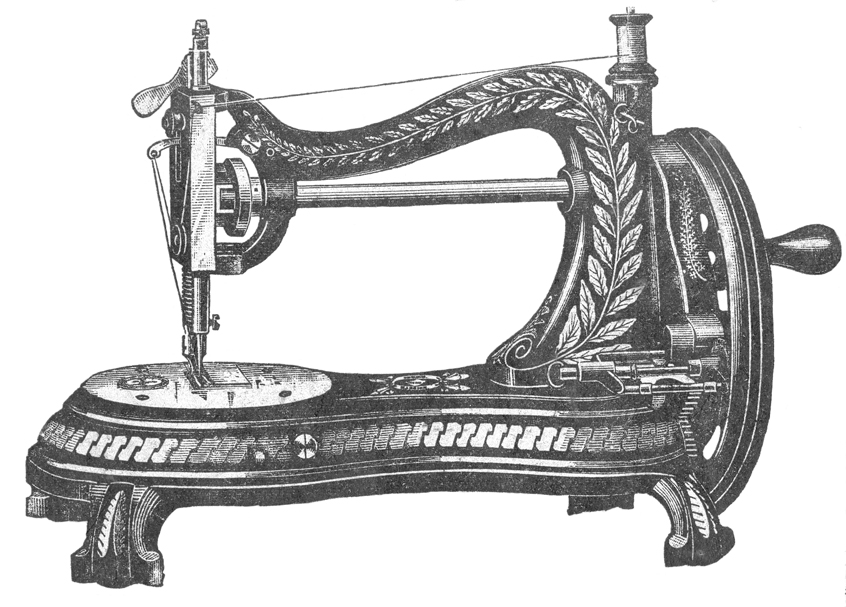
This Machine has the New Double Feed feeding on both sides of the needle, which carries the work straight,
and passes thick seams easily and without any difficulty.
WHEN ORDERING PARTS PLEASE STATE PLAINLY FOR
HAND MACHINE
TO READJUST THE DRIVING OR GEAR WHEELS
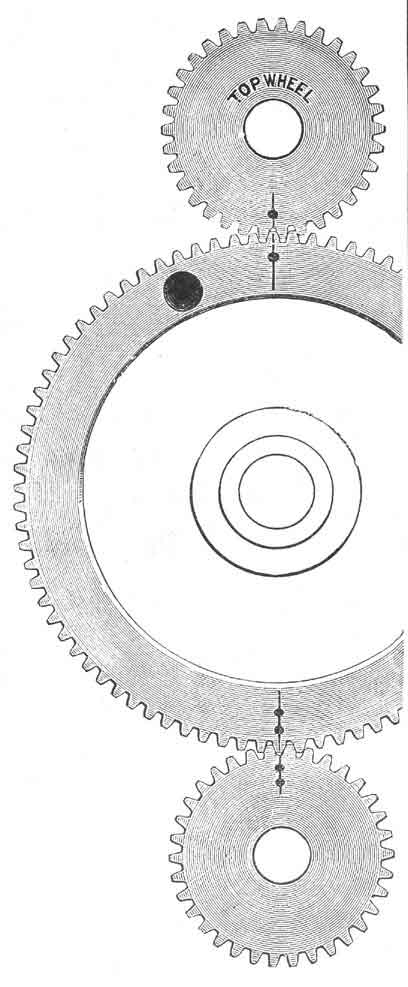
Never remove the Driving Wheel or principal working parts of the machine from their present position,or the machine will require to be returned to us for re-adjustment (which causes trouble and expense), or you will require to carefully carry out the following instructions: -
Keep turning the wheel until you find the top and bottom marks on the large wheel come exactly opposite the marks on the top and bottom small wheels, like drawing, which is sure to take place before you exceed 17 turns if the machine is timed right. If not timed right, take out the screw at the end of the balance wheel, which is a left-hand screw, and by turning this screw to the right, you loosen it; then take the balance wheel off large gear wheel; and pull the large gear wheel out of gear, turning both small gears round until the marks come directly opposite the marks on the large gear wheel, then push the large gear wheel in gear again, and replace balance wheel on large gear wheel, securing it to the end with the left-hand screw.
OILING THE MACHINE
The Arrows show the places where the Machine is to be oiled.
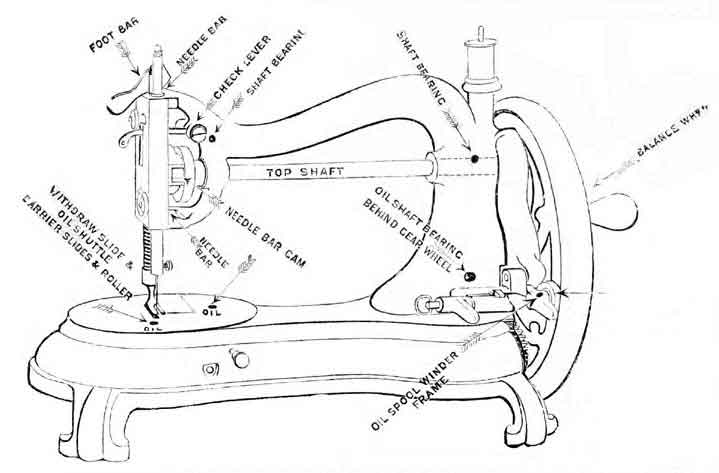
Never get any oil on the leather pulley of Winder, and be sure and keep the inside of Balance Wheel,
where this leather pulley works, clean and free from oil.
Turn machine completely over, resting it on the bobbin pin and needle bar.
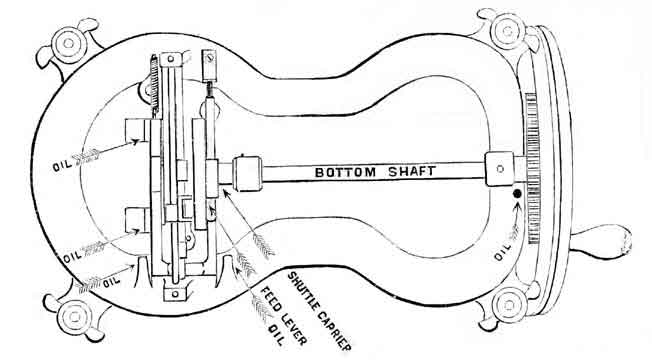
NOTE: The operator may occasionally remove the cloth plate to clean and oil the parts underneath,
but no other part of the Machine must ever be taken apart or tampered with.
________________________________________________________________________________________
NO MACHINE WILL WORK SATISFACTORILY UNLESS KEPT THOROUGHLY CLEAN AND WELL OILED.
________________________________________________________________________________________
NOTE: - When ordering parts, state that they are for HAND Machine. Always send the old or broken parts as a sample, or give number of the article from the plate of parts. Particular attention to this will save loss of time and annoyance. If you cannot send the broken old part - lay the part on a piece of paper and scribe round with a pencil, so that we may see the exact size and shape of the article wanted.
SENDING MACHINES TO BE REPAIRED
All Machines or parts sent for repairs should have the owner's name and address attached to them, together with instructions as to the nature of the repairs required. Unless this be strictly attended to, we cannot be held responsible for the safe return of any Machine.
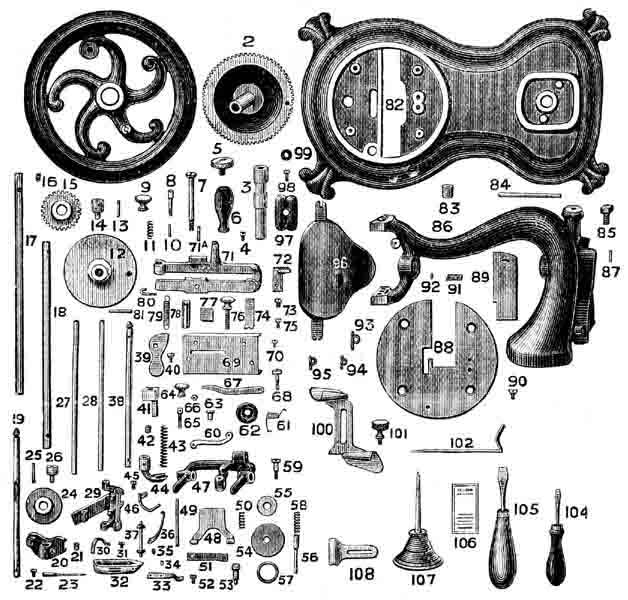
| Names
and numbers of the several Parts for New Style of Machine. |
|
| 1 Balance Wheel 2 Large Gear 3 Large Gear Stud 4 Lock Screw for Gear Stud 5 Screw to hold Balance Wheel on Machine 6 Balance Wheel Handle 7 Balance Wheel Handle Screw 8 Balance Wheel Bolt 9 Balance Wheel Bolt Nut 10 Balance Wheel Bolt Pin 11 Balance Wheel Bolt Spring 12 Feed Cam 13 Feed Cam Pin 14 Feed Cam Roller and Stud 15 Small Gear 16 Small Gear Screw 17 Top Shaft 18 Bottom Shaft 19 Needle Bar (only) 20 Needle Bar Cam 21 Needle Bar Cam Screw 22 Needle Set Screw 23 Needle 24 Cam Wheel (only) 25 Cam Wheel Pin 26 Cam Roller and Stud 27 Shuttle Carrier Slide (top) 28 Shuttle Carrier Slide (bottom) 29 Shuttle Carrier 30 Shuttle Carrier Spring 31 Shuttle Carrier Spring Screw 32 New Patent Shuttle recessed 33 Spring Latch inside Shuttle 34 Spring Latch Rivet 35 Shuttle Tension Screw 36 Shuttle Thread Guide 37 Shuttle Reel 38 Foot Bar only 39 Presser Foot Lifter 40 Presser Foot Lifter Screw 41 Post Block to Pressure Bar 42 Post Block Screw 43 Foot Bar Spring (spiral) 44 Presser Foot 45 Foot Screw for Quilting Guide 46 Braider 47 Spooler Frame 48 Spooler Presser Plate 49 Spooler Presser Plate Bar (wire) 50 Spooler Presser Plate Spring 51 Spring to hold Winder to Balance Wheel 52 Screw for ditto 53 Spooler Spindle 54 Spooler Pulley (leather) 55 Spooler Pulley Washer 56 Left Centre Pin for Spooler 57 Left Centre Ring
|
58 Left Centre Spring 59 Spooler Screw 60 Check Lever 61 Check Lever Spring 62 Tension Disc 63 Tension Disc Stud 64 Tension Thumb Nut 65 Tension Thumb Screw 66 Tension Screw Washer (leather) 67 Tension Spring 68 Check Lever Screw 69 Face Plate 70 Face Plate Screw 71 Feed Lever 71A Feed Rocker Stud 72 Feed Surface 73 Feed Surface Screw 74 Stitch Screw Spring 75 Screw for Spring 76 Stitch Screw 77 Leather Pad for end of Feed Lever 78 Leather Pad for centre of ditto 79 Feed Spiral Spring 80 Feed Spring Hook 81 Feed Spring Pin 82 Bed or Table 83 Bed Rubbers 84 Bobbin Peg 85 Top Arm Set Screw 86 Arm of Machine 87 Top Arm Steady Pin 88 Cloth Plate 89 Cloth Plate Slide 90 Cloth Plate Screw 91 Cloth Plate Pad (leather) 92 Cloth Plate Pad Rivet 93 Spooler Thread Guide (A) 94 Spooler Thread Guide on centre of Arm 95 Thread Controller 96 Large Oil Dripper 97 Small Oil Dripper 98 Screw for ditto 99 Cloth Washer for ditto 100 Double Hemmer 101 Guide Screw 102 Quilter 104 Shuttle Turnscrew 105 Screw Driver (large) 106 Packet of Needles 107 Oil Can 108 Guide or Tucking Gauge 109 110 Tension Release Lever 111 Tension Release Lever Stud 112 Tension Release Lever Stud Washer 113 Post Block Pin for Tension Releaser
|
NEEDLES, &c.
Needles and small articles can be sent by post to all parts of the country, on receipt of Post Office Order in payment. Stamps only for small sums under five shillings.
When any NEW PARTS are required,
wherever practicable, always send the old or broken part as sample or pattern; it saves endless time and annoyance. If you cannot send the broken part, lay the part on a piece of paper and scribe round with a pencil, so that we may see exact size and shape of the article wanted.
SENDING MACHINES TO BE REPAIRED.
All Machines or parts sent for repair should have the owner's name and address attached to them, together with instructions as to the nature of the repairs required. Unless this be strictly attended to, we cannot be held responsible for the safe return of any machine.
Part Two | Part Three | Part Four
Part 2
INSTRUCTIONS FOR OPERATING THE
HAND
SEWING MACHINE
~~~~~~~~~~~~~~~~~~~~~~~~~~~~~~~~
Jones' Sewing Machine Co. Limited,
GUIDE BRIDGE,
Near Manchester.
Part Two
The following table indicates the sizes of the Threads and Needles which should be employed together: -
| Size
of Needles |
Unglace
Cotton |
Kinds
of Work |
| 0
and 1 |
80
to 100 |
Finest
Work, Muslins and Linens, Handkerchiefs, Shirts, Fronts, &c. |
| 1
and 1-1/2 |
50
to 80 |
Baby
Linen, &c., Silk and Mantle Cloths, Dressmaking and Quilting. |
| 2 |
20
to 40 |
Mantle
Cloths |
Always use SOFT COTTON in the Shuttle.
SETTING THE NEEDLE
Raise the needle-bar to its highest point; place the shank of the needle up into the hole in the lower end of the needle-bar, and fasten it firmly with the screw near lower end of the needle-bar.
Be careful that the short groove is next to the shuttle or right-hand side, and the long groove on the opposite or left-hand side.
The operator will observe a mark on the needle-bar, and when this mark is level with the top of the head of the Machine, the eye of the needle should be exactly level with the cloth-plate.
Note particularly that the needle goes down the centre of the needle-hole in the cloth-plate: if inclined on one side, spring or bend the needle until it descends in the centre of the needle-hole. This is important and will prevent breaking needles and missing stitches.
If the needle point gets blunted or turned over by striking on the shuttle or needle-plate, the Machine will miss stitches. By all means change the needle, as you cannot possibly do nice work unless the needle point is perfectly sharp.
THREADING THE MACHINE
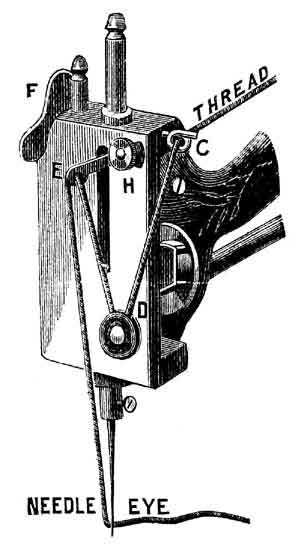
| Upon the spool pin place the spool so that it will turn perfectly free; pass the thread from the spool through the eye C at the top of the arm, then downwards under and between the tension discs as shown D, upwards through the eye of the eye of the check lever E, and lastly through the eye of the needle, the thread running from left to right.
|
 |
ADJUSTING THE NEEDLE THREAD TENSION
Be sure you lower the presser foot F before attempting to adjust the needle thread tension. The needle or top thread tension is adjusted by means of the milled head nut H. By turning the nut H towards the operator the tension is increased, and by turning the nut H away from the operator, the tension is decreased. Before commencing to sew be sure and see that the top tension is not too slack; if it is too slack, the thread will wind and tangle round the shuttle.
TO WIND THE SHUTTLE BOBBIN
|
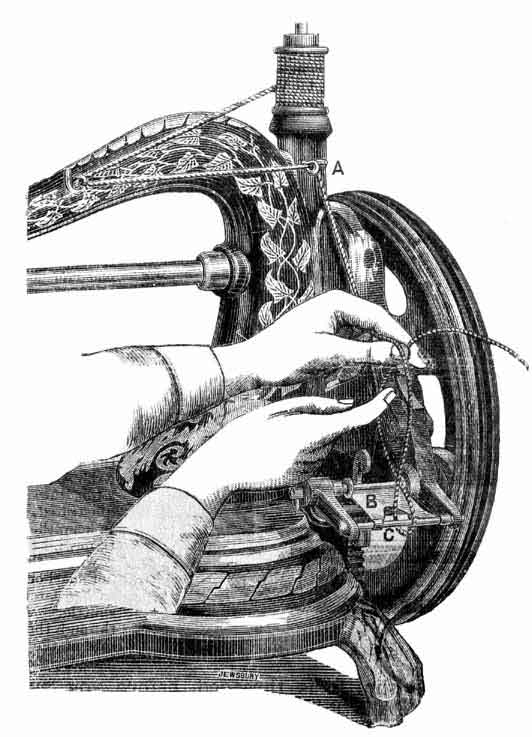
NOTE: Be sure you keep the inside of the Balance or Fly Wheel (where the leather pulley is driven from) thoroughly clean and free from oil, and the Spool Winder Spindle nicely oiled, or the Spool Winder may not wind freely.
To operate this truly valuable arrangement, first disconnect the Balance or Fly-wheel by drawing out the bolt and turning it round a quarter of a time.
The Fly-wheel will then run loose on the shaft and the machine remain stationary. After winding the Fly-wheel will again connect itself instantly by simply turning the bolt, so as to allow the spring to draw it into its place.
Be careful to fix the end of the thread between the brass end of the shuttle bobbin and the hollow cup of winder spindle. See Illustration. |
 |
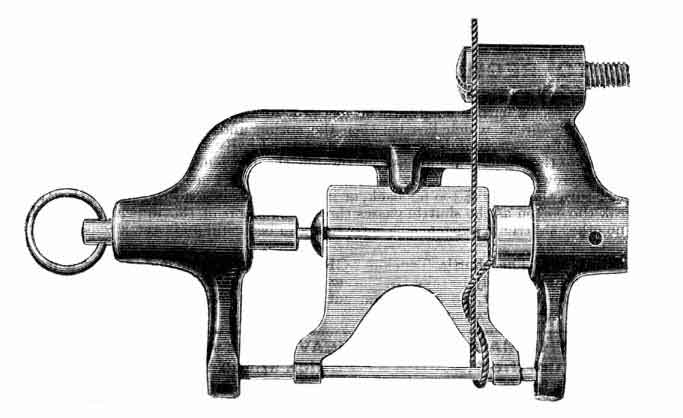
View of Spool Winder showing correct position of thread before commencing to wind.
These two Illustrations show exactly how to wind the Shuttle Bobbin.
Part One | Part Three | Part Four
Part 3
INSTRUCTIONS FOR OPERATING THE
HAND
SEWING MACHINE
~~~~~~~~~~~~~~~~~~~~~~~~~~~~~~~~
Jones' Sewing Machine Co. Limited,
GUIDE BRIDGE,
Near Manchester.
Part Three
TO THREAD THE SHUTTLE
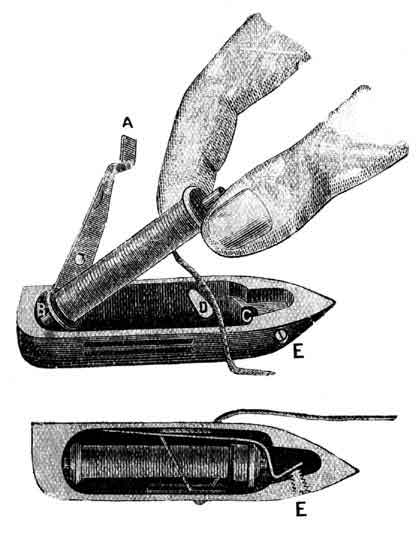
| Hold the shuttle in the left hand and raise the tension spring latch A with the first finger of the right hand. Hold the bobbin or reel so that the thread will draw off from the underside as illustrated. Now, place one end of the reel into the small hole B at the heel or back end of the shuttle, and drop the other end into the small slot C at the point of the shuttle. Pass the thread round the point or end of the bar D, be careful that the thread pulls from the bottom side of the Reel, thence through the slot in the tension spring latch A. Now drop the spring latch into the position, as illustrated; care being taken to keep the end of the thread tight whilst putting the spring down, so that the thread may not snarl or knot between the spring latch and the side of the shuttle. Pass the thread through slot F to the outer side of the shuttle and draw it under the spring.
When the shuttle is threaded, before you put it into the machine, ALWAYS PUT ONE DROP OF OIL ON THE FACE OF THE SHUTTLE. It causes the Machine to run easy and smoothly, and the shuttle will last three times as long. |
 |
TO REGULATE THE SHUTTLE TENSION
The tension may be regulated and varied to the greatest nicety by turning the Tension Screw E either backward or forward, so as to force the tension spring latch against the thread which lies between the spring and the side of the shuttle, and thereby increase or diminish the tension as desired. By turning the shuttle tension screw E to the right, you increase or tighten the tension. By turning the shuttle tension screw E to the left, you decrease or slacken the tension. Care should be taken not to turn the screw E too far back, or it will project beyond the side of shuttle, and break the cotton as the shuttle passes through the loop of the upper thread. Where is no other shuttle in existence that possesses so beautiful and even a tension.
NOTE: The shuttle Tension SCREW is split at the end, so that if it wears slack you have simply to take the Screw out of the shuttle, and insert the blade of a knife into the slot, so as to open out the Screw, and thus make it fit into the shuttle as tight as when new.
TO COMMENCE SEWING
Raise the presser foot by pulling the lifter F to the right; withdraw the slide that covers the shuttle race, and place the shuttle into the shuttle-carrier, leaving about two inches of thread stretched out behind. Then let the needle descend (putting the finger on the end of the thread). The shuttle will then pass through the loop of the needle thread, and when the needle rises it will bring the shuttle thread up with it through the needle-hole in cloth-plate. Then close the slide, place the fabric under the needle, and let the presser-foot down upon it. Be sure that the presser-foot rests upon the fabric before commencing to sew. There must be some tension upon the threads, otherwise they will know or tangle up.
THE TENSIONS
The tension should
be so regulated as to draw both threads and lock them together in the centre
of the fabric, thus:  producing
a firm, neat, and durable Lock-Stitch, which will neither rip nor ravel,
but has the same appearance on both sides of the material when sewn, if both
threads are of proper size, and have the right amount of tension upon them.
producing
a firm, neat, and durable Lock-Stitch, which will neither rip nor ravel,
but has the same appearance on both sides of the material when sewn, if both
threads are of proper size, and have the right amount of tension upon them.
If the shuttle
thread is very tight and the upper thread too loose, the under thread will
be straight, thus: 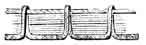 because
there is not sufficient upper tension to draw the under thread in. On the
other hand, if the shuttle thread draws off too easily, and the upper is too
tight, the under thread will be drawn up through the fabric, and the upper
thread will lie straight, thus:
while the under side may look well. The stitch should be made perfect on both
sides. It is therefore necessary to have the tension of both threads as nearly
alike as possible, and as tight as the threads will sew without breaking.
The upper tension can be increased or lessened at pleasure by turning the
tension thumb nut H; the lower tension by turning the screw in shuttle
to right or left.
because
there is not sufficient upper tension to draw the under thread in. On the
other hand, if the shuttle thread draws off too easily, and the upper is too
tight, the under thread will be drawn up through the fabric, and the upper
thread will lie straight, thus:
while the under side may look well. The stitch should be made perfect on both
sides. It is therefore necessary to have the tension of both threads as nearly
alike as possible, and as tight as the threads will sew without breaking.
The upper tension can be increased or lessened at pleasure by turning the
tension thumb nut H; the lower tension by turning the screw in shuttle
to right or left.
TO REMOVE THE WORK
Note the New Thread Releasing Arrangement, an Important Improvement in this Machine.
When removing the work from under the machine, immediately you lift the presser bar foot lifter you will find that the thread or cotton in the tension is released, and you can draw the work from under the machine easily without breaking the thread or needle. It is always necessary to leave a few inches of cotton or thread when you cut off the work.
TO REGULATE THE LENGTH OF STITCH
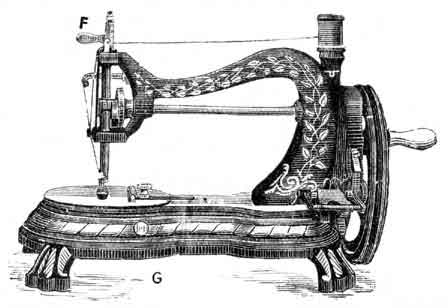 |
By turning the thumb screw G to the left hand, the stitch will be lengthened. By turning the thumb screw G to the right hand, the stitch will be shortened. NOTE: - Be careful not to turn the thumb screw G too much to the right hand, or you will stop the feed from acting and carrying the work forward. |
MISSED STITCHES
Are caused by the needle being too high or too low, or the cotton being too fine for the needle, or the needle point being blunt or damaged.
If the thread is improperly twisted, it may throw the loop towards one side, instead of square into the shuttle race. In that case the needle should be slightly turned in an opposite direction, to counteract this tendency to throw the loop away from its proper position.
When using very fine needles, and also when stitching heavy work, be sure that the point of the needle is perfect, sharp, and not blunted or turned over.
It is important the needle point is SHARP.
An imperfect needle may cause the best Machine to miss stitches.
BREAKING OF THREAD OR COTTON
Is caused by the needle being put into the Machine with the short groove on the wrong side:
Or if the needle is set too high or too low;
Or by the tension being too tight;
Or by the thread being too large for needle eye;
Or if the needle eye be rough or sharp.
Be sure that the hole in the needle plate is not rough or damaged but perfectly smooth.
If the hole in the needle plate is rough, it is sure to cause the Machine to cut and break the thread.
Part One | Part Two | Part Four
Part 4
INSTRUCTIONS FOR OPERATING THE
HAND
SEWING MACHINE
~~~~~~~~~~~~~~~~~~~~~~~~~~~~~~~~
Jones' Sewing Machine Co. Limited,
GUIDE BRIDGE,
Near Manchester.
Part Four
ACCESSORIES GIVEN WITH EACH MACHINE
| 1 BRAIDER 1 DOUBLE HEMMER for narrow and wide hems. 1 QUILTER 1 STRAIGHT GUIDE 1 SCREW for STRAIGHT GUIDE |
4 SHUTTLE BOBBINS 4 NEEDLES 1 LARGE SCREW DRIVER 1 SMALL SCREW DRIVER 1 OIL CAN FILLED WITH OIL 1 BOOK OF INSTRUCTIONS |
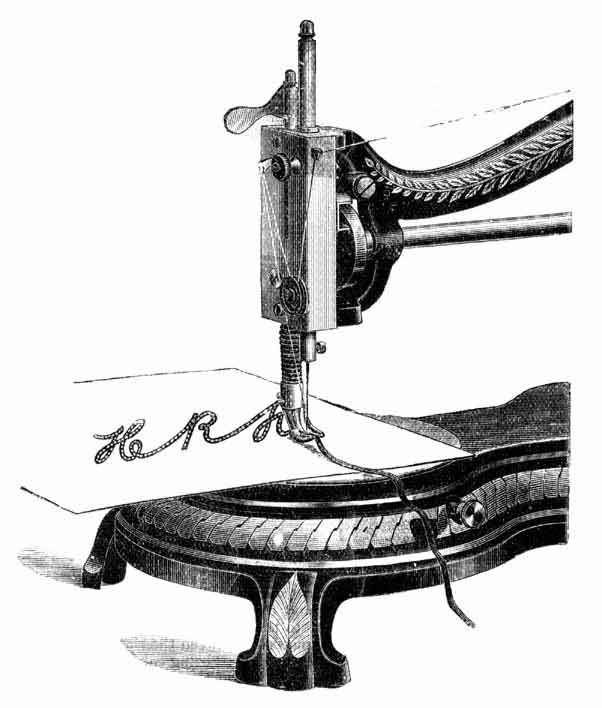
THE BRAIDER
Thread the braid through the braid hole in presser-foot, in front of needle, passing it out under the needle as above. Thus any design of plain or ornamental braiding may be wrought with the braid without trouble or difficulty.
The braid may be passed very easily through the hole in presser foot, by first doubling a piece of cotton, and pass it through the hole, and put the end of braid into it so that you may draw the braid through the hole in foot at once.
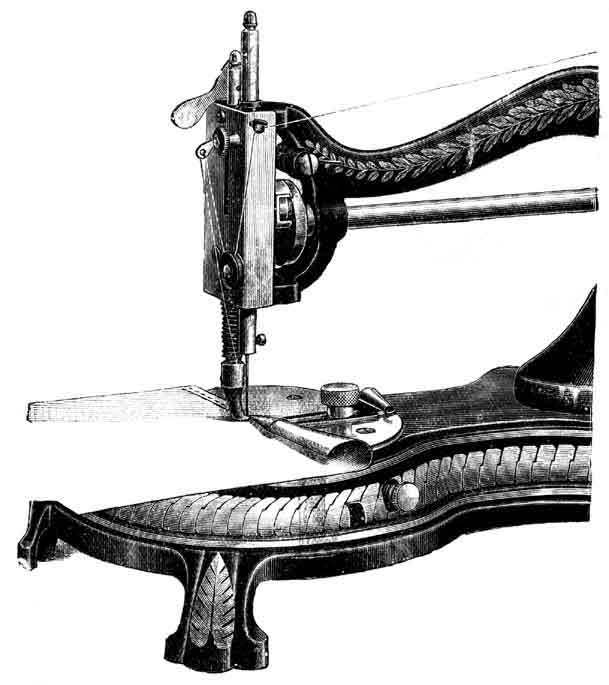
THE HEMMER
Secure Hemmer firmly to the Cloth Plate, with the Thumb Screw, as per illustration. Raise the needle and presser foot, and turn the edge of the cloth, as shown; put it into the hemmer, and draw it along to the needle; lower the presser-foot and commence to sew. Hold the edge of the material between the right-hand thumb and finger, and allow it to curl into the hemmer as shown, being careful not to more than half fill the large end of hemmer, or it will pass out at the small end near the needle.
TO GATHER
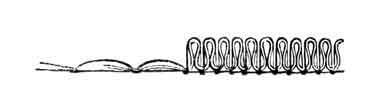
To Gather, make a long stitch with loose tension, so that the lower thread will not be drawn into the fabric, but be upon the lower surface. Gather by drawing up this lower thread, which should be a size coarser than the upper thread.
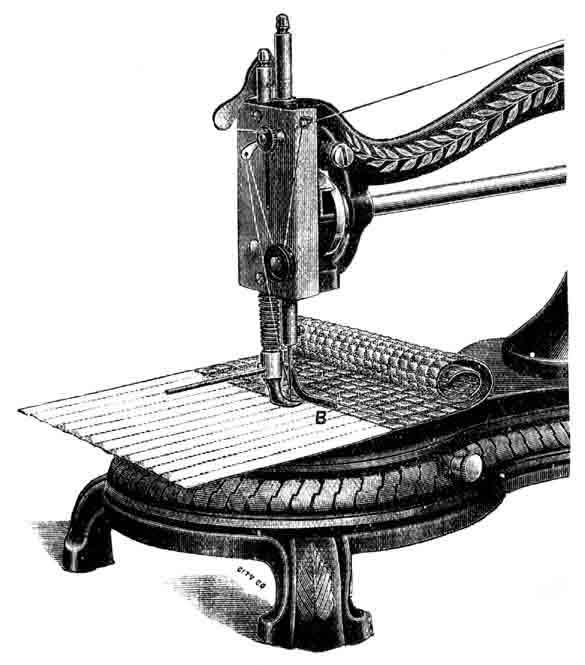
THE QUILTER
This admirable little appliance enables the operator to get a greater bulk of material through the machine, which could not possibly be attained by any other method. It is also more easily attached, and possesses the important advantages that it will not move from its position whilst at work, and the operator can put in and take out the work with the greatest ease.
This Quilting Gauge is simply placed into hole in the presser-bar as illustrated, and secured by the small screw shown. It may be adjusted to any required size of square or diamond, care being taken that the guide B is nearly resting on the work, and set at a proper distance from the needle.
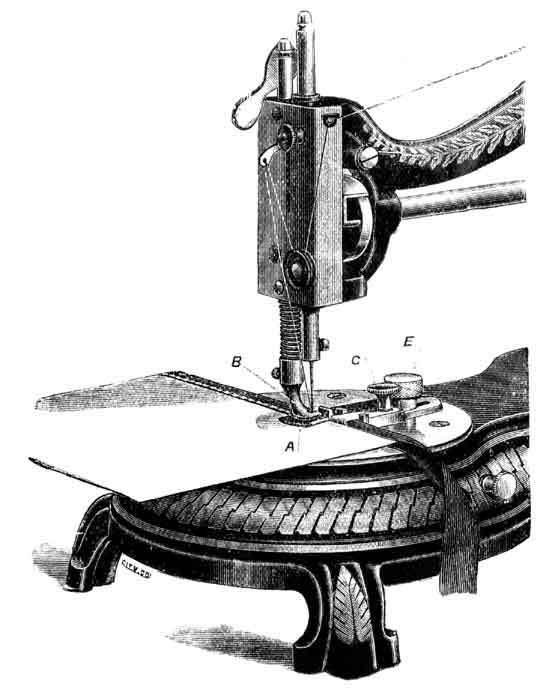
THE BINDER, extra
Raise the Presser-foot and secure the Binder firmly to the Cloth Plate by Thumb Screw E, as per illustration, with the spring A to work under the presser foot B. Adjust the two plates to width of binding by screw C; curl the binding into the clips on the end of plates. Seeing that it will pass through freely, insert the edge of the material to be bound between the clips, with the end directly under the needle; lower the presser-foot and commence to work.
If the needle misses sewing the binding on the top side, bring forward plate by screw C, and same with bottom plate if it misses on the underside.
If it misses on both sides, bring the binder forward altogether by thumb-screw E, taking care that the needle will pass freely through the slot in spring A under the presser-foot.
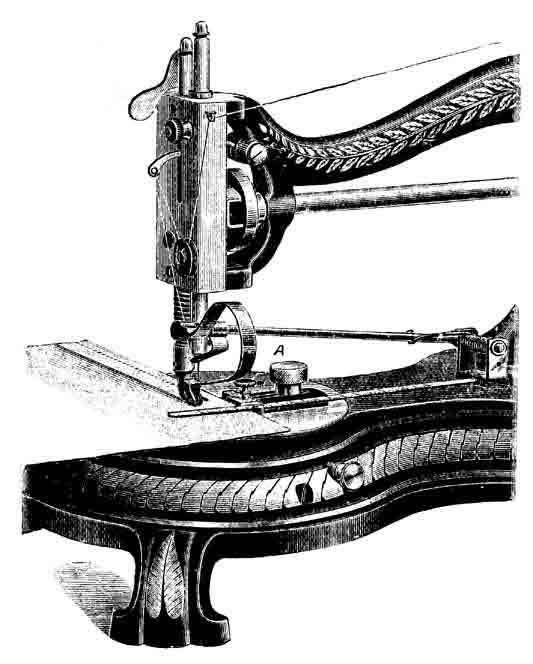
TUCK CREASER, extra
Secure the Tuck creaser in a similar manner to the Binder, hook the small plate that slides on the long wire round the needle, and the guide A fixed to the distance required for the tuck. Proceed as in sewing; one tuck will then be sewn, and the distance for the next creased by the hooked part of the spring striking on raised edge. Remove the work and fold it in the crease. Place the folded edge against guide at A, and proceed to sew. Thus each tuck will be exact without any time or trouble being spent in measuring and adjusting material.
________________________________________________________________________________________________________________________
IF THE MACHINE RUNS HEAVY, OIL IT WELL WITH PARAFFIN OIL, run the Machine at a quick speed for a few minutes, then clean the Paraffin Oil off, and oil the Machine well with GOOD SPERM OIL.
Part One | Part Two | Part Three