All 4 available source parts are included below.
Part 1
THE NEEDLEBAR Archive at ISMACS International
Online Manuals Section
INSTRUCTIONS
for the use of the
NAUMANN
Sewing Machines
SEIDEL & NAUMANN
23 MOOR LANE, FORE STREET
LONDON E.C.
(Part One)
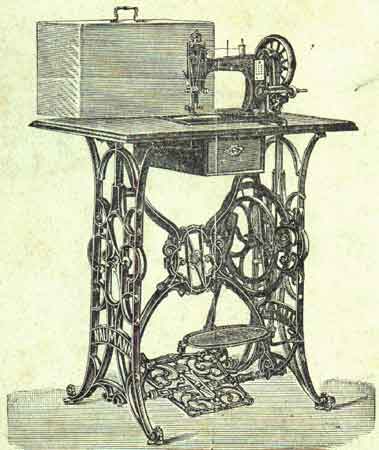
To erect the machine with our new stand as per illustration on the wrapper.
If the machine has come to you packed in a case unmounted, proceed as follows: -- Take the cross-brace and pass the 2 thinnest bolts through the holes beneath, in order to place the treadle bet- ween these bolts. If the treadle works easily fasten the bolts with the two square screws. Take the 2 legs -- gilt sides outwards -- and fix them to the cross-bar on the right and left side by means of 4 conical bolts, passing them through the 2 hind upper holes and the 2 under holes of the legs in front and through the 4 holes of tbe cross-brace; then fasten the 4 bolts by means of the nuts.
In order to put the wheel in its position, fix the crank in the hub of the wheel by means of a square screw. loosen the bolt, in the middle of the cross-brace and put the pointed axle of the whee1 into the middle of the right leg. Fee that the wheel moves easily and fasten the said bolt by means of the square screw. See that the wooden rod is plumb. Put the table loose on the stand and fasten the head of the machine to the table by its hinges. Adjust the table nicely, so that the belt will run clear. through the holes, and try it. Then screw the table from below to the. stand. Oil carefully, drive very fast aud see that everything runs easily.
M A N A G E M E N T
OF THE "NAUMANN" MACHINE
~~~~~~~~~~~~~~~~~~~~~~~~~~
TO ERECT THE MACHINE
. If the Machine has come to you packed in a case, stand unmounted, proceed as fellows: -- Take the treadle-rod and pass one and through the hole in the right leg and the other end through the left of the stand. Keep the gilt sides of the legs outwards. Screw the nuts on loosely. Put the cross brace in position as shown in the engraving, leaving the right side loose, so that you may fit the wheel in its place. To do this, you must first insert the pointed screw through the right leg, firmly fixing it with the nut outside. Then screw all the bolts tight. Screw the wooden pitman to the wheel and to the treadle, but not so tight as to make it run heavily. Fix the treadle with the conical nuts so that while it works easily it cannot shake about. See that the wooden rod is plumb. Put the table loose on the stand and fasten the head of the machine to the table by its hinges. Adjust the table nicely so that the belt will run clear through the holes, and try it. Then screw the table from below to the stand. Oil carefully, drive very fast and see that everything runs easily.
EVERY "Naumann" Machine, before leaving the Factory, is carefully tested. It will stitch with No. 300 cotton, or with coarse 9-cord thread, and is competent to perform all the kinds of work set forth in our circulars. As an evidence of this it is send out threaded, and with a piece of work under the needle.
Examine the threading of machine and shuttle carefully, which is clearly shown in our illustrations.
To put the Machine in Gear for Working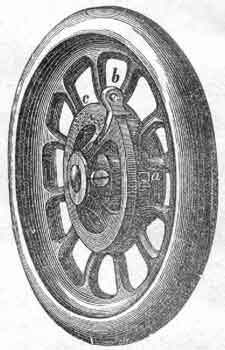
THE upper fly-wheel of every machine is disconnected before it leaves our Depot, so that no harm can happen to it in transit. Turn the steel connector "b" on the outside of the upper wheel inwards.
To put it out of gear turn the connector outwards.
To operate the Patent Rollers
TILT the machine from you, when the rollers will drop to the floor for use. Raise the light end of the machine and run it where you like. When about to sew, the machine will rest firm, which will be a great advantage to you.
To oil the Machine
THIS most important duty ought to be closely attended to. Neglect will bring trouble and dissatisfaction and we will not be held responsible for the consequences. You should only use best quality Sewing-machine Oil, which is always obtainable at our agencies. Never (except for cleaning as explained on next page and then only moderately and for a few minutes) use kerosene, petroleum or paraffin, which corrode the works. Salad-oil, olive, castor or any other coarse oil, are certain to clog the machine, cause it to run heavily and in the end stops it altogether.
Look into the openings on the outside of' the upper wheel. You will see a red line, indicating in oil-hole. Into this and into all others holes painted red pour a few drops of oil. On the top of the arm are two oil-holes No. 4 to the right and No. R to the left- Push the silvered plate No. 5 in front arm near the fly wheel to the left; you will then see the cog-wheels, which oil, and also the shaft which bears them. Put oil upon all parts of the machine subject to constant friction for instance the needle-bar 45, the presser bar 8, through the hole in the face plate.
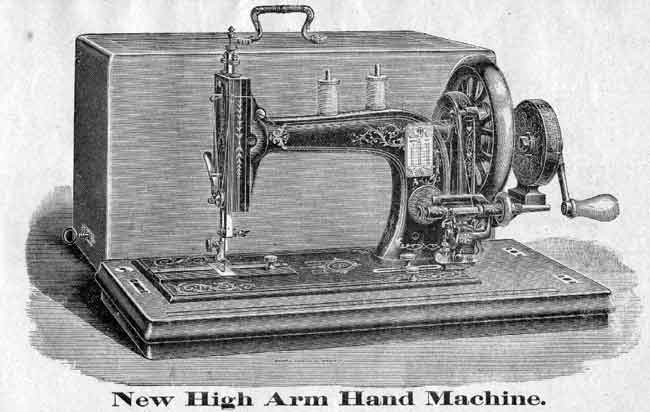
Should the machine be supplied with a hand appliance put some drops of oil in the 2 holes in the frame and also in the crank.
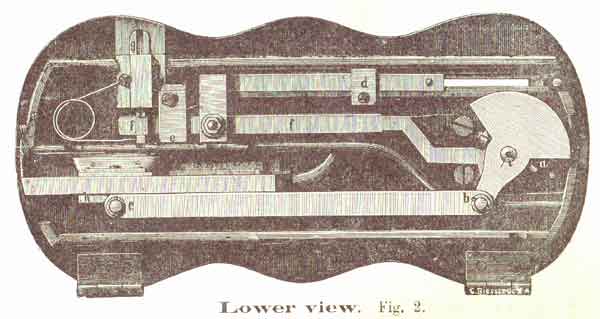
Now throw off the belt, turn up the head of the machine (refer to fig. 2 on the inside back cover) and oil all moving parts carefully, turning the wheel slowly that you may see them. Do not forget to look behind the revolving eccentric on the right a. Oil this. Also both ends of the long rod b and c, the slide of the shuttle carrier h and the part that moves the feeder g.
Oil all the bearings of the stand carefully and when taking off the belt of the wheel, see that it runs easily.
The machine will need cleaning from time to time, especially if only occasionally used. To do this pour kerosene or petroleum upon all the moving parts and drive very fast for a minute only. Then thoroughly wipe off the dirty kerosene or petroleum. Then oil throughout as above directed.
It is a simple plan and. a good one to keep a soft rag for the purpose of cleaning the wearing parts every Ray (if used constantly) before commencing work. Then oil the machine as directed, using only a few drops in each place. This will only take but a few moments which are well repaid.
If the machine runs stiffly he sure it is your own fault. It is either dirty, or you have not oiled some part.
The Treadle Motion
IF the operator is unused to sewing machines she should first become familiar with the treadle motion. Place the feet in an easy position on the treadle, so that the hollow of the foot may rest directly over the treadle rod. Start the wheel with the right hand by turning it towards you, then by giving the ankle an easy, rocking motion, regularity and evenness will be obtainable to the operator's best advantage.
Important Advice
IN the event of any breakage or disarrangement by accident, which seldom happens, please send the machine to one of our nearest agencies where the matter will be put right and with fair usage the machine will last your lifetime.
Do not allow any person to interfere with the mechanism in any way. Do not alter the main screws or the adjustment. Do not allow any clever friend to file, or mark or to tinker any part of the machine. We have often heard a customer saying:,I took my machine all to pieces and put it together again." Nothing is so bad. Let well alone.
~~~~~~~~~~~~~~~~~~~~~~~~~~~~~~~~
Setting the Needle
LOOSEN the screw 28 on the needle-clamp, first moving the needle- bar to, its highest point. Put the butt end of the needle in the clamp, keeping the side with the long groove towards you. Lower the needle-bar until the gauge-mark (a graven line) on the upper part of the bar is exactly level with the top of the machine. Then see that the eye of the needle comes exactly level with the needle-plate. Screw the needle-clamp tight. It will however be found that the needles supplied with the family machine are self setting and. invariably require to be simply pushed as high as they will go when they will be found in the right position without reference to the graven line aforesaid. See that the needle moves precisely in the centre of the hole in the needle-plate, If the needle be slightly bent, spring it with the finger until it be quite straight. If you neglect to set the needle properly you will break the thread or miss stitches.
Size of Needle and Thread
WITH the "Naumann" Machines you do not require so coarse a thread as in hand-sewing, every stitch being double, and, moreover, locked. Be careful and see that you have the needle adjusted to a given size for the thread to pass through viz.
For 200 to 150 Cotton use No. 9 (or 00) Needle
For 150 to 100 Cotton use No.10 (or 0) Needle
For 100 to 80 Cotton use No.11 (or 1) Needle
For 80 to 60 Cotton use No.12 (or 2) Needle
For 60 to 40 Cotton use No.18 (or 8) Needle
For 40 to 80 Cotton use No.14 (or 4) Needle
For 80 to 20 Cotton use No.15 (or 5) Needle
Part Two | Part Three | Part Four
|
Part 2
THE NEEDLEBAR Archive at ISMACS International
Online Manuals Section
INSTRUCTIONS
for the use of the
NAUMANN
Sewing Machines
(Part Two)
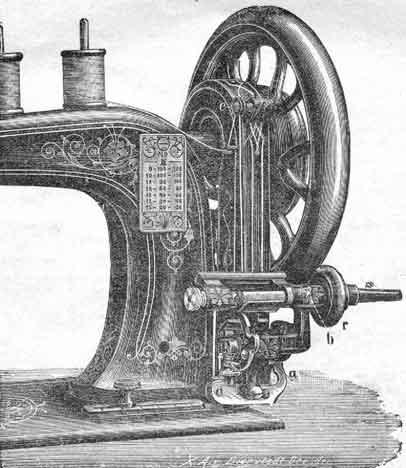
PATENT AUTOMATIC DOUBLE ACTION BOBBIN-WINDER
. HAVING placed the reel on one of the spindles, on the top of the arm of the machine, pass the cotton upwards through the wire eyelet (by simply slipping it into it from the back) then over and between the tension discs (c), down towards the winder from behind and under its shoulder-bar towards yourself. Then, take the bobbin in your right hand, and having threaded the cotton through the little hole in one of its brass ends, place the bobbin in the winder by fitting the little hole through which you have just passed the cotton into the corresponding pin in the right-hand socket of the winder; then place the other side of the bobbin in its position into the left- hand socket, to do which you require to draw out the left-hand piston-button, until you can drop the bobbin into both its sockets.
Having now the bobbin properly threaded and in its proper position, press the little lever (a) under the thread pressure-plate, which will cause the latter to spring flat against the bobbin; a second pressure against "b" will bring the India rubber ring in contact with the fly wheel. Disconnect the fly wheel and put it in motion and the bobbin will begin to fill and will throw itself out of action when full. Should the winder be thrown out of action before the bobbin is full enough, or only when the bobbin is too full, the defect either way can be regulated by means of the screw f on the lever d. It is advisable to regulate the screw f so, that the bobbin is not allowed to wind too full, otherwise it is apt to jam in the shuttle. Should the bobbin be only required to be partly fi11ed, the winder can be thrown out of action by simply pressing on the little lever (d) at the bottom of the left-hand side. Should the India- rubber wheel touch the fly wheel too firmly or not firm enough, the slightest turn of the screw e under the winder and facing the operator, will regulate a proper tension between the two wheels.
~~~~~~~~~~~~~~~~~~~~~~~~~~~~~~
DIRECTIONS
FOR
THREADING THE SHUTTLE WITH THE NEW STYLE
OUTSIDE SPRING
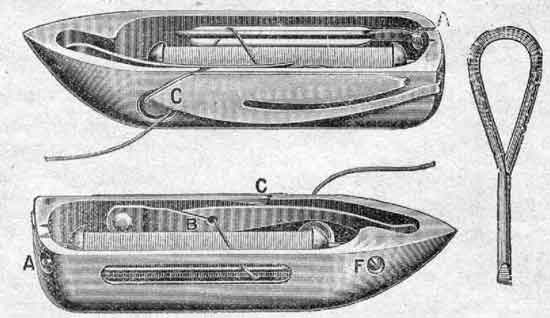
Hold the shuttle in the left hand, point towards yourself, and the bobbin in the right. Place one end of bobbin in the centre piston in point of shuttle, pressing bobbin down into the hole on the other end until it makes a slight, click".
The cotton must come from under the bobbin on the bar-side of shuttle.
Now proceed to thread the shuttle as illustrated above. Take the cotton and pass the same round circle A in end of shuttle, after which it will be seen to be round the bar; next take cotton across shuttle, pass it through groove into the hole B, and then by drawing cotton gently towards point of shuttle, it will pass under the spring to point C, as shewn in the illustration above, when it is ready for use.
By drawing cotton to the right after it is threaded, i.e., away from the point, the tension of the shuttle can be tested -- whether too tight or vice versa. A small screw-driver is supplied with the shuttle for the purpose of regulating the tension by the screw F; by turning screw to the right the tension is tightened, and to the left, the tension is loosened.
Care should be taken to oil both ends of the bobbin when it is fixed in the shuttle ready for work, in order that the same revolves freely.
~~~~~~~~~~~~~~~~~~~~~~~~~~~~~~~~~~~~
The Patent Self-Acting Bobbin-Winder
as fitted to the
Hand-Machine
"SAXONIA REGIA"
BEFORE you begin to spool throw the fly wheel out of gear by pushing the connector (47) away from you as far as it will go.
Then pass the cotton into the right hand slot (b) of the thread guide round and between the discs into the left hand slot (a) down towards and under the steel bar (c) to the bobbin; thread up the bobbin and put it so threaded in position precisely as described. (in this book) for the other winder. To put the winder in gear, press the shoulder bar (h) against the arm of the machine when the little cog wheel attached to the spooler on the right will grip the cogs of the fly wheel. To disconnect the spooler simply press on the flat button (e)
The screw f serves to regulate the position of the winder cog in connection with the fly wheel cog; if they do not meet sufficiently near to each other turn the screw f to the left, if they are too close turn the screw f to the right. The screw g simply serves to steady the regulation arrived at by the screw f and should always be screwed firmly against the rim of the bed plate.
Commencing to Sew
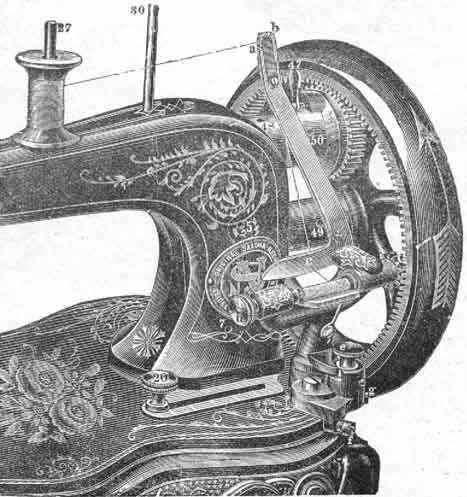
PLACE the material under the presser-foot (18), lower the presser- bar with the aid of handle 15, drive the machine fast or slow, as you may desire, but at a regular and even pace. If you want extra pressure for thick material, screw the nut on the top 18 of the presser-bar downwards. If you want less pressure for fine and delicate materials, screw the nut upwards. Do not pull or push the work through the machine; you will break needles and make bad work by doing so. The machine will feed quite regularly by itself. ln crossing thick places, or in seams, go slower, and if necessary, when a great thickness occurs, raise the presser-foot slightly.
To take out the Material
RAISE the needle-bar to its highest point aud then the presser-foot by means of the lifter (15). Draw the work out from you to the left and cut the threads leaving about three inches in order to be long enough to start afresh.
The Tension
TO adjust the upper tension turn the little thumb-screw No. 16 on the top of the machine slightly to the right to tighten the tension, and to the left to loosen it. The stitch is most perfect when it appears alike on both sides. If the thread forms loops underneath the fabric the upper tension is too loose. The "Naumann" machine is so designed that very little alteration of tension is needed. Fix it right once, and then you may mostly let it alone.
The Stitch Regulator
is the thumb screw 20 on the right of the machine. To lengthen the stitch loosen the screw and slide it to the right; to shorten it, slide the screw to the left. When adjusted always re-tighten the screw.
~~~~~~~~~~~~~~~~~~~~~~~~~~~~~~~~~
THE SLACK-THREAD-PIN (12) presses down the check-lever (6). It is adjusted properly for all classes of general sewing, and should never he altered unless the thread breaks in sewing very thick cloth; then loosen the screw (12) and adjust the slack-thread-pin a bit lower but very little. Should it become displaced, re-adjust it, according to the following rule: -- It should begin to press down the check-lever when the needle-gauge mark is fully one eighth of an inch above the top of the arm.
THE CHECK- SPRING (2) draws up check- lever (6). Should it break or wear out, insert another as follows; let the needle - bar (45) rest when the gaugemark is level with the top of the arm, take out the screw that holds the spring, draw the check lever out half way, holding it while you put in the spring with its hook end downward, then move the check-lever back into its place. Replace the screw, by turning it a few times only, press down the end of the spring into the first hole (or into the second or third hole, if using coarse thread) and tighten the screw.
THE LEATHER BAND must be tight enough to work the machine without slipping. If it is too loose, cut about half an inch from one end and refasten is as before with the strap hook.
IF THE NEEDLE-THREAD BREAKS when the needle is adjusted properly, it is caused by the tension being too tight, the eye of the needle being too small, the slack-thread-pin becoming displaced (see Note above), a roughness on the shuttle or its carrier, or sometimes, when using coarse silk, by the point of the needle being bent. The stitch plate is also sometimes the cause of its breaking, if not rightly screwed up; the needle has to move freely in the centre of the needlehole and not to touch the shuttle.
IF THE SHUTTLE-THREAD BREAKS, loosen the tension by the screw in the hole F. (See page 6 "Threading the Shuttle")
IF THERE ARE MISSED STITCHES, they are caused by the needle being adjusted too high or too low, by it being bent away from the shuttle, it being too small for the thread or by the point of the shuttle having become blunt, if the machine is dirty and not well oiled so that is has not a regular motion, if the long groove of the needle is not exactly' placed towards the operator or even stands towards the shuttle.
IF THE NEEDLE-THREAD FORMS SMALL LOOPS on the top of the fabric, it is caused by the check-spring (2) having become broken (see page 8:, The Check-Spring"), and sometimes, when sewing whit coarse silk or linen thread, by the needle being too fine or its point being bent.
IF THE STITCHES VARY IN LENGTH while hemming or sewing very thick and soft fabrics, loosen the feed raising cam (e) and move it a little to the right to raise the feed-points, then tighten it firmly', do not raise the feed-points too high: when they drop down in working, they should be a little below the surface of the needle-plate.
SEAMS IN HARD COTTON FABRICS should be passed over slowly, and, if extra thick, rub a little white soap on them, which will facilitate the passage of the needle.
~~~~~~~~~~~~~~~~~~~~~~~~~~~
Accessories
Given with each family Machine;
| 1) 12 assorted needles, | 11) 1 ruffler, |
| 2) 6 shuttle bobbins, | 12) 1 ordinary sewing foot, |
| 3) 1 straight guide with screw, | 18) 1 adjustable binder, |
| 4) 1 adjustable hemmer, | 14) 1 small forked guide, |
| 5) 1 foot hemmer, | 15) 1 quilter, |
| 6) 1 narrow foot hemmer, | 16) 1 extra check-spring, |
| 7) 1 feller, | 17) 1 extra - needle - plate with large hole, |
| 8) 1 adjustable corder, | 18) 1 screwdriver, |
| 9) 1 big corder, | 19) 1 oiler, |
| 10) 1 adjustable braider, | 20) 1 book of instructions. |
THE High Arm Family Machines (Hand or Treadle) if provided with the Darning and Embroidery Apparatus are also furnished with:
1 pair of darning rings,
1 darning foot,
1 extra thick needle plate.
~~~~~~~~~~~~~~~~~~~~~~~~~~~~~~~~~~
The machines for manufacturing purposes are only provided with the necessary accessories.
Part One | Part Three | Part Four
|
Part 3
THE NEEDLEBAR Archive at ISMACS International
Online Manuals Section
INSTRUCTIONS
for the use of the
NAUMANN
Sewing Machines
(Part Three)
 USES
OF THE APPLIANCES
USES
OF THE APPLIANCES
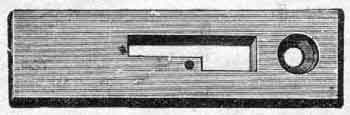
THE EXTRA NEEDLE- PLATE, which
has a larger hole, is only required when using a No. 14 or ] 5 needle with 20
to 40 linen thread: never use it for any other numbers.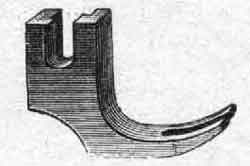
THE NEW EDGE-SEWER (small forked guide). FOR stitching close to an edge or to a cord or to any thickness in the work, which could not easily be done with the plain-sewing foot.
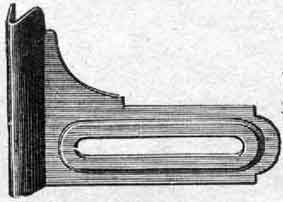 THE
STRAIGHT GUIDE. THIS simple appliance is fastened by the thumb-screw
to the bed-plate of the machine and serves to guide seams, very broad hems,
tucks, or other folds in a straight line.
THE
STRAIGHT GUIDE. THIS simple appliance is fastened by the thumb-screw
to the bed-plate of the machine and serves to guide seams, very broad hems,
tucks, or other folds in a straight line.
THREADING THE MACHINE
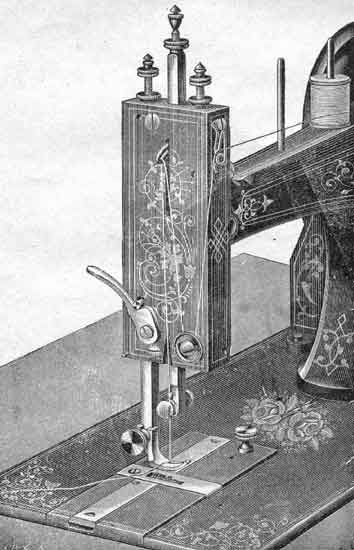
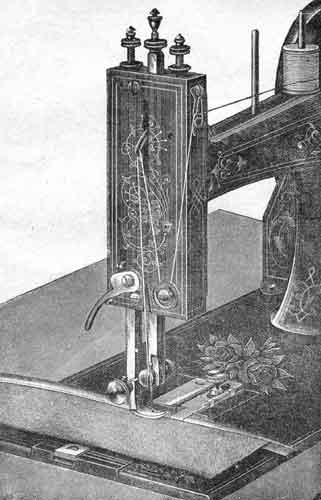
THE engraving clearly shows the threading of the needle. Having threaded the shuttle as shown on page 6, place it in its carrier with the point towards the needle. Hold the needle thread by the end, slack, turn the upper fly-wheel round once, towards you, and then draw the shuttle thread. upwards in a loop. Push both threads backwards, ready for sewing.
THE "NAUMANN" NARROW HEMMER
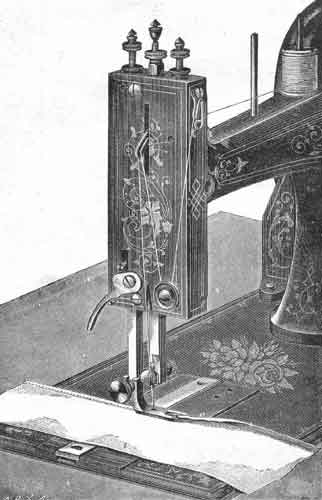
is the foot containing a little twisted steel spring. Turn down a couple of inches of the material as in hemming by hand. Insert enough of the folded part in the hemmer for the machine to feed. Keep the hemmer just full by turning the material over in the right, neither too much or too little of the material being supplied.
THE "NAUMANN" FELLER -- SINGLE SEAM
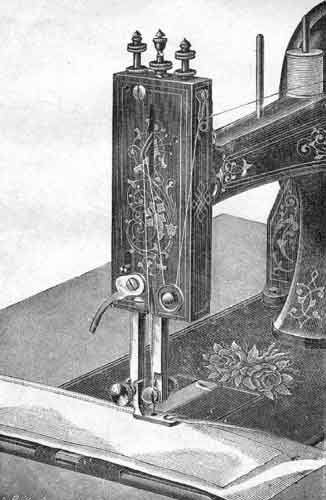
USE the foot as shown above, which is without the little steel spring. Place the two pieces of stuff (as in hemming) with the edge of the under one projecting about a quarter of an inch, and proceed as indicated by the engraving.
THE "NAUMANN" FELLER -- DOUBLE SEAM
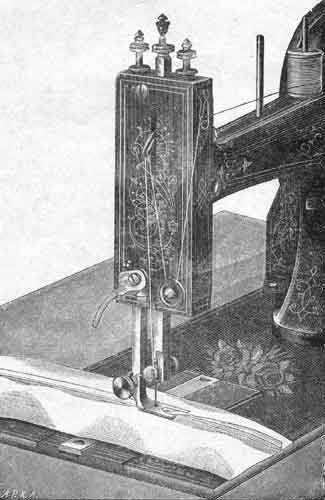
TO make the double seam, straighten out the work and insert, the fold in the same foot (see previous page) when it will stitch with perfect ease. This is a most useful appliance, and is a special feature of the "NAUMANN" machines.
THE "NAUMANN" RUFFLER OR FRILLER
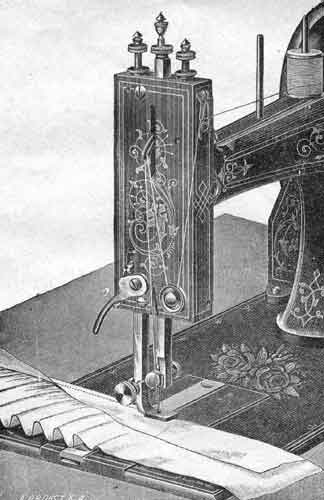
PLACE the material to be gathered underneath the presser-foot, and put the band between the two plates of the foot as engraved. A little practice will make perfect in its use. The larger the stitches and the tighter the tension the fuller will be the folds.
THE "NAUMANN" NEW QUILTING GUIDE
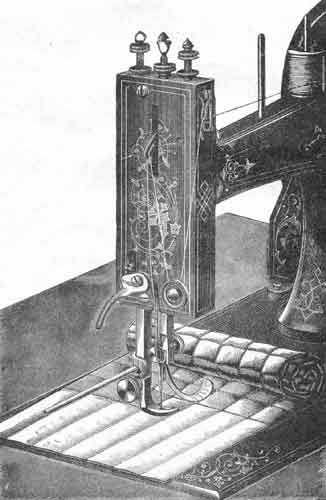
Loosen the small screw at the back of holder and place round presser-bar so that the holes exactly meet the hole in presser-bar, pass the straight end of guide through the holes -- move the the right or left according to the distance required between the rows of stitching and fix the guide firmly by tightening the screw.
Stitch the first row perfectly straight to begin with, then guide the next row by the first as shewn on the engraving. Adjust the upper tension rather loosely until you get the work flat below and puffy above -- by so doing you do not need to use silk in the shuttle, a middle size stitch is the best.
Part One | Part Two | Part Four
|
Part 4
THE NEEDLEBAR Archive at ISMACS International
Online Manuals Section
INSTRUCTIONS
for the use of the
NAUMANN
Sewing Machines
(Part Four)
THE "NAUMANN" CORDER
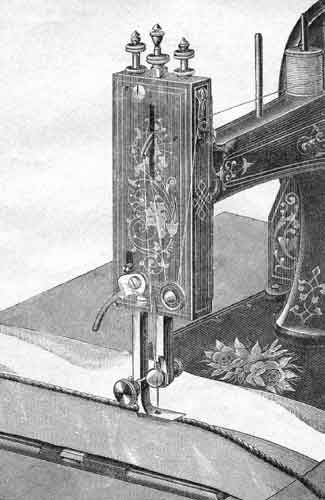
SEW the dress material together with the lining by means of a simple seam,' spread the two materials with the right side up. Put the cord under the groove of the presser exactly on the seam between the dress materials and. lining and sew it with rather long stitches. By sewing down the lining the cord will be on the lower edge of the dress,
THE "NAUMANN" PATENT ADJUSTABLE PARALLEL CORDER
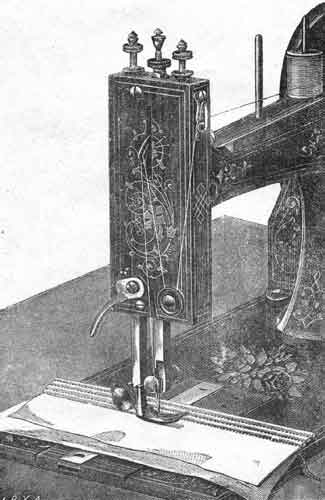
PLACE the first cord between the folds of the cloth. Put it under the presser-foot with the cord in the adjusted space, and take care to keep it straight. The machine will stitch it beautifully parallel if only you keep the cord to be sewn in tight up to the last one. This may be best done with the blunt point of a pair of scissors, or blunt pen knife, which will not soil the work. Used for hoods, children's stays, cuffs, collars, ladies underclothing.
THE "NAUMANN" ADJUSTABLE HEMMER
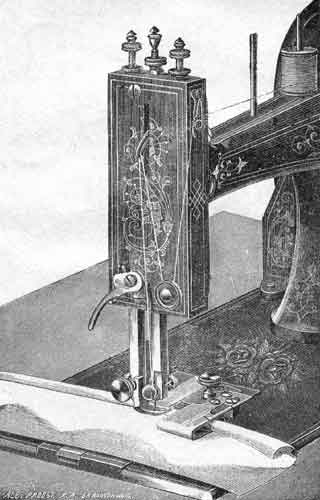
FOLD the material for a couple of inches, as in hemming by hand. Slacken the moveable screw of the hemmer and adjust it to the width of the hem you desire. Tighten the moveable screw. Insert the cloth and slide it backwards and forwards to fill the hemmer and press down the hem. Set the appliance so that the stitches shall rome close to the edge of the hem. Hold the work with the right hand, an<1 keep the hemmer just full neither more nor less.
THE "NAUMANN" ADJUSTABLE BRAIDER
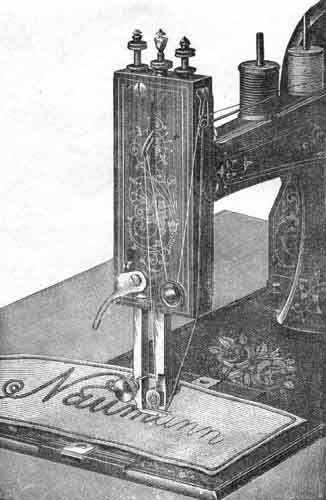
WIND the braid on a reel as shown, or allow the hall of braid to rest in the lap. In turning corners allow the point of the needle to hald the braid. By having a light pressure on the presser-foot the material may be turned gently round without raising the presser-foot. By so working neater corners are made. Have a middle-sized stitch, neither too small nor too large.
THE "NAUMANN" ADJUSTABLE BINDER
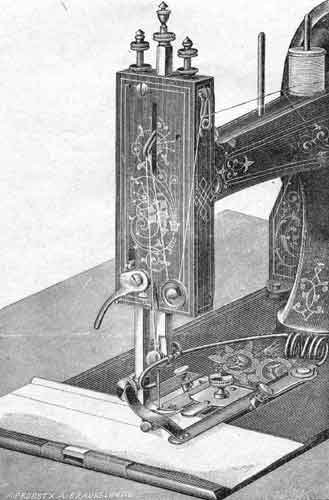
MOST useful for binding anything with braid or ribbon. Fasten the binder to the bedplate of the machine so that its two tongues come even with the point of the needle. Take the binding and pass one edge into the upper tongue and the other into the lower, and place the material to be bound between the two. Draw it about half an inch under the presser-foot so as to give the needle and feed a fair chance of starting the work. Lower the presser-foot and commence to sew. If wide binding is required, move the inside piece of the binder to the right, if narrow, to the left.
THE TUCK MARKER OR CREASER
FIX the appliance (as here shown) with the needle passed through the wire loop. Set the gauge to the width of tuck desired. Fold the cloth for the first tuck and place it in position as engraved, As the machine stitches, the creaser marks the place for the next tuck. Fold the material at that crease and proceed as at first. Our new Tuckmarker, just introduced, has a roller creaser. For very small tucks, close together, the straight-guide only is required, for which see page 10. Price extra 5 shillings.
 INSTRUCTIONS
FOR THE USE OF THE PATENTED
DARNER AND EMBROIDERER
SUPPLIED WITH THE
Naumann High Arm Family Machine
PRICE EXTRA 5/-
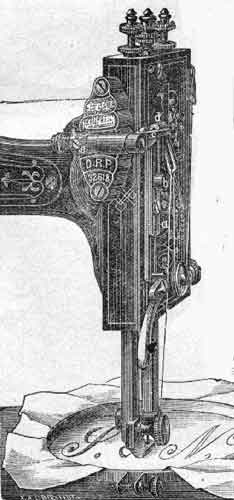
REM0VE the ordinary presser foot, also the ordinary needle plate and replace them with the darning presser foot and the darning needle plate (the latter is simply thicker for the purpose of protecting the feed teeth), Place the material to be darned under the presser foot, lower the same, and bring the needle. bar to its lowest position. Loosen the screw b, press the top d of the bar a down towards the lever c but so that they do not quite touch and tighten again screw b. The stitch regulator is to be fixed for the smallest stitch. The object of the bar b is to regulate the apparatus to every thickness of material. The tension, both of shuttle and top cotton, is to be a light one. Stretch the material to be darned between the two darning rings as tightly and smoothly as possible and so that the hole to be darned is in the centre of the ring. Now begin the darning simply by moving the ring slowly backwards and forwards (of course working the machine all the while) so as to produce rows or strings of stitches lying together as closely as possible, until they cover the hole to be darned; that d.one, turn the ring to the right or to the left, and begin sewing in the same manner, moving the ring backwards and forwards to produce again anti cross- ways close rows of stitches.
The whole operation will be found most simple and easy, though it will take just a few trials to get into the habit of moving the materials to and fro, and always getting one row of stitches close to the previous one.
Note. It will however be found much easier to place over the hole to be darned a piece of fine muslin.
In this case you will only require to cross the darn once, and be most particular to keep each row of stitching as close as possible to the previous row. This operation not only saves half the work but also produces a neater darn.
When embroidering, the design to be embroidered has to be traced on the material which is to be stretched tightly and smoothly in the rings. The ring is then moved same as when darning backwards and forwards.
The parts which move the lever e should be well oiled, also the interior parts through the hole on the top.
To detach the apparatus move the lever c to the left away from the bar a.