All 4 available source parts are included below.
Part 1
THE NEEDLEBAR
Online Manuals Section
D I R E C T I O N S
FOR USING THE
FLAT TENSION, VIBRATING SHUTTLE
NEW HOME

SERIES A
SEWING MACHINE
Transcribed for the NeedleBar by Helen Scarth
Part One
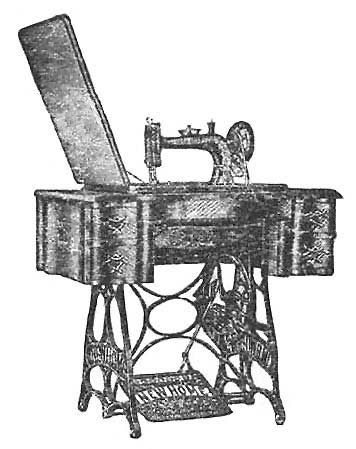
MANUFACTURED BY
THE NEW HOME SEWING MACHINE CO.,
MAIN OFFICE AND MANUFACTORIES,
ORANGE, MASS., U.S.A.
DISTRIBUTING OFFICES :
N.Y. CITY & EXPORT SALESROOM, 45 EAST 17TH STREET,
UNION SQUARE NORTH
LONDON OFFICE
CHICAGO SAN FRANCISCO
INDEX
| Bed Lock |
3
|
| Belt |
5
|
| Bobbin, How to Wind |
5
|
| Breaking Lower Thread |
7
|
| Breaking Upper Thread |
7
|
| Felling |
12
|
| Foot, To Remove |
10
|
| Foot, To Adjust |
9
|
| Gauge, Use of |
10
|
| General Remarks |
2
|
| Hemstitching |
10
|
| Hemming |
11
|
| Hemming and Sewing on Lace |
13
|
| Important |
2
|
| Illustrated Parts |
15
|
| List of Parts |
14
|
| Missing Stitches |
8
|
| Needles |
5
|
| Needle, To Set |
5
|
| Needles and Thread, To Select |
10
|
| Oil |
3
|
| Outfit |
11
|
| Parts of Stand and Cabinet |
16
|
| Quilting |
13
|
| Sewing, Ready for |
9
|
| Shuttle Ejector |
7
|
| Shuttle, To Thread |
6
|
| Shuttle, To Place |
7
|
| Shuttle Thread, To Draw Up |
8
|
| Stand, To Adjust |
4
|
| Stitch, Length of |
9
|
| Tension, To Regulate |
8
|
| Threading Machine |
7
|
| To Oil Machine |
3
|
| To the Learner |
2
|
| Treadle |
4
|
| Work, To Remove |
9
|
FOR OPERATING THE
FLAT TENSION,
VIBRATING SHUTTLE,
NEW HOME
Series A,
Sewing Machine
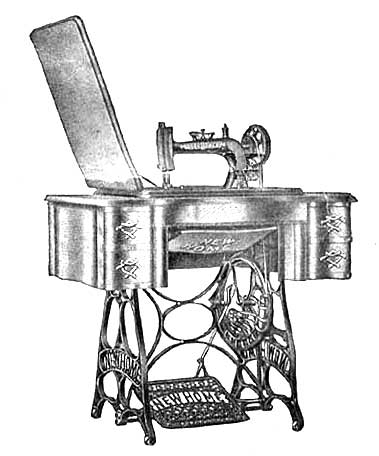
MANUFACTURED BY
THE NEW HOME SEWING MACHINE CO.,
MAIN OFFICE AND MANUFACTORIES,
ORANGE, - MASS., U.S.A.
DISTRIBUTING OFFICES:
N.Y. CITY & EXPORT SALESROOM, 48 EAST 17TH STREET,
(UNION SQUARE NORTH)
LONDON OFFICE: 24 - 26 DENMAN STREET, S.E.
CHICAGO - SAN FRANCISCO
Important
When you receive the machine you will observe a small tag attached to the bed of the machine by the screw which holds the head of the machine in place while in transit. Remove this screw as directed on the tag so the head can be turned back for oiling and cleaning. Do not replace the screw unless you desire to reship the machine, when it should be replaced.
To the Learner
A little time given to the study of the instructions before commencing to use the Machine, will be found of great advantage. Any one can learn to use the New Home. It is simple in construction, and requires so little change for any kind of work, that its operation can be easily understood.
Attention to the instructions here given, and a little practice, will soon enable the learner to successfully operate the Machine.
Do not attempt to use the Attachments until you can manage the Machine with ease on plain sewing.
The cause of a machine not working properly may be due to poor thread, or a size too large for the needle, or in the wrong adjustment of the tension.
If at any time the Machine fails to perform its work properly refer to the instruction book to ascertain the cause. This will help you out of the trouble if you carefully follow the directions.
For example, if your machine misses stitches, you turn to the index: (inside front cover) "Missing Stitches." On page 8 you read, "Should there at any time be skipped or long stitches at intervals, it is owing to the needle being set too low, or its having become best away from the shuttle, or its being too small for the thread in use, etc., etc." You will therefore be able to easily remedy the trouble. We advise a careful perusal of "General Remarks".
General Remarks
The presser foot must never be let down on the feed, unless when you are sewing and have cloth under it. When the shuttle is in, the machine must not be run with either of the shuttle slides out or partly open as the shuttle is liable to get out of position and break some portion of the machinery.
We caution purchasers to see that the manufacturers' plate number of the machine is plain and in good condition. If defaced or obliterated, it is sure evidence of fraud, and we will not warrant, or in any way be responsible for such machines. To avoid imposition buy only from us or authorized dealers.
Do not run the machine backward or with both threads in, without sewing.
Do not use a dull or bent needle, or draw the work faster than the feed will naturally carry it, as needles are frequently broken by failing to observe the latter caution.
When ordering parts always give the plate number of machine.
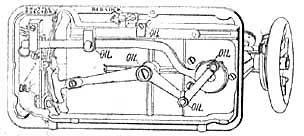
Poor oil is dearer than good oil, because it ruins the parts of the machine and does not last as long. It makes the machine run hard: corrodes and eats into the bearings, making them rough and hard to operate. It clogs and fills up the oil holes, so that, unless the operator carefully and laboriously picks out the holes, the oil cannot penetrate to the bearings and soon the machine begins to run hard. Be sure you get the best.
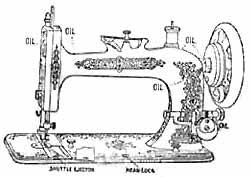 |
OIL THE UPPER PARTS AS HERE INDICATED. |
THE BEST OIL IS THE CHEAPEST.
OIL THE UNDER PARTS AS HERE INDICATED.
To Oil Machine
Oil the centers on which the driving wheel of stand turns, and where the foot piece rests on the rod. After the machine has been oiled, run it (with presser-foot up and shuttle out) for a minute, and then wipe off the superfluous oil. If the machine runs hard after standing idle for some time, use a little kerosene oil in the usual way and run rapidly, then wipe clean, and oil with the best prepared oil. Oil the bobbin-winder in places where there is any friction.
The head of the lock is depressed in the front of the bed-place. Push down on the lock head, this will release the machine head so it can be turned back and the parts can be oiled and cleaned.
The Treadle
Familiarity with the motion of the treadle is first to be learned, and practice is necessary in order to give a steady and uniform revolution to the driving wheel. The presser-foot, which holds the work in place on the feed, should be raised to prevent the feed from injury by contact with it. Place the feet on the treadle with instep directly over the rod upon which the treadle rests. Start the machine by placing the right hand upon the top of balance wheel and revolving it towards you, taking care to give it impetus enough; keep up a regular movement by pressing alternately with the heel and ball of the foot with equal effect. This should be practiced until a uniform motion of the wheel is obtained. Do not attempt to sew until you are familiar with the treadle movement.
To Adjust Stand
Every Sewing Machine of our manufacture is perfectly adjusted in all its parts when it leaves our factory. We illustrate below the different parts of the Stand to enable the inexperienced operator to properly adjust any part, should it in any way become loosened.
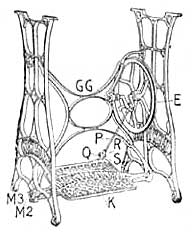
Should the Foot Plate (K) have nay play from right to left it needs adjusting; loosen the Plug Nut (M3) and adjust the Plug (M2) so that the Foot Plate will work evenly, taking care not to set the Plug too tightly against the Foot Plate to cause it to operate hard; if adjusted properly, it should work but with the slightest pressure. Should the Drive Wheel (E) not run true or evenly, loosen the Drive Wheel Crank Plug Screw (GG) and adjust the Plug so the Drive Wheel (E) has no play, but will run evenly, then screw tight. Should the Pitman (P) work too loose on Pitman Stud (Q), loosen nut on lower end of rod and turn the screw slightly to right and tighten nut.
The Belt
The belt should always be tight enough to prevent slipping. Should it become too loose, cut it to the desired length, observing to make a new hole at right angles with the grain side of the leather, that you may obtain its full strength.
Needles

WE MAKE OUR OWN NEEDLES, therefore, if you cannot get the genuine, with "NEW HOME" and our trade mark of a Greyhound stamped on the shank, write direct to us. Poor needles are responsible, many times, for skipped stitches.
To Set the Needle
First loosen the screw that clamps the needle and push to the left sufficient to allow the shank to enter; allow the needle (with the flat side of shank towards the needle bar) between the thumb and finger of the left hand, and insert the needle into the groove (as far up as it will go) under the clamp, and screw fast. Observe that the needle passes through the hole in the Throat Plate without touching either side. It it touches, take hold of it near its point, and press it gently in the opposite direction, until it is free.
To Wind Bobbin
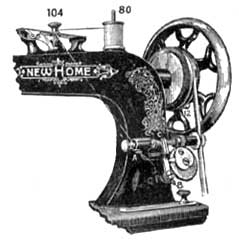
Unlock the balance wheel with thumb and forefinger of the right hand by drawing the key (12) out, turning it part around, (this will save the trouble and annoyance of unthreading the needle and removing the work while the bobbin is being filled). Then swing the bobbin winder until it is in position and presses firmly against the belt. Place the spool of thread to be wound from on the spindle (80) and put the bobbin in the bobbin winder. Pass the thread from the spool, once around the tension screw (104) as shown in cut, thence down between the bobbin winder frame and wire guide at (A), then through slot (B) at bottom of thread guide, then into V shaped slot of thread guide at (C). To secure the end of thread preparatory to winding, place it between the head of the bobbin and its socket at the right hand. Proceed as in sewing. When the bobbin has been filled, swing the winder from belt and turn back the key (12) until it enters the hole and locks the balance wheel.
To Thread Shuttle
Take the shuttle in the left hand, with the point toward you; draw off about two inches of thread from the bobbin, thread running from the upper side, (se Fig. 1); drop the bobbin into the shuttle as far as it will go; then draw the thread into the open slot of shuttle, at the same time putting a little pressure with the finger on the end of bobbin; by drawing the thread toward you it will be forced under the point of shuttle spring, (see Fig. 2); then draw it back until it passes over the point; (see Fig. 3); shuttle is ready for sewing. Fig. 4 shows shuttle properly threaded, ready for sewing.
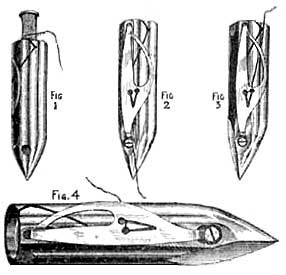
The tension is regulated by turning the screw in point of shuttle to the right or left; to the right to give more tension; to the left, to give less tension.
It will not generally be necessary to change the tension of shuttle for ordinary kinds of sewing.
To Place the Shuttle
Withdraw the front shuttle slide and place the shuttle in the carrier, point first, toward the operator; then close the slide. It is sometimes more convenient to withdraw the back shuttle slide and put the shuttle in its place when the carrier is at the back part of the machine. This is especially the case when some of the attachments are in use.
Shuttle Ejector
Pull out the front shuttle slide and press down on the ejector head, the shuttle will be raised and is easily removed.
Part 2
Online Manuals Section
FOR USING THE
FLAT TENSION, VIBRATING SHUTTLE
NEW HOME
SERIES A
SEWING MACHINE
Part Two
Lower Thread Breaking
This may be caused by the shuttle being wrongly threaded; the tension being too tight; the bobbin being wound too full, so it will not revolve freely; a rough or sharp place on the edge of the shuttle at the heel; or by failing to keep the shuttle race clean. For sewing heavy goods be careful to have the needle and cotton, (or silk), according to scale. When needle coarser than (1) is used, put in the throat plate with large needle hole, and lengthen the stitch according to thickness of goods.
Threading Machine
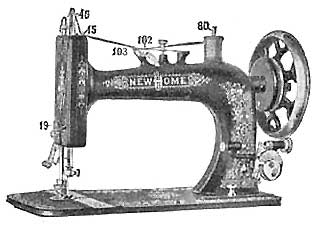
Put spool upon spindle (80), then, with the left hand catch the thread in slot (102) and draw it between the spring and cap (103) toward the needle bar, then under spring eyelet (15), up through slot in needle bar (46), down back of the staple (19), then with the thumb and forefinger of the left hand, catch the thread in center of staple (19), and draw it toward you around the hook of the take-up; then down through eye of needle from left to right, leaving about four inches of thread free.
Upper Thread Breaking
This may be caused by improper threading of the machine; the upper tension being too tight; the needle being too small for the thread; the needle being set the wrong side out, or set crooked; or, the needle being too large for the hole in the throat plate.
To Regulate the Tension
After threading the shuttle, try the tension by drawing the thread toward the blunt end; if it draws tightly, it is right for goods of firm texture; thin, soft goods require a loose tension. To obtain more or less tension, put more or less pressure on the shuttle tension spring, as described heretofore.The tension of top thread is adjusted by tension screw 104, turning to the right to tighten, and to the left to slacken it. Care must be taken in regulating the tension of the lower and upper threads. If the tension on either thread is too tight, it will cause the thread to break and the seam will be puckered. If there is not sufficient tension, the thread will not be drawn into the fabric, but will lie in loops on the under side. When both tensions are properly adjusted, both threads are drawn to the centre of the fabric as shown in figure A.
If the shuttle thread is very tight, and the upper thread too loose, the under thread will lie straight as shown in figure B, because there is not sufficient upper tension to draw the under thread in. On the other hand, if the shuttle thread draws off too easily and the upper thread is too tight, the under thread will draw through the fabric and the upper thread will lie straight as shown in figure C.

The NEW HOME Sewing Machine requires less change of tension than others, and it is seldom necessary to change the tension of the under thread. Always regulate the tension by adjusting the upper tension if possible.
To Draw Up Shuttle Thread
Take hold of the balance wheel with one hand and the needle thread with the other, keeping the latter slack, so as not to spring the needle; move the wheel toward you once around and pull up the needle thread with your hand, to draw the shuttle thread up through the throat plate hole. Then take both threads and pass them under the presser foot, toward the back of the machine.
Missing Stitches
Should there at any time be skipped or long stitches at intervals, it is owing to the needle being set too low, or its having become bent away from the shuttle, or its being too small for the thread in use, and sometimes to the point of the shuttle becoming accidentally blunted. When using very fine needles, and also when stitching heavy work, be sure that the points of the needles are perfect.
Ready for Sewing
The machine being fully threaded above and below, and the shuttle thread drawn up, you are ready to commence sewing.
Raise the presser foot by presser lifter (to the right for heavy work, to the left for hemming and felling), put the work under, and let the presser foot down upon the work.
Avoid pushing or pulling the goods through while stitching. In turning a corner stop the machine without raising the needle more than half way out of the work; raise the presser foot and turn the work in the manner desired, using the needle as a pivot.
Length of Stitch
On the stitch regulator scale will be found marks of different lengths; from these select the length of stitch you want; then loosen the thumb screw and move it opposite tot he mark chosen; and tighten it. The Nos. 32, 22, 16, etc., give the numbers of stitches to the inch. You can vary the stitch from the scale by setting thumb screw between numbers.
To Remove the Work
Raise the needle bar to its highest point, lift the presser foot, release the tension of the upper thread by pressing down on the tension releaser, at the same time with the left hand draw the work from you and a little to the left. Cut the thread, leaving about four inches with which to commence sewing.
To Adjust Presser Foot
At the top of the Machine, back of the needle bar, will be found a screw, which, by turning to the right, increases, and to the left, decreases the pressure of the presser foot. Heavy goods require more pressure than light goods. Too much pressure will pucker fine cloth, while too little pressure on heavy cloth will let presser foot rise as the needle ascents. Care should be taken to adjust the pressure correctly. All machines are properly adjusted for ordinary work, the screw should not be changed except on extra thick or thin goods.
Gauge
Every machine has a Gauge. It is attached to the bed plate by means of the thumb screw, and used for enabling the operator to sew at a given distance from the edge of the goods.
To Hemstitch
Fold blotting paper (or other soft paper) which can be readily torn, until you get thickness corresponding to the opening desired in the hem-stitching; put one of the pieces of goods under the paper and the other above, then place all under the presser foot and sew through them. After being sewed, both pieces will be double. Fold back the cloth first on one side, then on the other, all in the same direction and hold firmly while you tear out the paper. Remove the other half of the paper and open the hem-stitching, one edge of each, or either piece may be cut and passed through the hemmer, or a row of stitching can be passed along side the hem-stitch, and the double edge finished off as you choose.
To Remove the Foot
Raise the needle bar to its highest point, loosen the binding nut which is just above the foot, by turning to the right, then draw the foot out.
To Select Needles and Thread
| Size of Needle | Class of Work To Sew | Size of Cotton, Linen or Silk |
|
O
|
Very Fine Thin Muslins, Cambrics, Linens, etc. | 120 to 300 Cotton |
|
B
|
Very Fine Calicoes, Linens, Linen Shirtings, Fine Silk Goods, etc. |
90 to 120 Cotton 000, & 00 Silk Twist |
|
1/2
|
Shirtings, Sheetings, Bleached Calicoes, Muslins, Silks and General Domestic Goods, and all classes of General Work. |
60 to 90 Cotton 0 and 00 Silk Twist |
|
1
|
All kinds of Heavy Calicoes, Light Woolen Goods, Heavy Silks, Seaming, Stitching, etc. |
40 to 60 Cotton A and 0 Silk Twist |
|
2
|
Tickings, Woolen Goods, Trousers, Boys' Clothing, Corsets, Cloaks, Mantles, etc. |
24 to 40 Cotton A and 0 Silk Twist |
|
3
|
Heavy Woolens and Tickings, Bags, Heavy Coats, Trousers, and Heavy Clothing generally | 10 to 24 Cotton, A and B Twist, and 60 to 80 Linen |
|
4
|
Bags, Coarse Cloths, Heavy Goods of any texture. | 40 to 60 Linen, B, C, & D Silk Twist, or very Coarse Cotton |
For Needles O, B, 1-2 and 1, use throat plate with Small needle hole; for 2, 3, and 4 use throat plate with Large hole.
Stamped on front shuttle slide will be found a scale for selecting thread and needles.
Outfit
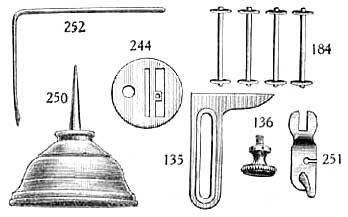
Every new home Sewing Machine is threaded up and ready for use when it leaves our factory, accompanied by the following accessories; 135 Gauge; 136 Gauge Screw; 244 Throat Plate, coarse; 250 Oil Can, filled; 252 Quilter; 184 Four Bobbins, one of which is filled ready for use in shuttle; 251 Hemmer and Feller, Package of Assorted Needles.
Part 3
Online Manuals Section
FOR USING THE
FLAT TENSION, VIBRATING SHUTTLE
NEW HOME
SERIES A
SEWING MACHINE
Part Three
INSTRUCTIONS
FOR USING THE
FOOT HEMMER AND FELLER
Hemming
Raise the needle to its highest point and raise the presser foot to its first lift by turning the lifter to the right. Loosen the nut A, take off the presser foot and replace with the Hemmer. Set same to its right place and fasten nut A by turning to the left. Raise the presser bar by turning the presser foot lifter to the right, and pass the edge of the cloth into the hemmer in the manner shown in the illustration, drawing it through the hemmer as far as the needle hole, in order that the feed may be at once catch the cloth. Then let the hemmer down upon the feed surface, and operate the machine as usual. Should the goods begin to run out of the hemmer, carry them to the Right; should too much run into the hemmer, carry the goods to the Left. About one-fourth of an inch in width is as much of the goods as is usually required to form a perfect hem. If the stitch takes the hem too far from the edge, turn the hemmer a little to the Right. If, on the contrary, the stitch does not catch the edge of the hem, turn the hemmer a little to the Left.
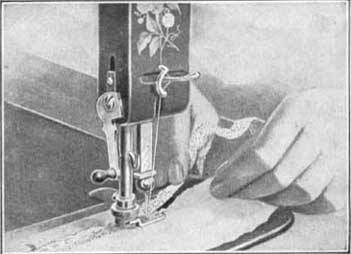
ILLUSTRATING HEMMING WITH FOOT HEMMER AND FELLER
Felling
Sew the two edges of the cloth together, the under one projecting one-fourth of an inch beyond the upper; then open out the work and crease the seam down, the wide edge over the narrow edge. Draw the wide folded edge into the hemmer, the same as if were a hem, and drop the foot, Then guide the fold edge, and work the machine the same as in ordinary hemming. A wider fell requires a wider seam, which is turned the same as a wider hem.
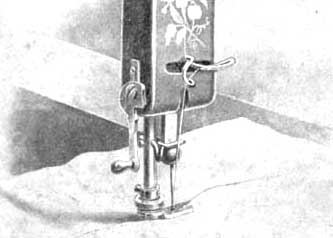
ILLUSTRATING FELLING WITH FOOT HEMMER AND FELLER
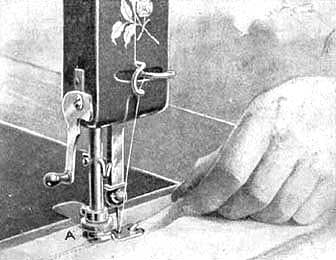
To Hem and Sew on Lace
Put the edge of the fabric into the hemmer. When the hem is well started, raise hemmer foot by means of the presser lifter and also raise the needle. Then pass the lace through slot in the side of the hemmer, carrying it back under the hemmer on top of the hem. Proceed as in ordinary hemming, keeping lace well in the side.
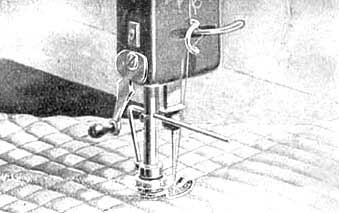
Quilting
Insert the quilter through the small hole in the presser bar, and fasten with the screw in the back of presser bar, moving it to the right or lest to the required width of the rows of stitching. Raise or lower the quilter according to the thickness of the goods. Having made the first row the desired distance from the edge place the work so that this row will be under and in line with the lower edge of the quilter, which will form a guide for each row of stitching; the last row made always passing under and in line with the quilter while stitching the next.
Part 4
THE NEEDLEBAR
Online Manuals Section
FOR USING THE
FLAT TENSION, VIBRATING SHUTTLE
NEW HOME
SERIES A
SEWING MACHINE
Part Four
|
List
of Parts of the Vibrating Shuttle, New Home, Series A
|
|||
| A101 | Arm | A188 | Shuttle Basket Spring |
| A102 | Arm Screw | A189 | Shuttle Basket Spring Rivet |
| A103 | Arm Pin | A190 | Shuttle Basket Spring Heel |
| A104 | Arm Cap | A191 | Shuttle Basket Spring Heel Rivet |
| A105 | Arm Cap Screw | A192 | Shuttle Basket Screw |
| A106 | Bed Cap Screw | A193 | Shuttle Basket Washer |
| A107 | Hand Wheel | A194 | Shuttle Carrier |
| A108 | Hand Wheel Flange | A195 | Shuttle Carrier Stud |
| A109 | Hand Wheel Flange Screw | A196 | Shuttle Carrier Cone |
| A110 | Hand Wheel Flange Pin | A197 | Shuttle Carrier Cone Pin |
| A111 | Hand Wheel Collar | A198 | Shuttle Carrier Stud Set Screw |
| A112 | Hand Wheel Collar Screw | A199 | Shuttle Carrier Link Stud |
| A113 | Hand Wheel Key | A200 | Shuttle Slide (front) |
| A114 | Hand Wheel Key Spring | A201 | Shuttle Slide (back) |
| A115 | Hand Wheel Key Spring Screw | A202 | Spool Spindle |
| A116 | Eyelet Spring | A203 | Bobbin Winder Frame |
| A117 | Eyelet Spring Screw | A204 | Bobbin Winder Wire Thread Guide |
| A118 | Face | A205 | Bobbin Winder Screw |
| A119 | Face Screw | A206 | Bobbin Winder Pulley |
| A120 | Face Adjustable Screw | A207 | Bobbin Winder Pulley Arbor |
| A121 | Face Staple | A208 | Bobbin Winder Center |
| A122 | Feed Cam | A209 | Bobbin Winder Center Nut |
| A123 | Feed Cam Screw | A210 | Bobbin Winder Spring |
| A124 | Feed Cam Pin | A211 | Thread Guide |
| A125 | Feed Lever | A212 | Thread Guide Screw |
| A126 | Feed Lever Cap | A213 | Thread Guide Spring |
| A127 | Feed Lever Cap Screw | A214 | Thread Guide Cam |
| A128 | Feed Bar | A215 | Thread Guide Cam Screw |
| A129 | Feed Bar Spring | A216 | Worm Gear |
| A130 | Feed Bar Spring Washer | A217 | Worm Gear Screw |
| A131 | Feed Bar Spring Washer Screw | A218 | Worm Gear Screw Washer |
| A132 | Feed Bar Pin | A219 | Worm Gear Screw Nut |
| A133 | Feed Bar Block | A219½ | Auto. Bobbin Winder complete |
| A134 | Feed Bar Block Screw | A220 | Stitch Regulator Bar |
| A135 | Gauge | A221 | Stitch Regulator Adj. Screw |
| A136 | Gauge Thumb Screw | A222 | Stitch Regulator Thumb Nut |
| A137 | Gear for Horizontal Shaft | A223 | Stitch Regulator Thumb Screw Wire |
| A138 | Gear for Upright Shaft | A224 | Stitch Regulator Index |
| A139 | Gear Screw | A225 | Stitch Regulator Index Screw |
| A140 | Gear Pin | A226 | Stitch Regulator Cap |
| A141 | Bed Hinge complete | A227 | Stitch Regulator Cap Screw |
| A142 | Bed Hinge Stud | A228 | Stitch Regulator Fulcrum Block |
| A143 | Bed Hinge Tongue | A229 | Stitch Regulator Fulcrum Block Screw |
| A144 | Bed Hinge Tongue Pin | A230 | Stitch Regulator Fulcrum Block Washer |
| A145 | Bed Hinge Stud Nut | A231 | Take-Up complete |
| A146 | Bed Hinge Washer | A232 | Take-Up Spring |
| A147 | Bed Hinge Rubber Washer | A233 | Take-Up Screw |
| A148 | Horizontal Shaft | A234 | Take-Up Lever |
| A149 | Horizontal Shaft Flange | A235 | Take-Up Link |
| A150 | Horizontal Shaft Flange Pin | A236 | Take-Up Link Rivet |
| A151 | Link | A237 | Take-Up Spring Rivet |
| A152 | Link Screw | A238 | Take-Up Spring Guide |
| A153 | Link Pin Stud | A239 | Tension Spring (upper) |
| A154 | Link Pin Washer | A240 | Tension Spring Cap |
| A155 | Link Pin Washer Pin | A241 | Tension Spring Pin |
| A156 | Needle Bar | A242 | Tension Releaser |
| A157 | Needle Bar complete | A243 | Tension Thumb Screw |
| A158 | Needle Bar Cam | A244 | Throat Plate (fine or coarse) |
| A159 | Needle Bar Cam Rivet | A245 | Throat Plate Screw |
| A160 | Needle Bar Stud for Take-up Link | A246 | Thread Cutter |
| A161 | Needle Bar Clamp | A247 | Upright Shaft |
| A162 | Needle Bar Clamp Screw | A248 | Upright Shaft Collar |
| A163 | Needle Bar Stop Pin | A249 | Upright Shaft Collar Pin |
| A164 | Needle Bar Bar Oil Cup | A250 | Oil Can |
| A165 | Oil Tube for Face | A251 | Foot Hemmer |
| A166 | Presser Bar | A252 | Quilter |
| A167 | Presser Bar Spring | A253 | Quilter Screw |
| A168 | Presser Bar Spring Washer | A254 | Key |
| A169 | Presser Bar Adj. Screw | A256 | Bed Lock Catch |
| A170 | Presser Bar Spline | A257 | Bed Lock Catch Screw |
| A171 | Presser Bar Spline Screw | A258 | Bed Lock Catch Spring |
| A172 | Presser Bar Spline Adj. Screw | A259 | Bed Lock Catch Push Button |
| A173 | Presser Foot | A260 | Bed Lock Catch Plate |
| A174 | Foot Holder | A261 | Bed Lock Catch Plate Screw |
| A175 | Foot Holder complete with Foot | A262 | Shuttle Ejector Lever |
| A176 | Foot Holder Shank | A263 | Shuttle Ejector Lever Screw |
| A177 | Foot Holder Screw | A265 | Shuttle Ejector Lever Spring |
| A178 | Foot Holder Nut | A266 | Shuttle Ejector Push Button |
| A179 | Presser Foot Lifter | A267 | Shipping Screw |
| A180 | Presser Foot Lifter Screw | A268 | Shipping Screw Bushing |
| A181 | Horiz't'l Shaft Flange Stud | Shipping Screw Bushing Nut | |
| A182 | Needle Bar Cam Roll | ||
| A183 | Shuttle complete | ||
| A184 | Shuttle Bobbin | ||
| A185 | Shuttle Tension Spring | ||
| A186 | Shuttle Tension Spring Screw | ||
| A187 | Shuttle Basket complete | ||
|
ORDER
BY LETTER AND NUMBERS FROM THIS LIST
|
|||
ILLUSTRATED PARTS
OF THE
FLAT TENSION
VIBRATING SHUTTLE
NEW HOME, Series A, SEWING
MACHINE
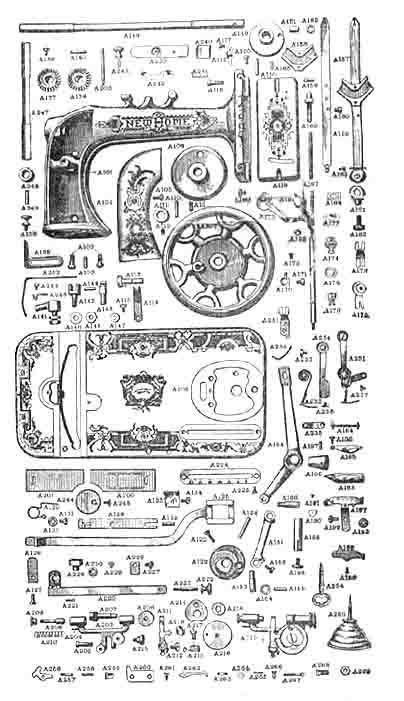
Order by the Letter and Numbers from this List
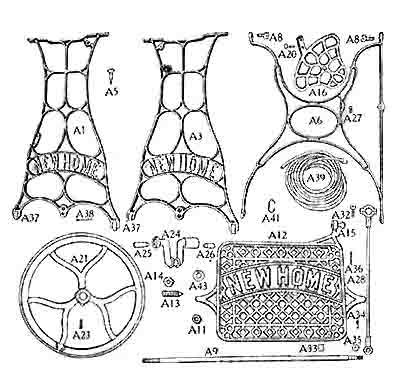
A1 Right Leg, box top; A2 Right Leg, drop-head, not shown; A3 Left Leg, box top; A4 Left Leg, drop-head, not shown, A5 Leg Screw; A6 Brace, drop-head, not shown;
Parts of Series A -- New Home Cabinet A108
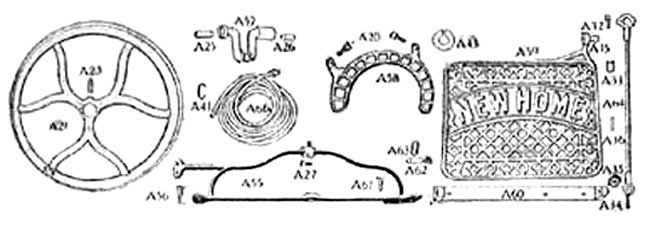
A21 Wheel; A23 Wheel Set Screw; A55 Wheel Hanger;
Our Latest
NEW HOME
ATTACHMENT SET
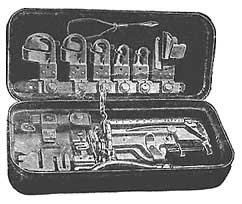
WITH THESE
VARIOUS ATTACHMENTS
a greater variety of work can
be accomplished on the
New Home than on
any other.
Part Two | Part Two | Part Three