All 5 available source parts are included below.
Part 1
Online Manuals Section
INSTRUCTIONS
FOR USING THE
NEW WILLIAMS
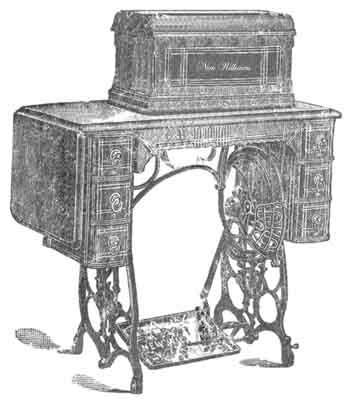
Sewing Machines
Transcribed for the NeedleBar by Helen Scarth
Part One
INSTRUCTIONS
FOR USING
THE NEW WILLIAMS
SEWING MACHINES
---- and ----
ATTACHMENTS
----:----
MANUFACTURED BY
Williams Manufacturing Company, Ltd.
MONTREAL, CANADA.
----- : -----
Montreal
C. R. CORNEIL PRINT, 60 CRAIG STREET
THE
NEW WILLIAMS
SEWING MACHINE
_______________
THE SEWING MACHINE OF THE PERIOD
______________
|
Is calculated to supply a want long felt by the users of Sewing Machines. It is simple in construction, quiet in motion, easy to run; there is plenty of space under the arm. It is made of the best of material, and finished in the most workmanlike manner, by the most skillful mechanics that money can procure. Agencies established in all the leading cities of the United States, Canada and Europe. If there is no Agent in your locality, write for any information you may require to
|
THE WILLIAMS MANUFACTURING COMPANY, LTD.,
246 ST. LAWRENCE STREET, MONTREAL.
|
CONTENTS
|
|
|
Page
|
|
| Illustration, Upper view of Machine |
4
|
| Illustration, Under view of Machine |
5
|
| List of Accessories |
5
|
| Illustration. Complete Machine |
6
|
| Adjustable Castor |
6
|
| Instructions for using |
7
|
| To Oil the Machine |
7
|
| To Get the Motion |
7
|
| To Thread the Machine |
7
|
| To Remove the Needle |
7
|
| To set the Needle |
8
|
| To Wind a Bobbin |
8
|
| To Thread the Shuttle |
9
|
| To Draw up the Shuttle |
10
|
| To Commence Sewing |
10
|
| To Take Out the Work |
10
|
| To Regulate the Tension |
10
|
| To Turn a Corner |
10
|
| To Alter the Length of Stitch |
10
|
| To Adjust Pressure on work |
11
|
| To Raise or Lower the Feed |
11
|
| To Shorten the Belt |
11
|
| To Select Needles and Thread |
11
|
|
ATTACHMENTS
|
|
| Narrow Hemming - Foot Hemmer |
12
|
| Hemming with Hemmer Set |
14
|
| Braiding |
16
|
| Felling |
16
|
| Tucking |
18
|
| Gathering or Ruffling |
20
|
| Shirring |
20
|
| Quilting |
22
|
| Hemming and Sewing on Lace |
23
|
| Binding |
24
|
|
NOTICES
|
|
| Advice |
18
|
| Hints to Users | 25 & 26 |
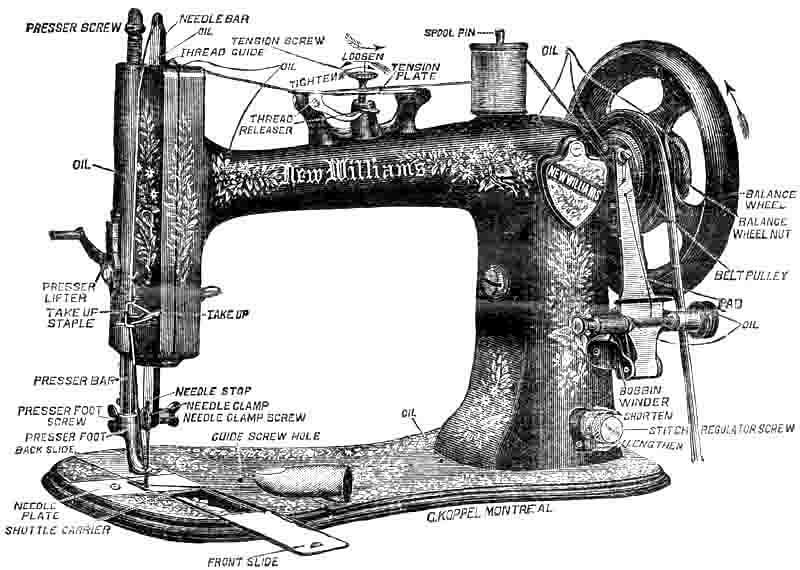
This cut is intended for reference, and shows very clearly the direction the wheel should turn, the threading of Machine and Bobbin Winder, and gives the names of all the parts to which reference is made in the instructions. It also indicates the places to be oiled, and shows the manner of drawing up the under thread.
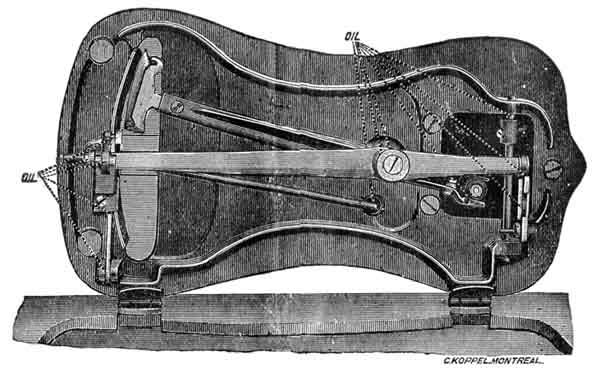
Head of Machine, showing under mechanism and points at which oil must be applied.
ATTACHMENTS AND ACCESSORIES
We furnish free with each New Williams Machine.
| Six Bobbins | One Thumbscrew | One Shirring Blade |
| One Screw Driver | One Foot Hemmer or Feller | One Binder |
| Twelve Needles | Four Plate Hemmers (Set) | One Braider |
| One Guide | One Tucker | One Oil Can |
| One Quilter | One Ruffler | One Thread Cutter |
| One Oil Bottle | ||
|
One small Screw Driver for Shuttle Tension Screw
|
||
The above articles constitute the most valuable and useful outfit furnished with any machine in the Market.
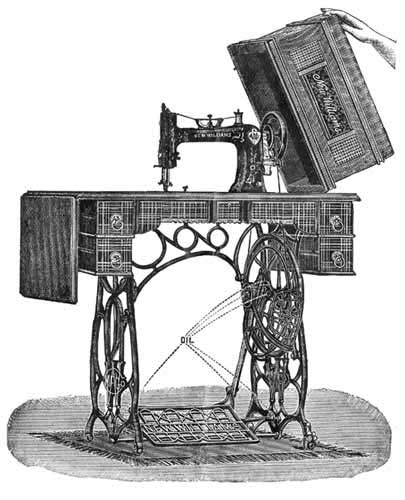
Special attention is called to our PATENT DEVICE FOR AUTOMATICALLY ADJUSTING THE LEGS OF MACHINE to any kind of floor. On the foot of the right front leg, you will notice a small Thumbscrew, which, when loosened, releases the adjustable Castor, which will at once cause all the legs to rest on the floor. Tighten the Screw and the Machine will stand solidly, thus in a very simple manner, obviating the necessity of "WEDGES", "SCREW DRIVERS", etc., being stuck under the leg to level up the Machine; and when moving the Machine to another place, it is only necessary to repeat the loosening and tightening of the Thumbscrew to ensure a solid standing Machine. The dotted lines indicate points where oil is needed.
Part Two | Part Three | Part Four | Part Five
Part 2
Online Manuals Section
INSTRUCTIONS FOR USING THE
NEW WILLIAMS SEWING MACHINES
Part Two
INSTRUCTIONS FOR USING THE MACHINE
TO OIL THE MACHINE
(See Cuts on Pages 4, 5 and 6.)
| 1st. - See that Machine is CLEAN, then oil in all the small round HOLES and wherever there is any friction of the working parts. Oil the working parts of the STAND as well as the head of the Machine. Use only the best Sewing Machine Oil. Only a small quantity should be used at a time. |
| 2nd. - The curved side of the RACE against which the Shuttle works should be oiled at least twice a day when the machine is in constant operation. |
| 3rd. - After the Machine has been oiled, run it (with PRESSER-FOOT up and SHUTTLE out) for a minute, and then wipe off the superfluous oil. |
| 4th. - If the oil becomes gummed, causing the Machine to run hard, put a little KEROSENE or ALCOHOL in the OIL-HOLES, run rapidly, wipe clean, and then oil with Sewing Machine Oil. |
|
TO GET THE MOTION
|
| 1st. - Unthread the NEEDLE; remove the SHUTTLE, and raise the PRESSER-FOOT by turning the LIFTER-HANDLE from you. |
| 2nd. - Place the feet on the TREADLE, with the instep directly over the ROD upon which the TREADLE rests. |
| 3rd. - Start the Machine by placing the right hand upon the top of the BALANCE WHEEL and revolving it from you. |
| 4th. - Place a piece of cloth on the FEED and let the PRESSER-FOOT down, and practice starting and stopping the Machine until you can do so with ease. |
|
TO THREAD
THE MACHINE
|
| 1st. - Raise the Needle to the highest point by turning the wheel from you by hand. |
|
2nd. - Place the SPOOL on Spool-pin and pass the thread
into the slot in the Tension Spring, carrying it to the left under the
point of the flat THREAD-GUIDE, and through the hole in the top of the
NEEDLE-BAR. Pass the thread down behind the CHECK LEVER THREAD-GUIDE
(a bent wire near the lower end of the Face-plate), drawing it towards
you between the Guide and the Face-plate. Next pass it over or into
the hook of the CHECK LEVER, after which, push it back from you, between
the THREAD-GUIDE and Face-plate, thence bring it down to the needle,
and pass it through the eye from left to right, leaving about three
inches extending beyond the needle. See Cut, page 4.
|
TO REMOVE THE NEEDLE
Raise the NEEDLE-BAR to its highest point; take hold of the NEEDLE with the thumb and finger of the left hand, and with the right hand loosen the NEEDLE-CLAMP by turning the top of the winged NEEDLE-CLAMP NUT toward you about a turn, not more; then lower the Needle and remove it.
TO SET THE NEEDLE
 |
 |
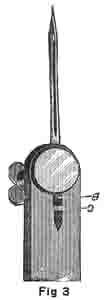 |
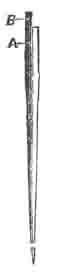
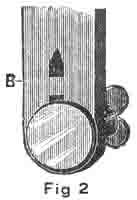
| Now observe the illustration above. Fig. 1 shows the NEEDLE; A is the shank and B the self-adjusting stop. Fig. 2 shows the end of NEEDLE BAR and CLAMP, and just above the | ||
| CLAMP, and in the groove that receives the NEEDLE, is the stop C, against which the end of stop B (Fig.1) rests, as clearly shown in Fig.3. Pass the shank of NEEDLE up into the groove of the NEEDLE-BAR, keeping the shoulder to the right and the long groove to the left. Guide it up until it rests against and covers the stop C (Fig.3), then fasten by turning the top of winged THUMB-NET from you. As the NEEDLE is self-setting, this brings it correctly into place. | ||
TO WIND A BOBBIN
| Examine the Cut on page 4, and the threading will be better understood. |
| 1st. - Oil the cavity in the end of the SPOOLER-SPINDLE and the bearing of the SPOOLER-PULLEY before inserting the BOBBIN. |
| 2nd. - At the end of the Upper Shaft, and to the right of the Balance Wheel, will be found a nut. Turn this nut a little to the left or towards you; this will loosen the Balance Wheel, so that it will turn freely, without running the Machine. |
| 3rd. - Put the BELT into the groove in the PULLEY of the WINDER. |
| 4th. - Place the spool of thread on the spindle on the top of arm of Machine, draw off a few inches of thread, and pass the end of it through the small hole in brass head of Bobbin from the inside. |
| 5th. - With the left hand pull the SPINDLE to the left and insert the BOBBIN, taking care to put the little pin in the socket to the right enters the hole in the end of the BOBBIN. |
| 6th. - Pull the TENSION-PAD towards you until it presses against the Bobbin. |
| 7th. - Take hold of the thread just above the top of the Tension-Pad, pass it into the right hand slot in Pad, then round behind into the left hand slot, then from right to left around the Tension-Screw between the Tension Discs, then again through the left hand slot, then roll up on the Spool any slack thread that may remain between Winder and Spool. |
| 8th. - Start the BALANCE WHEEL from you by hand, and proceed as in sewing. |
| 9th. - When done winding, turn the nut to the right, or from you, to tighten the wheel, and remove the belt from the Winder Pulley. |
(half-page inserted in original manual)
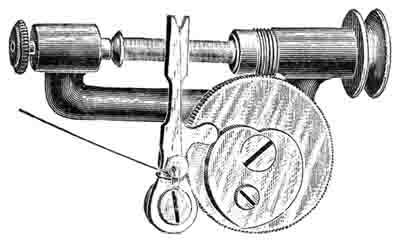
TO WIND THE BOBBIN
 |
|
New Style Automatic
Bobbin Winder
|
Oil the cavity in the end of the left spindle in which the bobbin turns, the bearings and worm at the right end, loosen the balance wheel by turning the nut towards you which will allow the wheel to turn without the machine running, put the belt into the groove in the pulley of the winder, then run the machine before inserting the bobbin on top of the arm of the machine, draw off a few inches of thread, pass the end of it through the small hole in the brass head of bobbin from the inside. With the left hand pull the spindle to the left and insert the bobbin, with the end that you have the thread inserted in to the left, taking care that the little pin in the driving head enters the hole in the end of the bobbin, pass the thread into the notch in top of the arm of winder, downward and into the notch at the bottom of the arm, then round the back of the tension screw and start slowly to wind the bobbin, holding the free end of the thread for a few revolutions, so as to get the winding properly started. There should be no slack thread left between the spool and the bobbin when you are ready to wind.
TO THREAD THE SHUTTLE
N.B. - Remember the Shuttle is Self-threading.
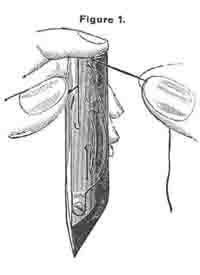
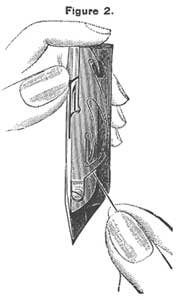
| 1st. - Hold the SHUTTLE between the thumb and middle finger of the left hand, point down, and spring side towards you. |
| 2nd. - Take the BOBBIN between the thumb and forefinger of the right hand, holding it so that the thread will draw up and over FROM LEFT TO RIGHT. |
| 3rd. - Drop the BOBBIN into the SHUTTLE, and press it gently on the end with the forefinger of the left hand to prevent its turning readily. Draw the thread into the notch at the end of the spring shown in Fig. 1, continue to draw the thread firmly down towards the point of the SHUTTLE, and you will find that it will pass under the different points of the Tension Spring, and finally come into the position shown in Fig. 2. The SHUTTLE is now threaded and ready for use. |
 |
 |
To increase the tension, turn the screw to the right; to decrease it, turn to the left. A very small screw-driver is furnished for this purpose.
To put the SHUTTLE in: Have the CARRIER at one end of the race, and lay the SHUTTLE in the CARRIER, point first, and towards you, the spring side up. Let the end of the thread (about three inches) lie over the SHUTTLE and CARRIER, on your right and close the slide.
TO DRAW UP THE SHUTTLE THREAD
See Cut, page 4 - Position of thumb and Thread.
Take hold of the BALANCE WHEEL, with one hand and the Needle-thread with the other. Let the thread lie slack, so as not to spring the Needle. Move the Wheel from you once round, and pull up the slack of the needle-thread with your hand, in order to draw the Shuttle-thread up through the needle-plate; then take both threads and pass them under the PRESSER-FOOT, towards the back of the Machine. Then close the slide over the SHUTTLE-RACE.
Part One | Part Three | Part Four | Part Five
Part 3
Online Manuals Section
INSTRUCTIONS FOR USING THE
NEW WILLIAMS SEWING MACHINES
Part Three
Place the work on the FEED and let the PRESSER-FOOT down on it. Guide the work with the left hand, starting the machine with your right hand by turning the WHEEL from you. The work should be kept free, so as not to drag or hold back on the FEED.
TO TAKE OUT THE WORK
Raise the Needle-bar to its highest point, and lift the PRESSER-FOOT off the goods. With the forefinger of the right hand press down the Lever of the Thread Releaser (which will be found in front of the Tension plate) while with the left hand you draw the work out back from the Machine. Break or cut both threads about three inches from the Needle by means of the THREAD-CUTTER.
TO REGULATE THE TENSION
To tighten the Tension of upper thread, turn the TENSION THUMB SCREW to the right. To lessen it, turn to the left. If the upper thread is not properly drawn into the cloth, loosen the upper tension. If the under thread is not properly drawn into the cloth, tighten the upper tension. (See Hints to Users, No. 7, page 26).
TO TURN A CORNER
Stop the Machine without raising the Needle more than half way out of the work; raise the PRESSER-FOOT, and turn the work in the manner desired, using the Needle as a pivot.
TO ALTER LENGTH OF STITCH
The STITCH ADJUSTING SCREW is in the front of the NEEDLE-ARM BASE, and near the BED-PLATE. To lengthen the stitch, turn the THUMB-SCREW to the left; to shorten the stitch, turn the Screw to the right.
TO ADJUST THE PRESSURE ON WORK
Hard, stiff goods require more pressure than light or soft goods. To increase the pressure turn the PRESSURE-SCREW at the top of the Machine to the right; to decrease it, turn the screw to the left.
TO RAISE OR LOWER THE FEED
At the left end of the feed-lever is a block attached to the lever by means of a screw. Loosen the screw and push up the block to raise the feed, or pull it down to lower the feed. When you have the feed to the right height, then tighten the screw.
THE BELT
The belt should be tight enough to run the Machine without slipping. Should it be necessary to shorten it, open one end of the wire hook which joins the ends of the Belt together; cut a small piece off the end which you have unfastened, make another hole for the hook, and join it again.
TO SELECT NEEDLES AND THREAD
|
The following table may be a useful guide: -
|
|||
|
Thread
|
Silk
|
Needle
|
|
|
300 to 500
|
000
|
1
|
For the very finest work
|
|
120 to 200
|
00
|
2
|
For the very finest work that ordinarily occurs
|
|
90 to 110
|
0
|
3
|
For fine underclothing, etc.
|
|
70 to 80
|
0 & A
|
4
|
For common underclothing, calico, etc.
|
|
40 to 60
|
B
|
5
|
For unbleached cotton or linen fabric, etc.
|
|
12 to 36
|
C
|
6
|
For heavy work
|
|
0 to 10
|
D & E
|
7
|
For very heavy work
|
|
8
|
The coarsest soft goods | ||
Part One | Part Two | Part Four | Part Five
Part 4
Online Manuals Section
INSTRUCTIONS FOR USING THE
NEW WILLIAMS SEWING MACHINES
Part Four
USING THE ATTACHMENTS
NARROW HEMMING
(See Opposite Page.)
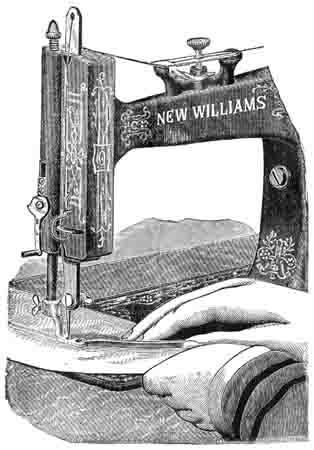
Put the HEMMER in place of the PRESSER-FOOT, and hold it up by the lowest lift. Have the under thread drawn up through the needle-hole.
Turn the right hand edge of the work upward into the scroll of the HEMMER, while passing it from you through the HEMMER, until it inclines over to the left, and forms a hem which must lay under the Needle. Then let the Hemmer down.
As you start to sew, pull gently on the ends of the thread to help the work along one or two stitches until the FEED catches it, then rest your hands back on the table and gently hold back on the work to keep it smooth and in line with the feed. As it runs through the hands, turn it (enough to fill the hemmer) straight up from the table. Do not attempt to fold it over nor to place it in the hemmer, but keep your hands so far away that the hemmer can act freely, when it will only require the proper quality of goods to make an absolutely perfect hem.
To bring the stitching close on the edge of the hem, the hemmer should be set close to the needle; but for coarse, rough work, it is well to set it off a little.
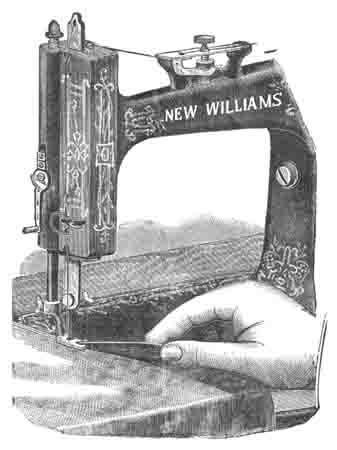
NARROW HEMMING
(See Opposite Page.)
This Hemmer is furnished with the Machine without extra charge.
THE HEMMER SET
(See Opposite Page.)
This set consists of four Plate Hemmers and a Binder, which are adjusted to the bed plate of Machine, and held in place by the gauge screw, and are used with the usual sewing foot. These Hemmers are very convenient for general family use, making good even hems on all kinds of goods, straight or bias, even when seams have to be crossed.
IN setting the Hemmers, they can be moved either to the right or left, if found necessary, in order to get the stitch in the proper position on the hem.
Take the end of the piece to be hemmed and turn down the edge for a distance of about three inches, and about a quarter of an inch in width. Enter the doubled edge of the goods into the scroll of the hemmer, and pass it out under and beyond the foot; then fold again that part of the goods which has passed through the hemmer and draw it towards you, until the double-folded portion comes directly under the needle. Let down the PRESSER-FOOT, start the machine, and guide the material so that it will just fill the scroll of the hemmer without crowding it.
The shoulder of the Guide-screw is prevented from injuring the attachments by means of a small leather washer; be careful that the washer does not drop off and be lost.
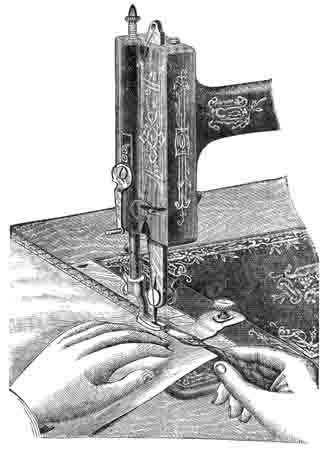
WIDE HEMMING
(See Opposite Page.)
The Hemmer set contains four Hemmers and a Binder.
FELLING
(See Opposite Page.)
If the HEMMER (which is also the FELLER) is on, it can be used simply as a presser in running up the seam, the edges of which should be trimmed if necessary, as in hand felling.
Open the work flat, wrong side up, the seam standing up straight, and taking the work near the beginning of the first seam in the left hand, and the ends of the thread in the right hand, draw the edges into the FELLER, and let down the FELLER without disarranging the work.
Slightly lengthen the stitch and sew the second seam.
NOTE: - The WIDE EDGE should be of such a size as to just fit the FELLER, and should be kept smooth. The NARROW EDGE should be TRIMMED as close as security permits. In sewing the second seam of a fell, the first seam should pass close to the left hand edge of the opening of the FELLER, over which BOTH EDGES of the cloth should be made to pass. The FELLER may be adjusted to the right or left, so as to sew close on the edge of the fell, or near the first seam, as desired.
_____________
THE UNDER-BRAIDER
Remove the NEEDLE-PLATE and adjust in its place the BRAIDER-PLATE. Remove the front slide, and turn back the CAP that covers BRAID RECESS in BRAIDER-PLATE, and place the BRAID in the channel which is in the BED-PLATE under the side, and along into the BRAID-RECESS in BRAIDER-PLATE; let the end of the BRAID lay over the FEED-TEETH; then swing the CAP back over the BRAID and replace the slide, taking care that the BRAID remains in its proper place in the channel.
By means of the THUMB-NUT, which will be found on the lower part of the arm of Machine just back of the NEEDLE-BAR, adjust the VIBRATOR so that when operating the Machine the presser-foot will be raised slightly off the goods when the needle is down. Proceed to work with a rather long stitch and tight tension.
NOTE; - For under-braiding the pattern is stamped or traced on the wrong side of the goods, which must be uppermost while the braiding is being done.
This removes the difficulty experienced in turning sharp corners, and renders the braiding of the most intricate patterns a comparatively easy matter.
(See opposite page.)
This operation is performed with the hemmer.
TUCKING
See opposite page.
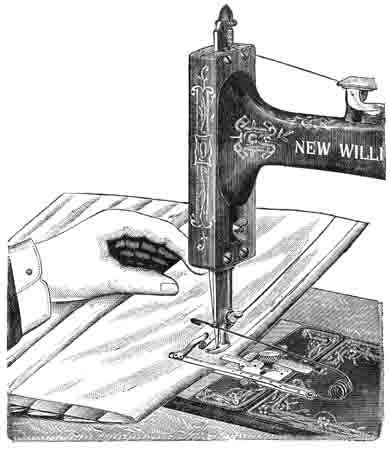
With the GUIDE-SCREW, attach the TUCKER to the Machine, adjusting the TUCKER-GAUGE as far from the NEEDLE to the right of the width of the tuck desired.
Adjust the CREASING-END of the TUCKER at such a distance to the left of the NEEDLE as is equal to DOUBLE the WIDTH of the TUCK and the DESIRED SPACE BETWEEN the tucks, TAKEN TOGETHER.
Note: - When no space is desired between tucks, it will, of course, only be necessary to move the CREASING-END to the left of the needle a distance equal simply to double the width of the tuck.
The TUCKER being arranged as desired, unite the parts by tightening the SMALL THUMB-SCREW, and connect the WORKING ARM of the TUCKER with the machine by ATTACHING the HOOK to the NEEDLE.
Fold the right-hand edge of the cloth under for the first tuck, and the PRESSER-FOOT being raised, place the work in the Machine with the fold close against the guide, after which lower the PRESSER-FOOT and proceed to sew.
As the work passes through the Machine it is CREASED for the fold of the NEXT TUCK, which is made the SAME AS THE FIRST.
|
ADVICE Never attempt to take the Machine apart, or you will be sure to get into trouble. Ladies sometimes boast that they "have taken their Sewing Machine all to pieces and put it together again." Nothing can be worse; it is a mistake to suppose that a Machine can be benefitted by being tampered with, by inexperienced parties. |
(See opposite page.)
GATHERING OR RUFFLING
(See opposite page.)
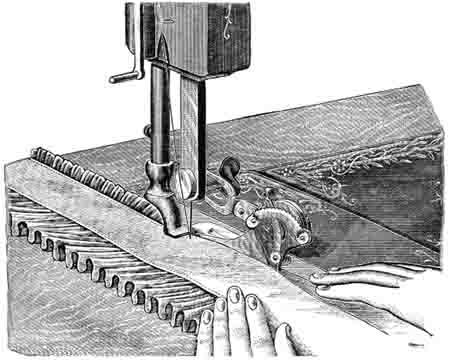
Take off the PRESSER-FOOT and put the RUFFLER in its place, as shown in the engraving. The SLOT in the ARM of the RUFFLER must be placed around the THUMB-NUT of the NEEDLE-CLAMP. Care should be taken to see that the needle passes down through the centre of the hole.
The goods to be ruffled are to be placed between the JAWS of the RUFFLER, and if bands are to be dewed on, they must be placed above and below the ruffle and separated from it by the JAWS. Either one or two bands may be sewed on, or the ruffle can be made without any band, as desired.
The fullness of the gathers may be changed, by moving the regulating LEVER. Move it outward (toward yourself) to INCREASE the fullness and inwards to DIMINISH it. The notches on the plate will hold it in the required position. The fullness is also influenced by the length of the stitch. With a short stitch, and a scant movement of the Ruffler, a fine gather will be made; but if the movement of the Ruffler be increased, the gathers assume more of the form of pleats, and then, by a long stitch, you can again get the gathered appearance.
____________________
SHIRRING
Among the attachments will be found a piece similar to the front shuttle slide, but having a small notched plate attached to it near one end. This is known as the Shirring Blade, and is used only in connection with the RUFFLER.
To prepare the Ruffler for Shirring remove the lower blade; this is done by loosening the screw at the back of the ruffler-foot and slipping it out toward the right. Remove the front slide that covers the shuttle, and put the shirring-plate in its place; when this is properly done the blade covers the feed. This enables you to bring the shirring blades into the centre of your goods, or rather to place your goods between the blades at any required distance from the edge.
RUFFLING
(See opposite page.)
A great variety of work can be done with this Attachment.
QUILTING
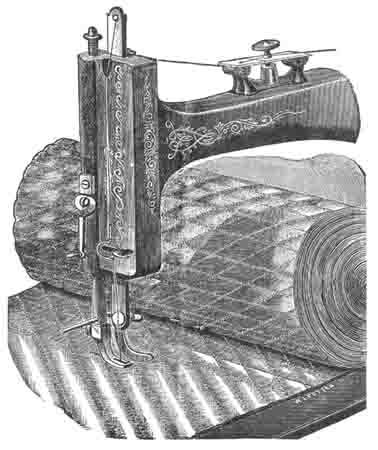
To attach the Quilter, pass the ROUND ARM of it from right to left through the hole in PRESSER BAR, bringing the flat or GUIDING-ARM at a distance to the right of the NEEDLE equal to the desired distance between the seams, and just high enough to allow the work to pass freely under it. Fasten by the screw at the back of the PRESSER-BAR.
Keep the first row of stitching straight by a mark or basting thread. All succeeding rows are made straight, and at uniform distance, by keeping the row last made steadily under the guide. In squares or diamonds, the appearance of the work is better if on equal bias.
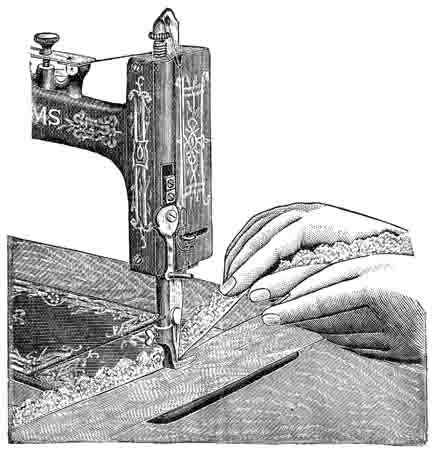
SEWING ON LACE AND HEMMING AT ONE OPERATION
Start a narrow hem, as shown on page twelve. When the hem is well started, raise the PRESSER, turning the LIFTER from you, and also raise the NEEDLE. Then pass the end of the lace through the slot in the side of the HEMMER, and on top of the hem.
Be sure that the hem is not displaced in the HEMMER, and that the needle goes down through the lace and them together. Then let down the PRESSER and guide the lace over the front of the HEMMER, keeping it well into the slot.
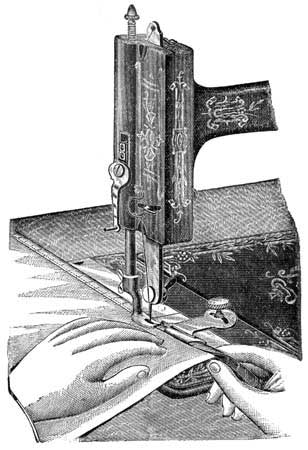
BINDING
Attach the BINDER to the bed of the Machine by the GUIDE SCREW; set the screw firmly, so that the Binder will not move.
For raw edge binding the strips must be cut seven-eighths of an inch in width and on a true bias. Pass the binding directly into the scroll of the Binder, and the material to be bound between the upper and lower scrolls; guide the cloth with the left hand, and let the binding pass easily through the finger of the right. If the stitching is too near or too far from the edge, move the Binder a trifle to the right or left, as occasion may require.
Part One | Part Two | Part Three | Part Five
Part 5
Online Manuals Section
INSTRUCTIONS FOR USING THE
NEW WILLIAMS SEWING MACHINES
Part Five
HINTS TO THE USERS OF THE "NEW WILLIAMS"
----- : : : -----
|
No. 1. --- Do not expect to get along entirely without trouble. Difficulties will arise of a more or less serious nature. Poor thread, defective needles, bad oil, etc., lead to these; and, remember; that you yourselves are liable to make mistakes in threading and handling the Machine. Should it fail to give satisfactory results, in any particular point, refer at once to the directions for that point, and they will always help you out.
|
|
|
No. 2. --- If upper thread breaks, the needle is not set correctly; or the Machine is not properly threaded; or the upper tension is too tight; or the needle is too small for the thread; or the eye of the needle is sharp or rough; or the point of the needle is bent or broken; or the Machine has turned toward you instead of from you, or the thread has slipped from under thread guide behind needle bar. See page 4.
|
|
|
No. 3. --- If the under thread breaks, the bobbin has been filled too full; or the thread has been too unevenly wound; or the thread has not been properly drawn into the shuttle; or tension of the shuttle is too tight; or the tension spring may have got bent.
|
|
|
No. 4. --- Needles are broken (nine times out of ten) by pulling the goods when sewing. Let the Machine do its own feeding. If the stitch is not long enough, lengthen at the proper place. Too fine a needle for the size of the thread used will also be apt to break the needles.
|
|
|
No. 5. --- If the upper thread loops, the tension is too loose; or the take up - see page 4 - is not threaded; or the thread is tangled somewhere. Too loose a tension on the shuttle thread, or the thread not properly drawn into the shuttle, will case the under thread to loop.
|
|
|
No. 6. --- If "skip stitches" are being made, the needle is not set correctly; or it has got bent; or it is too fine for the thread; or better decide that it is a bad needle, and set another.
|
|
|
No. 7. --- PERFECT STITCHING. - This will result when the upper and under threads evenly balance each other (tight enough to lay the threads smoothly yet not so tight as to pucker the cloth), the thread being locked in the centre of the goods, thus,
|
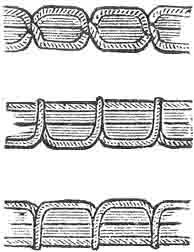 |
| If the thread is straight on top, thus, the upper tension is too tight or the under tension is too loose. | |
| If the thread is straight underneath, thus, | |
|
the shuttle tension is too tight, or the upper tension is too loose. If both upper and under threads appear loose (not smoothly drawn into the cloth), then both tensions require tightening. NOTE. --- A short stitch will bear a tighter tension than a long one; so it is well when you lengthen the stitch to loosen the upper tension a little, especially on fine goods.
|
|
|
No. 8. --- The main cause of Machine running hard is gummed oil. Oil Machine with kerosene, run until perfectly free, then wipe clean and oil afresh with good oil. Too tight a belt will also cause the Machine to run heavy; whilst too loose a belt will slip, and cause the Machine to run irregular.
|
|
|
No. 9. --- BAD THREAD. --- Whilst nearly all the different makes of thread are good, and give satisfactory results, some are so bad as to be unfit for machine use, and some even of the best, from being too exposed to dampness, will become spotted with mildew. Such thread if put on the Machine, will give trouble in breaking, as a matter of course. See that your thread is of good quality and free from "knots". Never wind a "knot" on the bobbin. The PRESSER FOOT should never be let down on the FEED, unless when you are sewing and have cloth under it. Do not run the Machine with either of the shuttle slides open. Do not use a dull or bent needle, or draw the work faster than the feed will naturally carry it. Needles are frequently broken by failing to observe the latter caution. |
|
THE WILLIAMS MFG. CO. LTD.
MANUFACTURERS OF
Sewing Machines
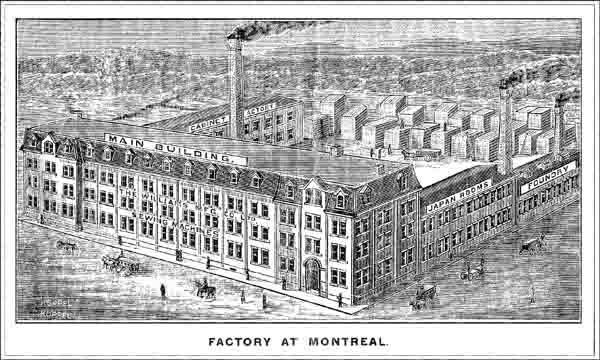
MONTREAL, CANADA
Plattsburgh, New York, U. S. A.
Part One | Part Two | Part Three | Part Four