All 4 available source parts are included below.
Part 1
THE NEEDLEBAR Archive at ISMACS International
Online Manuals Section
INSTRUCTIONS FOR USING
SINGER 12K
"NEW FAMILY"
SEWING MACHINE
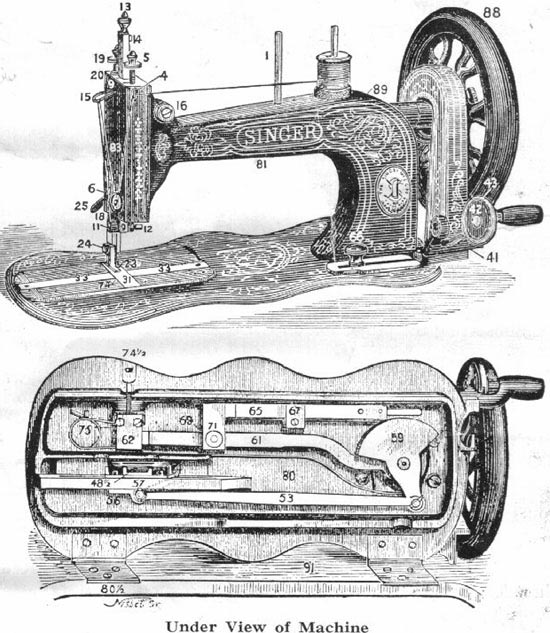
The figures shown in the above illustrations are the numbers of the parts. When ordering parts for this machine the numbers must be followed by "12K", e.g. 48 1/2 /12K.
BALANCE WHEEL STOP MOTION
This device allows the balance wheel to run free, so that bobbins may be wound and the correct method of treadling acquired, without operating the stitching mechanism. To loosen the wheel, hold it with the left hand, and with the right hand pull out the disc sufficiently to allow of its being turned either to the right or left, thus liberating the projection on the inner side of the disc from its recess.
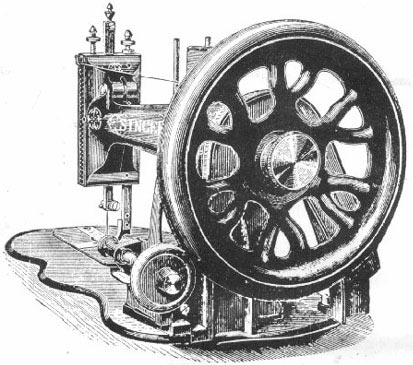
To lock the balance wheel, hold it with the left hand and, with the right, turn the disc until the projection springs back into its recess.
TO ENSURE PERFECT ACTION OF THE MACHINE
The balance wheel must always turn from the top towards you.
The presser foot must be raised, except when sewing.
Do not work the machine with the shuttle and the needle threaded, except when sewing.
The slides (33) over the shuttle must be closed before starting work on the machine.
TO OPERATE THE TREADLE MACHINE
Loosen the balance wheel as described above, place both feet upon the treadle and turn the balance wheel over towards you, at the same time allowing the feet to move freely and lightly with the motion of the treadle. Continue to do this until a regular and easy movement is acquired and you are able to work the treadle so that you can re-start the machine without the balance wheel turning in the wrong direction.
When familiar with working movement, lock the balance wheel, and place a piece of material under the presser foot (23). Lower the latter by means of the lifter (25) and again work the machine, without its being threaded, until you are accustomed to guiding the material.
TO SET THE NEEDLE
Raise the needle bar (9) to its highest point and loosen the needle clamp nut (12). Hold the needle with the left hand and, with its long groove towards you, place its point down through the hole in the throat plate (31). Turn the wheel (88) slowly towards you, while you guide the the needle under the needle clamp nut (12).
With the left hand insert the point of a fine needle into the eye, resting it on the throat plate (31). Loosen the clamp nut or screw (12), and pressing the fine needle into the eye in a direct line from you, turn the wheel (88) slowly until the line engraved on the needle bar (9) is level with the top of the arm. Then tighten the clamp nut or screw (12)
TO THREAD THE NEEDLE
Place a reel of thread on the spool pin nearest the balance wheel and lead the end of the thread through the guide (4), then down from front to back under and between the tension discs (6), up and from front to back through the hole in the check lever (15), down and through the hole in the needle clamp (11), then from front to back through the eye of the needle, leaving an end of thread three inches long, which should be placed under and to the back of the presser foot.
TO WIND THE BOBBIN
Withdraw the left slide and turn the balance wheel until the shuttle is in full view, then lift it from the machine and remove the bobbin. Put a reel of thread on the spool pin, place the bobbinin the spooler (41) and secure the end of the thread by placing it between the end of the bobbin and the cup of the spooler. Operate the machine and guide the thread upon the bobbin slowly from one end to the other, always having the thread a trifle higher at the ends than in the centre.
TO THREAD THE SHUTTLE
Having removed the bobbin from the spool winder, take it between the thumb and finger of the right hand, being careful that the thread is over the bobbin towards the hand. At the same time take the shuttle in the fingers of the left with its point towards the hand, place one end of the bobbin in the spring centre in the end of the shuttle cavity next to the point, and gently press the other end into its place.
Pass the thread through the bottom long slot, in at the upper slot, and thence over to the tension holes, passing it through the one nearest the blunt end first, then through as many holes as may be necessary to obtain the tension required, always finishing, however, by passing it through the hole nearest the point, either from the inside outward, or from the outside inward (in the latter case pass it out through the slot below) and finally, in every case, under the spring.
TO COMMENCE SEWING
Open the left hand shuttle slide (33), place the shuttle in its carrier (57), leaving out about two inches of thread. Close the slide to within an eighth of an inch, draw out about two inches of thread down from the check lever (15) and through the eye of the needle.
Hold the end of thread with the left hand, allowing it to be slack from the hand to the needle, and turn the wheel (88) towards you until the needle moves down and up again to its highest point. Pull the thread you are holding, and the under thread will be brought up with it through the hole in the throat plate.
Close the slide, place both ends of the thread and the material to be sewn, under the presser foot, lower the the presser bar lifter (25) and commence to sew by turning the balance wheel from the top towards you.
After making a few stitches, stop and examine them. Should there be loops projecting or a straight thread upon the lower surface, turn the tension screw (5) on the top of the machine to the right, so as to tighten the tension on the needle thread.
If the thread lies straight upon the upper surface, turn the tension screw to the left to loosen the tension of the needle thread.
The secret of perfect sewing lies in adjusting the tension on the needle thread and that on the shuttle thread so that they are equal.
TO REMOVE THE WORK
Raise the needle bar (9) to its highest point, draw about three inches of thread downwards from the check lever (15), and raise the lifter (25). Move the material back and to the left about three inches and cut the threads close to the work so as to leave the ends long enough to recomence sewing.
Before removing the work from the machine, however, seams should be secured by taking a few stitches in the opposite direction, as in hand sewing.
TO REGULATE THE TENSIONS
Test the tension of the shuttle thread by drawing it towards the round end of the shuttle. If it draws as tightly as it will bear without breaking, it is right for fabrics of firm texture. Thin, soft fabrics require less tension. To obtain more or less tension, pass the thread through more or less holes. (see page 4, "To Thread the Shuttle".)
The tension of the needle thread is regulated by turning the tension screw (5). To test the tension, draw the thread downward from the check lever (15), turning the screw (5) to the right, until the thread draws as tightly as it will bear without breaking. For thin, soft fabrics less tension is required.
TO ALTER THE LENGTH OF STITCH
Loosen the screw (66) in the slot in the bed of the machine and move it to the right to lengthen, or to the left to shorten the stitch. When the required length of stitch is obtained tighten the screw.
The shortest possible stitch is obtained by changing the screw into the hole at the end of the stitch regulator (65) and moving it to the left in the slot as far as it will go.
TO OIL THE MACHINE AND STAND
If used constantly, the machine should be oiled daily, while with moderate
use, an occasional oiling is sufficient, a drop of oil being applied at each
of the following places:
the sides of the needle bar (9),
in the four holes on the top of the arm,
the two holes on the side of the arm,
the shuttle carrier slide,
both ends of the pitman (53) and the feed lever (61),
the feed raising cam (62),
the centre joint of the feed lever,
and the slot of the feed guide.
To oil the stand, apply a drop of oil to the treadle bearings, both ends of the wooden pitman and the axle of the band wheel.
After oiling, run the machine rapidly for a few minutes, afterwards wiping off any superfluous oil.
If the machine works hard while in constant use it is certain that some place requiring oil has been overlooked. If it works hard after being out of use for some time, or after using inferior oil, use a little paraffin, run the machine rapidly for a few minutes, wipe clean and then oil with Singer Superior Machine Oil.
12K Manual - Part Two
12K Manual - Part Three
12K Manual - Part Four
Part 2
THE NEEDLEBAR Archive at ISMACS International
Online Manuals Section
INSTRUCTIONS FOR USING
SINGER 12K
"NEW FAMILY"
SEWING MACHINE - PART TWO
A few special notes are added below in explanation of any adjustment that may be necessary.
THE SLACK THREAD PIN (12) presses down the check lever (15). It is adjusted properly for all classes of general sewing, and should never be altered unless the thread breaks in sewing very thick cloth; then loosen the screw (14), and slightly lower the the slack thread pin, after which retighten the screw. Should it become displaced, it should be re-adjusted so that it begins to press down the check lever when the needle gauge mark is one-eighth of an inch above the top of the arm.
THE CHECK SPRING (16) draws up the check lever (15). Should it break or wear out, insert another as follows:- Move the needle bar (9) until its check mark is level with the top of the arm. Remove the screw that holds the spring, draw out the check lever half its length, holding it while putting in the spring with its hooked end outwards, then move the check lever back into ita place. Replace the screw, turning it a few times only, press down the end of the spring into the first hole (or into the second or third hole, if using coarse thread), then tighten the screw.
THE PRESSURE SCREW (19) regulates the pressure upon the material. Turn it to the left to increase the pressure, and to the right to decrease it. Fabrics of thick or firm texture require more pressure than thin and soft fabrics.
IF THE NEEDLE THREAD BREAKS when the needle is adjusted properly, it is caused by the tension being too tight, the eye of the needle being too small, the slack thread pin becoming displaced (see Note above), a roughness on the shuttle or its carrier, or by the point of the needle being bent.
IF THE SHUTTLE THREAD BREAKS, loosen the tension by passing the thread through fewer holes. (See page 4, "To Thread the Shuttle")
IF THERE ARE MISSED STITCHES, they are caused by the needle being adjusted too high or too low, being bent away from the shuttle, being too small for the thread, or by the point of the shuttle having become blunted.
IF THE NEEDLE THREAD FORMS SMALL LOOPS on the top of the fabric, it is caused by the check spring (16) having become broken (see Note above), and sometimes, when sewing with coarse silk or linen thread, by the needle being too fine or its point being bent.
IF THE STITCHES VARY IN LENGTH while hemming or sewing very thick and soft fabrics, loosen the feed raising cam (62), and move it a little to the left to raise the feed points, then tighten it firmly. Do not raise the feed points too high; when they descend in working they should be a little below the surface of the throat plate.
SEAMS IN HARD COTTON FABRICS should be passed over slowly, and if these are extra thick, rub them with a little white soap, which will facilitate the passage of the needle.
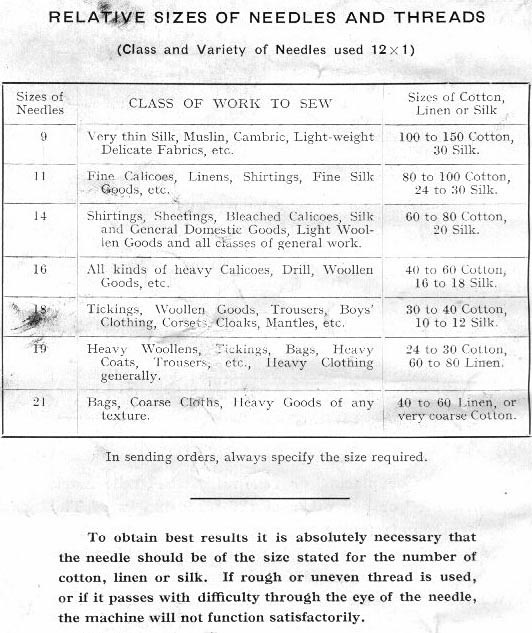
THE EXTRA THROAT PLATE, which has a large hole, is only required when using a No. 21 needle with 40 or 60 linen thread; never use it for any other size. See page 12 for sizes of needles and threads.
THE LEATHER BELT must be tight enogh to work the machine without slipping. If it is too loose, cut about half an inch from one end, and rejoin.
12K Manual - Part One
12K Manual - Part Three
12K Manual - Part Four
Part 3
THE NEEDLEBAR Archive at ISMACS International
Online Manuals Section
INSTRUCTIONS FOR USING
SINGER 12K
"NEW FAMILY"
SEWING MACHINE - PART THREE
ATTACHMENTS
THE ADJUSTABLE BINDER
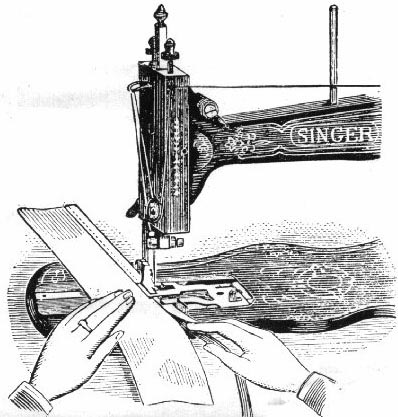
Adjust the binder to the desired width of binding and fix it firmly to the machine with the thumb screw. Place the end of the binding over the feed points, and its edges under the clips, then insert the fabric between the clips, and guide it against the binder.
If the sewing is not on the edge of the binding, loosen the screw and move the binder a little to the right or left until it is in the correct position. The under clip may be adjusted to fold the binding wider on the under than on the upper side of the work.
THE BRAIDER
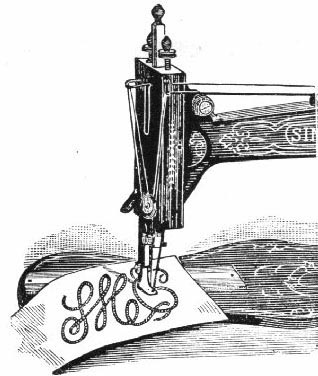
Attach the braider to the presser bar, pass the braid through the eye at the top of the arm, then take a short piece of thread and pass the ends through the slot in the braider, forming a loop.
Place the end of the braid into the loop, and drawing the thread through the slot, the braid will pass through with it. (Or pass the braid through by pushing the end with the point of a needle.)
Stamp or trace the design on the fabric, and guide it as required.
THE CORDER
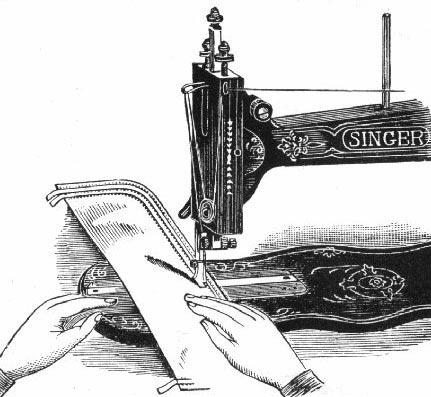
Attach the corder foot to the presser bar, pass the cord into the eye of the guide, which is held in the left hand between the folds of the fabric with its end opposite the first groove in the foot.
In placing each succeeding cord, guide the fabric with the last cord sewn in the second groove of the foot. In Cording, always turn a square corner while the needle rests in the fabric.
THE EMBROIDERING ATTACHMENT
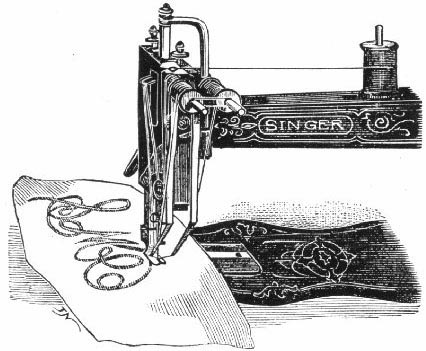
Remove the presser foot, raise the needle bar to its highest point and take out the lower screw of the face plate. Place the attachment on the edge of the face plate nearest you, with the fork of its driving rod under the slack thread pin (13).
Insert the long screw (supplied with the attachment) through the bracket arm into the lower screw hole of the face plate, keeping the attachment close to, and level with, the top of the head, and tighten it securely.
The reel bracket is now hooked around the tension screw, and also screwed to the top of the embroiderer. Attach the embroidering presser foot, turn the balance wheel slowly, and see that the levers pass each other, clearing both the needle and the presser foot.
The reels are kept on the reel pins by an elastic band. Both threads come off on the left side of the reel and pass through the tension springs on the levers. The left cover is threaded at the point from the inside, and the right lever from the outside, that is, towards the needle. The two threads afterwards pass under the presser foot.
Each embroidering thread should pass under the tension spring, so that it is tightly held between the spring and the lever to give a very light tension.
NOTE. When using the Embroidering attachment, the needle thread passes behind the driving rod into the slot of the reel bracket, and then down to the tension discs, etc..
12K Manual - Part One
12K Manual - Part Two
12K Manual - Part Four
Part 4
THE NEEDLEBAR Archive at ISMACS International
Online Manuals Section
INSTRUCTIONS FOR USING
SINGER 12K
"NEW FAMILY"
SEWING MACHINE - PART FOUR
ATTACHMENTS - continued
THE HEMMER
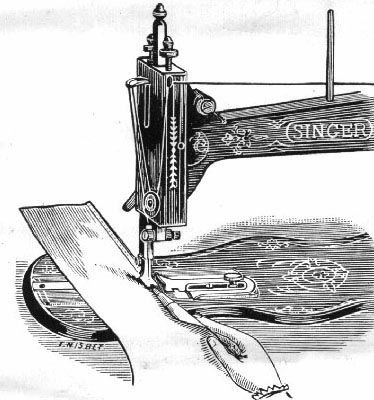
To make a Narrow Hem - Attach the hemmer to the presser bar. Commence the hem by folding it at the end, then pass a thread through it by means of a needle, drawing the thread and the fabric into the hemmer (or pass the edge of the fabric into the hemmer without a thread).
Lower the foot and proceed to sew, guiding the material with the thumb and forefinger of the right hand, taking care to keep the hemmer curl just full. Should the edge begin to run out, move the hand to the right; should too much material run in, move to the left.
To make a Wide Hem - Commence by turning the width of hem required one fold only, adding about one-eighth of an inch, which will be turned under by the hemmer. Pass the edge of the fabric into the hemmer as for a narrow hem, then fix the straight guide to gauge the width, and guide the fabric in the usual manner.
THE FELLER
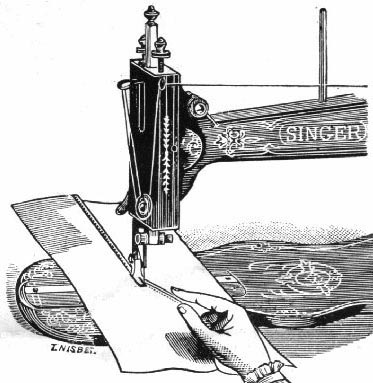
To make a Fell Seam - The two pieces of cloth should be laid, wrong side out, one over the other, with the edge of the under piece a little farther to the right than the upper piece. Stitch the two pieces together about three-eighths of an inch from the edge.
Raise the hemmer foot and open the work out flat, wrong side up, so that the edges will stand up straight. Then push the edges at the beginning of the seam into the mouth of the hemmer, as far as the needle, and lower the hemmer foot. While stitching, keep the material perfectly flat, using both hands.
THE QUILTING GUIDE
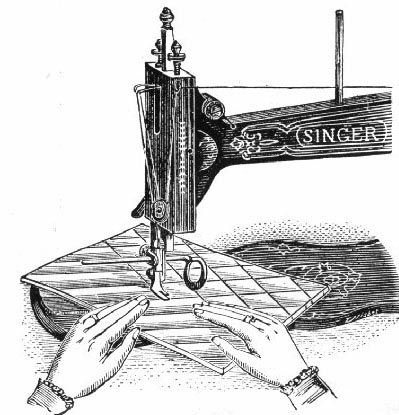
Attach the guide by passing the horse-shoe shaped clamp over the presser bar from behind, bringing the holes in it in line with that in the presser bar immediately above the presser foot. Through these holes pass the rod of the quilting guide from either side, and when the guide is at the proper distance for the pattern required, tighten the quilter in position by means of the thumb screw in the clamp.
Make a straight line upon the fabric with chalk or by crwasing, and stitch upon it. Then adjust the gauge-arm the required distance for the next line of stitching, and guide the fabric with the line already sewn directly under the gauge arm.
THE TRIMMER
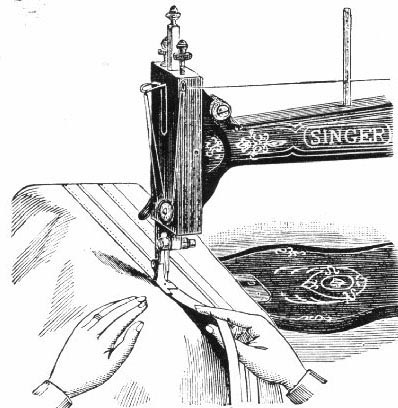
Attach the trimmer to the presser bar. Place the braid, velvet, or ribbon in the slot and under the needle, then guide the material and the trimming to follow the pattern desired.
THE TUCK MARKER
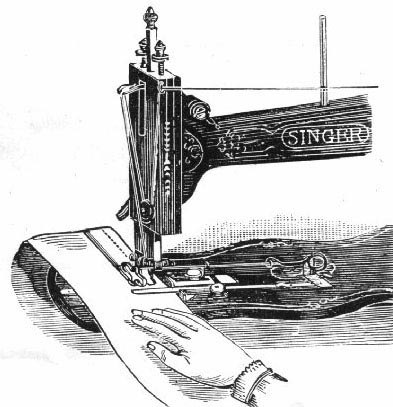
Attach the marker to the machine by the thumb screw, passing the needle through the eye in the tongue upon the marker lever. Adjust the guide to the desired width for the tuck, and the marker to the required distance from the line of stitching for the centre of the next tuck.
Fix both thumb screws firmly, then stitch the tuck, and the action of the marker will gauge and mark the next one ready for folding.
TO ALL WHOM IT MAY CONCERN:
The improper placing or renewal of the trade-mark "SINGER" or any other of the trade-marks of The Singer Manufacturing Company (all of which are duly Registered Trade-marks) on any machine that has been repaired, rebuilt, reconditioned, or altered in any way whatsoever outside a Singer factory or an authorised Singer agency is forbidden.
12K Manual - Part One
12K Manual - Part Two
12K Manual - Part Three