All 4 available source parts are included below.
Part 1
THE NEEDLEBAR Archive at ISMACS International
Online Manuals Section
Instructions for using
S I N G E R
SEWING MACHINES
15K110 -- 15K111 -- 15K112
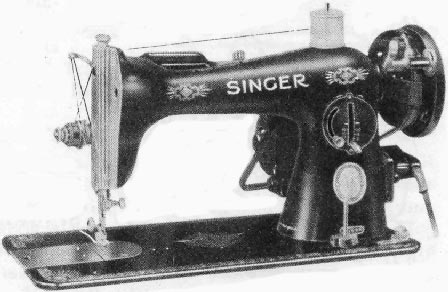
Part One
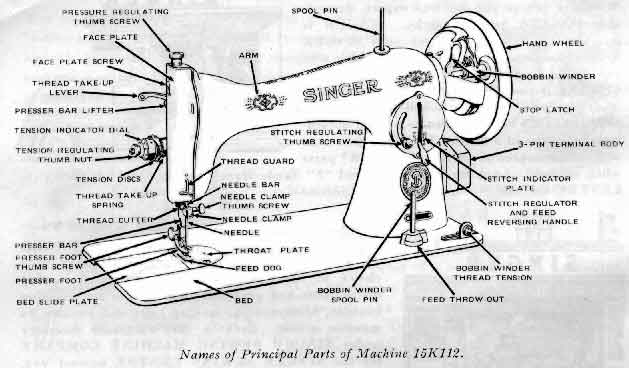
IF MACHINE IS ELECTRICALLY OPERATED
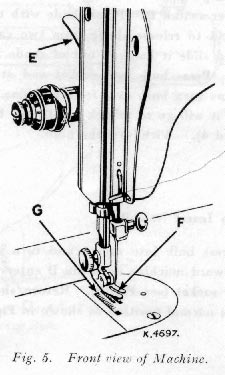
Raise presser foot F by means of presser bar lifter E to prevent injury to the foot F and feed G.
Place a piece of material under presser foot and let the foot down upon it. Turn on electric current and, if the combination knee and foot controller is installed as a knee controller, press knee lever to the right. If controller is placed on the floor to be used as a foot controller, press down on pedal of controller.
The speed of the machine is controlled entirely by the amount of pressure applied to the controller. Operate machine in this way, without being threaded, until you have become accustomed to guiding the material and operating the controller.
IF MACHINE IS HAND OPERATED
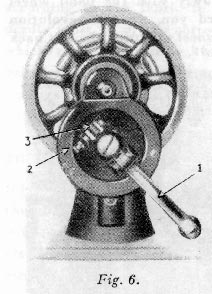
When the machine is uncovered, the hand attachment will be found to be out of working position as shown in Fig. 6. Pull the small spring stud 2, and turn the handle back until the lever 1, enters the socket 3. Press back the hinged finger 4, Fig. 7 between the spokes of the wheel. The machine is now ready for working, as shown in Fig.7.
NOTE. Before replacing the cover or the machine in its case, the lever should be disengaged and the handle placed in the position shown in Fig. 6.
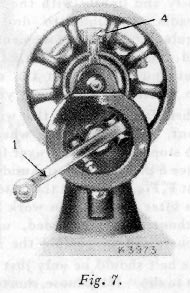
TO OPERATE THE HAND MACHINE
Place a piece of material under the presser foot F, Fig 5, and lower the latter by means of the lifter E.
Now turn the handle over from you to work the machine, without being threaded, until you are accustomed to guiding the material with the left hand.
IF MACHINE IS TREADLE OPERATED
Loosen the hand wheel by turning stop motion screw 17, Fig. 12, over toward you, place both feet upon the treadle and turn the hand wheel over toward you, at the same time allowing the feet to move freely and lightly with the motion of the treadle.
Continue to do this until a regular and easy movement is acquired and you are able to work the treadle so that you can re-start the machine with the wheel turning toward you.
When familiar with the working movement, tighten the hand wheel by truning the stop motion screw over from you, and place a piece of material under the presser foot F, Fig. 5.
 Lower
the latter by means of the lifter E and again work the machine, without being
threaded, until you are accustomed to guiding the material.
Lower
the latter by means of the lifter E and again work the machine, without being
threaded, until you are accustomed to guiding the material.
The belt should be only just tight enough not to slip. If too loose, shorten and rejoin.
BELT SHIFTER
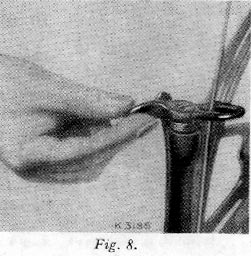
This device simplifies throwing off and replacing the belt. To throw off the belt, move the belt shifter to the left (see Fig. 8), working the treadle at the same time. To replace the belt, work the treadle slowly with the hand wheel turning toward you, when a revolution or two of the wheel will bring the belt back into its place.
NEEDLES AND THREAD
Note - This machine uses a 15 x 1 Needle -- available in sizes 9, 11, 14, 16, 18, 19 and 21For perfect stitching, the thread should be selected according to the fabric to be stitched and the needle must be of the correct size for the thread which must pass freely through eye of needle.
Select the correct needle according to the chart below. Be sure that the needle is not blunt or bent.
CHART SHOWING THE RELATIONSHIP OF TYPES OF FABRICS, THREAD AND NEEDLE SIZES AND MACHINE STITCHES TO THE INCH
| Types
of Fabrics |
Thread
Sizes |
Needle
Sizes |
Machine Stitches per Inch: Inside Seams |
Machine Stiches per Inch: Outside Seams |
| Very thin Silk, Muslin, Cambric, Light-weight
Delicate Fabrics, etc. |
100 to 150 Cotton, 50 Silk, 80 Mercurised
Darning Cotton |
9 |
20 |
25 to 30 |
| Fine Calicoes, Linens, Shirtings, Fine
Silk Goods, etc. |
80 to 100 Cotton, 50 Silk, 50 Mercurised
Darning Cotton |
11 |
16 |
20 |
| Plastic Materials |
50 to 80 Mercurised Cotton |
11 |
10 |
12 |
| Shirtings, Sheetings, Bleached Calicoes,
Silk and General Domestic Goods, Light woollen Goods and all classes of
general work |
60 to 80 Cotton 50 Silk 50 Sylko |
14 |
12 |
18 |
| All kinds of heavy Calicoes, Drill, Woollen
Goods, etc. |
40 to 60 Cotton |
16 |
10 |
12 |
| Tickings, Heavy Woollens, Trousers, Boy's
Clothing, Corsets, Cloaks, Mantles, Heavy Coats, and Heavy Clothing generally |
24 to 40 Cotton 60 to 80 Linen |
18 or 19 |
8 |
10 |
| Bags, Coars Cloths, Canvas, Duck, Heavy
Goods of any texture |
40 to 60 Linen, or very coarse cotton |
19 or 21 |
6 |
8 |
 UPPER
THREADING
UPPER
THREADING
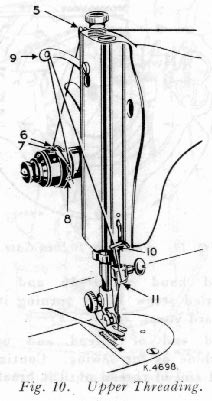
See Fig. 10
Raise take-up lever 9 to its highest point.
Place spool of thread on spool pin at top of machine.
Lead thread into notch 5.
Down and from back to front between tension discs 6.
Up over thread guard 7 from behind.
Into the loop of take-up spring 8.
Up and from the back through hole in take-up lever 9.
Down through guide 10 on face plate.
Into guide 11 in needle clamp.
From left to right through eye of needle.
Draw about two inches of thread through eye of needle with which to begin sewing.
The SINGER Needle Threader saves time, trouble and patience and is invaluable to those having defective sight.
TO REMOVE THE BOBBIN
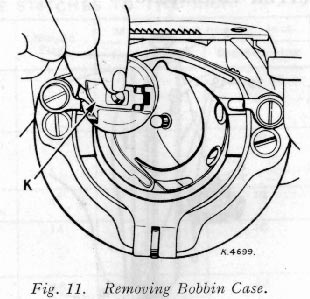
Turn the hand wheel toward you until take-up lever 9, Fig. 10, is at its highest point. Withdraw the bed slide plate. Reach down with the left hand and open bobbin case latch K, Fig. 11. Lift out bobbin case. Release catch and remove bobbin from bobbin case.
TO WIND THE BOBBIN
See Fig. 12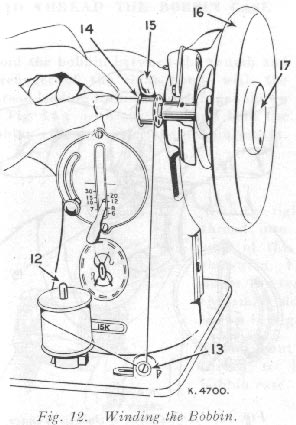
- Place bobbin on spindle with pin of spindle entering slot in right side of bobbin.
- Lock bobbin in place by pressing bobbin-winder down until latch 15, Fig. 12 engages.
- Place spool of thread on spool pin 12. Draw thread under and between tension discs 13. Lead thread up through hole in bobbin 14 from the inside.
- Hold hand wheel 16 and loosen knurled screw 17 by turning it over toward you.
- Hold end of thread and operate machine as for sewing. Continue to hold end of thread until it breaks off.
Allow tension discs to control flow of thread. Do not guide or hold thread when winding bobbin.
The bobbin winder will stop automatically when the bobbin is filled.
Remove bobbin from spindle and tighten knurled screw 17.
If pressure of bobbin winder pulley against hub of hand wheel is insufficient for winding the bobbin, press down bobbin winder until latch 15, Fig. 13 drops and holds its position.
Loosen adjusting screw 18, Fig.
13. With forefinger, push back upper end of slotted plate 19
as far as it will go, as 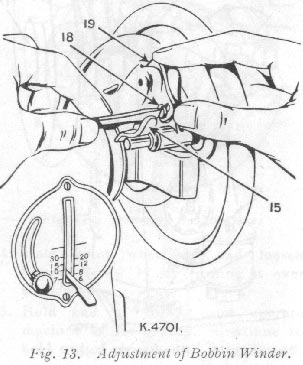 shown
in Fig. 13, and at the same time, press bobbin
winder pulley against hub of hand wheel.
shown
in Fig. 13, and at the same time, press bobbin
winder pulley against hub of hand wheel.
Tighten adjusting screw 18. If thread does not wind evenly on bobbin, loosen screw which holds tension bracket 13, Fig. 12 in postion.
Move bracket to the left if bobbin winds high on right; move bracket to the right if bobbin winds high on left.
When bracket is properly centred, thread will wind evenly across bobbin.
Bobbins can be wound while machine is sewing. Follow Bobbin Winding instructions above, omitting item 4.
TO THREAD THE BOBBIN CASE
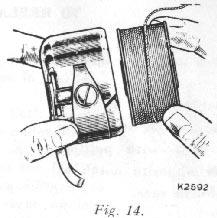
Hold the bobbin between the thumb and forefinger of the right hand, with the thread leading from left to right, as shown in Fig. 14; with the left hand hold the bobbin case and place the bobbin into it.
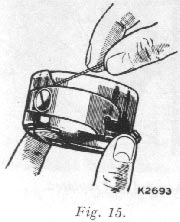
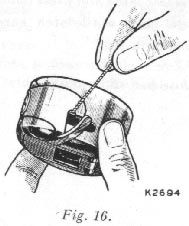
With the right hand draw the thread into the slot in the edge of the bobbin case, as shown in Fig. 15 and back under the tension spring into the small slot at its end , as shown in Fig.16.
Allow about three inches of thread to hang free from the bobbin case.
TO REPLACE THE BOBBIN CASE
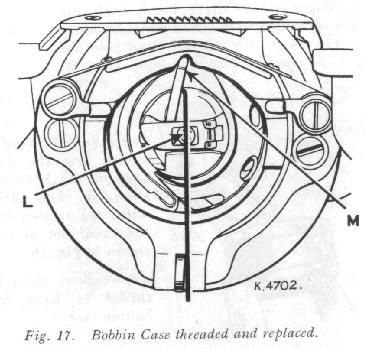
Hold bobbin case bylatch and place it on stud L of shuttle body with position finger M opposite notch at top of shuttle race.
Release latch and press bobbin case back until latch enters groove in stud.
Close bed slide plate.
Part Two
Part Three
Part Four
Part 2
THE NEEDLEBAR Archive at ISMACS International
Online Manuals Section
Instructions for using
S I N G E R
SEWING MACHINES
15K110 -- 15K111 -- 15K112
Part Two
TO PREPARE FOR SEWING
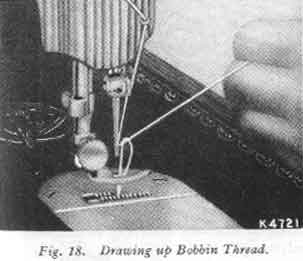
Hold end of needle thread with left hand and turn hand wheel
over toward you until needle goes down and up again 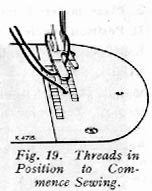 and
thread take-up lever 9, Fig.
20, is at its highest point. Pull up needle thread and bobbin threa will
come with it, as shown in Fig. 18.
and
thread take-up lever 9, Fig.
20, is at its highest point. Pull up needle thread and bobbin threa will
come with it, as shown in Fig. 18.
Lay both threads back under presser foot diaonally across the feed, as shown in Fig. 19, to the right or left, depending upon which side of needle the material is to be located, so that when presser foot is lowered, the threads will be firmly jeld between the feed and the presser foot.
TO START SEWING
-
Bring take-up lever 9 to its highest position.
- Place material under presser foot F.
- Position needle in material.
- Lower presser foot and start to sew.
NOTE :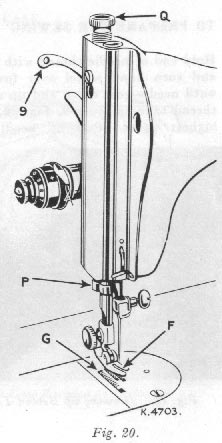
Most materials require only guiding for best sewing results. However, the miracle fabrics such as nylons, synthetic fabrics, blends with various rayons, puffed weaves, sheers, jerseys and tricots, which, by their nature require light pressure, also require support in the form of holding the material taut at the back and front of the needle as the needle enters the fabric.
This support assures a smooth, even seam. Never pull the material along when stitching.
Never operate the machine without cloth under the presser foot.
The slide over the bobbin case should be kept closed when the machine is in operation.
The hand wheel must always turn over toward the operator.
TO REGULATE THE LENGTH OF STITCH
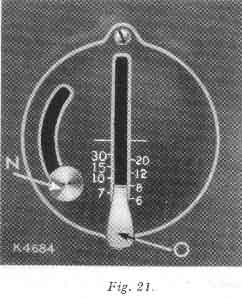
The numerals on the stitch indicator plate denote the approximate number of stitches per inch.
To change length of stitch, loosen thumb screw N and move it to bottom of slot. Move stitch regulating lever O until its upper side is in line with the number of the desired length of stitch.
 Move
thumb screw N until stitch regulating plate (inside) touches lever O.
Tighten thumb screw N.
Move
thumb screw N until stitch regulating plate (inside) touches lever O.
Tighten thumb screw N.
The machine will then make the indicated number of stitches to the inch in either a forward direction (lever O at its lowest position) or a reverse direction (lever O at highest position).
BASTING
The longest stitch, No. 6 on the stitch regulator, adjusted by lever O, Fig. 21, is found satisfactory for basting. These basting stitches can be easily removed by clipping every sixth stitch and withdrawing the long, continuous thread.
Machine basting is firmer, more even and much quicker than hand basting.
TO SEW BIAS SEAMS
Use a shorter stitch when sewing bias or curved seams to increase the elasticity of the seam and to prevent seam failure under strain. No change in tensions is required.
TO TURN A CORNER
Pivot on eye of needle. Stop machine when needle is in this position. Raise presser foot, turn work as desired, lower the presser foot and resume sewing.
TO REMOVE THE WORK
Stop machine with thread take-up lever 9, Fig. 20, at its highest position. Raise presser foot, draw the fabric back and to the left, and sever the threads on thread cutter P, Fig 20. Place ends of threads under presser foot, as shown in Fig. 19.
TO REGULATE DIRECTION OF FEED
To move the material from you, push down stitch regulator lever O, Fig. 21, to the numeral of stitch desired.
To feed the material toeard you, raise stitch regulator to the point where it will make the desired length of stitch.
The direction of feed can be reversed at any point of a seam without removing work from machine.
The reverse feed makes it easy to "back stitch" and to fasten ends of seams.
TO REGULATE PRESSURE ON PRESSER FOOT
 The
amount of pressure influences the case with which you achieve a straight seam
and uniform stitching. The pressure should be heavy enough to prevent side creepage
of material and light enough to carry the material without marking.
The
amount of pressure influences the case with which you achieve a straight seam
and uniform stitching. The pressure should be heavy enough to prevent side creepage
of material and light enough to carry the material without marking.
The surface finish on fabrics, as well as their weight, determines amount of pressure to be applied. The glazed surface of chintz and polished cotton, the loose map surface of satin, the deep piled surface of velvet, the delicate and broken surface of lace and brocade, all require a lighter pressure.
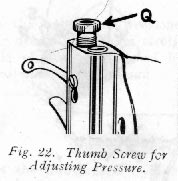
To set a light pressure, turn thumb screw Q, Fig. 22, upward until fabric moves easily under presser foot without slipping and without showing feed marks.
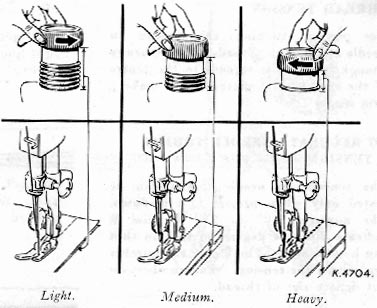
To set a heavy pressure, turn thumb screw Q downward until the fabric moves easily and the seam edges are carried evenly by the foot and the feed. Heavy, spongy fabrics like towelling, chenille, coating, etc., require heavier pressure.
THREAD TENSION
For perfect stitching, the tension on needle and bobbin threads must be heavy enough to pull the threads to the centre of the the thickness of material and make a firm stitch.
TO REGULATE NEEDLE THREAD TENSION
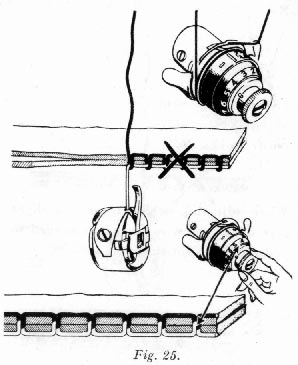
The tension on needle thread can be tested only when presser foot is down. The numerals "0" to "9" on dial B indicate different degrees of tension that can be obtained. The higher the number the greater the tension. The numbers do not denote size of thread.
When tension has been correctly set for average sewing, note number at indicator line S. This setting may be quickly regained should the tension be altered for special work or change in size of thread.
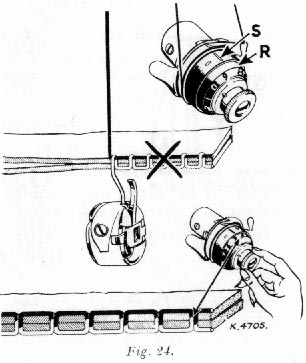
In the unbalanced tensions of Fig. 24, the needle thread lies straight along top side of material, caused by too heavy tension on needle thread.
In the unbalanced tensions of Fig. 25, the bobbin thread lies straight along under side of material, caused by too light tension on needle thread.
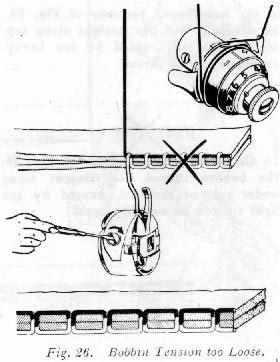
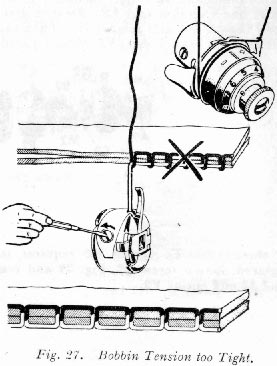
The tension on bobbin thread is regulated by the screw of the tension spring, as shown in Fig. 26.
When adjusting bobbin tension, a slight turn of the screw is all that is needed to make a fine adjustment.
To increase tension, turn screw gradually over to the right (Fig. 26).
To decrease tension, turn screw gradually over to the left (Fig. 27).
Part One
Part Three
Part Four
Part 3
THE NEEDLEBAR Archive at ISMACS International
Online Manuals Section
Instructions for using
S I N G E R
SEWING MACHINES
15K110 -- 15K111 -- 15K112
Part Three
TO REMOVE AND DISASSEMBLE NEEDLE THREAD TENSION
Turn thumb nut A2 to left (counter-clockwise) until "0" on numbered dial R stops at centre line S on indicator E2. Press in dial R to disengage pin B2 in thumb nut A2, unscrew thumb nut and remove it. Then remove dial, stop washer C2, tension spring D2, indicator E2, tension discs F2, thread guard G2 and pin H2.
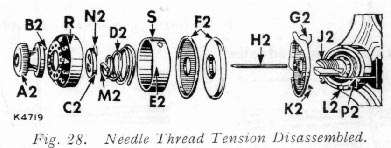
If thread take-up spring P2 requires to be replaced, loosen screw Q2, Fig. 29 and remove stud J2 and spring P2.
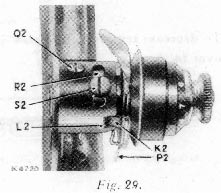 TO
REMOVE AND REPLACE NEEDLE THREAD TENSION
TO
REMOVE AND REPLACE NEEDLE THREAD TENSION
Place thread take-up spring P2 on short end of stud J2 and insert the stud with spring into the regulator R2.
Turn stud until correct tension is obtained, then tighten screw Q2. Place thread guard G2 on stud so that the lug K2 engages the short recess L2 so as to position the thread guard.
Insert tension releasing pin H2 in stud. Place two tension discs F2 on stud with their convex faces together.
Replace indicator E2, open side
out, on stud with plus and minus signs at top. Insert tension spring D2
in indicator 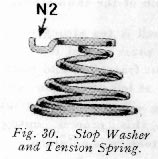 so
that first turn turn M2 of this spring will straddle
lower half of tension stud.
so
that first turn turn M2 of this spring will straddle
lower half of tension stud.
If spring and stop washer are in the correct position, extension N2 will clear first (half) coil of tension spring, as shown in Fig. 30.
Next place numbered dial R on stud and push dial to compress spring so that thumb nut A2 can be turned on to stud, carefully guiding pin B2 in thumb nut into one of the holes in numbered dial.
Lower presser bar and turn thumb nut to left until it stops at "0".
Thread the tension and pull thread through tension discs to test amount of tension at the "0" position. At this point there should be a barely perceptible pull on the thread to indicate that there is a minimum tension which gradually increases with the turning of thumb nut A2 to the right, providing a full range of tensions from light to heavy within one revolution of the thumb nut.
If the pull is too strong for a minimum tension, press in dial R to disengage pin B2 in nut from dial, and reset pin in one of holes at left of previous setting. This resetting will produce less tension at "0". Repeat this process until minimum desired tension is obtained.
If there is no tension at "0", press in dial R and reset pin B2 in one of holes at right of previous setting, repeating this process until a slight minimum tension is obtained.
The tension on thread take-up spring P2 and stroke of this spring should be just sufficient to take up slack of needle thread until eye of needle reaches fabric in its descent.
To adjust setting of thread take-up spring loosen screw S2 and move screw in slot to desired position. Then tighten screw S2.
IF CORRECT STITCHING IS NOT OBTAINED
If bobbin thread tension has been disturbed, or a correct stitch cannot be obtained without a very heavy or very light needle thread tension, then the following procedure is recommended:
Using size 50 mercurised thread in needle and on bobbin, adjust needle thread tension as instructed in Part Two.
Then turn tension thumb nut to "4" and, with two thicknesses of thin material in machine, adjust bobbin thread tension as instructed in Part Two, until stitch is correctly locked in material.
A wide range of materials and threads can now be accommodated without further adjustment of bobbin thread tension.
SEWING SUGGESTIONS
Breaking of needles might be caused by:
- Improper size of needle for thread and material.
- Bent needle.
- Pulling of material when stitching.
- Needle striking improperly fastened presser foot or attachment.
- Crossing thick seams with too small a needle.
Breaking of needle thread might be caused by:
- A knot in thread.
- Improper threading.
- Upper tension too tight.
- Needle set incorrectly.
- Needle blunt or bent.
- Thread too coarse for needle.
- Roughened hole in throat plate.
- Improper arrangement of threads to start sewing.
Breaking of bobbin thread might be caused by:
- Improper threading of bobbin case.
- Bobbin thread tension too tight.
- Bobbin wound unevenly.
Skipping of stitches might be caused by:
- Improper setting of needle.
- Needle blunt or bent.
- Needle too small for thread.
- Needle rubbing presser foot.
 DARNING
AND EMBROIDERING
DARNING
AND EMBROIDERING
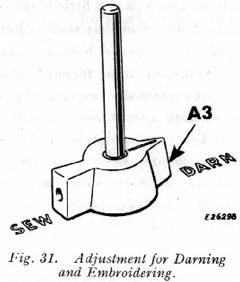
Turn pointer of feed throw-out A3, clockwise to "darn" position as shown in Fig. 31.
The feed is thus rendered inoperative and will not interfere with the free movement of the work.
Move stitch regulating lever O, Fig. 21 to its neutral position in the centre of slot at front of machine.
Remove presser foot F and let down presser bar lifter E, Fig. 5 to restore tension on needle thread which is releases when lifter is raised.
Draw up bobbin thread as instructed in Part Two.
When darning flat work, it is advisable to use embroidery hoops to hold the work.
Place the work in machine, have the unworn part near the hole under the needle. Start darning by making a line of stitches across hole a little longer than width of hole. Continue making parallel lines of stitches across hole, moving the work backward and forward and at same time gradually moving the work sidewise until hole is covered with lines of stitches running across hole. Then start as before and move the work lengthwise of hole until the stitches across hole are completely covered and the darn is finished.
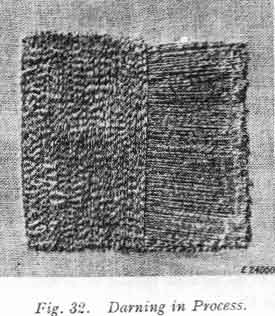
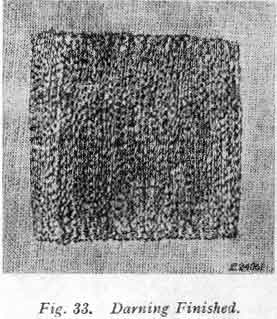
When you have finished darning or embroidering, raise presser bar lifter and replace presser foot.
Turn pointer of feed throw-out A3, Fig. 31 counterclockwise to "sew" position. Then return stitch regulating lever O, Fig. 21, to its original position and the machine is ready for regular stitching.
Part One
Part Two
Part Four
Part 4
THE NEEDLEBAR Archive at ISMACS International
Online Manuals Section
Instructions for using
S I N G E R
SEWING MACHINES
15K110 -- 15K111 -- 15K112
Part Four
PROTECTION AGAINST RUST DAMAGE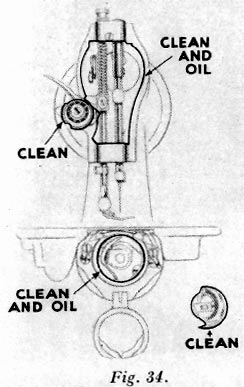
Your sewing machine was built to exacting standards of precision and workmanship. Its performance depends on the care and treatment it receives when in use and especially before storing away.
Lint and fluff, if not removed prior to storage will, during humid periods, absorb and hold moisture, and thus accelerate rust damage to highly polished thread handling and other exposed parts.
The extent of rust damage would depend upon the length of time the machine remained in idle storage in an unventilated closet, attic or basement room.
Sudden drops in temperature will cause moisture to form on parts, which if not protected by a film of oil, would rust and be damaged while in storage.
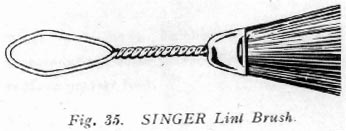
Proper storage care suggests thorough brush-cleaning to remove all traces of lint or fluff, followed by swabbing of all exposed parts with a lint-free brush saturated with SINGER oil.
See Fig. 34 for the areas that should be cleaned and coated with a protective coat of oil.
TO OIL THE MACHINE
If the machine is used continuously, it should be oiled daily. If moderately used, an occasional oiling is sufficient.
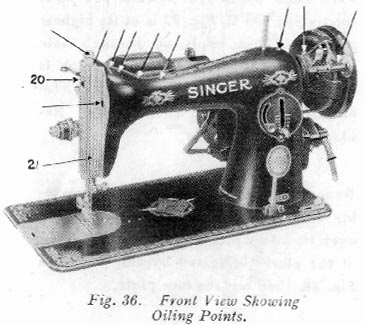
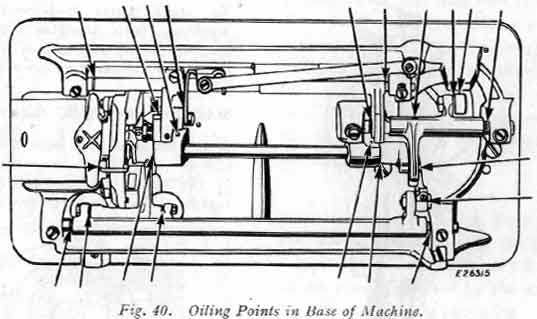
Apply one drop of oil at each of the places indicated by the unlettered arrows in Figs. 36, 38, and 40.
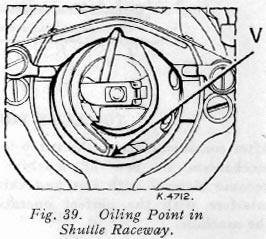
Draw to the left the bed slide plate and after removing the
lint and dust which may have accumulated, apply oil to 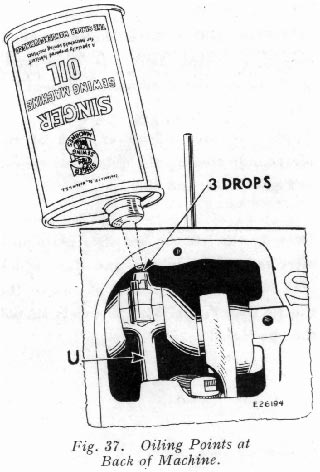 the
shuttle race V, Fig. 39.
the
shuttle race V, Fig. 39.
The slide should then be closed.
Remove cover plate from back of machine.
Turn hand wheel over toward you until connecting rod U, Fig. 37 is set at its highest position.
Then apply oil through hole in top of machine to the wick which is retained in cap of connecting rod.
Also oil the other moving parts inside.
Remove face plate 21, Fig. 36, by loosening screw 20 and slipping the plate up over it.
Apply one drop of oil at each of the places indicated by the arrows in Fig. 38, then replace face plate.
To reach parts underneath the bed of the machine, turn machine back on its hinges.
Apply one drop of oil at each of the places indicated by arrows in Fig. 40
MACHINE WORKING HEAVILY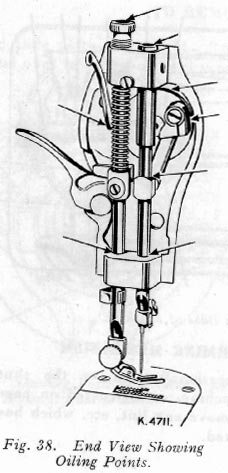
If the machine runs hard after standing idle for some time, use a little paraffin (US = kerosene) in the oiling places. Run the machine rapidly, then wipe clean and oil.
TO CLEAN THE STITCH FORMING MECHANISM
After considerable use, the stitch forming mechanism in the bed of the machine may become clogged with lint and this may interfere with the perfect operation of the machine.
Occasionally remove the shuttle from the machin, as instructed below, and remove any lint, etc., which has accumulated.
TO REMOVE THE SHUTTLE
 Draw
bed slide plate to the left.
Draw
bed slide plate to the left.
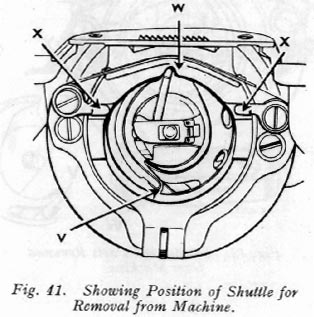
Turn hand wheel ove toward you until needle is at its highest and point of shuttle is at the position shown at V, Fig. 41.
Remove bobbin case and bobbin.
Flick shuttle race latches X, Figs. 41 and 42, downward. Swing top of shuttle race W downward on its hinge as shown in Fig. 43.
The shuttle V, Fig. 41 and 42 may now be easily removed and the parts cleaned.
TO REPLACE THE SHUTTLE
See that the needle is at its highest point.
Replace shuttle with its point V in position in Fig. 41.
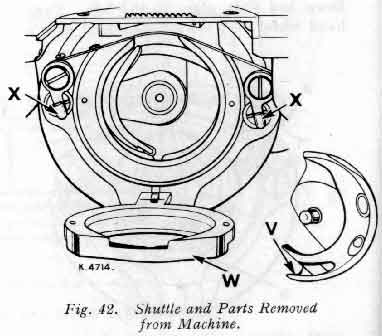
Swing top of shuttle race W, Fig. 42, upward on its hinge to position shown in Fig. 41.
Then flick latches X, Fig 42, toward each other to lock race W, Fig. 42, in position.
Replace bobbin and bobbin case and close bed slide plate.
Part One
Part Two
Part Three