All 5 available source parts are included below.
Part 1
THE NEEDLEBAR Archive at ISMACS International
Online Manuals Section
INSTRUCTIONS
FOR USING
S I N G E R
Portable Electric Sewing Machine
No. 221K
Rotary Hook, Reverse Feed
FOR FAMILY USE
(Part One)
To Pack Up the Outfit
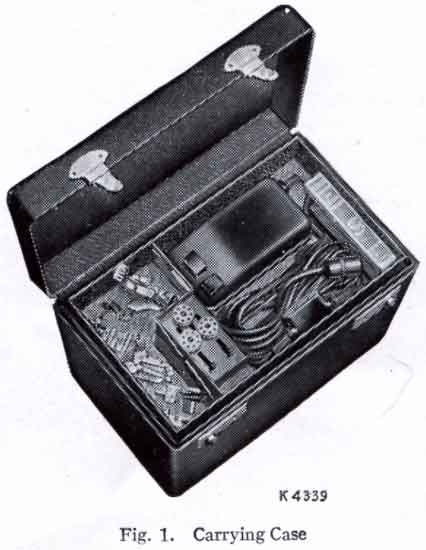
When placing the machine in its case, have the balance wheel at the right hand side of case and see that the base of the machine is at the right of the cleat at the bottom of the case
Electrical Connections
Unwind the long electric cord supplied with the machine. Push the socket plug at one end of the electric cord as far as it will go to the three-pin terminal block at the right of the machine, as shown in Fig. 8. Attach the plug at the other end of the cord to the nearest electric point.
Place the foot controller in a convenient position on the floor and the machine is ready for operation.
Singerlight
Turn the Singerlight "on" or "off" by means of the switch A, Fig. 2.
To Remove and Replace the Bulb
Do not attempt to unscrew the bulb. It is of the bayonet and socket type and does not unscrew.
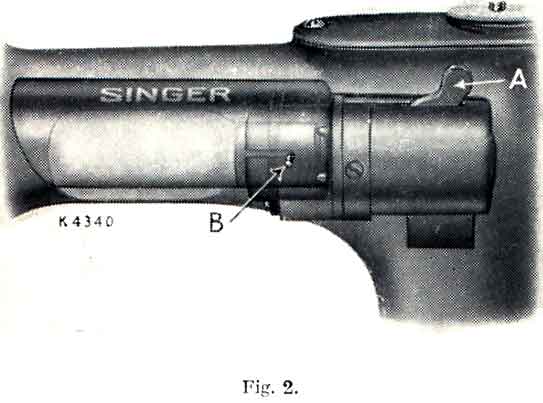
To Remove the Bulb. Press the bulb into the socket at the same time turning it over towards the machine as far as it will go; then withdraw the bulb.
To Insert a New Bulb. Press the bulb into the Singerlight socket and turn it over from the machine until the bulb pin B, Fig. 2, enters the notch in the socket as shown.
Caution
When you have finished your sewing, always disconnect the plug from the electric point.
To Operate the Machine
Raise the presser foot (B) by means of the presser bar lifter (C) to prevent injury to the foot and the feed (A).
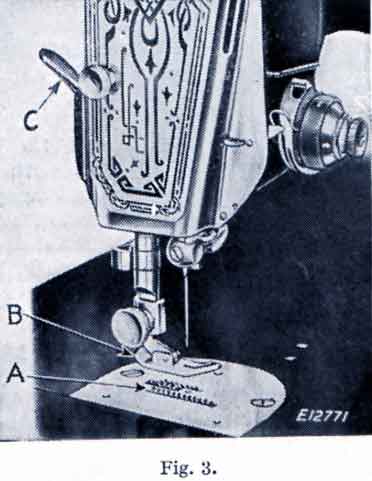
Place a piece of material under the presser foot and lower the latter upon it.
Turn on the electric current, place the right foot on the rest at the right of the foot controller and turn the foot inwards to depress the pedal. This will set the machine in motion, the speed being perfectly controlled by the amount of pressure which should be gradually applied. Operate the machine in this way, without its being threaded, until accustomed to guiding the material and operating the foot contoller.
 Balance
Wheel Stop Motion
Balance
Wheel Stop Motion
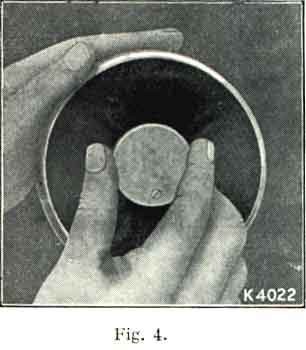
This device allows the balance wheel to run free, so that bobbins may be wound without operating the stitching mechanism. To loosen the wheel, hold it with the left hand, and with the right hand hand turn the stop motion screw over towards you, as shown in Fig. 4.
To Ensure Perfect Action of the Machine
Do not work the machine with the presser foot lowered or with the needle threaded, except when sewing.
Do not try to help the machine by pulling the fabric, lest you bend the needle. The machine feeds the work without assistance
-
To Remove the Bobbin Case and Bobbin
(See Fig. 5)
Turn the balance wheel towards you until the take-up lever (6, Fig. 14) is at its highest point. Raise the bed extension (B) as far as it will go, and with the thumb and forefinger of the left hand, open the latch (A) and withdraw the bobbin case.
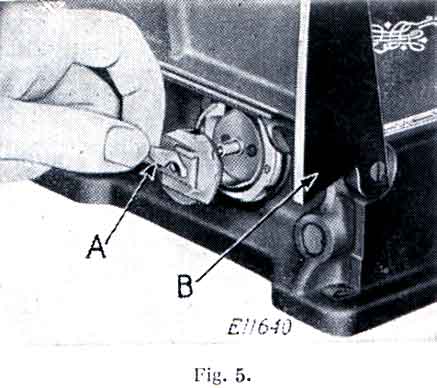
While the latch is held open, the bobbin is retained in its case. On releasing the latch and turning the case downward, the bobbin will drop out.
To Remove and Replace Bobbin Case Base
(See Figs. 6 and 7)
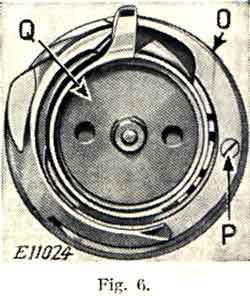
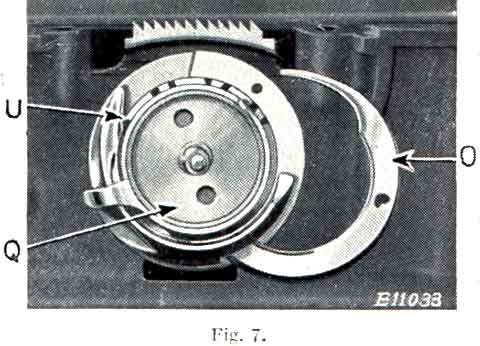
Remove throat plate and take out screw (P) so that the gib (O) can be displaced as shown in Fig. 7. Turn the bobbin case base so that the small point (U) on the base is beneath the point of the sewing hook, as shown in Fig. 7 and take out the bobbin case base (Q). To replace the base, reverse the operation.
To Wind the Bobbin
(See Fig. 8)
Loosen the balance wheel (see Fig. 4). Place an empty bobbin on the bobbin winder spindle and push it on as far as it will go. Place a reel of thread on the spool pin (1), and lead the thread into the guide (2), under and between the tension discs (3), and, from the inside, through one of the holes in the left side of the bobbin (4).
Press down th bobbin winder pulley against the belt, and then gradually apply pressure to the foot controller to operate the bobbin winder. The end of the thread must be held until a few coils are wound and should then be broken off. When sufficient thread has been wound upon the bobbin, release pressure on the foot controller, pull the bobbin winder pulley away from the belt and remove the bobbin from the spindle.
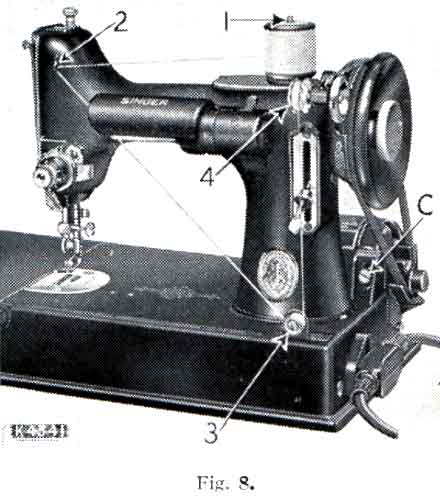
If the thread does not wind evenly on the bobbin, loosen the screw which holds the tension bracket (3) in position on the bed of the machine and slide the bracket to the right or left, as may be required. Then tighten the screw.
 To
Thread the Bobbin Case
To
Thread the Bobbin Case
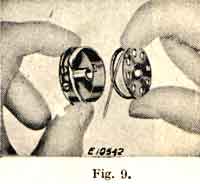
Hold the bobbin between the thumb and forefinger of the right hand with the thread leading from right to left, as shown in Fig. 9.
With the left hand hold the bobbin case as shown in Fig. 9, the slot in the edge being at the top, and place the bobbin into the bobbin case.
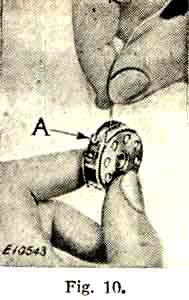
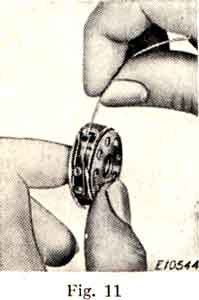
Then pull the thread into the slot as shown in Fig.10, and back under the tension spring into the slot at the end of the tension spring as shown in Fig. 11.
-
-
To Replace the Bobbin Case
(See Fig. 12)
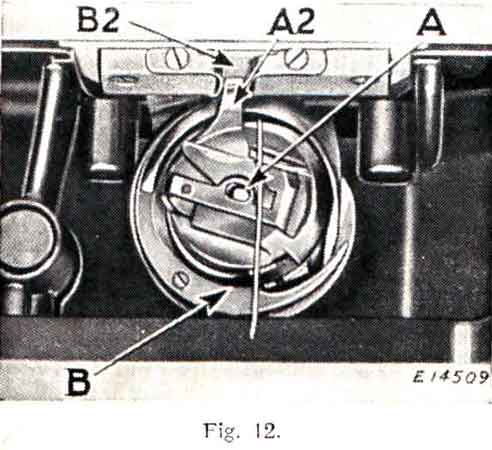
After threading the bobbin case hold its latch between the thumb and forefinger of the left hand. Place the bobbin case on the centre stud (A) of the bobbin case base with the thread drawing from the top of the bobbin case. Release the latch and press the bobbin case back until the latch catches the groove near the end of the stud. Allow about three inches of thread to hang free, and turn down the bed extension.
Caution -- If the throat plate is removed for cleaning the stitch-forming mechanism, etc., make certain when replacing the throat plate that the position finger (A2) enters the notch (B2) of the position plate attached to the underside of the throat plate.
**********
Part Two / Part Three / Part Four / Part Five
Part 2
THE NEEDLEBAR Archive at ISMACS International
Online Manuals Section
INSTRUCTIONS
FOR USING
S I N G E R
Portable Electric Sewing Machine
No. 221K
Rotary Hook, Reverse Feed
FOR FAMILY USE
(Part Two)
 To
Set the Needle
To
Set the Needle
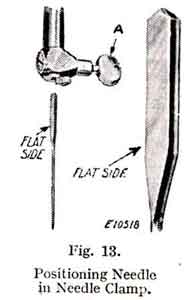
(See Fig. 13)
Turn the balance wheel over towards you until the needle-bar is at its highest position, and loosen the thumb-screw (A) in the needle clamp.
Insert the needle into the needle clamp, to the left of the thread guide, as far as it will go, with the flat side of its shank to the left, as shown in the illustration. Then tighten the thumb-screw.
-
 Upper
Threading
Upper
Threading
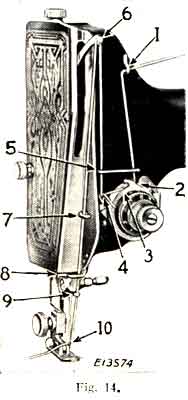
(See Fig. 14)
Turn the balance wheel over towards you until the thread take-up lever (6) is raised to its highest point. Place a reel of thread on the spool pin at the top of the machine, and lead the thread into the thread guide (1), down, under and from right to left between the tension discs (2).
Hold the reel tightly with the right hand and with the left hand pull the thread up under the take-up spring (4) until it enters the retaining fork (3).
Then pass the thread up and back of the thread guide (5) and from right to left through the hole in the take-up lever (6), down into the guide (8), into the guide (9), and from right to left through the eye of the needle (10), leaving about three inches of thread with which to commence sewing.
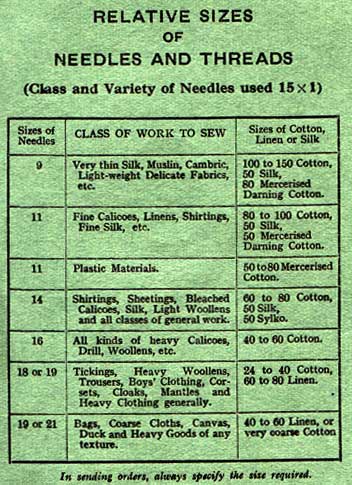
To obtain best results it is absolutely necessary that the needle should be of the size stated for the number of cotton, linen or silk, as shown on inside of back cover. If rough or uneven thread is used, or if it passes with difficulty through the eye of the needle, the machine will not function satisfactorily.
The Singer Needle Threader saves time, trouble and patience and is invaluable to those having defective sight.
To Prepare for Sewing
With the left hand hold the end of the needle thread, leaving it slack from the hand to the needle.
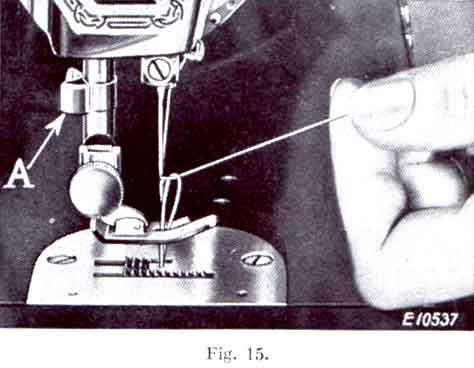
Turn the balance wheel over towards you for the needle to move down and up again to its highest. Pull the thread you are holding, and the under thread will be brought up with it through the hole in the throat plate, as shown in Fig. 15. Place both ends of thread under and to the back of the presser foot.
To Commence Sewing
Place the material to be sewn beneath the presser foot, lower the latter, and commence to sew.
When sewing thick material, it may be necessary to turn the balance wheel over towards you by hand to start the machine. This should also be done if the machine stops when sewing across thick seams.
NOTE -- Do not try to help the feeding of the work by pulling the material, as this may deflect the needle and cause it to break.
To Remove the Work
Stop the machine with the thread take-up lever (6, Fig. 14) at its highest point and raise the presser foot. Draw the material back and to the left and sever the threads by passing them over the thread cutter (A, Fig 15). Leave the ends of the threads a few inches long under and at the back of the presser foot.
To Regulate the Tensions
(See Fig 16)

For ordinary stitching, the tension on the upper and under threads should be equal, so as to lock both threads in the centre of the work, as above.
If either tension is stronger than the other, imperfect stitching will be the result, thus:--
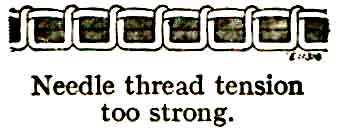
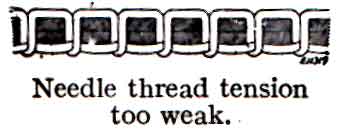
Fine fabrics require a light tension, while heavy materials want more tension to obtain a perfect stitch.
The tension on the needle thread can be regulated only when the presser foot is down.
A correct stitch can usually be obtained by varying the tension on the needle thread.
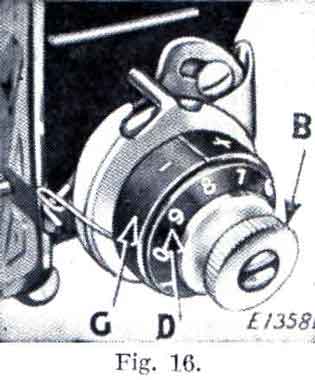 Lower
the presser foot and then turn the thumb
nut (B) for more or less tension. The tension index
flange (D) is marked with numbers 0 to 9 indicating the different degrees
of tension that can be produced. The numbers do not denote a particular size
of thread.
Lower
the presser foot and then turn the thumb
nut (B) for more or less tension. The tension index
flange (D) is marked with numbers 0 to 9 indicating the different degrees
of tension that can be produced. The numbers do not denote a particular size
of thread.
By noting the particular number opposite the indicator line, when set for a satisfactory tension on work being stitched, this number can be readily reverted to when changing from one class of material to another. The higher numbers denote increased tension, and the lower numbers less tension. The tension indicator (G) is marked with the signs + and - which indicate the direction to turn the thumb nut (B) for more or less tension.
As all machines are correctly adjusted before leaving the factory, the under tension seldom requires to be altered, but if this becomes necessary tighten the screw (A, Fig 10) which is nearest the centre of the tension spring on the outside of the bobbin case for more tension, or loosen the screw slightly for less.
Always use thread with corresponding size of needle as per Table on page 3 of cover.
 To
Regulate the Length of Stitch and the Direction of Feed
To
Regulate the Length of Stitch and the Direction of Feed
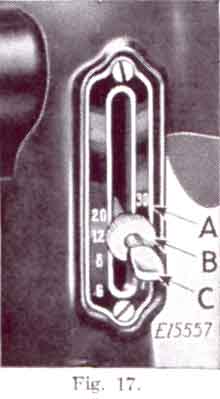
(See Fig 17)
Screw the thumb nut (B) away from the stitch indicator plate (A) as far as it will go, then move the stitch regulator lever (C) until it is in line with the figure denoting the number of stitches desired per inch, and screw the thumb nut (B) inward until it touches the stitch indicator plate.
Thus set, the machine will make the indicated number of stitches in a forward direction. If it is desired to reverse the direction of the stitching, raise lever (C) as far as possible and the machine will make the same number of stitches in a backward direction.
Basting
Loosen the tension on the needle thread and set the stitch regulator to make the longest stitch -- No. 6. The stitches may then be easily pulled from the material.
Machine basting is firmer, more even, and much more quickly done than by hand.
To Change the Pressure on Material
For ordinary family sewing it is seldom necessary to change the pressure on the material. If sewing fine silk or flimsy material, lighten the pressure by giving the thumb screw (C, Fig 19) two or three turns upwards. To increase the pressure, give the thumb screw a few turns downwards.
To Turn a Corner
Stop the machine when the needle is rising, but still in the material. Raise the presser foot and turn the work, using the needle as a pivot. Then lower the presser foot.
To Sew Flannel or Bias Seams
Use a short stitch and as light a tension as possible on the needle thread, so that the stitching will be loose enough to allow the material to stretch.
To Oil the Machine
To ensure easy running the machine requires to be oiled so that all moving parts in contact are covered with a film of oil. These should never be allowed to become dry.
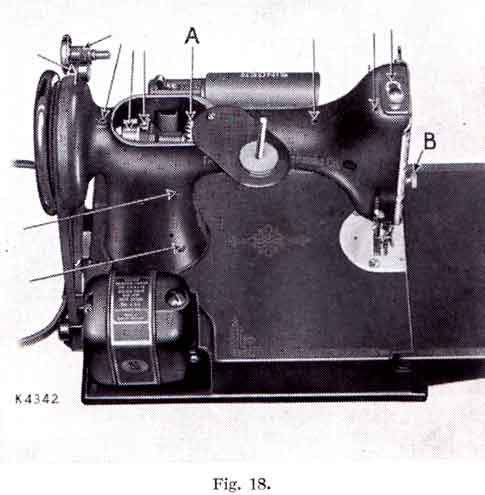
If used constantly, the machine should be oiled daily, while with moderate use, an occasional oiling is sufficient. A drop of oil should be applied at each of the points indicated by the unlettered arrows in Figs. 18, 19, and 20. Oil holes are provided in the machine for bearings which cannot be directly reached. When oiling insert the oil can spout well into the oil holes.
Turn back the cover at the top of the machine and oil the moving parts inside the arm as indicated in Fig. 18, and occasionally apply a small quantity of Singer Motor Lubricant to the teeth of the gear (A), then replace the cover.
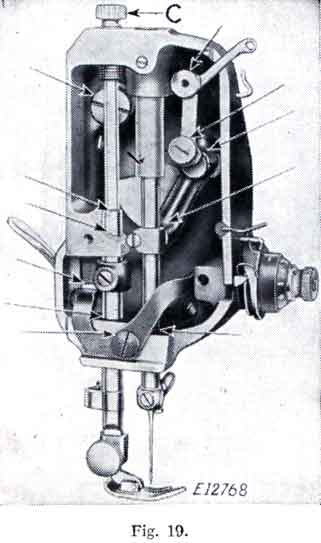
Take out the thumb screw (B, Fig 18) and remove the face plate. Put one drop of oil into each of the holes and joints indicated in Fig. 19, then replace the face plate and thumb screw.
Occasionally apply a drop of oil at the hook bearing at B in Fig. 12.
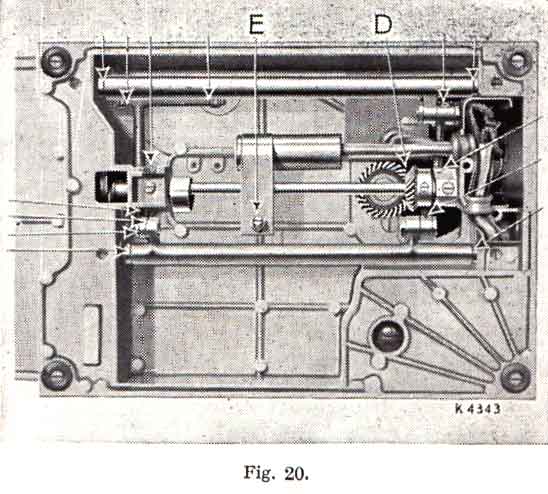
To reach the parts underneath the bed turn the machine over on its side. Remove the thumb nut and felt washer from the screw (E, Fig 20) and take off the cover plate. Apply oil at the holes and bearings indicated in Fig. 20, and occasionally apply a small quantity of Singer Motor Lubricant to the teeth of the gears (D). Replace the bed cover plate, washer and thumb nut, being careful not to fasten the latter too tightly.
To Lubricate the Motor
USE ONLY SINGER LUBRICANT FOR LUBRICATING THE MOTOR. A tube of this lubricant is sent with the machine.
Singer Electric Motor Lubricant is a specially prepared non-flowing compound which is not affected by varying temperatures. It is the only lubricant which will positively lubricate the motor. Other lubricants, including oil or ordinary grease, must not be used for lubricating the motor as they are harmful for this purpose.
When the machine is despatched from the factory the two motor grease cups (A, Fig. 21) are filled with sufficient lubricant for approximately six months use, under ordinary circumstances.
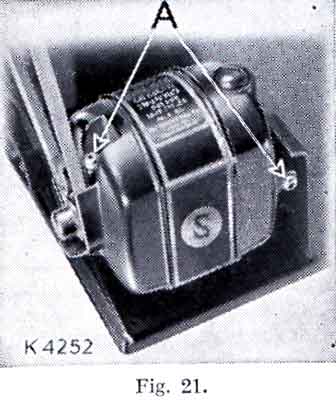
At least once every six months thereafter, these grease tubes should be refilled with Singer Electric Motor Lubricant. To do this, insert the tip of the lubricant tube tube into the hole of each of the grease tubes and force the lubricant through until both grease tubes are filled.
HINTS
The Belt. The belt tension should be only enough to keep the belt from slipping. If the tension is incorrect, loosen the screw (C, Fig. 8) about one turn to allow the motor to drop downward. Now retighten the screw and the belt will be found to have the correct tension.
Machine working heavily. If the machine runs hard after being idel, oil with paraffin (US = kerosene. AQ). Then run rapidly, wipe clean and oil with Singer Oil.
Needles Breaking. See that the needle is not bent, the upper tension is not too tight, and the presser foot or attachments are securely fastened. Avoid pulling the material and do not sew heavy seam or thick goods with too fine a needle (see table on inside of back cover).
Breaking of Needle Thread. This may be caused by:
Improper threading.
Tension being too tight.
Thread being too coarse for size of needle.
Needle being bent, having a blunt point, or being set incorrectly.
Inferior needles and thread are often the causes of breaking. The eye in Singer Needles is specially finished to prevent cutting of thread, while the best thread resists strain and is free from knots. Singer Shops sell the best machine sewing thread.
Breaking of Bobbing Thread. This may be caused by:--
Improper threading of bobbin case.
Tension being too tight.
Skipping of Stitches. The needle may not be accurately set into the needle bar. It may be blunt or bent, or too small for the thread in use.
**********
Part One / Part Three / Part Four / Part Five
Part 3
THE NEEDLEBAR Archive at ISMACS International
Online Manuals Section
INSTRUCTIONS
FOR USING
ATTACHMENTS
SUPPLIED WITH
S I N G E R
Machine No. 221K
NOTE -- Before applying any of these attachments raise the needle and remove the presser foot. After substituting the attachment turn the balance wheel slowly over towards you to make sure that the needle passes through the centre of the needle hole.
The Binder -- Binding
Pass the binding through the scroll of the binder and draw it under the needle.
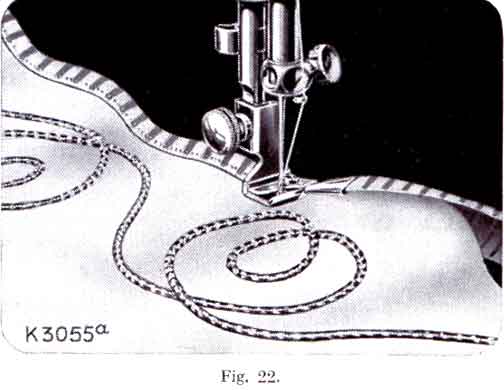
Place the edge of the material to be bound between the scroll of the binder and under the needle, lower the presser-bar lifter ans sew as usual. Bias binding should be cut 15/16 of an inch wide.
To Bind with Dress Braid -- Proceed as when using bias binding; but as dress braid and binding purchased already folded are narrower than bias binding they should be inserted in the outer slot of the binder. The edges of dress braid are not turned under as in the case of bias binding.
To make French Folds -- Proceed as directed for binding, but pass the cloth beneath the binder-foot, so that the fold is stitched on to the face of the material instead of on the edge.
The Adjustment and Operation of the Binder
The edge to be bound should be held well within the centre slot of the scroll, and with a little practice this is quite easy. If the material is allowed to slip away form the scroll when near the needle, the edge will not be caught in the binding.
Various materials and conditions require different adjustments of the Binder to bring the stitching close to the edge. A wider adjustment of the Binder is necessary when binding curves than when binding a straight edge.
To adjust the Binder, loosen its small screw and move the scroll to the right for a narrower adjustment, or to the left for a wider adjustment, after which securely tighten the screw. To become perfectly familiar with the adjustment of the Binder, a little practice is necessary.
Binding Outside Curves
Practice is required to bind a curved edge properly. The edge to be bound must be allowed to pass freely through the scroll and should not be crowded in or against it. Guiding should be from the back of the binder and to the left, allowing unfinished edges to swing naturally into the scroll of the binder.
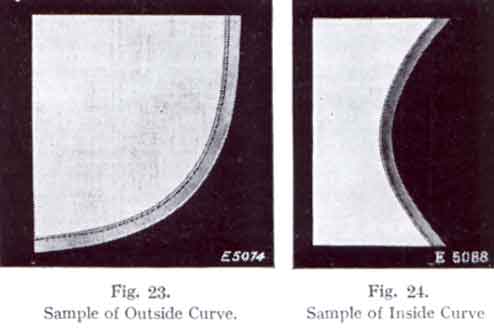
Never pull the binding as it feeds through the Binder, as bias material is very easily stretched and would be too narrow when it reaches the needle. If this occurs the edges will not be turned.
When binding a curved edge, turn the material only as fast as the machines sews. It is not possible to hold the material in the entire length of the scroll when binding a small curve.
Do not push the material in too fast, as the edge will then become puckered, and do not stretch the material or the curve will not be the proper shape when finished. If the stitching does not catch the edge of the binding the scroll should be adjusted a little to the left.
Binding Inside Curves
This curve is found on nearly all garments which are finished with a bound edge, but practice is necessary on various materials.
When binding an inside curve, straighten out the edge as it is being fed into the Binder. When doing this, take care not to stretch the edge of the material.
If the material is soft, like batiste or crepe de chine, add a row of machine stitching close to the edge of the curve before binding.
 The
Edge-Stitcher
The
Edge-Stitcher
A Combined Edge-Stitching, Lace-Joining and Piping Attachment
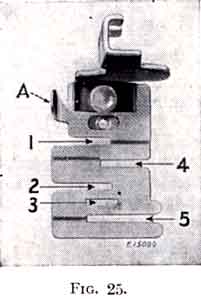
This attachment is an indispensable aid whenever stitching must be kept accurately on the extreme edge of the material. The slots numbered 1 to 5 in Fig. 25 serve as guides for sewing together laces, inserions and embroideries, sewing in position hemmed or folded edges, piping or sewing flat braid to a garment.
The distance of the line of stitching from the edge of the material in the slots can be regulated by pushing the lug (A) to the right or left. If it moves hard, put a drop of oil under the blue spring, then wipe it dry.
-
Sewing Lace Together with the Edge-Stitcher
It is difficult to sew two lace edges together even after basting, but the edge-stitcher makes it possible to stitch on the very edge.
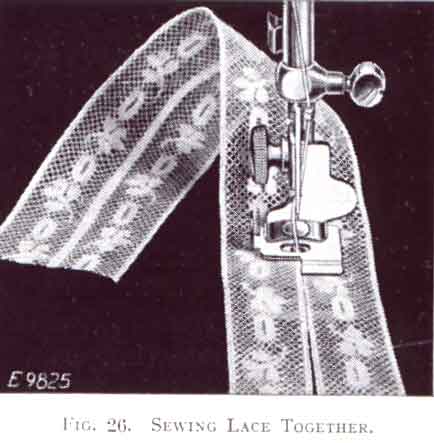
Place one edge in slot 1 and th other in slot 4, and adjust lug (A) until both edges are caught by the stitching. Hold the two pieces slightly overlapped to keep them against the ends of the slots. The thread tensions should be loose to avoid puckering of fine lace.
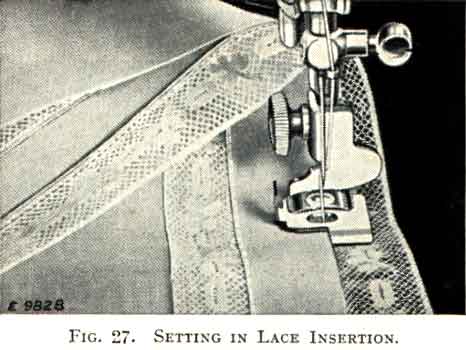
Lace and ribbon or other insertions can be set in by using the same slots (1 and 4). The material may be folded over before placing it in the slot so that a double thickness is stitched and will not pull out. The surplus material is trimmed away close to the stitching as shown in Fig. 27.
Piping with the Edge-Stitcher
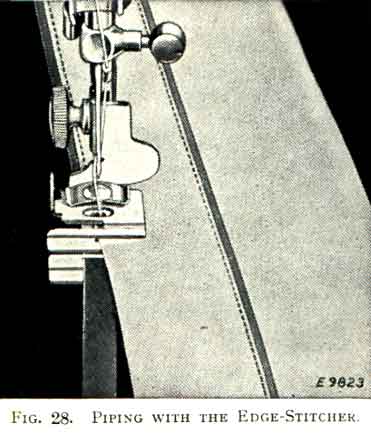
Piping is very attractive if the correct contrasting colour is chosen for the piping material. Place the piping, with its finished edge to the left, in slot 3. Place the edge to be piped in slot 4, as shown in Fig. 28.
Piping should preferably be cut bias, and should be cut to twice the width of the slot (3) in the edge-stitcher so that it can be folded once.
Applying Bias Folds with the Edge-Stitcher
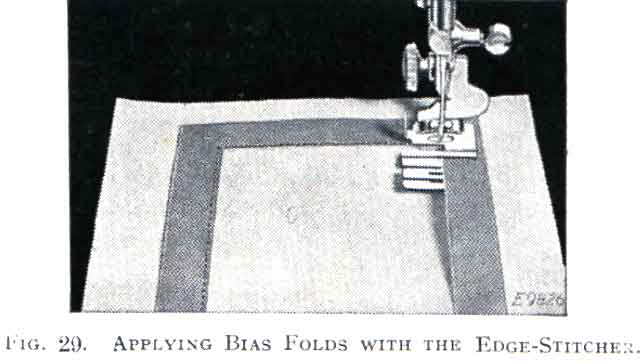
Folded bias tape or military braid, used for neat and colourful trimming, may be sewn on by placing the garment under the edge-stitcher, the same as under a presser foot, and placing the tape in slot 1 or 4. To make a square corner, sew until the turning point is reached, then remove the tape from the attachment and form the corner by hand, replace it in the slot and continue stitching, as shown in Fig. 29. To space two or more parallel rows, a guide line such as a crease, chalk mark or basting thread should be used.
-
Stitching a Wide Hem with the Edge Stitcher
 A
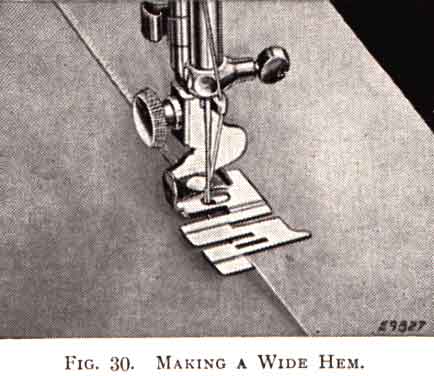
wide hem on sheets, pillow slips, etc., may be attached evenly with the edge-stitcher
after the hem has been measured and the edge turned. Insert the dge in slot
5 as shown in Fig. 30 and adjust to stitch
as close to the edge as desired.
A
wide hem on sheets, pillow slips, etc., may be attached evenly with the edge-stitcher
after the hem has been measured and the edge turned. Insert the dge in slot
5 as shown in Fig. 30 and adjust to stitch
as close to the edge as desired.
-
Making a French Seam
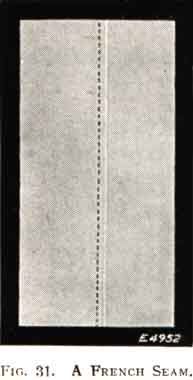
An even French seam may be made by inserting the two edges to be joined, wrong sides together, in slot 1 or 2 and stitching close to the edge; then folding both right sides together and inserting the back of the seam into slot 1 again and stitching with enough margin to conceal the raw edges. See Fig. 31.
-
Tucking with the Edge-Stitcher
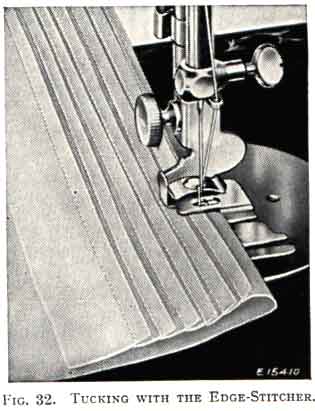
Dainty narrow tucking may be produced on the edge-stitcher by inserting creased folds in slot 1 as shown in Fig. 32, and adjusting the edge-stitcher to right oleft for the desired width of tuck, up to 1/8 inch. Successive tucks may be easily creased by folding the material at the desired distance from the previous tuck, and then running the length of the fold over a straight edge such as the edge of the sewing machine cabinet. The secret of good tucking lies in a light tension, short stitch, and fine thread and needle.
**********
Part One / Part Two / Part Four / Part Five
Part 4
THE NEEDLEBAR Archive at ISMACS International
Online Manuals Section
INSTRUCTIONS
FOR USING
ATTACHMENTS
SUPPLIED WITH
S I N G E R
Machine No. 221K
(Part Two)
The Gathering Foot -- Shirring
Material placed under the gatherer and stitched in the usual way will be slightly gathered. Any fabric that drapes well is especially suited for shirring with the gatherer, generally with a long stitch and tight tension.
To increase the fullnes of the gathers, lengthen the stitch. To decrease the fullness, shorten the stitch.
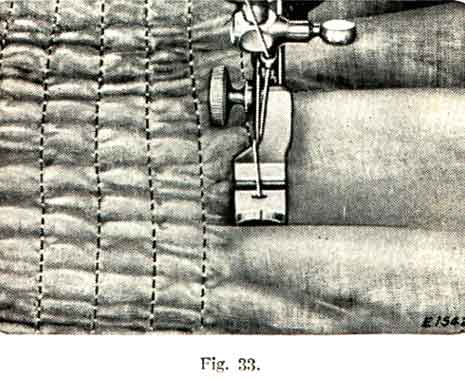
With the gatherer, it is possible to shirr in narrow rows as shown in Fig. 33. The material may be guided as easily as when sewing with the presser foot.
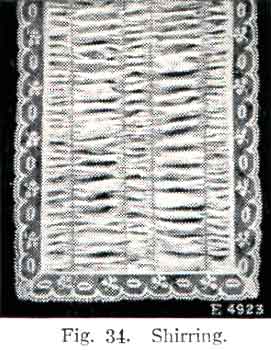
Fine materials, such as batiste, silk or net, may be very attractivelt shirred. Where only a slight fullnes is required, as at the top of a sleeve or around the neck, the gatherer will be found very convenient.
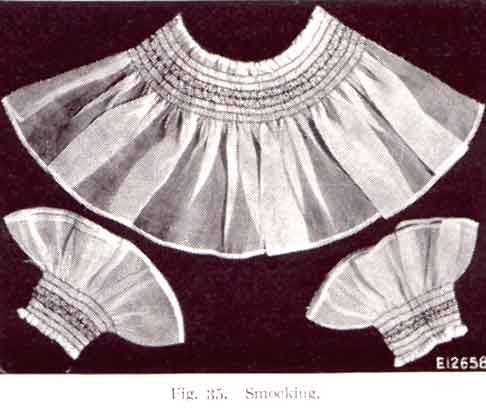
A very pleasing effect may be gained by using thread or embroidery silk of contrasting colour on the bobbin. Fig. 35 shows a white organdie collar and cuff set with red and green smocking made with the gatherer, using fine crochet cotton or tatting thread on top and white cotton on the bobbin.
-
The Foot Hemmer -- Hemming
Clip off the right hand corner of the material for its edge to curl easily. Then, with the hemmer foot raised, place the material from left to right under the foot and, with its edge slightly raised, insert the corner into the mouth of the hemmer, easing it along until it fills the curl and reaches the needle.
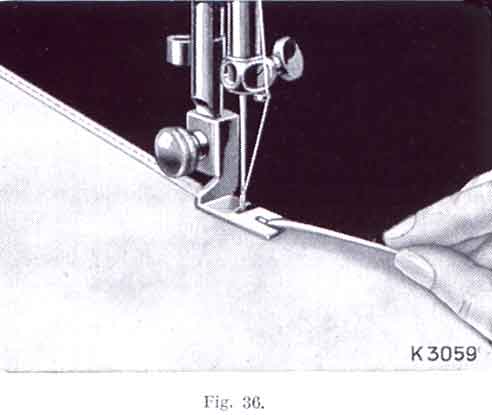
Lower the foot and make the first few stitches slowly. Guide the material with the thumb and forefinger of the right hand, so that the edge lies flat over the top of the hemmer, and proceed to sew, taking care to keep the hemmer curl just full. Should the dge begin to run out, move the hand to the left; should too much material run in, move to the right.
Hemming and Sewing on Lace in one Operation
Start the hem, as explained on page 34, and, when it is well started, raise the needle to its highest point. Raise the hemmer to relieve the pressure on the hem, and pass the end of the lace through the slot in the side of the attachment and over the hem, as shown in Fig. 37.
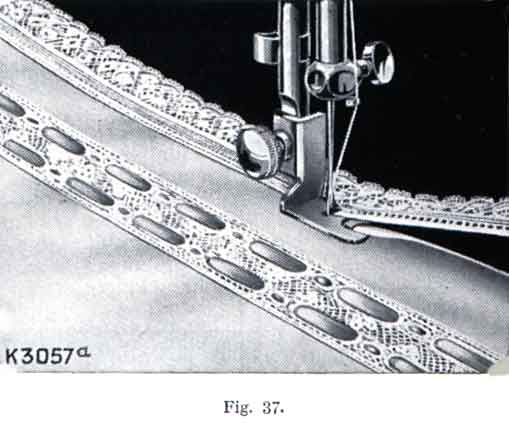
Take care that the hem is not displaced in the hemmer, and that the needle goes through both lace and hem. Then lower the presser bar, and guide the lace over the front of the hemmer, taking care to keep it well into the slot.
 The
Foot Hemmer -- Felling
The
Foot Hemmer -- Felling
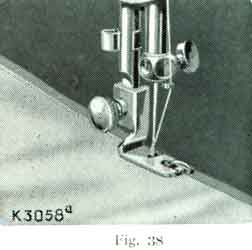
The two pieces of cloth should be laid, wrong side out, one over the other, with the edge of the under piece a little farther to the right than the upper piece, as shown in Fig. 38.
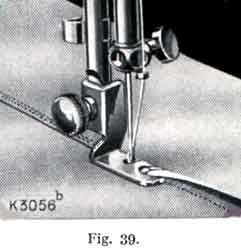 Stitch
the two pieces together, using the front projecting part of the hemmer as a
guide for keeping the seam straight. This should be made close, but not too
near to the edge of the upper piece, or the cloth will give way at the seam
when a strain is put upon it.
Stitch
the two pieces together, using the front projecting part of the hemmer as a
guide for keeping the seam straight. This should be made close, but not too
near to the edge of the upper piece, or the cloth will give way at the seam
when a strain is put upon it.
Raise the hemmer foot and open the work out flat, wrong side up, so that the edges at the beginning of the seam into the mouth of the hemmer, as far as the needle, and lower the hemmer foot. While stitching, keep the material perfectly flat, using both hands, and see that the seam is in line with the mouth of the hemmer. For the second seam, the stitch should be lengthened slightly.
-
 The
Adjustable Hemmer
The
Adjustable Hemmer
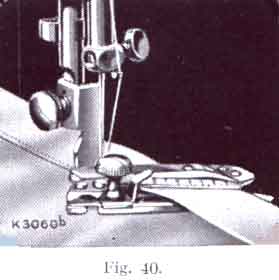
With its slide closed, see Fig. 40, the attachment will make hems up to one inch wide.
 Loosen
the screw at the front and move the slide until the pointer is against the desired
width, then tighten the screw. Insert the edge of the material between the slide
and the number gauge, and draw it backward and forward until the hem is formed,
stopping with its end under the needle. Lower the presser bar and sew, taking
care in guiding the work to keep the hemmer full. Felling can also be done by
following the instructions on page 36.
Loosen
the screw at the front and move the slide until the pointer is against the desired
width, then tighten the screw. Insert the edge of the material between the slide
and the number gauge, and draw it backward and forward until the hem is formed,
stopping with its end under the needle. Lower the presser bar and sew, taking
care in guiding the work to keep the hemmer full. Felling can also be done by
following the instructions on page 36.
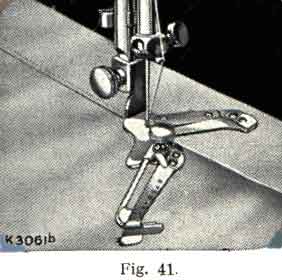
To make a hem more than one inch wide, loosen the screw, draw the slide to the right as far as it will go, and turn it towards you, as in Fig. 41. Fold and crease down a hem of the desired width, pass the fold under the extension at the right of the hemmer, then insert the edge of the material into the folder, and proceed to sew.
-
The Ruffler
Lines 1, 2, 3, 4, and 5 in Fig. 42 indicate where the material is to be placed for various operations, as follows:
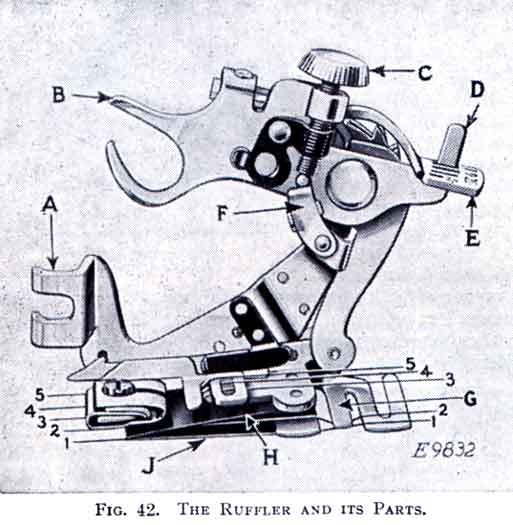
Line 1 -- the correct position for the material to which the ruffled material is applied.
Line 2 -- material to be ruffled.
Line 3 -- the facing for the ruffle.
Line 4 -- thestrip of piping material.
Line 5 -- the edge to be piped.
Refer to Fig. 42 when inserting the material in the ruffler.
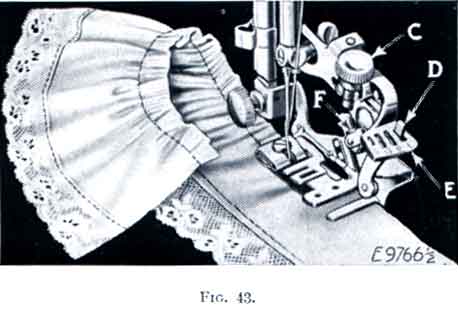
The names and uses of the principal parts of the ruffler are as follows, see Fig. 42:
A -- FOOT -- the part by which the ruffler is attached to the presser bar.
B -- FORK ARM -- the section that must be placed astride the needle clamp.
C -- ADJUSTING SCREW -- the screw that regulates the fullness of the gather.
D -- PROJECTION -- the part that projects through the slots in the adjusting lever.
E -- ADJUSTING LEVER -- the lever that sets the ruffler for gathering or for making a plait once at every six inches or once at evry twelve inches, as desired; also for disengaging the ruffler, when either plaiting or gathering is not desired.
F -- ADJUSTING FINGER -- the part which regulates the width or size of the plaits.
G -- SEPARATOR GUIDE -- the guide on the underside of the ruffler, containing slots into which the edge of the material is placed to keep the heading of the ruffle even; also for separating the material to be ruffled from the material to which the ruffle is to be attached.
H -- RUFFLING BLADE -- the upper blue steel blade with the teeth at the end to push the material in plaits up to the needle.
J -- SEPARATOR BLADE -- the lower blue steel blade without teeth, which prevents the teeth of the ruffling blade coming into contact with the feed of the machine or the material to which ruffle or plaiting is to be applied.
To Attach the Ruffler to the Machine
Raise the needle bar to its highest position and remove the presser foot. Attach the ruffler foot (A) to the presser bar from the right and fasten by means of the thumb screw, at the same time placing the fork arm (B) astride the needle clamp as shown in Fig. 43.
To Adjust the Ruffler for Gathering
The adjusting finger (F) is not intended for gathering and should be moved forward and away from the needle, as shown in Fig. 43.
Raise the adjusting lever (E) and move it to the left so that the projection (D) will enter the slot marked "1" in the adjusting lever (E) when the lever is released. The ruffling blade will then move forward and back once at every stitch. Insert the material to be ruffled between the two blue blades, following the line 2 in Fig. 42. Draw the material slightly back of the needle, lower the presser bar and commence to sew.
To make fine gathering, shorten the stroke of the ruffling blade by turning the adjusting screw (C) upward; also shorten the stitch. To make full gathering, lengthen the stroke of the ruffling blade by turning the adjusting screw (C) downward; also lengthen the stitch. By varying these adjustments, many pleasing varieties of work can be accomplished.
To Make a Ruffle and Sew it to a Garment in One Operation
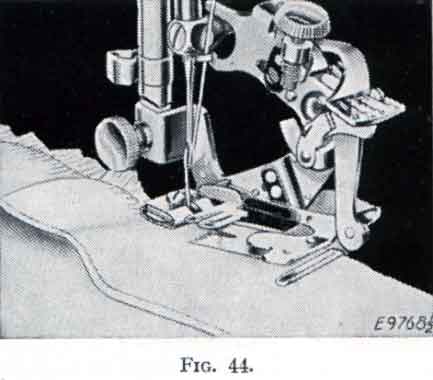
Insert the material to be ruffled between the two blue blades, following the line 2 (Fig. 42).
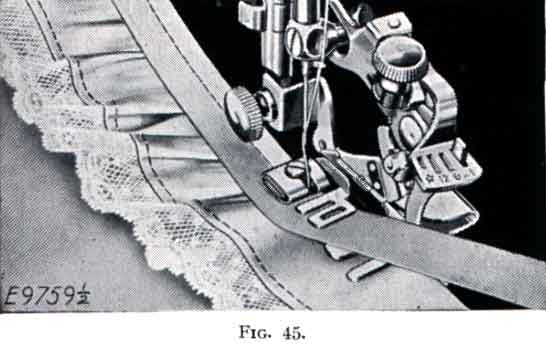
Place the garment to which the ruffle is to be attached under the separator balde, following the line 1 (Fig. 42). Place the material for the the facing over the upper blue blade, as shown in Fig. 45, following the line 3 (Fig. 42). The facing may be straight or bias material. If the facing is to be on the right side of the garment, place the garment and the ruffle so that the wrong sides are together. If the facing is to be on the wrong side, place the right sides of the garment and the ruffle together.
-
Piping a Ruffle
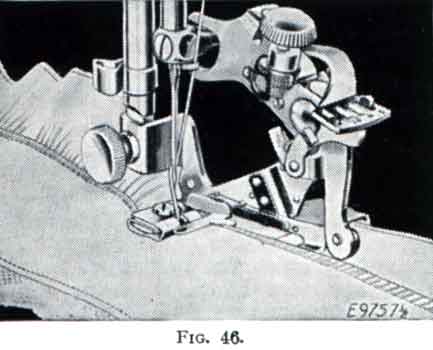
Insert the material to be ruffled between the two blue blades, following the line (Fig. 42). This material must not be over 1 1/4 inches wide, as it is carried through the ruffler with the finished edge of the ruffle to the right of the attachment as shown in Fig. 46.
The material for piping must measure about 1/4 inch wide when folded in the centre and is usually cut on the bias. Place the piping material in the ruffler, following the line 4 (Fig. 42) with the folded edge of the piping to the right. The material to which the piping and ruffling are to be sewn should be folded on the edge and inserted in the ruffler, following the line 5 (Fig.42).
To Adjust the Ruffler for Plaiting
Raise the adjusting lever (E) and move it to the right so that the projection (D) will enter the slot marked "6" in the adjusting lever when the lever is released.
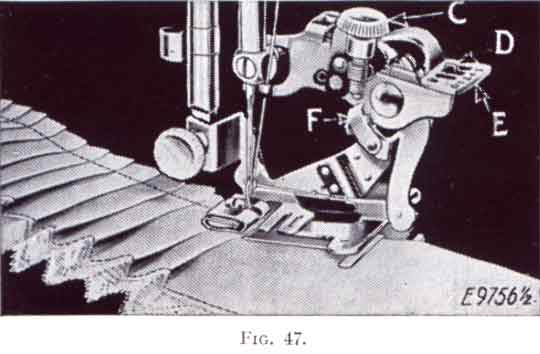
The ruffling blade will then move forward and back once at every six stitches. To adjust the ruffling blade to make a plait once at every twelve inches, place the adjusting lever (E) so that the projection (D) enters the slot marked "12" in the adjusting lever. Insert the material to be plaited between the two blue blades, following the line 2 (Fig. 42). The size or width of plaits is regulated by the adjusting screw (C) and the adjusting finger (F, Fig. 47). To make a wider plait, move the adjusting finger (F) back or toward the needle and turn the adjusting screw (C) downward. To make a smaller plait, turn the adjusting screw (C) upward. The distance between plaits is regulated by the length of stitch.
To Adjust the Ruffler for Group Plaiting and Gathering
The ruffler can be adjusted for group plaiting by lifting the adjusting lever (E) and moving it to the right so that the top of the projection (D) enters the small slot indictaed by the star on the adjusting lever.
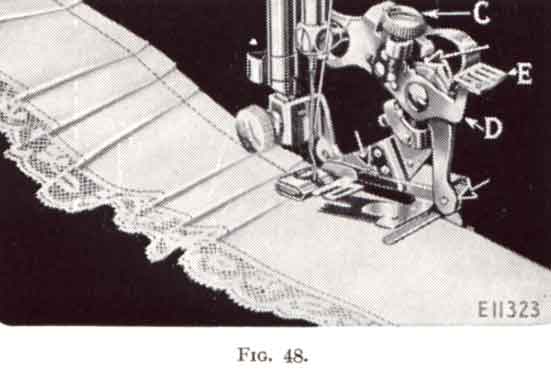
This should be done at the points where you wish to make the space between the plaits. The ruffler will then stop and plain stitching will be made. When the desired space has been made, adjust the lever (E) so that the projection (D) enters either the slot marked "6" or the slot marked "12". By alternately making groups of plaits and plain spaces, as shown in Fig. 48, very attractive work can be produced.
To Oil the Ruffler
Occasionally apply a drop of oil to the working parts of the ruffler at each of the places indicated by the unlettered arrows in Fig. 48. After oiling, operate the ruffler on a waste piece of material to prevent the oil soiling the work. If the ruffler does not plait evenly, a drop of oil may remedy the trouble.
**********
Part One / Part Two / Part Three / Part Five
Part 5
THE NEEDLEBAR Archive at ISMACS International
Online Manuals Section
INSTRUCTIONS
FOR USING
ATTACHMENTS
ETC.
WHICH MAY BE PURCHASED SEPARATELY
Bias Gauge
The Bias Gauge will be found very useful (especially in the case of soft materials) when cutting bias strips from 7/16 inch to 1 3/8 inches in width. This may be done by placing the bias gauge upon the point of the scissors and setting the blued indicator to the width desired. The line F is the point at which to set the blued indicator for facings, the line B for binding, and the line C for cording or piping.
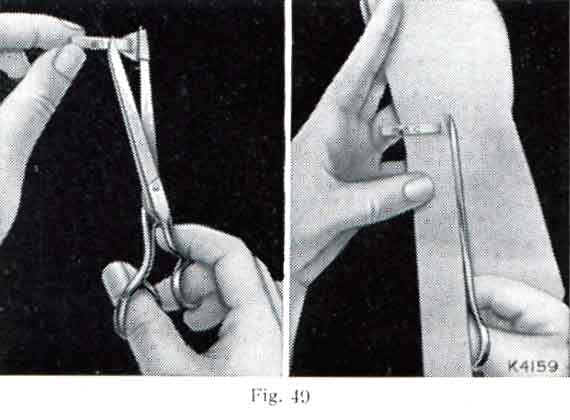
Insert the material in the gauge with the edge against the blued indicator, and hold as shown in Fig. 49.
Bias binding for use with the Binder Attachment should be cut 15/16 inch wide, and to do this the indicator should be set midway between the lines F and B.
Cording Feet
Presser feet for stitching on edge and inserting cord are made in two styles, 125035 for stitching on the left side of the needle, and 121877 adjustable for stitching on either the right or left side.
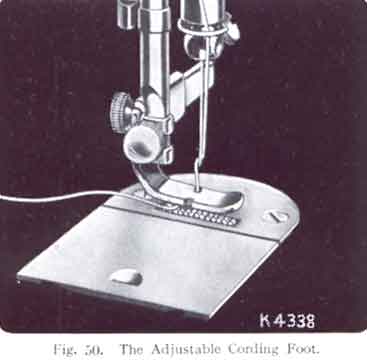
Both feet produce identical work, and the different styles meet the individual requirement of the operator.
For Edge Cording -- fold the edge of the fabric over the cord and stitch close to the cord, guiding the work by hand.
For Corded Seams -- fold the bias strip around the cord and insert the covered cord between the two pieces of fabric, with all raw edges together and the right sides of the fabric together. Then stitch close to the cord.
-
Darning
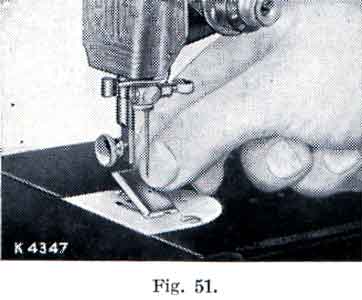
Remove the presser foot and fit Feed Cover Plate No. 108002 over the feed dog by inserting the single prong into the long slot at the front of the throat plate (see Fig. 51), pressing lightly on the cover plate until the two prongs engage in the slots at the rear of the throat plate.
Attach Spring Darning Foot No. 121094, but do not tighten the thumb screw. Stretch tightly the article to be repaired in an embroidery hoop and place below the needle by tilting the edge of the hoop. Then lower the presser bar by means of its lifter, and adjust the height of the darning foot to allow just sufficient space for the free movement of the work. After adjustment, tighten the thumb screw securely. The hoop should be moved backward and forward by the hands and the hole or damaged part completely covered with stitching in one direction before turning the work at a right angle and stitching across to complete the darn.
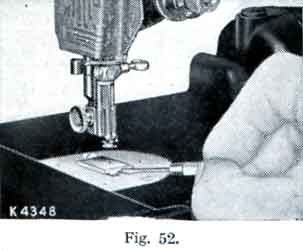
When the machine is to be used again for plain stitching, replace the presser foot and remove the feed cover plate by inserting the blade of the small screw driver in the notch and twisting to the right, as shown in Fig. 52.
-
Embroidery
For lace embroidery, i.e. open work, remove the presser foot and attach Feed Cover Plate No. 108002 and Spring Foot No. 121094, as described on page 49.
For surface embroidery, where a clear view of the stitching is required, neither foot should be used.
-
Quilter
The quilter guide can be used at either the right or left of the needle, and the distance of the guide from the needle determines the width between the rows of stitching. Slide the wire into its holder on the foot, and set it to the width desired; then lower the foot on to the material.
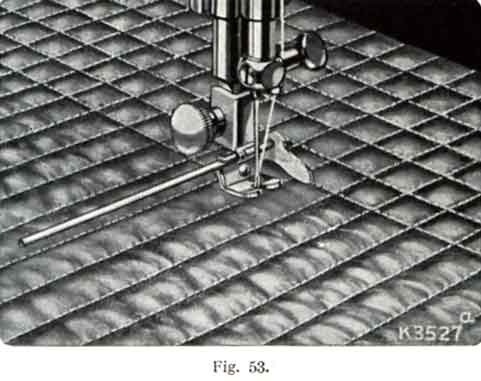
To Quilt -- For the first row of stitching, let the quilter guide follow the edge of the material, a straight crease, or a line, as preferred. Succeeding rows are made straight and at a uniform distance by keeping the previous row steadily under the guide, as shown in Fig. 53.
-
Under Braider -- Braiding
Fit the quilter foot, as shown in Fig. 54.
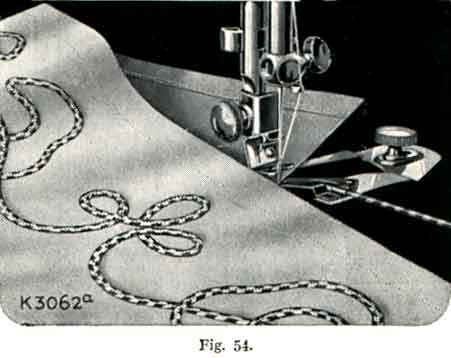
To attach the under braider, insert the downwardly projecting hook of the attachment into the hole in the throat plate at the right of the feed dog. Then place the guide thumb screw in the slot of the attachment and into the hole in the bed plate of the machine. The under braider must be firmly secured by tightening the screw.
The pattern or design to be braided must be stamped or traced on the wrong side of the material. Pass the braid from the left between the blued guide and the lower plate until it enters the back and front braid guides, and then under the needle. Place the material, wrong side up, above the braid, lower the presser foot and proceed to sew, following the lines of the design.
-
Perforated Braiding Designs
Instead of stamping or tracing the pattern on the material itself, a perforated paper design may be used.
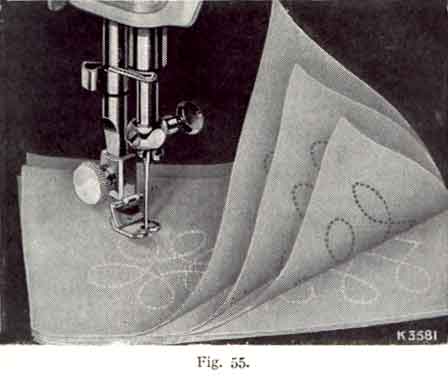
A braiding design may be copied with the sewing machine by pinning it to several sheets of paper, as shown in Fig. 55.
Attach the quilter foot and, without threading the machine, follow the design with the needle. Several copies of the design can be made in this way, one of which can then be pinned to the material to be braided and torn away when the braiding is finished.
-
Tuckmarker
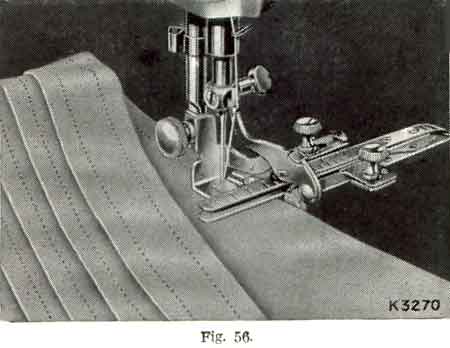
Fit the tuckmarker, as shown in Fig. 56.
The attachment has two figured scales, that in front (the space scale) in eighths and the central clip (the tuck scale) in sixteenths of an inch.
The tuck scale determines the width of the tuck. For instance, if this is required to be 1/4 inch, loosen the back thumb screw and slide the guide until its straight edge is over the figure 2, then tighten the screw.
By loosening the front thumb screw, the space scale may be moved in either direction to give the desired width between the lines of stitching. For instance, if 1/4 inch tucks are wanted with 1/4 inch clear space between each, the space scale should show the figure 3 exactly in line with the needle hole; or if no space is required, then the figure 2. When the required width is obtained tighten the thumb screw.
To operate the tuckmarker is exceedingly simple. Fold the material by hand and place it in the attachment by passing the folded edge over the upright marking point below the left hand end of the space scale, then between the tuck guide and below the foot. The lever on the top must also be down in position, as in Fig. 56, and the edge of the fold up against the small guide.
Lower the presser bar lifter and sew as usual, being careful to keep the folded edge against the guide. When the first tuck is completed the material will be found creased for the second tuck. Fold the material at the crease and, with its plain side uppermost, proceed as before. When making the last tuck, raise the lever so that it does not press on the space scale. In this position no crease for a succeeding tuck is made in the material.
Use the table below to assist you in setting the Tucker.
|
Tuck Guide
|
Space Scale
|
|
|
1/8" tucks with no space
|
1
|
1
|
|
1/8" tucks with 1/8" space
|
1
|
1 1/2
|
|
1/4" tucks with no space
|
2
|
2
|
|
1/4" tucks with 1/4" space
|
2
|
3
|
|
1/2" tucks with no space
|
4
|
4
|
|
1/2" tucks with 1/2" space
|
4
|
6
|
|
1" tucks with no space
|
8
|
8
|
**********
Part One / Part Two / Part Three / Part Four / Part Five