All 5 available source parts are included below.
Part 1
THE NEEDLEBAR Archive at ISMACS International
Instruction Manual
for the
S I N G E R
221K Featherweight
Portable Electric Sewing Machine
(Part One)
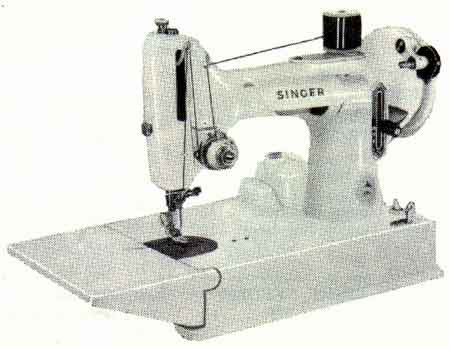
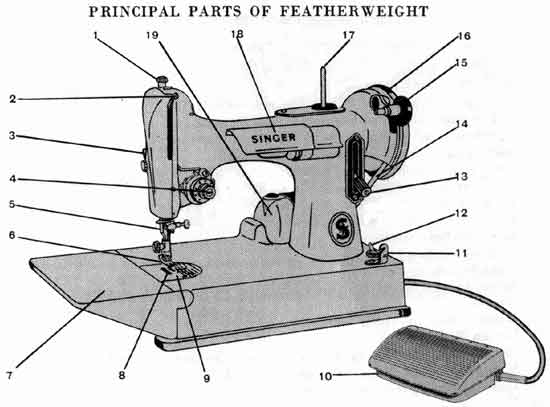
GETTING TO KNOW YOUR FEATHERWEIGHT
* * * * *
-
Pressure Regulator -- controls pressure of presser foot on fabric.
-
Take-Up lever -- controls needle thread.
-
Presser Foot Lever.
-
Needle-Thread Tension Regulator -- tightens and loosens needle thread.
-
Thread Cutter -- Slot on back of bar cuts thread easily and safely.
-
Presser Foot -- holds fabric against the feed dog.
-
Bed Extension -- lifts up for easy access to bobbin.
-
Feed Dog -- moves fabric as it is being stitched.
-
Throat Plate -- Numbered lines show seam width in 1/8-inch gradations. Arrow reminds you to thread from right to left.
-
Electrical Controller.
-
Bobbin-Winging Thread Guide.
-
Light Switch.
-
Stitch Length Regulator -- controls number of stitches per inch, forward and in reverse.
-
Motor Belt -- activates machine.
-
Bobbin Winder.
-
Hand Wheel -- controls take-up lever. Always turn it toward you.
-
Spool Pin -- wire coil keeps spool steady; felt disc keeps it silent.
-
Light -- pours light on sewing area.
-
Motor
FIVE BASIC CONTROLS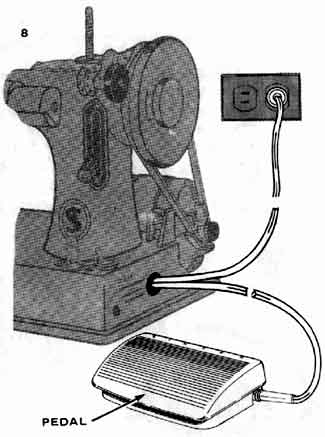
Your Featherweight has five basic controls that enable you to direct the machine to sew just as you want it to. You will use some of these controls every time you sew; others, only occasionally. We suggest that you get acquainted with all of them now, however, so that you will be ready to use them with ease as the need arises.
No. 1 Electrical Controller
No. 2 Stitch Length Regulator
No. 3 Pressure Regulator
No. 4 Needle-Thread Tension Regulator
No.5 Bobbin-Thread Tension Regulator
No. 1 Electrical Controller
Let us begin with the control that makes the machine go.
Before you put the plug in your wall outlet, be sure that the voltage and number of cycles (stamped on the plate on top of the motor) are within the range marked on the electric meter installed by your power company.
Speed Controller. Speed of machine is regulated by amount of pressure on pedal of foot controller.
SAFETY : DISCONNECT PLUG FROM ELECTRICITY SUPPLY WHEN MACHINE IS NOT IN USE.
No. 2
Stitch Length Regulator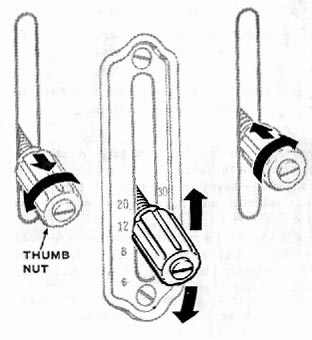
The numbers on either side of the lever represent the approximate number of stitches per inch. The higher the number, the shorter the stitch.
In general, lightweight fabrics require short stitches (a high number setting) and heavyweight fabrics require longer ones (a low number setting).
To set stitch length --
- Loosen thumb nut by turning it to the left.
- Move lever to desired stitch length setting.
- Tighten thumb nut by turning it to the right until it touches the numbered indicator plate.
To stitch in reverse --
- Set stitch length and tighten thumb nut.
- Raise lever as far as it will go.
No. 3 Pressure Regulator
To increase pressure, turn thumb screw in clockwise direction.
To decrease pressure, turn screw in anti-clockwise direction.
This screw regulates the degree of pressure that the presser foot exerts on
the fabric.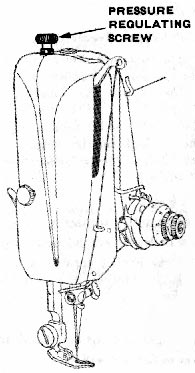
Pressure should be heavy enough to prevent the fabric from slipping sideways and light enough to carry the fabric without marking it.
In general, heavy fabrics require heavier pressure than lightweight fabrics.
But surface finish and fabric texture must also be considered: crisp fabrics, for example, require more pressure than soft fabrics.
No. 4 Needle-Thread Tension Regulator
The numbers on the dial represent the degree of tension on the needle thread. The higher the number, the tighter the thread.
Correct needle-thread tension is important because too tight a thread will cause fabric to pucker.
Too loose a thread, on the other hand, will produce slack stitches and weak seams.
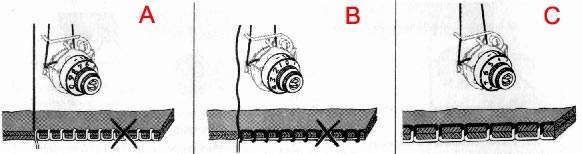
A = Needle-thread tension too tight -- correct by setting dial to lower number
B = Needle-thread tension too loose -- correct by setting dial to higher number.
C = A perfectly locked stitch results with upper and lower tensions balanced so that needle and bobbin threads are drawn equally into fabric.
No. 5 Bobbin-Thread Tension Regulator
This "regulator" is simply a screw on the bobbin case. (For instructions on removing bobbin case see below). A very slight turn of the screw nearer the thread slot on the bobbin case will produce a noticeable change in bobbin-thread tension.
You will seldom need to adjust bobbin-thread tension. Usually it is possible to obtain correct tension by adjusting the needle-thread tension alone.
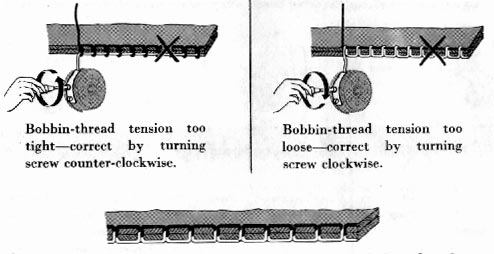
A perfectly locked stitch results with upper and lower tensions balanced so that needle and bobbin threads are drawn equally into fabric.
Part Two
Part Three
Part Four
Part Five
Part 2
THE NEEDLEBAR Archive at ISMACS International
Online Manuals Section
Instruction Manual
for the
S I N G E R
221K Featherweight
Portable Electric Sewing Machine
(Part Two)
HOW TO USE YOUR FEATHERWEIGHT
* * * * *
CHOOSING THE RIGHT NEEDLE, THREAD, AND STITCH LENGTH
Your Featherweight will stitch perfectly on almost any kind of fabric. All you have to do is choose the right needle, thread , and stitch length. Use the table below to make sure that you will get perfect results every time.
|
FABRICS
|
THREAD SIZES
|
NEEDLE SIZES
|
MACHINE STITCHES PER INCH STRAIGHT
STITCHING
|
|
DELICATE -- tulle, chiffon, fine lace, silk, organdie,
fine tricot
|
60 Mercurised 100 Cotton Fine Synthetic Thread |
9
|
15 to 20
|
|
LIGHTWEIGHT -- batiste, organdie, Jersey, voile,
taffeta, silk, crepe, plastic
|
50 Mercurised 80 to 100 Cotton Pure Silk Synthetic Thread |
11
|
12 to 15 (8 to 10 for plastic) |
|
MEDIUM WEIGHT -- gingham, man-made fabric, pique,
linen, chintz, faille, satin, fine corduroy, suitings, cotton-based plastic
|
50 Mercurised 60 to 80 Cotton Pure Silk Synthetic Thread |
14
|
12 to 15
|
|
MEDIUM HEAVY -- gaberdine, tweed, sailcloth, denim,
coatings, furnishing fabrics
|
40 Mercurised 40 to 60 Cotton |
16
|
10 to 12
|
|
HEAVY -- overcoatings, twill, upholstery fabrics,
canvas
|
36 Mercurised 24 to 40 Cotton |
18
|
8 to 10
|
INSERTING
THE NEEDLE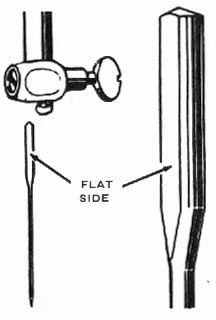
1. Turn hand wheel toward you to raise take-up lever to its highest point.
2. Loosen needle-clamp screw by turning it toward you.
3. Hold needle with flat side to left and push it up into the needle clamp as far as it will go.
4. Tighten clamp screw.
NOTE : This machine uses needle Catalogue No. 2020 (15 x 1) Sizes 9, 11, 14, 16, and 18.
THREADING
When you prepare to sew, wind the bobbin first, then thread the machine.
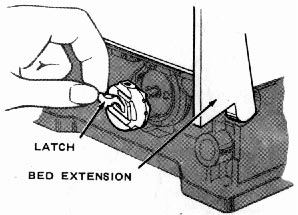 To
Remove the Bobbin Case and Bobbin --
To
Remove the Bobbin Case and Bobbin --
1. Turn hand wheel toward you to raise take-up lever to its highest position.
2. Raise the bed extension.
3. Grasp bobbin-case and bobbin will drop out of case.
To Wind the Bobbin --
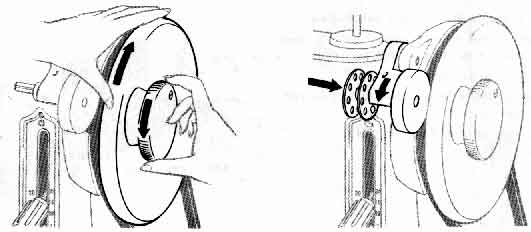
1. Loosen stop-motion screw with right hand while holding hand wheel with left hand.
2. Place empty bobbin on bobbin-winder spindle.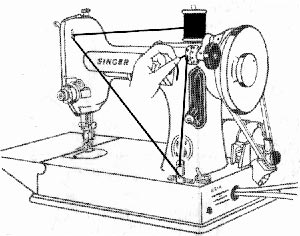
3. Press bobbin winder down against motor belt.
4. Place spool of thread on spool pin.
5. Thread machine and bobbin as shown above.
6. Hold thread end and start machine. (End of thread will break off after a few coils have been wound on bobbin.)
7. When bobbin is full, stop machine.
8. Cut thread.
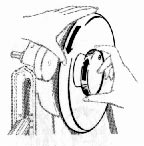 9.
Lift bobbin winder away from belt and remove bobbin.
9.
Lift bobbin winder away from belt and remove bobbin.
10. Tighten stop-motion screw.
If Thread Does Not Wind Evenly on Bobbin --
1. Loosen screw that holds bobbin-winding thread guide (reverse "S" ) on bed of machine.
2. Move thread guide to left if thread winds high on right of bobbin.
3. Move thread guide to right if thread winds high on left of bobbin.
4. Tighten thread guide screw.
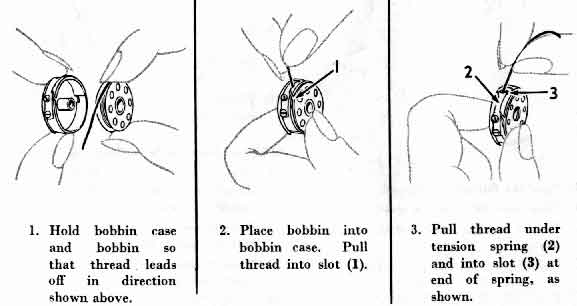
To Thread the Bobbin Case --
To Replace the Bobbin Case --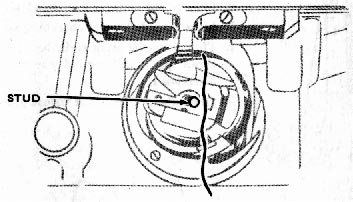
1. Hold bobbin case by latch, with thread leading off top of case.
2. Slide case on to stud as far as it will go.
3. Release latch, and allow about 3 inches of thread to hang free from bobbin case.
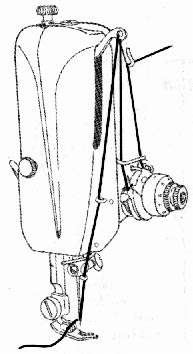
To Thread the Machine --
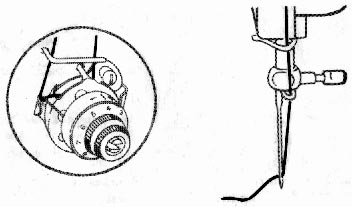
1. Turn hand wheel toward you to raise take-up lever to its highest position.
2. Place spool of thread on spool pin.
3. Lead thread through threading points shown.
4. Thread needle from right to left. (The arrow on the throat plate will remind you of the correct threading direction.)
5. Draw about 3 inches of thread through the needle.
PREPARING TO SEW
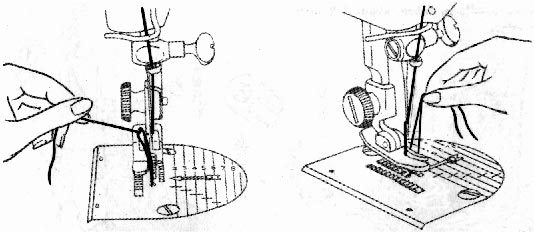
1. Have take-up lever at its highest position.
2. Hold needle thread lightly with left hand.
3. Turn hand wheel so that needle enters plate and brings up bobbin thread in loop.
4. Untie loop with finger and lay both threads diagonally under presser foot.
Part One
Part Three
Part Four
Part Five
Part 3
THE NEEDLEBAR Archive at ISMACS International
Online Manuals Section
Instruction Manual
for the
S I N G E R
221K Featherweight
Portable Electric Sewing Machine
(Part Three)
SEWING A SEAM
1. Set stitch regulator for desired stitch length.
2. Position needle in fabric about 1/2 inch from edge.
3. Raise stitch regulator to reverse.
4. Lower presser foot.
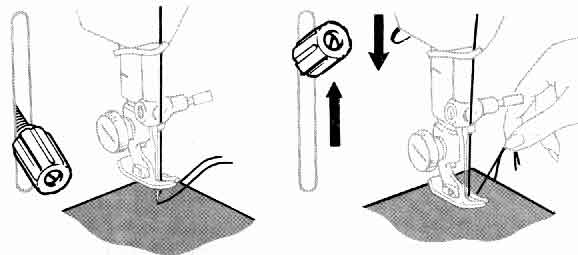
5. Backstitch to edge of fabric for reinforcement.
6. Lower stitch regulator for forward stitching of seam.
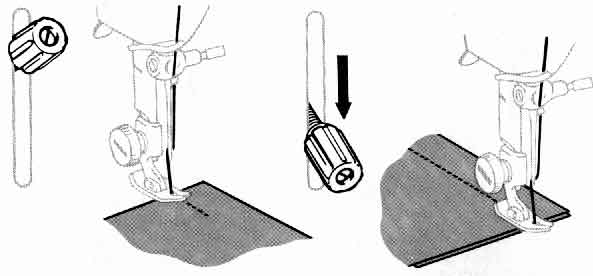
7. When you reach the end of the seam, raise stitch length regulator and backstitch to reinforce seam.
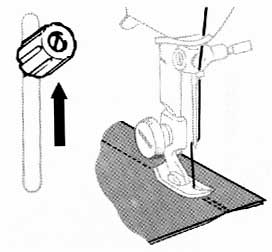
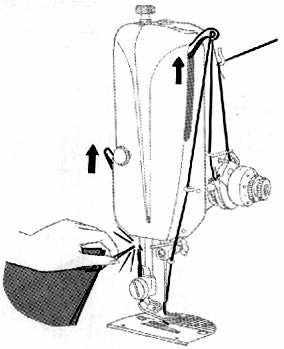
8. With take-up lever at its highest position, raise presser-foot, remove fabric by drawing straight back and cut threads with thread cutter as shown.
TURNING A SQUARE CORNER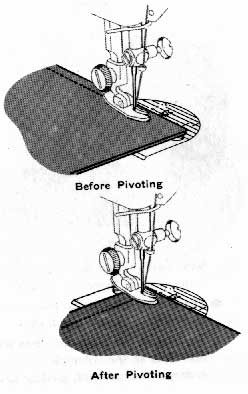
If you wish to stitch a square corner, the guidelines on the throat plate will enable you to make a perfect right angle without measuring. (Each short horizontal line represents the same distance from the needle as the vertical line it crosses.) Suppose, for example, that you wish to make a square corner on a 5/8 inch seam:
1. Line up fabric edge on guideline 5.
2. Stitch until the bottom edge of the fabric is on the horizontal line that crosses guideline 5.
3. Stop the machine as the needle is entering the fabric.
4. Raise presser foot.
5. Pivot the fabric counterclockwise: again line up seam edge with guideline 5.
6. Lower presser foot and continue stitching.
GUIDING AND SUPPORTING FABRICS
Most fabrics need to be guided in front of the presser foot only, as shown at left. Some fabrics, however, require support while being stitched:
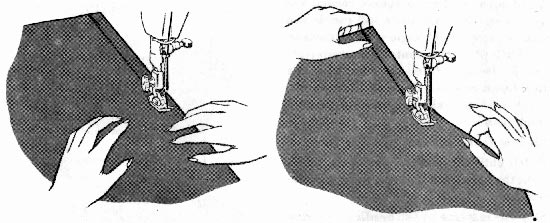
- For filmy sheers, knits, tricots, etc., apply gentle tension by by holding seam in front and back of the presser foot.
- For stretch fabrics, apply firm tension front and back when stitching in the same direction as the "stretch". For seams not on the "stretch" direction, stitch in conventional manner, guiding fabric in front of presser foot.
DARNING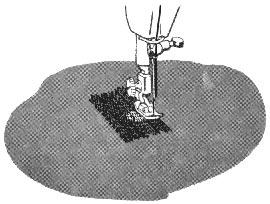
With just a little practice you will be able to darn clothing and your household linens effortlessly and quickly on your Featherweight.
1. Adjust Stitch Length Regulator for desired stitch length (usually about 10 or 12).
2. Decrease pressure by turning Pressure Regulator thumb screw anti-clockwise. Pressure should be lighter than for normal sewing but not too light to prevent work from feeding smoothly.
3. If area to be darned is open, baste an underlay in place.
4. Place area to be darned under presser foot.
5. Lower presser foot and start stitching, alternately letting fabric feed normally away from you and then gently pulling fabric toward you. Continue this forward and backward motion until area to be darned is filled with parallel lines of stitching.
6. For additional strength, turn fabric and cover area with crosswiae lines of stitching.
HOW TO USE THE ATTACHMENTS
The attachments that come with your Featherweight are designed to help you do tricky sewing jobs with ease. Resist the temptation to hide them in the back of your sewing drawer!
THE ZIPPER FOOT
(Part No. 16127)
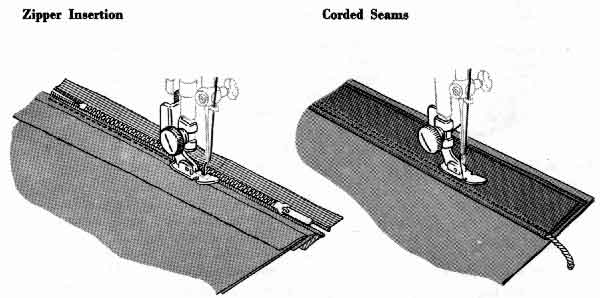
The narrow Zipper Foot makes it easy to place stitching close to a raised edge -- either a zipper or cording. Also, the hinge in the foot makes it ride easily over pins, heavy layers of fabric, or cross seams.
Use the Zipper foot for --
Zipper Insertions
Tabular Cording
Corded Seams
Slipcover Welting
To Attach the Zipper Foot --
1. Loosen the large screw at the left of the presser bar and remove presser foot (You do not need to remove the screw).
2. Hook the prongs of the Zipper Foot around the presser bar from the back, and tighten the presser-bar screw.
3. If the raised edge (zipper or cording) is to the right of the needle, adjust the Zipper Fot by loosening the thumb screw at the back of the foot and sliding foot to the left of the needle. If the raised edge is to the left, slide foot to right.
4. With presser foot down, check its position by lowering needle into side notch, making sure it just clears the foot.
5. Tighten thumb screw to lock foot into position.
THE BINDER FOOT
(Part No. 121464)
With the Binder Foot, you can apply bias binding to an unfinished edge in a single operation. Such binding can be a colourful trim for children's clothes, aprons, or household textiles. Or it can be a practical finish for seam edges that might ravel.
If you buy ready made binding use that which measures 5/8 inch wide. This may be purchased from any Singer Sewing Centre, is specially made for use in the binder and is available in a good range of colours. If you make binding yourself be sure to cut it one inch wide to allow for turnings.
To Attach the Binder Foot --
1. Loosen the large screw at the left of the presser bar and remove the presser foot. (You do not need to remove the screw.)
2. Hook the prongs of the Binder Foot around the presser bar from the front, and tighten the presser-bar screw
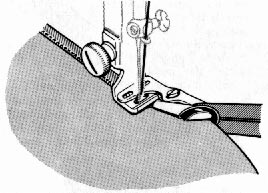
To Apply Binding --
1. Cut end of binding diagonally to form a long point (as you would cut a ribbon).
2. If the binding is folded, insert pointed end (from the outside of the scroll) into the slot and pull it through the scroll until evenly folded edges are under the needle.
3. If the binding is not folded, insert it directly into the end of the scroll and pull it through until evenly folded edges are under the needle.
4. Insert edge to be bound in centre slot of scroll.
5. Position needle in fabric, lower pressure foot, and stitch.
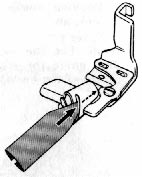
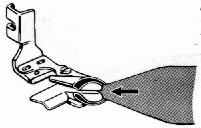
Never pull binding as it feeds through the scroll. Let the Binder Foot do the work. Just guide the edge to be bound into the centre of the scroll as you stitch.
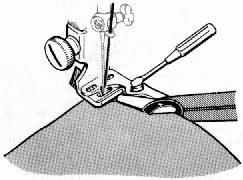
To Adjust Binder Foot --
To position stitching in relation to the binding edge, adjust the Binder Foot.
1. Loosen adjusting screw.
2. Move scroll to right or left as necessary.
3. Tighten adjusting screw.
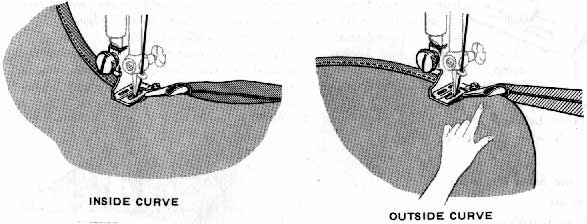
To Bind Curved Edges --
Curved edges require slightly different fabrics handling from straight edges. Inside curves should be straightened as they are fed into binder. If fabric is soft and has a tendency to stretch, reinforce edge with a single row of stitching before binding.
Outside curves tend to lead away from centre slot of scroll and should be guided so that a full seam width is taken at needle point. Do not attempt to pull or straighten fabric into full length of scroll.
 THE
SEAM GUIDE
THE
SEAM GUIDE
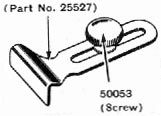
(Part No. 25527)
The Seam Guide will help you stitch seams of perfectly uniform
width. It is especially useful for hard-to-handle fabrics or for curved seams.
When you use it, you can place stitching at any distance between 1/8 inch and
1-3/8 inch from the edge of the fabric.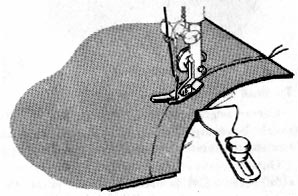
Use the Seam Guide for --
Seams
StayStitchingTop Stitching - Single or Multiple Rows
To Attach the Seam Guide --
Place screw in either of the two holes to the right of the slide plate.
SEAMS
For straight seams: Align guide with presser foot. Pin seam edges and baste if necessary. Guide fabric edges lightly against guide while stitching.
For curved seams: Set attachment at an angle so that end closer to needle acts as a guide. Shorten stitch length for greater elasticity and strength.
Part One
Part Two
Part Four
Part Five
Part 4
THE NEEDLEBAR Archive at ISMACS International
Online Manual Section
Instruction Manual
for the
S I N G E R
221K Featherweight
Portable Electric Sewing Machine
(Part Four)
FASHION AIDS*
(* Fashion Aids are available for purchase at your local SINGER SEWING CENTRE)
THE BUTTONHOLER
(Part No. 86718)

This attachment produces neat and durable buttonholes in a great variety of fabrics without any special skill on the part of the operator. The buttonholes are produced in a fraction of the time required for hand work and they are frimer and more even than those made by hand.
The attachment can be adjusted to make buttonholes from 3/8 to one inch long and the spacing of stitches, width of stitch and amount of cutting space can also be changed at will. When desired, buttonholes longer than one inch can also be made by following the instructions supplied with the attachment.
 THE
EDGE STITCHER
THE
EDGE STITCHER
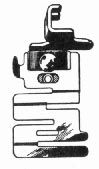
(Part No. 36865)
This attachment provides a series of slotted guides which regulate the placement of stitching in relation to a fabric edge.
Among its many decorative and practical applications are the joining and insertion of lace, tucking from pin width to 1/4 inch, French seaming, seam piping, facing and seam finishing.
 THE
GATHERING FOOT
THE
GATHERING FOOT
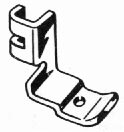
(Part No. 121441)
Single or multiple rows of shirring can be quickly and expertly placed with the gathering foot. Evenly spaced shirring is insured as this foot is designed to lock fullnes into every stitch.
 Use
the Gathering Foot for --
Use
the Gathering Foot for --
Plain Shirring
Elastic Shirring
Waffle Shirring
Machine Smocking
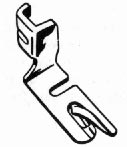 THE
HEMMER FOOT
THE
HEMMER FOOT
(Part No. 120842)
The Hemmer Foot forms a perfectly turned hem without basting or pressing.
It can be used for --
Fine Hems, Ruffle Edges, Hemmed Seams, Lingerie Finishes
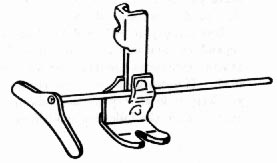 THE
QUILTER
THE
QUILTER
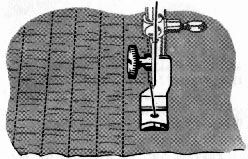
(Part No. 35932)
The Quilter is excellent for the placement of stitching in block, floral or scroll designs and is especially well adapted to stitching lightly padded materials. The short open foot permits following curved lines with ease and accuracy; the adjustable space guide placed to the right or left of the needle keeps rows of stitching parallel.
* * * * * *
HOW TO TAKE CARE OF YOUR FEATHERWEIGHT
Your Featherweight is a fine yet sturdy precision instrument, and it will serve you perfectly for many years if you take a few simple steps to keep it in good working condition.
How often you will need to clean, oil, and lubricate your machine
will depend on how often you use it and where you keep it. The following general
guidelines assume that you will be sewing two or three times a week. If you
use the machine continuously, clean and oil it daily. Or, if you keep it in
a very warm or damp place, oil and lubricate it more frequently than the following
guidelines suggest.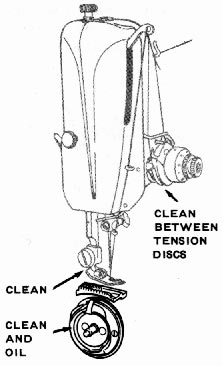
THE MOTOR REQUIRES NO LUBRICATION
EVERY WEEK OR SO --
Remove lint and fluff from working parts. As a matter of fact, you will be able to see the lint and fluff on these parts, and we recommend that you remove them as they accumulate.
With a soft cloth, clean:
- Between tension discs.
- Area around needle and presser foot
- Take-up lever and thread guides
- Bobbin case. (For instructions on removing bobbin case, see Part One)
With a soft brush, clean:
- Bobbin-case area.
- Feed dog. (Remove throat plate first).
CAUTION :
Make certain, when replacing throat plate that position finger of bobbin-case base enters notch of position plate attached to underside of throat plate, as shown below.
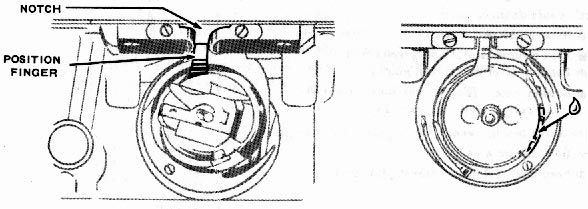
After cleaning the bobbin-case area, apply a drop of SINGER oil, as shown.
 EVERY
FEW MONTHS --
EVERY
FEW MONTHS --
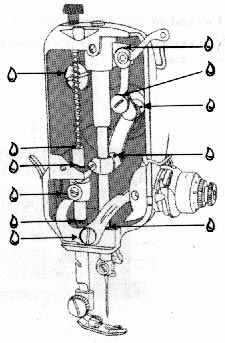
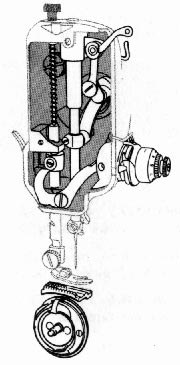
1. Clean and oil the parts behind the face plate.
- To remove face plate, turn hand wheel until take-up lever reaches its highest point.
- The remove face-plate thumb screw, raise face plate and carefully pass it toward you over end of take-up lever.
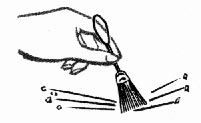
- Brush lint and fluff away and apply a drop of SINGER oil to each spot indicated.
2. Clean and oil the top and back of the machine.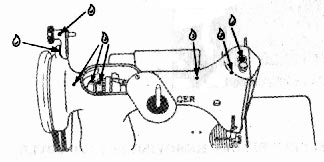
EVERY SIX MONTHS --
Clean and oil the underside of the machine.
- Remove screw and cover plate from underside of machine.
- Apply SINGER oil to spots indicated.
- Replace bottom cover.
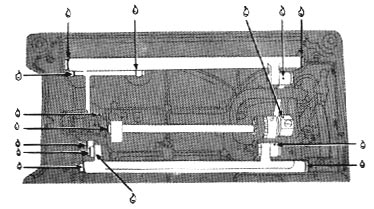
DISCONNECT PLUG FROM ELECTRICITY SUPPLY BEFORE REMOVING BOTTOM COVER
 IF
THE MACHINE IS TO BE STORED --
IF
THE MACHINE IS TO BE STORED --
- Brush away all traces of lint and fluff.
- Swab all exposed parts with a soft, lint-free brush saturated with SINGER oil to protect against rust damage.
- Swab parts behind face plate with oil.
CHANGING THE LIGHT BULB --
The light is turned "on" or "off" by the switch located on bed of machine at the right.
DISCONNECT PLUG FROM ELECTRICITY SUPPLY BEFORE CHANGING BULB
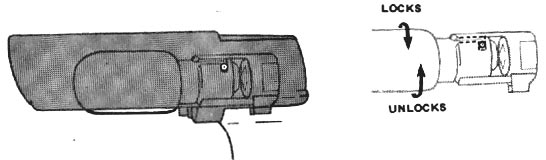
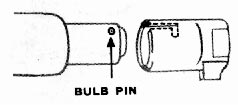 To
Remove Bulb. Press bulb into socket and turn it in "unlock"
direction, as shown, and withdraw.
To
Remove Bulb. Press bulb into socket and turn it in "unlock"
direction, as shown, and withdraw.
To Replace Bulb. Press bulb into socket with bulb pin slot and turn it in "lock" direction, as shown.
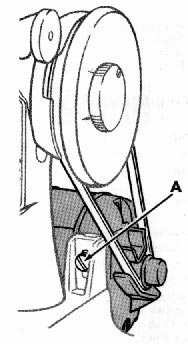 ADJUSTING
BELT TENSION --
ADJUSTING
BELT TENSION --
On rare occasions, you may find it necessary to adjust the tension on the motor belt. Tension on the belt should be just strong enough to keep the belt from slipping. If the belt is too tight, the machine will run slowly.
This will overload and possibly damage motor.
To Adjust --
1. Loosen bracket screw (A) a full turn.
2. Allow weight of motor to supply correct belt tension.
3. Tighten bracket screw.
Part One
Part Two
Part Three
Part Five
Part 5
THE NEEDLEBAR Archive at ISMACS International
Online Manual Section
Instruction Manual
for the
S I N G E R
221K Featherweight
Portable Electric Sewing Machine
(Part Five)
HINTS FOR HOME SERVICE
SINGER SEWING MACHINE -- MODEL 221
Whenever sewing difficulties are encountered, review the sections of the instruction book that pertain to the operation that you are performing, to assure you are using the machine properly. If the problem still exists, the following hints will help you to correct it:
Fault -- Machine does not sew
Symptom |
Remedy |
|
a. Needle bar does not move. |
1. Make sure that motor is connected to electrical supply or treadle belt is engaged. 2. Make sure that clamp stop motion is tightened |
|
b. Needle bar moves but machine does not stitch. |
1. Replace needle. Make sure proper needle class and size is used; make sure the needle is properly inserted and check to see if machine is threaded properly. 2. Make sure that bobbin case and bobbin are properly placed in machine. 3. Make sure that bobbin case is free of lint. |
|
c. Needle bar moves and stitches but fabric does not move. |
1. Make sure feed regulator is set to desired stitch length. 2. Make sure there is sufficient presser bar pressure to hold material. 3. Remove throat plate and clean all lint from around feed dog. |
|
d. Needle breaks. |
1. Replace needle, making sure it is the proper class and size and make sure it is properly inserted. Turn handwheel over by hand several times to make sure needle does not foul throat plate, presser foot or attachment. 2. If material is being guided behind the needle, make sure that it is not being pulled too quickly. 3. Make sure that presser foot or attachment is securely fastened to presser bar. 4. Do not pull the material to one side when taking it from the machine. The needle may become bent and strike the throat plate or presser foot. |
Fault -- Thread breaks
Symptom |
Remedy |
|
a. Needle thread failures. |
1. Needle might be bent. Replace needle making sure it is the proper class and size, and make sure it is properly inserted. 2. Make sure the machine is properly threaded. 3. If the needle thread tension is too tight it should be made lighter. 4. Check needle hole in throat plate and presser foot to ensure that they have not been damaged. 5. Make sure bobbin and bobbin case are properly inserted in machine. 6. Make sure that threads are properly placed under presser foot when starting to sew. |
|
b. Bobbin thread failures. |
1. Make sure bobbin is wound properly. 2. Make sure bobbin case is threaded and inserted properly. 3. Check to make sure bobbin or bobbin case have not been damaged. |
Fault -- Skipped Stitches
Symptom |
Remedy |
|
Failure to consistently make stitches |
1. Needle might be bent. Replace needle, making sure it is the proper class and size, and make sure it is properly inserted. 2. Make sure that machine is threaded properly. 3. Make sure that material is held down firmly (particularly when doing darning or embroidery). |
Fault -- Looped Stitches
Symptom |
Remedy |
|
Loose stitches occurring on underside of fabric. |
1. Needle might be burred. Replace needle, ensuring that it is the proper class and size, and make sure it is properly inserted. 2. If needle thread tension is too loose, it should be tightened. 3. Make sure bobbin case area is free of lint. 4. Make sure the bobbin is not wound too full (the thread should be below the edge of the sides). |
Fault -- Gathering or puckering of material
Symptom |
Remedy |
|
Material does not lie flat after sewing. |
1. Needle might be bent. Replace needle, making sure it is the proper class and size, and make sure it is properly inserted. 2. If needle or bobbin thread tension is too tight it should be made lighter. 3. Make sure there is sufficient presser bar pressure to hold material. 4. Stitch length may be too long for material (particularly fine materials). 5. Make sure proper presser foot is being used. |
Fault -- Incorrect Feeding
Symptom |
Remedy |
|
Material does not move properly under presser foot. |
1. Presser bar pressure may be too light. 2. Presser foot or attachment may not have been properly re-assembled to presser bar. 3. Feed regulator may not be set to proper stitch length. 4. Remove throat plate and make sure lint has not accumulated on feed dog. |
Fault -- Sluggish and/or noisy machine
Symptom |
Remedy |
|
Handwheel difficult to turn over manually and/or machine noise level has increased. |
1. All lint should be cleaned from machine, particularly in area of bobbin case. 2. All oiling points should be oiled. Singer sewing machine oil should be used. |
If the suggestions offered here do not correct your sewing problems, call your local Singer Sewing Centre or authorised Singer Dealer
Part One
Part Two
Part Three
Part Four