All 4 available source parts are included below.
Part 1
THE NEEDLEBAR Archive at ISMACS International
Online Manuals Section
DIRECTIONS AND SUGGESTIONS FOR WORKING THE
"WARWICK"
FAMILY AND MEDIUM
(LOCK-STITCH)
SEWING MACHINE
Part One
Purchasers should be able to make their machines quite useful in a few days' time; if they do not, it is for want of proper instruction for which they will please apply to the party who furnished the Machine.
SOLE MAKERS:
HENRY WALLWORK & Co.,
CITY SEWING MACHINE WORKS
HILTON STREET
Show Rooms and Offices - China Lane, PICCADILLY,
and
UNION BRIDGE FOUNDRY, CHARTER STREET, MANCHESTER.
_________________________
| Telephone - No. 567 |
Telegraphic Address --- "Foundry,
Manchester"
|
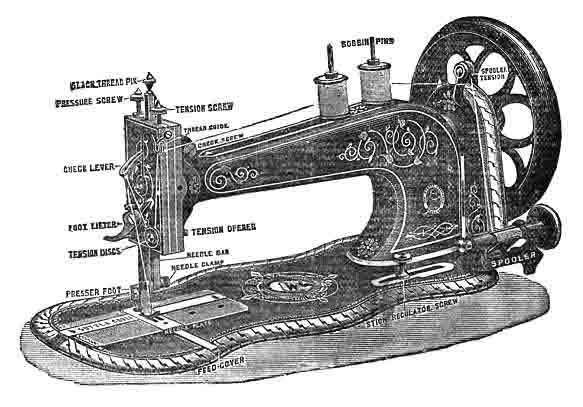
Refer to these cuts for the Technical Names of the parts of the Machine.
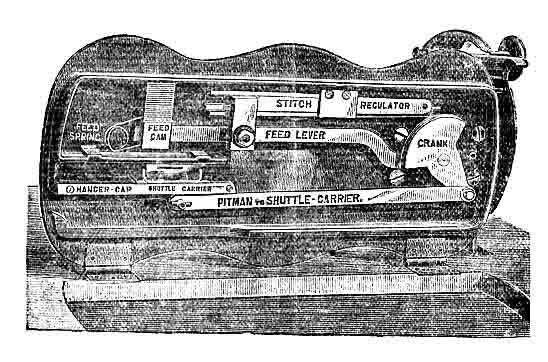
This Cut represents the Machine turned on its hinges, showing the parts on the underside.
THE AUTOMATIC
SPOOL OR REEL WINDER
<--------->
The most Mechanical Spool Winder in the World.
To Wind the Bobbin or Spool for the Shuttle
|
The Screw at the end of Shaft that secures the Balance Wheel is a left- handed screw, and to take off the Balance Wheel |
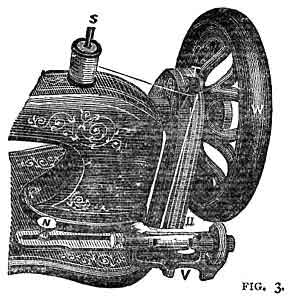 |
You must turn the Screw from left to right, just the opposite to the usual direction of Screws. |
Fix the reel in the winder, press the winder so that the India-rubber pulley comes into contact with the balance wheel, place the bobbin upon the pin (S), pass the cotton through the hole at (T) down to the winder, underneath the straight wire (U) from back to front, then from right to left behind the cotton which descends to put a twist in the cotton, and pas it through the hole at the left end of the reel. Turn the wheel towards you with the right hand, holding the end of the cotton with the left, until it is held by the reel, then break off the end, turn the wheel again until two rows are wound upon the reel, raise the pressure-plate so that it comes into contact with the reel, and proceed to treadle until the reel is full. It is important that the straight wire be kept smooth and free from rust.
TO COMMENCE SEWING
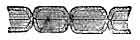 It
is a stitch that will neither rip of ravel. The tension should be thoroughly
understood; if the thread is straight or in loops on the under surface of the
fabric, thus -
turn the tension screw from right to left to loosen the needle thread, or tighten
the shuttle thread as instructed.
It
is a stitch that will neither rip of ravel. The tension should be thoroughly
understood; if the thread is straight or in loops on the under surface of the
fabric, thus -
turn the tension screw from right to left to loosen the needle thread, or tighten
the shuttle thread as instructed. TO ADJUST THE NEEDLE
TO ALTER THE LENGTH OF STITCH
TO REMOVE THE WORK
TO OIL THE MACHINE
Part Two | Part Three | Part Four
Online Manuals Index | Main Index
Part 2
THE NEEDLEBAR Archive at ISMACS International
Online Manuals Section
DIRECTIONS AND SUGGESTIONS FOR WORKING THE
"WARWICK"
FAMILY AND MEDIUM
(LOCK-STITCH)
SEWING MACHINE
Part Two
SPECIAL NOTES
THE SLACK-THREAD PIN presses down the check-lever. It is adjusted properly for all classes of general sewing, AND SHOULD NEVER BE ALTERED unless the thread breaks in sewing very thick cloth; then loosen the screw and adjust the Slack-Thread Pin a very little lower. Should it become displaced re-adjust it according to the following rule - It should begin to press down the check-lever when the needle gauge mark is one-eighth of an inch above the top of the arm.
THE CHECK-SPRING draws up the check lever. Should it break or wear out after long usage, insert another as follows: - Let the needle-bar rest when the gauge mark is level with the top of the arm, take out the screw that holds the spring, draw the check-lever out half its length, holding it while you put in the spring with its hooked end downward, then move the check-lever back into its place. Replace the screw, turning it around a few times only, press down the end of the spring into the first hole (or into the second or third hole if using coarse thread), and tighten the screw.
THE PRESSER-SCREW regulates the pressure upon the fabric; turn it to the right to increase the pressure, and to the left to decrease it. Fabrics of thick or firm texture require more pressure than thin and soft fabrics.
THE LEATHER BAND must be tight enough to work the machine without slipping. If it is too loose, cut about half-an-inch from one end and re-fasten it as before.
IF THE NEEDLE-THREAD BREAKS when the needle is adjusted properly, it is caused either by the tension being too tight, the eye of the needle being too small, the slack-thread pin becoming displaced (see note above), a roughness on the shuttle or its carrier, and sometimes, when using coarse silk, by the point of the needle being bent, or the needle being rough.
IF THE SHUTTLE THREAD BREAKS, loosen the tension by unscrewing the small screw at the side of the shuttle.
IF THERE ARE MISSED STITCHES, they are caused by the needle being adjusted too high or too low, by it being bent away from the shuttle, it being too small for the thread, or by the point of the shuttle having become blunted, or needle-eye too large for cotton.
IF THE NEEDLE-THREAD FORMS SMALL LOOPS on the top of the fabric, it is caused by the check-spring having been broken, (see note above "Check Spring",) and sometimes when sewing with coarse silk or linen thread, by the needle being too find, or its point being bent. In the latter case smooth the point of the needle on an oilstone.
IF THE STITCHES VARY IN LENGTH while hemming or sewing very thick and soft fabrics, loosen the feed-raising cam, and move it a little to the right to raise the feed-points, then tighten it firmly; do not raise the feed-points too high; when they drop down in working they should be a little below the surface of the needle plate.
SEAMS IN HARD COTTON FABRICS should be passed slowly, and if extra thick rub a little white soap on them, which will facilitate the passage of the needle.
THE EXTRA NEEDLE PLATE, which has a large hole, is only required when using a No.4 or 5 needle with 25 to 60 linen thread. Never use it for any other number.
See page 12 for sizes of needles and thread.
ACCESSORIES GIVEN WITH EACH MACHINE:
| 1 BRAIDER (Illustrated on page 11.) | 1 QUILTING GAUGE and SCREW |
| 1 DOUBLE HEMMER | 6 SHUTTLE BOBBINS |
| 1 TUCKING GUIDE | 12 NEEDLES, ASSORTED |
| 1 SCREW for TUCKING GUIDE | 1 SCREWDRIVER |
| 1 COARSE NEEDLE PLATE | 1 OIL CAN |
| 1 SPRING for CHECK LEVER | 1 BOTTLE OF OIL |
1 BOOK OF INSTRUCTIONS
The other Accessories are for special classes of work, and are supplied at a small extra charge.
TO THREAD THE PATENT SHUTTLE
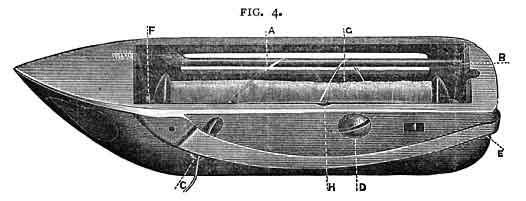
Put the bobbin in the shuttle by inserting one end in (F) towards the shuttle point, pressing the other end down to its place (B), having the tread to draw from under the reel at the right side (A) when the shuttle point is from you; then across the shuttle, down the (H) slot in the spring, and finally through the large hole (C), which will bring it under the spring (E). The tension is regulated by turning the screw (D).
If the shuttle or any other small part of the machine gets out of order, it may be sent through the post to the works.
Part One | Part Three | Part Four
Online Manuals Index | Main Index
Part 3
THE NEEDLEBAR Archive at ISMACS International
Online Manuals Section
DIRECTIONS AND SUGGESTIONS FOR WORKING THE
"WARWICK"
FAMILY AND MEDIUM
(LOCK-STITCH)
SEWING MACHINE
Part Three
QUILTING
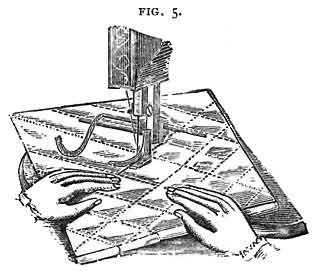
Make a crease across the material, and sew a straight line upon it. Then adjust the gauge to the required width for the next line of sewing, and guide the fabric with the line already sewn directly under the gauge arm.
THE DOUBLE HEMMER
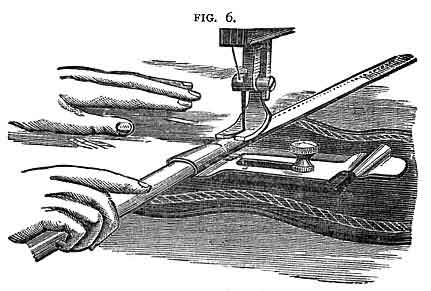
The hemmer must be secured by means of the thumb screw as shown in the illustration with the coil through which the material passes fixed immediately in front of the presser foot, regulate the distance of the sewing from the edge of the hem, by sliding the hemmer further away from or closer to the line of the needle. Take hold of the edge to be hemmed and draw it tightly into the hemmer from the side, and by drawing it backwards and forwards a few times work into the folds of the hemmer, drop the presser foot, and commence to sew, first assuring yourself that the hem is properly folded. As the fabric enters the hemmer, guide it with the right hand, holding the edge slightly turned over in the direction of the hem. Broad hems may be made by turning them down by hand and using the plain guide.
HEMMER - How to make a Narrow Hem
Adjust the hemmer to the presser bar; commence the hem by folding it at the end, then pass a thread through it by means of a needle, drawing the thread and the fabric into the hemmer (or pass the edge of the fabric into the hemmer without a thread), lower the lifter and commence sewing, guiding the edge of the fabric with the right hand. If the edge unfolds out of the hemmer, move the fabric to the RIGHT, if it folds too much into the hemmer, move the fabric to the LEFT.
TUCKER
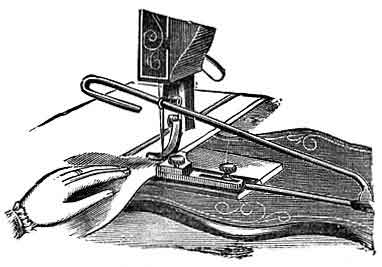
The tucker is attached to the machine by means of the right hand thumb screw, which also answers for securing in its place the adjustable gauge, while the one at the left is used to hold the under marking lever in its place. After having been adjusted to the proper position to produce the required width of tuck, the loop which attaches to the needle-bar, by means of the needle-clamp nut, and through which the upper marking-lever passes, should be so adjusted that the notch in the lever shall only press heavily enough upon the goods to produce a distinct crease; any required width of tuck may be produced by properly adjusting the gauge and marking lever.
TRIMMER
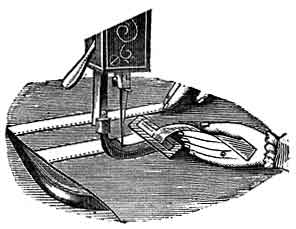
Adjust the trimmer to the presser bar; place the braid, velvet, or ribbon in the slot, and under the needle; then guide the fabric and trimming to stitch on the desired line or pattern.
ADJUSTABLE BINDER
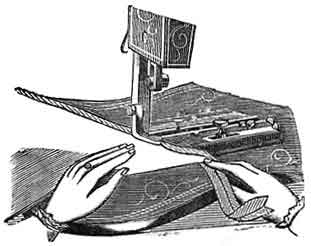
Adjust the binder to the desired width of binding, fix it firmly to the machine with the thumb screw; place the end of the binding over the feed points, and its edges under the clips; then place the fabric between the clips, and guide it against the binder. If the sewing is not on the edge of the binding, loosen the screw, and move the binder a little to the right or left until it is in the right position; the under-clip may be adjusted to fold the binding wider on the under than the upper side of the fabric.
CORDER
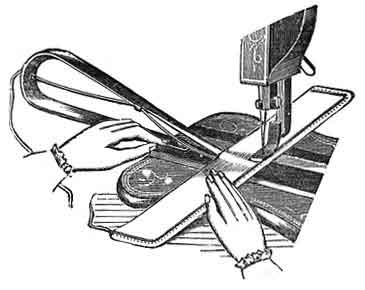
Adjust the corder-foot to the presser bar, pass the cord into the eye of the guide, which is held in the left hand between the folds of the fabric, with its end opposite the first groove in the foot; in placing each succeeding cord, guide the fabric with the last cord sewn in the second groove of the foot. In cording, always turn a square corner while the needle rests in the fabric.
BRAIDING
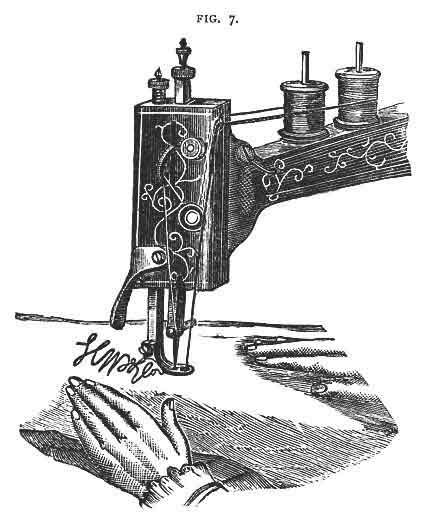
Adjust the braider to the presser-bar, pass the braid through the eye at the top of the arm, then take a short piece of thread and pass the ends through the slot in the braider, forming a loop; place the end of the braid into the loop, and drawing the thread through the slot, the braid will pass through with it (Or pass the braid through by pushing the end with the point of a needle.) Stamp or trace the design on the fabric, and guide it as required.
Part One | Part Two | Part Four
Online Manuals Index | Main Index
Part 4
THE NEEDLEBAR Archive at ISMACS International
Online Manuals Section
DIRECTIONS AND SUGGESTIONS FOR WORKING THE
"WARWICK"
FAMILY AND MEDIUM
(LOCK-STITCH)
SEWING MACHINE
Part Four
The following Table indicates the Sizes of the Threads and Needles which should be employed together.
___________________________
In transmitting orders for Needles, to prevent mistakes and delay, always specify the size required, and say for
The "FAMILY" or "MEDIUM", as the case may be.
|
Size of Needle
|
Class of Work to Sew
|
Sizes of Cotton, Linen or Silk
|
|
0
|
Very fine Muslins, Cambrics, Linen, &c., Tucking
and Stitching
|
150 to 800 Cotton
|
|
1
|
Very fine Calicoes, Linen, Linen Shirtings, fine Silk
Goods, &c., Tucking, Hemming, Shirtings, Sheetings, Bleached Calicoes,
Muslins, Silks, and General Domestic Goods, and all Classes of General
Work
|
60 to 80 Cotton 24 to 30 Silk Twist |
|
2
|
All kinds of heavy Calicoes, light Woollen Goods, heavy
Silks, Seaming, Stitching, &c., Tickings, Trousers, Boys' Clothing,
Corsets, Cloaks, Mantles, &c.
|
40 to 60 Cotton 16 to 24 Silk Twist |
|
3
|
Heavy Woollens, Tickings, Bags, heavy Coats, Trousers,
&c., heavy Clothing generally.
|
10 to 24 Cotton 60 to 80 Linen |
|
4
|
Bags, Coarse Clothes, Heavy Goods of any texture
|
40 to 60 Linen, very coarse Cotton or Silk
|
Always use the best soft-finished cotton, because it makes better work, and is the cheapest in the end.
Purchase the needles at our establishment or agencies, to ensure their being of the best quality.
We keep in stock superior drilled-eyes needles, machine oil, &c., manufactured expressly for our sewing machines. Needles and small articles can be sent by post to all parts of the country, on receipt of post-office order in payment; stamps only for small sums under five shillings.
THE WARWICK SEWING MACHINES
The high reputation of the "Warwick" Sewing Machine has led to numerous attempts to make and sell spurious imitations, which are usually offered as the "Warwick", or under the pretext of being made on the same system.
|
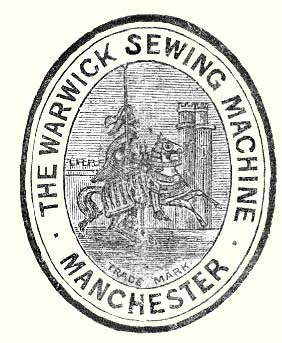
No Machine sold as the "Warwick" is genuine
without this Trade Mark stamped on a Brass Plate and fixed to the arm.
|
 |
The Public are warned against the purchase of counterfeit Machines sold as the "Warwick" in violation of legal rights. |
REGISTERED
The above Cut represents the "Warwick" Trade Mark Plate, which is affixed to the arm of every Machine as an additional protection to the public against the deceptions of parties advertising for sale worthless counterfeit Machines as the "Warwick".
Part One | Part Two | Part Three
Online Manuals Index | Main Index