All 3 available source parts are included below.
Part 1
THE NEEDLEBAR Archive at ISMACS International
Online Manuals Section
DIRECTIONS
FOR USING
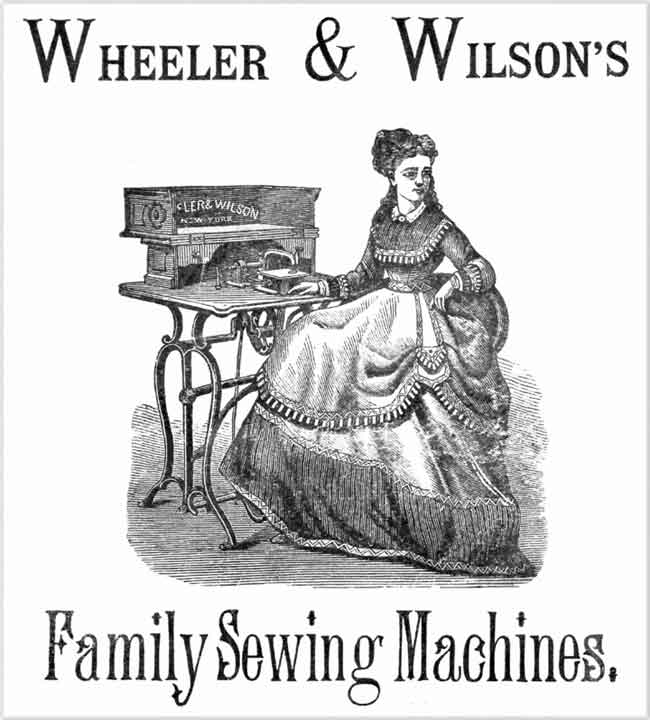
These directions should be carefully studied and followed by persons learning to operate.
Allow no person interested in the sale of other Sewing Machines to handle the Machine in any manner whatever. Allow the Machine to be adjusted or repaired by no one but an authorized Agent, or at our Office.
NEEDLES AND THREAD
Genuine WHEELER & WILSON needles are marked W. & W. M'f'g Co., all others are imitations. We cannot warrant machines to work when counterfeit needles are used.
Needles are numbered on the flat side.
Buy good cotton and silk. You cannot make a smooth, even stitch with poor, rough thread.
SIZES OF NEEDLES AND THREAD TO BE USED
| SIZES OF NEEDLE | FOR: | SIZES OF COTTON |
| 0 | Undressed Nainsook and Jaconet Tucking Fine Linen Bosoms |
90 to150 80 to 100 |
| 1 | Swiss Muslin, Collars, Lawns, Handkerchiefs and Fine Muslins | 80 to 90 |
| 2 | Muslin, Calico, Delaine &c Shirting, Sheeting and Under Clothing |
60 to 80 60 to 70 |
| 2 1/2 | Quilting and Boys' thin Clothing Lace, Tulle and Berge |
40 to 50 100 to 150 |
| 3 | Cassimere Coats, Pants and Vests Flannel |
30 to 50 40 to 70 |
| 3 1/2 | Coarse and Heavy Cloth | 24 to 40 Cotton 60 to 80 Linen |
IN SEWING WITH SILK TWIST USE
| FOR: | SILK | |
| 1 | Fine Silk Goods | 000 |
| 2 | Dress Waists, Cloaks and Fine Cloth | 00 to 0 |
| 2 1/2 | Boy's Fine Clothing | 0 to A |
| 3 | Cassimere Coats, Pants and Vests | A to B |
| 3 1/2 | Overcoats and Heavy Cloth | B to C |
Use the fine plate slide with number 0, 1, 2 and 2 1/2 needles.
Use the coarse plate slide with number 3, 3 1/2 and 4 needles.
The Heavy Spring is used to obtain more pressure in sewing thick or hard goods, and is inserted in the place of the lighter one surrounding the cloth-presser piston in the fixed arm.
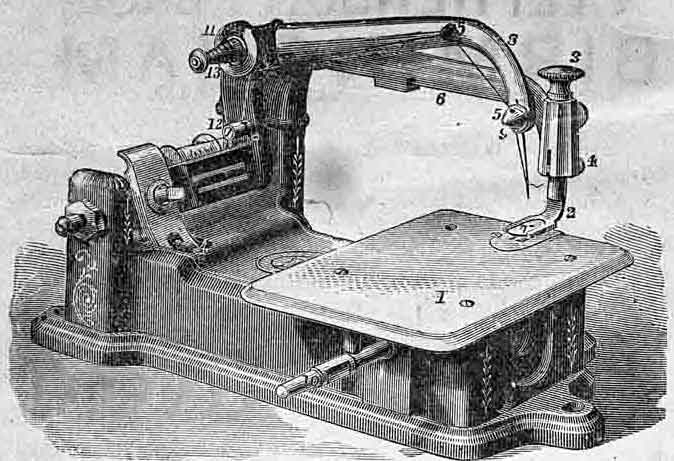
| 1. Cloth Plate | 6, Fixed Arm | 10. Spindle |
| 2. Cloth Presser | 7. Glass Foot | 11. Tension Pulley |
| 3. Cloth Presser Knob | 8. Needle Arm | 12. Thread Guide |
| 4. Cloth Presser Lifter | 9. Needle Yoke | 13. Volute Spring |
| 5. Eyelets |
ALWAYS TURN THE BALANCE WHEEL
OVER FROM YOU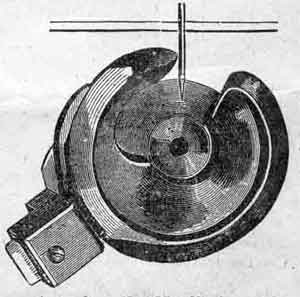
Set the Needle with the flat side to the left. The eye of the needle should be level with the top of the back part of the hook, when the point of the hook has just reached the needle, as in the cut. See that the needle runs perfectly true through the center of the needle-hole in the plate; if it does not, bend it until it does.
The point of the Needle should enter the Needle-hole in the same place that the shank of the Needle occupies when the Needle is at the lowest point
To Fill the Bobbin. Raise the cloth-presser and unthread the needle. Place the bobbin on the spindle and the spool of thread on the spool-pin; wrap the end of the thread round once or twice in the bobbin to fasten it; then work the treadle. Hold the thread only moderately tight, that it may not run too tightly into the bobbin.
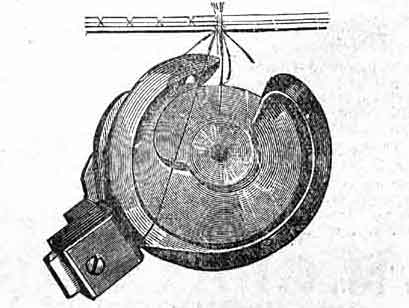
To Place the Bobbin.
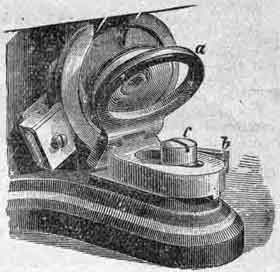
Press the Lever (b) and turn back the drop (a). Place the bobbin upon the drop
with its lower edge within the cavity of the rotating hook, as shown in the
cut, and the thread winding from the top of the bobbin towards you. Turn up
 the
drop till secured by the catch.
the
drop till secured by the catch.
To Thread the machine. Place a spool of thread on the wire at the back of the machine; pass the thread through the thread-guide, pressing it as far back as possible, then upward in front of the tension pulley, around the pulley once, then through the eyelets in the needle arm, and through teh needle eye about five inches.
To Sew. Turn the balance wheel over from you until the needle goes down and up once, pass the srew-driver (or other article) between the presser and plate pulling out the thread. Place the cloth beneath the presser; lower the presser, and start the balance wheel over from you with the left hand. Then place the left hand gently on the work to guide it. Do not pull nor hold back the work. Stop exactly at the end of the seam. Do not turn the machine after the cloth has passed the needle.
To take out the work. Turn the machine until the needle is at its highest point; loosen the thread between the eyelet and the tension; raise the cloth presser, and pull out the work, cut the upper thread close to the cloth, then cut the under thread. This leaves the threads in proper position for starting again.
The Tension should draw the under thread up into the center of the goods, but never any higher. It is regulated by the nut at the end of the volute spring. If the lower thread lies along on the under side of the cloth, or loops are left, the tension is not tight enough and the nut should be turned forward. If the work puckers, or the thread lies straight upon the upper side of the cloth, the tension is too tight and the nut should be turned backward.
Length of Stitch. For a short stitch move the lever under the left end of the plate toward you, for a long one move the lever from you. Have a long stitch when sewing soft woolen or thick goods.
Part Two | Part Three
Online Manuals Index | Main Index
Part 2
THE NEEDLEBAR Archive at ISMACS International
Online Manuals Section
DIRECTIONS
FOR USING
WHEELER AND WILSON'S
FAMILY SEWING MACHINES
Part Two
OILING THE MACHINE
Use the best Sperm Oil, to be had of our Agents, and at our offices.
The machine should be Oiled once a day, when in use.
Remove the Needle and the Cloth Plate.
Turn machine till narrow part of Cam is on top, and remove the Feed Motion and clean it.
Clean well about the Rotating Hook.
Then put a drop of oil --
1st, in the oil holes at each end of the Rotating Hook Shaft.
2. On the right side, and small part of the Cam.
3. In the oil hole in the connection to the left of the Cam.
4. On top of the Cloth-Presser piston where it passes through the fixed arm.
5. On the Steel Tongue under the feed point, and on the side of the bar between this and the feed point.
6. In teh poil holes at each end of the back part of the Needle Arm, over the points of the side screws.
7. In the Slot at the rear end of the connection.
8. In the oil holes of the Treadle, each end of the Wooden Pitman, and in the oil holes over both ends of the Balance Wheel Shaft.
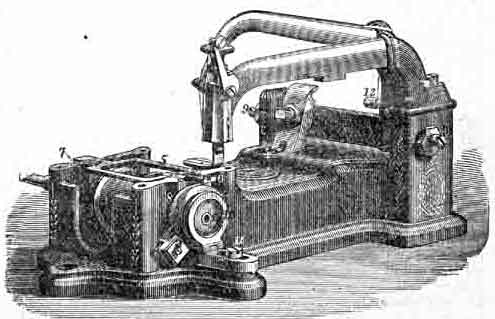
| 1. Bobbin | 5. Feed Bar | 8. Rotating Hook |
| 2. Brush Pad | 6. Feed Point | 9. Side Screws |
| 3. Cam | 7. Feed Spring | 10. Bobbin Holder |
| 4. Connection | 11. Bobbin Holder Screw |
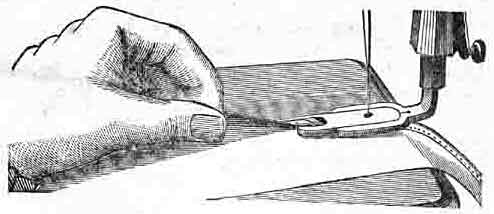
To Hem. Take out the Glass-foot (with the needle wrench) and substitute the hemmer. Fold the hem for about half an inch, and insert it in the hemmer far enough for the needle to catch the hem. The edge of the cloth should pass completely around the scroll as in the above cut. If the hemmer does not turn the edge of the goods completely under, but leaves a raw edge, turn the edge in the left hand a little towrds you. If too much is turned in, turn it from you. To hem bias worsted goods, hold them stretched.
If the needle is bent, so that it does not catch the edge of the hem, spirng it from you. If it strikes too far from the edge and into the center of the hem, spring it to you.
To make a wide hem, fold the cloth (once only) the width of the required hem. Pass the edge into the hemmer, as in making a narrow hem, the extra width extending back from the hemmer.
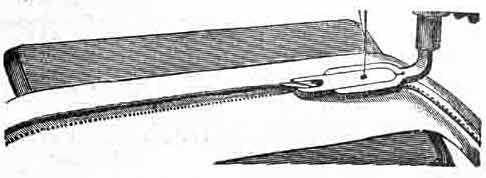
To fell, sew up the two edges, the lower extending about an eighth of an inch beyond the upper. A good rule is to have the hemmer in the cloth-presser, and have the edge of the lower piece of cloth pass exactly under the farther edge of the hemmer, and the edge of the upper piece pass under the opening in the hemmer.
Nearly the whole secret of felling is in sewing this seam.
Then open the goods well, and fell down the projecting edges with the hemmer, as in the cut below.
 The
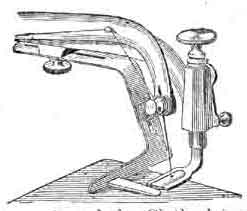
Large Gauge is used for wide tucking, quilting, and plaiting
shirt bosoms. It is fastened by the Thumbscrew to the under side of the Stationary
Arm, as in the cut, and can be moved forward or backward, according to the width
of tuck or plait required.
The
Large Gauge is used for wide tucking, quilting, and plaiting
shirt bosoms. It is fastened by the Thumbscrew to the under side of the Stationary
Arm, as in the cut, and can be moved forward or backward, according to the width
of tuck or plait required.
To adjust the Gauge for quilting loosen the screw which connects the parts, and raise the lower part to allow the goods to pass between it and the Cloth-plate; then tighten the screw.
The last seam sewed should pass directly under the gauge, and the next seam will be parallel with it.
The Plate Gauge, for sewing close to an edge, or for tucking, is screwed to the Cloth-plate, using the Thumbscrew. For sewing a very narrow seam or tuck, use the glass with the under side cut away.
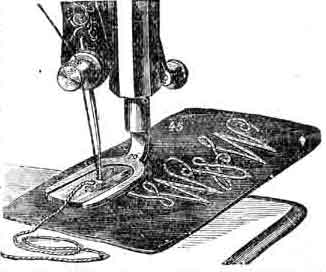
The Braider is of glass, with two holes in it, one for the braid, the other for the needle, and fits in the cloth presser. To braid, pass the braid through the left hole of the braider, and draw the end out under the cloth presser to the right, being careful to have it pass under the needle.
After the first stitch is taken the braid will be drawn through with the goods by the feed point.
The Glass Corder is a glass foot with grooves on the under side. Insert the cord between the folds of the goods, and crease it close to the edge with the needle-wrench or scissors. Place the goods under the Cloth presser, with the cord in teh groove nearest the operator, and stitch as usual.
If the cord is held straight it is more easily placed close to the edge.
Part One | Part Three
Online Manuals Index | Main Index
Part 3
THE NEEDLEBAR Archive at ISMACS International
Online Manuals Section
DIRECTIONS
FOR USING
WHEELER AND WILSON'S
FAMILY SEWING MACHINES
Part Three
GENERAL DIRECTIONS
Sharpen Needles by grinding them with the emery wheel, placed on the spindle. Have the cloth-presser raised, the needle unthreaded, and the bobbin removed. Make the point round, long and tapering, not short and blunt.
Use the Thread Hook to get the end of the thread out of the bobbin, or blow it out; never use a pin, needle, or scissors, nor mar the edge of the bobbin.
Never allow the bobbins to get rusty.
Never oil the tension pulley.
Never turn the various screws in the machine except as herein directed.
Ordinary Seams are easily crossed. If very thick, go slowly; and if the work is retarded, push it under the presser, when the needle is out of the goods, so that all the stitches will be of equal length.
Hard and lime dressed goods and stiff brilliants are sewed better after being rubbed with white soap, where the seam is to be, or by using the thread oiler, or after being washed.
Why the Thread Breaks
When the tension is too tight.
When the needle is not set right, or is too small for the thread.
When the bobbin or hook have been scratched.
The most frequent cause of silk or thread being chafed or frayed off, when the tension is not too tight, is that the needle is too fine.
Skipping Stitches. This may occur when the needle is too high; or when the point is blunted; or with lime dressed goods, which need soaping, or the use of the thread oiler; or if the needle does not pass perfectly true through the needle-hole in the cloth plate.
If the Machine does Not Feed the Cloth, the stitch is too short, or the feed points need cleaning. If the feed motion is worn so that it does not rise the proper height, it may be raised by turning down the left screw on the feed point. It should lift the hemmer off the plate the thickness of a card only.
Heavy Work. To sew heavy work, put in the coarse plate slide and use a coarse needle, and the heavy spring, if necessary. For size of needle and thread see first page. Heavy work needs a tight tension and long stitch.
If the Band Slips, and does not force the needle through the cloth, it needs tightening, which can be done by cutting off a small piece and lacing it again. Cut the end perfectly square.
To Gather. Put No. 24 thread in the bobbin, make a long stitch with a moderately loose tension and gather by drawing the under thread.
If a very elastic bias seam is desired, keep the goods well stretched while sewing.
To Turn a Corner, llet the needle raise half way out of the goods, draw up teh thread, taking hold of it just back of the eyelet, and being careful not to pull any thread from the tension pulley; raise the cloth presser and turn the work, the needle acting as a pivot; let down the cloth presser and proceed. Or, raise teh cloth presser and turn the goods when the point of the needle in going down has just reached the top of the glass.
The Brush Pad is to detain one loop until the point of the hook has entered the next. It should press snugly against the outer edge of the rotating hook, but should not be forced against it sufficiently to divide the bristle, as it will then detain the thread too long, and cause it to break. It should never be moved unless worn away until it does not touch the hook, in which case it may be moved against the hook.
Wheeler & Wilson Mfg. Co.
Factory and Chief Office at
Bridgeport, Conn.
U. S. A.
Part One | Part Two
Online Manuals Index | Main Index