All 3 available source parts are included below.
Part 1
THE NEEDLEBAR Archive at ISMACS International
Online Manuals Section
Directions for using the
Willcox & Gibbs Automatic Noiseless
Sewing Machine
(Part One)
INSTRUCTIONS RELATIVE TO THE CARE AND OPERATION OF THE PORTABLE ELECTRIC MOTOR
To Adjust Motor to Machine
Place machine on motor base, so that the felts on the motor coupling enter the opening in the wheel of the sewing machine; then turn machine-end of motor base towards you, allowing it to project over the edge of the table, and tighten thumb screw underneath. When doing this, be sure that the main shaft of machine is in perfect alignment with main shaft of motor by turning wheel by hand slowly from you. Should it not run freely, loosen thumb screw and adjust machine by slight movement to or from you. Again, turn the wheel and if it runs freely, then tighten thumb screw securely, taking care not to shift machine on base.
To Connect with Lamp Socket
Screw plug into electric lamp or base socket; then take plug cap end of flexible cord attached to Foot Controller and snap the two pins into the plug. Do not attempt to screw into or unscrew plug from socket while flexible cord is attached. If you do, you will probably break the wires in the flexible cord.
To Connect Foot Controller
Take the plug cap end of the shorter flexible cord and snap the two pins into the Foot Controller. Light pressure with the foot gives slow speed, more pressure increased speed. The speed may be changed by adjusting the screw underneath the foot pedal, by turning this screw to the right or left. Turning to the right increases speed; turning to the left decreases speed. How much to raise or lower the adjusting screw will be determined by noting speed of machine when foot-piece touches top of screw.
Special Caution
Before applying current, be sure machine wheel turns freely by hand. If it does not, follow instructions under head "TO ADJUST MOTOR TO MACHINE".
1. Do not pull Connections from sockets by grasping the Wire.
Take hold of the hard rubber Plug and remove gently. This will prevent disturbing the wires and save you much trouble and annoyance.
2. To place Electric Automatic and Foot Controller in Carrying Case.
Arrange lead wires on sewing machine and foot controller carefully. Turn stitch regulator to 22. Place machine in case at a slight angle so that the base of machine will slip under brackets which hold it in place. Place attachment box back of machine and oil slide in front, after machine is in place. Place foot controller in compartment provided for it at end of case.
3. Never oil Foot Controller.
Keep in a dry place.
4. Do not oil Motor.
To lubricate motor, remove grease cups and fill them with vaseline.
5. Keep sewing machine thoroughly oiled
as per directions on pages 10 & 11 of Instruction Book, using Willcox & Gibbs Automatic Oil.
6. Be sure and use the right Needle and Thread
by consulting the scale on the right hand side of Cloth Plate. Use only genuine Willcox & Gibbs Sewing Machine Needles.
7. When using Attachments,
always consult Instruction Book, using thread needle and stitch as directed.
8. Do not endeavor to make Repairs.
Consult the nearest Willcox & Gibbs Office for prompt and courteous service.
DIRECTIONS FOR USING THE WILLCOX & GIBBS NOISELESS AUTOMATIC SEWING MACHINE
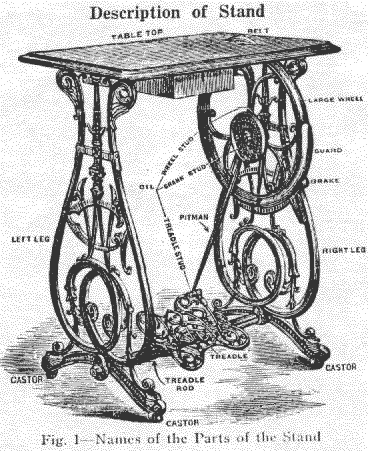
The Stand, as shown above, consists essentially of the Table Top; Right Leg; Left Leg; Treadle Rod; Large Wheel, turning upon the Wheel Stud; Pitman, connected at its upper end with crank of Large Wheel by the Crank Stud; and Treadle, connected with the lower end of Pitman by the Treadle Stud.
The Large Wheel is covered in front by a Guard to protect the dress of the operator, and in a recess in this guard is a small Rubber Ball, which acting as a Brake, prevents the Wheel turning the wrong way.
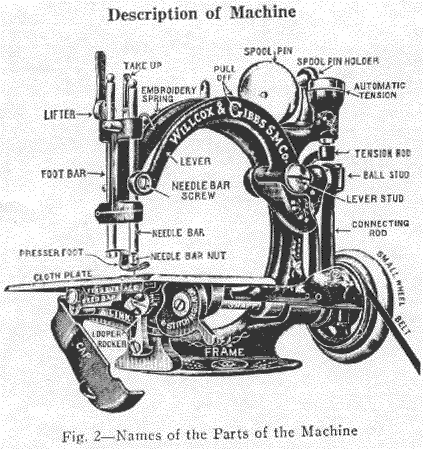
This illustrates the principal parts of the Machine, to which reference is made in the course of these Directions, and a careful study of which will be found exceedingly helpful to the learner.
Treadle Practice
Before commencing to sew, practice running Machine, with one foot, without thread in the Needle, and with Presser Foot raised from Cloth Plate, until you can with ease produce a regular motion.
The Cap that covers the Looper must be kept closed while practising or sewing.
We advise use of one foot only in running Machine, as it runs so very lightly.
Oiling -- Notes and Cautions
A little care bestowed in properly oiling and cleaning Machine will abundantly repay owner in ease of running and general comfort.
Use oil put up expressly by us, which is decidedly best for the purpose, and can be obtained at any of our Branch Offices. Should Machine run hard after standing for some time (which it may do if any oil except ours is used), oil with a little kerosene or benzene, and after running it a few minutes, oil again with our sewing machine oil. (See "Best Sewing Machine Oil" on page 39)
A bottle of oil and an oiler accompany each Machine sent out by us.
The Machine should be cleaned and oiled two or three times a week, or every day, if in constant use.
Keep outer rim of Large Wheel, underneath Table, free from oil. This will prevent its turning backward in consequence of oil reaching Rubber Ball. Should it do so, wipe outer rim of Large Wheel and Rubber Ball thoroughly with a cloth, then apply powdered chalk or pumice stone to Rubber Ball.
If oil gets on your work, rub the spots with soap and cold water before putting the garment in the suds.
Oiling the Stand
The Stand requires oiling in only three places, at each of which will be found oil holes, namely Wheel Stud, Crank Stud (both to the right of Pitman), and Treadle at its connection with Pitman (See Fig 1)
To oil them move toe of Treadle to its lowest point. This will raise both Stud oil holes to the top -- the only position in which they can be reached for oiling.
Part Two -- Part Three
Part 2
THE NEEDLEBAR Archive at ISMACS International
Online Manuals Section
Directions for using the
Willcox & Gibbs Automatic Noiseless
Sewing Machine
(Part Two)
Setting the Needle
This operation so important, and in other Machines so difficult, is rendered easy and certain by the patented improvement, applied to the Automatic Sewing Machine.
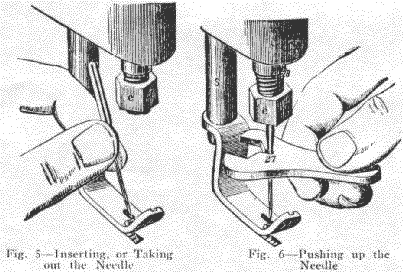
Let Presser Foot
down on Cloth Plate by turning Lifter
to right or left; raise Needle Bar to its highest
point by turning Small Wheel; then holding Needle
between thumb and finger (Fig 5), and with groove toward the left, let its point
go down into the "Needle Hole" in Plate until you are able to bring
shank of Needle directly under the end of Needle Bar.
If it does not readily enter, roll it between thumb and finger while pressing
it up, and it will soon find its proper 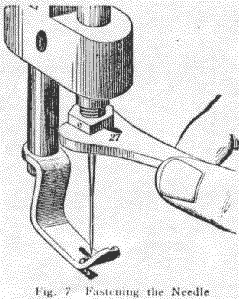 position
and enter easily. Then push Needle up as far as you can with the fingers; then
apply slot in wrench (Fig 6) below the taper on the Needle, and push it up as
high as it will go.
position
and enter easily. Then push Needle up as far as you can with the fingers; then
apply slot in wrench (Fig 6) below the taper on the Needle, and push it up as
high as it will go.
Before taking Wrench off, hold Needle again firmly between the thumb and finger, to prevent it slipping down; then place Wrench on Nut (Fig 7), and turn it to right until Needle is held firmly in its place.
Keep the Needle sharp. A dull Needle cannot do good work, and is liable to become bent in going through the cloth.
To Take Out the Needle
Let Presser Foot down, and raise Needle Bar to its highest point. Unscrew Needle Bar Nut with Needle Wrench, taking a half turn to the left.
To Tighten the Belt
Should Belt become loose after use, and you wish to tighten it, unscrew one end of Belt from Brass Ferrule, and shorten it by cutting off from one-quarter to one-half inch; then place end of Belt on bare floor, or on any smooth hard surface where you can gently roll it under your foot, so as to compress the end which enters ferrule, and screw together as below.
To Apply the Belt
Pass one end between the Pitman and Large Wheel, then pass both ends up through slot in Table. Hold end of Belt (having the ferrule) in left hand; take the other end of Belt between the thumb and finger of right hand, and turn it towards you six full turns -- this will put a twist, or "kink" in Belt. Then push end of Belt hard into ferrule, screwing it in as far as you can by turning it from you which will take the twist out of Belt and leave it straight.
To Thread the Machine
Machines are always sent from our offices properly threaded; therefore, observe Machine carefully when you receive it. The direction of thread is shown by the darts in Fig 9.
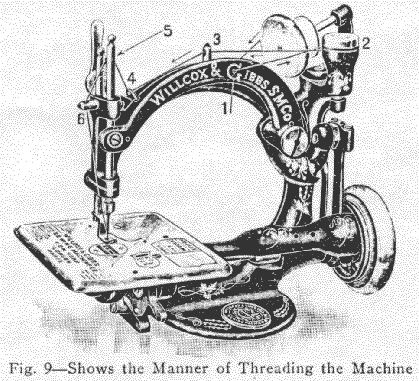
When threading, first pull out Spool Pin, and place spool upon it, noticing that spool revolves freely around Pin. Replace Spool Pin. Raise Needle Bar to highest point by turning Small Wheel, and then proceed as follows:
1. Thread from back toward you, through the two staples and hole in Arm known as Pull-off (1, Fig 9).
2. Then carry thread between spool and Automatic Tension, being careful to draw thread between the washers under cap of Automatic Tension (2, Fig 9)
3. Thread from right to left through Thread Pin on top of Frame (3, Fig 9).
*4. From right to left through Wire Staple (4, Fig 9). * NOTE Do not thread through loop of Spring under the staple, unless embroidering.
5. Take thread between thumb and finger of both hands, passing it between Needle Bar and Take-up, and press it from you into opening at top of Take-up (5, Fig 9).
To Regulate Length of Stitch to Size of Thread or Silk Used
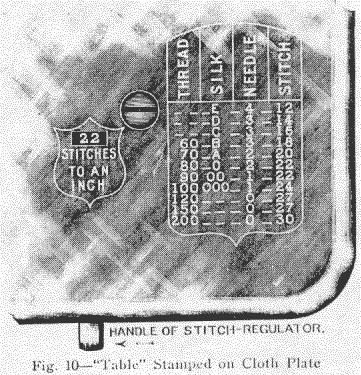 From
Fig 10 it will be seen that there is stamped upon Cloth Plate of the Machine
a "Table" showing proper size of Needle and length of stitch for each
size of cotton or silk. For example: For 80 thread or 0 silk, use a No. 2 Needle,
and 22 stitches to an inch.
From
Fig 10 it will be seen that there is stamped upon Cloth Plate of the Machine
a "Table" showing proper size of Needle and length of stitch for each
size of cotton or silk. For example: For 80 thread or 0 silk, use a No. 2 Needle,
and 22 stitches to an inch.
To left of this "Table" is a slot, surrounded by a shield inscribed "Stitches to an inch". To obtain length of stitch required, move handle of Stitch Regulator until proper number appears through slot. The length of stitch indicated by the "Table" should always be used, as the proper elasticity will then be secured in all seams. A strict adherence to the "Table" will always ensure good and durable work.
Selecting Thread or Silk
When selecting thread or silk for machine sewing, the operator should bear in mind that generally three or four sizes finer than that used in hand sewing is strong enough, and best adapted to the work. For instance, where 60 cotton would be used in hand sewing, use 80 cotton on the Machine. By using 80 or 90 cotton on muslin you will have a seam as strong as the fabric, and a chain so small on underside of garment as to make it almost impossible to detect it after laundering. This rule also applies to finer materials.
The following rules on this subject will be found useful:
For bleached muslin, shirting etc., use ----------- From 80 to 100 white cotton
Dress Making ---------------------------------- From 70 to 100 black cotton, 70 only in colors, 0 or A silk
For tucking cotton or silk ----------------------- From 100 to 200 cotton, 000, 00 silk
For light woollen clothing, flannels etc. ---------- 70 to 90
For heavy woollen clothing --------------------- 60 to 80
For fine linens ---------------------------------- 100 to 150
For fine lawns, nainsooks etc. ------------------ 120 to 200
For embroidering * ---------------------------- E or F silk (* When threading for embroidery, thread through Embroidery Spring. See "Embroidering")
For hemming silk or wool goods --------------- 000 silk
For braiding ----------------------------------- 80 cotton or 0 silk
We recommend the use of Willcox & Gibbs Cotton, and while any good cotton can be used, Willcox & Gibbs Cotton invariably gives the best results.
When colored cottons are required, use Willcox & Gibbs colored Cotton, and in the case of black select one number coarser than called for in the above rules. Colored cotton can be had only in number 80.
Size Needle to be Used
The "Table" stamped upon Cloth Plate (Fig 10) shows by number the proper size of needle to be used with each size of thread or silk.
The number is stamped on shank of each Needle.
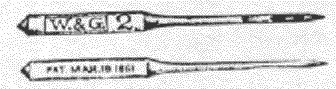
CAUTION: -- Every Needle made by us is stamped on shank  and
and 
All others are worthless imitations and invariably give trouble as well as injure the Machine. Imitations or bent needles will cause loose stitches and breaking of thread.
The Automatic Tension
This important feature of the Willcox & Gibbs Automatic Sewing Machine calls for few words of explanation, as it is entirely self-acting, requiring no attention or skill on the part of the operator, no matter what nature the fabric my be, or what size of thread or silk is required.
No adjustment of he Automatic Tension being required for any size thread or silk, or any kind or thickness of work, it only remains for operator to select thread or silk, and to regulate the stitch, by following the directions on page 13 and the "Table" stamped on Cloth Plate (Fig 10). The operator can then be certain that Machine will start immediately and do perfect work.
The Automatic Tension is not at all liable to get out of order, but will remain perfectly adjusted and self-adjusting, if not meddled with.
We repeat the caution: - Do not Oil the Automatic Tension
Part One -- Part Three
Part 3
THE NEEDLEBAR Archive at ISMACS International
Online Manuals Section
Directions for using the
Willcox & Gibbs Automatic Noiseless
Sewing Machine
(Part Three)
To Place the Work and Begin Sewing
Raise Needle to its highest point, also Presser Foot. Place work under point of Needle. Have two or three inches of thread drawn through the eye of Needle (NOTE -- unless the Needle Bar is at its highest point, the thread is held by the Automatic Tension, and cannot be drawn through).
Pass thread under Presser Foot, towards the left. Let down the Presser Foot, the thread being held fast between the Presser Foot and Cloth.
The thread may be held lightly under the finger, instead of being passed under the Presser Foot, in which case, hold it until two stitches are made. If held too tightly, the thread will break at the first stitch.
Crossing Seams
The Automatic Sewing Machine will give no trouble in passing over any ordinary seam. Very heavy seams may need a little assistance.
To Fasten Seam and to Take the Work Out
To Fasten the End of Seam -- Sew off end of seam two stitches: more than this may leave seam unlocked. Stop with Needle at its highest point. With left hand, catch thread between Needle and Thread Pin (6, Fig 9), and pull some slack through the Automatic Tension. With right hand, draw the slack through the eye of Needle, and, grasping thread firmly, cut the thread close to the goods. Lift Presser Foot and then pull the goods from you, and end of thread will be drawn through the loop. Next, pull end of thread, which will tighten the knot and fasten off the seam. If you cannot pull any slack thread from the spool, it is because the Needle Bar is not at its highest point.
To Fasten Seam in the Goods -- Stop the Needle in the goods, place the fingers on the goods close to Presser Foot to prevent goods from moving, raise Presser Foot, and take one more stitch in last hole made. Then break off thread, take out goods and fasten off as directed in preceding paragraph.
To Fasten Seam to be Trimmed or Cut -- Seams that you wish to trim from the finishing end should be fastened by sewing back in the same row of stitching, a little beyond the point of trimming. If it is necessary to trim the finishing end of a seam that has not been fastened as above, immediately after cutting, lock the seam by inserting a pin through loop on under side of goods, pulling end of thread through and drawing it backward upon the seam.
To Take Out Seam -- It is one of the decided advantages of the Automatic Sewing Machine, that, if required, its work can be taken to pieces, without injuring the goods, by simply unlocking the seam at any point, and drawing out the thread. The seam can only be take out in one direction, viz: towards the point of starting. It is therefore a good plan to begin all seams from the end most exposed.
To Turn a Corner -- Stop with Needle raised to its highest point; raise Presser Foot and turn the work. As the thread acts as a pivot the work will become displaced from the position where the Needle was withdrawn; therefore, readjust the work so that the Needle will enter it at proper distance from last stitch. Let Presser Foot down, and proceed.
Difficulties of Beginners
As in all things "Practice makes perfect", so in the operation of the Willcox & Gibbs Automatic Sewing Machine, all the varied kinds of work which can be done on it will be accomplished with ease and in perfection as you daily grow more accustomed to its use while closely following this book of instructions. When in trouble arising from inexperience or failure to observe these directions, the following important features should be specially observed:
"It will not feed" -- STITCH REGULATOR not set according to "Table" on CLOTH PLATE. Thread wound on LOOPER. Needle bent. Threads or ravellings caught on PRESSER FOOT. Cloth caught in HEMMER or other attachment. Very heavy seams will not pass under PRESSER FOOT without a little assistance (See "Crossing Seams").
"It ravels when I take the work out" -- Stop Machine with Needle at its highest point and before it runs off the cloth more than two stitches. Never turn Machine backward to raise Needle. This precaution will leave last stitch always locked.
"It drops stitches" -- Needle is bent, or not right size for thread according to "Table"; or you are using soft finished cotton.
"The thread breaks" -- Machine is not threaded up right. You did not start according to instructions. You are sewing goods too hard for Needle to penetrate without soaping, or you are using wrong sized Needle for the thread; black or colored soft finished cotton; or the thread is caught on spool or wound around SPOOL PIN; or Automatic Tension does not hold the thread (See "Tension does not work" below)
"The Looper winds up" -- Caused either by not holding on to end of thread in starting, or by not putting thread under PRESSER FOOT; or leaving PRESSER FOOT up; or stitch not right by "Table". When this difficulty occurs pull down the Cap and clear thread from LOOPER, being careful not to scratch LOOPER.
"It runs hard" -- Machine or Stand needs oiling, or you have been using poor oil that gums. Thread or ravellings are wound in between SMALL WHEEL and CONNECTION ROD -- this can occur only with our earlier AUTOMATIC and B-Machines. All our latest AUTOMATIC Sewing Machines have been so improved that this difficulty is entirely removed.
"Wheel turns backward" -- There is oil on rim of LARGE WHEEL (See directions for preventing Wheel turning backward).
"Belt slips" -- See directions to Tighten the Belt.
"Sewing is much too loose" -- You have a shorter stitch than required by "Table" or you have threaded through EMBROIDERY SPRING; or you have not drawn thread between the Tension Washers.
NOTE -- Imitation or bent Needles will cause loose stitches and breaking of thread.
"Tension does not work" -- A knot on thread may have broken off in AUTOMATIC TENSION. Raise Needle Bar to highest point, and draw a piece of folded writing paper between Washers, both front and back of Tension.
Accident to Machine
In case of accident, unscrew Machine from Table, pack tightly in a small box, so that it will not be shaken about in transit, and send by Express to us, or any of our Branches for repair. First tie a tag or card with your name and full address to the Machine before sealing up the box, and give the office to which you send it full particulars, stating also number of Machine. Do not send the Thumb Screw or Attachments.
Address: --
WILLCOX & GIBBS S. M. Co.,
658 Broadway, New York.
Part One -- Part Two