Film cameras
Agfa Recorder I and IIDifferent translation User manual
User manual for Agfa Recorder I and IIDifferent translation. 14 pages in English. Read the original PDF, download or print a copy without registration.
14 pagesEnglish5.4 MB PDF
Loading your manual…Open PDF directly
Document details
- Brand
- Agfa
- Model / document
- Agfa Recorder I and IIDifferent translation
- Document type
- User manual
- Language
- English
- Pages
- 14
- File size
- 5.4 MB
- Category
- Film cameras
- Document date
- Not specified in catalog
Search available document text
Find a term, then jump to its page in the original PDF. Image-only pages may not be searchable; check the PDF for exact wording and diagrams.
Page 1 · Read text
www.butkus.us
Agfa Recorder I and II
          This is a translation via Google from French, hence not perfect !
The Agfo Record I and II models differ almost nothing from each other in terms of their exterior. In terms of materials,
they are absolutely identical. Their narrow objectives are perfectly corrected onostigmots which are suitable very good
also for Agfocolor photography.

The Agfo Record ll is equipped with an Agfo Apotor lens or the Agfo Solinor high-closing objective and Prontor S, SV or
Synchro-Compur shutters. In besides this model has a blocking device double exposure.


                                                                                                                                                                                                                       Digitally signed by Mike Butkus
                                                 Mike Butkus  DN:ou=Butkus.org,email=mike@butkus.org,cn=Mike Butkus, o, c=US
                                                                                                                                                                                            Date: 2025.11.10 20:18:45 -05'00'


                                    www.butkus.us


       2
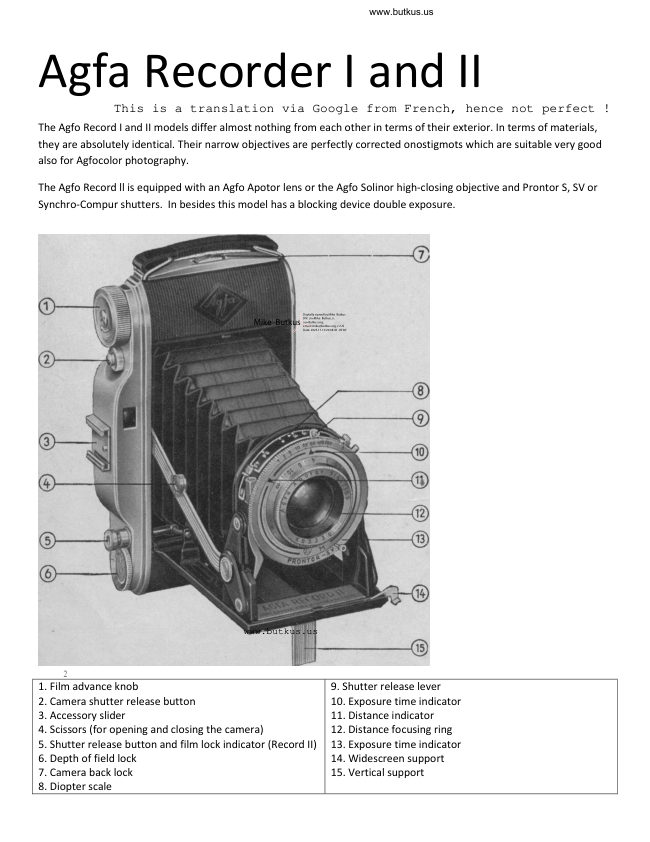
1. Film advance knob                                           9. Shutter release lever
2. Camera shutter release button                           10. Exposure time indicator
3. Accessory slider                                         11. Distance indicator
4. Scissors (for opening and closing the camera)             12. Distance focusing ring
5. Shutter release button and film lock indicator (Record II)   13. Exposure time indicator
6. Depth of field lock                                       14. Widescreen support
7. Camera back lock                                        15. Vertical support
8. Diopter scale
View original page 1Page 2 · Read text
To open the back of the device:
                         Push the latch under the strap in the direction of the arrow. Open the back of the device.

                        To charge the 6x9 B2 film camera (120\)
                      Do not charge the camera in direct sunlight, but only in daylight.


Loosen the spool holder and remove the spool holder. Place the full spool on the guide. The spool on the fixed trunnion,
the spool holder must be located. Remove the movable spool holder in its housing and retract the spool holder of the
belt.


                                            Insert the film reel
                                           unit of the same size
                                      so that the pointed end
                                          of the protective cover
                                                        is directed towards the empty reel.


      www.butkus.us


Open the reel and carefully remove it, pull out the protective clip and slide its tip into the longest slot of the
empty reel.

Turn the film winding screw to tighten the clip; adjust the clip, by pushing it in properly, until the reel winds
perfectly - that is, without letting light in - between the two edges of the empty reel.
View original page 2Page 4 · Read text
www.butkus.us


                                        Press firmly on the back of the device
                                               until you hear the closing click.

                                     (two less than the last two minutes)


Tilt the film control window to the side. Turn the advance knob until the
preliminary signals (dots, hands, or arrows) appear and stop when the number 1
appears. The film is then ready for the first shot.

To open the camera:

When you press the closing button (number 2, position 2), the lens holder slides
forward and is locked in place. For this operation, it is advisable to tilt the camera
slightly forward. It is sometimes necessary, e.g. when the time was long or rest, to
help a little less this implementation boot until it clicks into place.

The oontoge presented by the Agfo Record I in all that the opportunity for scissors
resides in its bottling in the blink of an eye. The careful construction of the scissors
ensures a particularly robust stability of the target holder.
View original page 4Page 5 · Read text
Viewfinder.
Bring the optical viewfinder close to your eye so that
the field of view of the inner lens is visible even in the
corners.
Remember to hold the viewfinder for long distances...
Find a stable position. Hold the device upright: do not
tilt it in any direction.
Press firmly on the shutter release button, without
hesitation or sudden movement, with your index finger
on the right.


                                And for the pictures
                                    Operate by gently pressing
                                      with the thumb of the
                                             right hand, on the
                                         shutter release button.
                              Do not press too hard,
                                        to avoid shaky photos.
                                  Then press the shutter release button.


                                  To close the camera:
                                              Press down with two fingers from top to
                                       bottom on the lens holder's " "
                                                     scissors;
                                              press the button to close the camera
                                       and you should hear a click.


Caution! Adjust the distance and remove the screen and the flexible trigger. Before closing the device, retract
the small support (14) fixed to the camera, if it was used.
View original page 5Page 6 · Read text
www.butkus.us

To unwind the camera: After the last (8th) shot, continue turning the film advance knob until
the end of the reel's protective cover is in front of the window.

Open the back of the camera. Pull the advance knob completely out. Carefully remove the full
reel – the cover must not unwind – fold the end of the cover, glue it, and wind the film so that
it is protected against the lens. Place the empty reel in the compartment next to the belt, with
the end of the split spool facing the advance knob.


A camera is a particularly well-crafted instrument of precision optics and mechanics, which
must be handled properly.

Before taking your first picture, you should be familiar with how to use it.

The Agfa Record is equipped with a locking device that reliably prevents double exposures.

Thanks to the red indicator in the small window next to the shutter release (page 2, number
5), you can see that the exposure has already been made and that you need to advance the
film. If you only advance it just before the next shot, there will be no accidental exposure, and
a careful operator cannot make a mistake. As for the snapshot hunter, who knows their
camera, they will proceed as usual, because they are keen to always be ready to capture a
scene.

You should also know what mistakes can be made. If you press the shutter release button
once while opening the camera—it takes a bit of dexterity to do this—the shutter release will
no longer work. What to do? First, close the camera. The shutter release is jammed. You could
unjam it by advancing the film, but then you'll lose that portion of film. In this exceptional
case, release the shutter using the cable release that attaches to thread 10 (page 12) or the
polished lever 6 (see pages 12-13) protruding from the shutter.

However, you must do this carefully and avoid putting your fingers in front of the lens. With
the Agfa Record 1, it's easy to fix by closing the camera again and then opening it properly.

Always remember: Never press the shutter release while opening the camera!
View original page 6
Page 7 · Read text
We are telling you that you must always remember, before closing the shutter, to remove the
shutter release, the flexible cable, the film, etc. Turn the front lens on.


The shutter is a very fine piece of clockwork mechanism, offering the most subtle precision. Do
not set it in principle except for the actual exposure. It should never happen that a
photographic lens is damaged with the shutter closed. It is also necessary to set the exposure
time before closing the shutter; this point is particularly important for very short exposure
times. By turning the knurled knob, one can feel how strong the spring tension must be for an
exposure time of 1/100th of a second.

Maintenance of the camera

Careful maintenance prolongs the life of the camera.

Protect it from dust and unnecessarily prolonged exposure to sunlight. Before inserting a new
film, ensure that the inside of the camera and the lens do not contain any dust or foreign
objects.

An optical instrument of such high quality must be kept constantly very clean. Therefore, avoid
touching the lenses and immediately remove any trace of fingerprints or dirt. For cleaning, use
only a soft sliver of cotton or a soft linen cloth, which must be absolutely dust-free and free of
coarse or soapy water. Take the cloth on the tip of a finger or a small piece of wood, or on a
metal object. There is no harm in blowing the air onto the surface of the lenses to clean them
more easily. However, never disassemble the lens, which should only be done by a specialist.

             SHUTTERS f 7
               Agfa Record I with shutter
               Pronto or Vorio


              Pronto                                                                        /


Speed, 8, 15, 100, 100, 200 | Speed: B, 25, 50, 200

Discrepancies (meters): 1 1.2 1.5 1.7 2 2.5 3 4 6.10 00
View original page 7Page 8 · Read text
www.butkus.us

1. Aperture: 4.5 5.6 (6.3) g ll 16 22 | 1. Setting the exposure time: Turn the knurled outer
knob.

2. Shutter release lever: Cock the shutter for each shot, also for B.

3. Distance adjustment knob: Turn the triangular knob.

4. Diopter lever.

5 Synchronized socket for 3 mm flash.

6 Automatic shutter release (for Pronto only).

      Reaction time: approximately 2 seconds. (Do not place on <B>.)
       1. Arm the shutter release.

       2. Arm the lever (6) of the automatic shutter release. 3. Release by pressing the button.

7. Socket for cable release.

Diameters of usable filters:

Vorio 6.3: 30 mm. Pronto 4.5: 30 mm.

The numbers indicated on the shutter release button indicate the intervals of one second, e.g.,
25 = 1/2 of a second, 50 = 1/2 of a second.
View original page 8Page 9 · Read text
Agfa Record II with


Prontor S., Prontor SV                     SynchroCompur
Synchronization                             with
- integral                                    Prontor S., Prontor SV
Speed:                                       Synchronization
B, 1, 2, 5, 10, 25,                                  -integral Synchronization
50, 100, 250                                Speed:
                                                 B, 1, 2, 5, 10, 25,
                                               50, 100, 250


Distances (meters): 1, 1.1 , 1.2, 1.3, 1.5 1.7, 2, 2.5, 3, 4, 6, 10, 00

1. Shutter cocking lever: Cock the shutter before each shot, until it stops (also for "B").

2. Self-timer lever (and synchronization for Prontor SV), unusable in position B and 1 hour -
delay of approximately 7 seconds. Subsequent steps: 1. Cock the shutter. 2. Cock the self-
timer. For the Compur, after pressing button 2, cock lever 1 again. 3" Release.

3. Shutter speed setting mark - turn the outer knurled ring; the mark indicates the selected
time.

4. Front lens mount.
View original page 9Page 10 · Read text
www.butkus.us

5. Distance setting mark: Turn to the desired distance.

6. Front shutter release lever. 4 until the mark indicates the X or M sync control lever (for
Prontor SV and Synchro-Compur only).

7. Cable release socket.

Usable filter diameters: Vorio 6.3: 30 mm. Pronto 4.5: 30 mm.
8. Flash socket; 3 mm diameter.

9. Aperture scale and control lever.

10. Cable release socket.

11. X or M sync reference points (Prontor SV).

For indications 2, 7, and 11, see the following pages.

FLASH TECHNIQUE WITH AGFA CAMERAS

The different flashes obtained on the camera are distinguished by: the flash duration, their
light intensity, and the time elapsed between contact and flash ignition.

Integrated synchronization shutters are adapted to these different properties.

With fixed synchronization focus (Vorio, Pronto, and Prontor S shutters), flash ignition occurs
at the maximum opening moment of the shutter settings. However, its use is restricted to low
speeds, e.g., 1/4" shutter speeds. This setting or point is called X synchronization.

For fully synchronized shutters, in addition to this X synchronization, M synchronization can be
used.

In contrast to the fixed X synchronization, the M synchronization allows the shutter opening to
be twisted by a few milliseconds, thus enabling the use of the floppy technique with the
highest speeds.

The table provides all the necessary information regarding the position of the sync lever for X
and M synchronization when using the twister.

For silent shooting, the position of the sync lever is irrelevant – with one exception – if the
twister is to be used with the Prontor SV shutter, it is essential to ensure that the sync lever is
in the red X position; otherwise, the twisting movement will not function. For 6cloir
photography, the exposure time must be chosen according to the distance to the subject and
the type of color lamp used. Refer to the instruction manual included with the 6cloir lamp.
View original page 10
Page 11 · Read text
Table 2 provides all the necessary information for setting the lever and speed, for X and M
synchronization, according to the most common types of lamps.

I did not scan the flashbulb or flash graphs.

Depth of field is the extent in depth of field of the subject's sharpness, measured
from the front to the background.

In front of the point of focus, the depth of field is shallower than behind that point.

When focusing on a nearby object, the depth of field is shallower than when
focusing on a point at a greater distance.


                                       Depth of field is the extent in depth of field of
                                            the subject's sharpness, measured from the
                                                front to the background.
        Largest opening F4.5, Smallest F16                   In front of the point of focus, the depth of
                                                       field is shallower than behind that point.
                                When focusing on a nearby object, the depth
                                               of field is shallower than when focusing on a
                                              point at a greater distance.


By choosing small F-stop (high digits), a greater depth of field is obtained (see the
table on page 19).

The simplest method is to stick to focusing on two points. For installations, this is
almost always sufficient.

Aperture setting           Adjusting the distance     Depth of field. Perfect
                                                   sharpness between
Red dot                 3 m (nearby)               2.5 to 5 m
entire 8 and 11           10 m (far)            5m to infinity
                      marked in red
View original page 11Page 12 · Read text
www.butkus.us


                                  The depth-of-field magnification fixed
                                 on the upper part of the device
                                          constitutes a very useful supplementary
                                              tool. If, by turning the outer lens, we
                                           place, for example, diophrogm 8 on the
                                number 4 (meters) of the inner disk, the
                                        magnification limiting the diophrogm
                                    zone shows us the limits of the depth of
                                                field of the most prominent or most
                                        received point, that is to say,
                                      approximately 3to 6m


What is lo parallax of the viewfinder?
Don't be put off by this complicated word - the thing is very simple.
The axes of the lens and the optical viewfinder are not fixed.  It is therefore
sufficient to turn the camera slightly in the direction of the viewfinder:

for horizontal shots: upwards;

for vertical shots: sideways towards the viewfinder.

at the same height. However, they are designed to show that, in most shots, the
axis of the viewfinder coincides with that of the lens. For photographs taken from
the front, if we want the edges of the photograph to correspond exactly to the
viewfinder, we must take into account a first offset which is called the angle of
viewfinder.
View original page 12Page 13 · Read text
In the views taken from close up
(less than 2 m.) one sees from
the upper part of the monument
a little less than from the viewer.


For close-up shots, if you want the edges of the lens to correspond exactly to the
viewfinder, you must take into account a first factor called the angle of the
viewfinder.


There are light meter apps for smartphones. Some free, some for a few bucks.
They will correspond to the F/stop and shutter speeds. Just remember this camera
only goes to 1/250 and the more expensive lens 1/500. So 200 ASA film is fine.
View original page 13
Page 14 · Read text
www.butkus.us


With the Agfa camera -
Agfa filters and lenses
Agfa filters are used to render various colors for exotic colors corresponding to the
gum of black to white.
We supply high-quality filters, uniformly colored in the foam, rigorously saturated
and renowned for satisfying the highest requirements. Densities: one orange, one
medium, one green and red-orange.
The softening of the filters notably requires a longer exposure. For this purpose,
exposure length factors are used, which depend, however, primarily on the film
sensitivity. The film specifications indicate on the packaging which projection
factors must be taken into account for the most common filter densities.
When these specifications are incorrect, the following data will serve as the
standard for polychromic films.
Color filter are only for use in B&W films.
View original page 14
Related documents and language editions
From the M. Butkus Camera Manual Library. Original publisher and archive notices are retained.
Check the model and edition against your equipment.
PDF verified 2026-10-10.