Film cameras
Canon Sure Shot Max User manual
User manual for Canon Sure Shot Max. 36 pages in English. Read the original PDF, download or print a copy without registration.
36 pagesEnglish1.8 MB PDF
Loading your manual…Open PDF directly
Document details
- Brand
- Canon
- Model / document
- Canon Sure Shot Max
- Document type
- User manual
- Language
- English
- Pages
- 36
- File size
- 1.8 MB
- Category
- Film cameras
- Document date
- Not specified in catalog
Search available document text
Find a term, then jump to its page in the original PDF. Image-only pages may not be searchable; check the PDF for exact wording and diagrams.
Page 4 · Read text
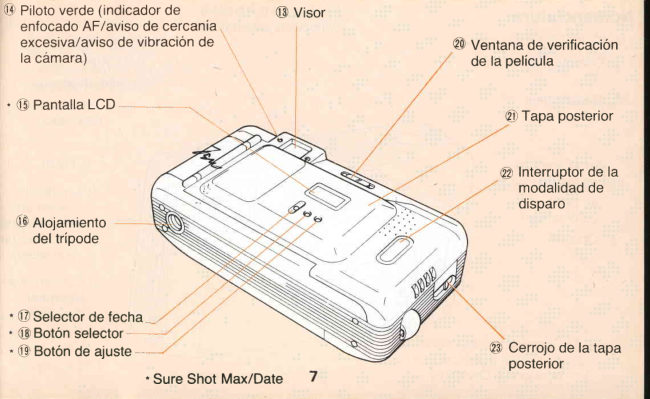
@ Greenlamp (AF In-Focus      @ Viewfinder  lndicator/Too-CloseWarning/
  Camera-ShakeWarning)                                    €o)ShootingMode Switch


 'C) LCD panel                                                        €DBackCover


                                                          €DritmCheckWindow

 @ TripodSocket


                                             Q3BackCoverOpeningLatch r @ Set Button
              'Sure Shot Max/Date
View original page 4Page 7 · Read text
HandlingPrecautions

 1) This camera is not resistantto water, and    4) The batterymay explodeor cause burns if
   should not be used outdod-rsif raining or      disassembled,recharged, shorted, eX-
   snowing.lf accidentallydroppedin water,     posedto high temperatures,or disposedof
   contactan authorizedCanon servicefacil-       in fire.
    ity. Keep the camera out of salt spray and    5) Use a blower brush to remove dust and
   excessivehumidity.lf used at the beach,     sand from the lens and insidethe camera.
   clean it thoroughly afterward with a dry     Do not applyany fluidsto the lensor body.
   cloth.                                Take the camera to an authorizedCanon
2) Store the camera in a cool, dry, dust-free      servicefaci{ityfor a more thoroughclean-
   place. Be sure to keep the camera out of       ing if necessary.
   direct sunlight,and away from "hot spots"    6) Film passingthroughX-ray examinations
   such as the trunk or rear windowshelf of a        at an airport may be exposed and ruined
   car. Avoid places where mothballs are     even when loadedin the camera.Request
   used.and use a dessicantin excessivehu-      a handcheckedinspectionto avoid dama-
   midity.                                    ge.                                                     :
3) Do not attemptto disassemblethe camera    7) Color reproductionmay be adverselyaf-
   yourself,due to the high-voltagecircuitry      fected if film is left in the camerafor a long
   inside.                                       time.  Always  develop exposed  film
                                              promptly.

                            www.orphancameras.com1 5
               ,*1,                    qik..            +i          .   ,     }.{i.t        +.,d,ag&+u:;        ,...*j,-.     '...
View original page 7Page 8 · Read text
f" f,oadrmgand #fiee$rsmgfhe
      ffiaffery

   This camerausesone CR123Athree-voltlith-
  ium battery.
   1) Slide the batterycover in the directionof
     the arrowto open.
   2) Load the batteryso that its terminalsface
      in the directionshownin the illustration.
   3) Closethe batterycover"


1 9
View original page 8Page 9 · Read text
Checking the Battery
             1) Open the lens cover (thisturns the power
               on) by slidingthe lens cover open/close
               switchin the directionshown,and the lens
            movesout to the readyposition.
             2) Set the shootingmode switchto Flash-ON
                       (  t  ) and press the shutterbutton com-
                pletelyto fire the flash.
             3) Removeyour finger only from the shutter
               button,,andwait for six seconds.
             4) Then press the shutter button again and
               the battery power is suficientif the flash
                  fires.
            oCheckthe batterybeforeloadingthe film.


www.orphancameras.com21
View original page 9Page 10 · Read text
Shooting Capacity
                 Approx. 18 rolls oI 24-exp.filmwith 50% flash
                  use. (Data based on Canon's StandardTest
                Method)

                                -                    Always check the battery before taking
                       pictures.
                           *                When you intend to take many pictures,
                   such as on a trip or at a wedding,be sure
                         to take along a spare battery.                                                       '                Whenthe camerais not in use,be sureto
                      close the lens cover keep the camera in
                              its case.                                      .                  The batteryshould be changedwhen no
                         film is loaded, however if you must
                  changeit in mid-roll,closethe lenscover
                   and then quicklychangethe battery.

           23

,iu"Lrusg*.,r..     a   -                                                                                                                                                 ..       ..'.Aid*;d*':is
View original page 10Page 11 · Read text
2. Holding the Camera

                  Unsharppicturescaused by "camera shake"'
                may occur if the camera is not held steadily.
                    Try the following technique to ensure sharp
                     pictures.
                   1) Put the neckstraparound your neck, and
                       hold the camerawith both hands.
                      2) Keep your elbowsclose to your body.
                      3) Hold the.calneralightlyagainstyour nose
                   and lookthroughthe viewfinder.                                           .                We recommend using ISO 200 or ISO
                     400 film to decreasethe chancesof cam-
                       era shake by providinghigher shutter
                      speeds"                                    -                    Be careful to keep hair and fingers from
                         blockingthe lens, AE metering/AutoFo-
                      cus windows,or flash when holdingthe
                     camera.                                    -                   Do not grasp the lens barrelwhen holding
                         the camera.
            25       www.orphancameras.com                                                                            I
'1  ::  ..:;q.r:,i;    rbi   +;Ji                                    , l ; - A : } w - - . "      - ' ; ' ,        " 2          : , 2 :                              ,;$l
View original page 11Page 12 · Read text
3, Shutter Button Actian

  The shutterbuttonactivatestwo functionsde-
   pendingon the amountof pressureapplied.
   1) Presshalfwayfor focusand metering.
   2) Presscompletelyto take the picture.
        " Shutter button action plays an important
       part in taking sharp pictures.A quick
       strokewith the tip of yourfingeror finger-
        nail may cause unnecessarycamera
     movementcalled "camerashake."Rest
       the ball of your fingeron the shutterbut-
       ton, pressthe buttonhalfwayto focus the
       subject,and then pressthe buttoncom-
       pletelyusinga gentlesqueezingaction.


27
View original page 12Page 13 · Read text
l9j,,d.,.pm4ffrl.t6f.f",tt+:,frLfgnt

          Use only DX-codedfilm whenever possible.
          The cameraautomaticallysetsthe film speed.
                     " Anv DX-codedfilrn within the range ot
             ISO 25-3200can be useci.                           .               For slide film, use DX-codedfilm with a
             speedof ISO25,50, 100,200,400,800,
              1600,or 320C.                      -             Non-DX-codedfilm cartridgesare auto*
                maticallyregisteredas ISO 25.
             1) Slidethe back cover latch up to open the
                                 I             back cover'.
             2) Insertthe flat end of the film cartridgein
                   first"
             3) Carefullypull the film tip across until it
             reachesthe film tip positionmark.


www.orphancameras.com29
View original page 13Page 14 · Read text
4) Makesurethe film liesflat and is positioned
     properly between the filrn guides, then
     closethe backcover.The film automaticai-
       ly advancesto the first frame, and "1" af:-
     pearsin the framecounter"       *            lf "S" showsin the framecounter,the film
      has been loadedincorrectly.Reloadthe
       film
        " No photos can be taken if the film is
      loadedincorrectlir.        -     WhenusingISO25 film or non-DX-coded
        film,pressthe shutterbuttonafterclosing
      the back cover. "1" will appear in the
      frame coLrnte:


3r
View original page 14Page 15 · Read text
fllJ Prisesde vues
              flll Fotografiab6sica
             flll BasicPictureTaking


www.orphancameras.com33
View original page 15Page 16 · Read text
1. Turn on the Camera

Move the lens cover open/closeswitchto the
bottom( G  ) OPEN position.
View original page 16
Page 17 · Read text
2, Select the Shooting Mode

          The Sure Shot Max/Max Date has three
           shootingmodes: Flash-ON,Flash-OFF,and
           Flash-ONwith Red-eyeReduction.Selectthe
            shootingmode accordingto the type of picture
           you wish to take.


www.orphancameras.com37
View original page 17Page 18 · Read text
Flash-ON(   |   ): Use this settingfor fiil-in
                                            flash photographyin daylightor tow-lightflash
                                     photographyof inanimateobjects. The flash
                                     always fires regardlessof the existing light
                                       conditionsin this mode.
                                             In this mode, the Red-Eye Reductionlamp
                                       doesn'tfunction.
                                      Flash-OFF(OFF): Use this seftingfor nor:
                                    mal daylightsituationsand also existinglight
                                          picturessuch as sunsetsor in locationswhere
                                            flash is prohibited,such as museums. The
                                          flashneverfires in this mode.-
                                     Flash-ONwith Red-EyeReduction (o  f ):
                                Use this settingfor flash photographyof pdo-
                                          ple or pets. The flash alwaysfires regardless
                                             of the existinglightconditionsin this mode.**


                          39
.:iigi4s.i..             k             r!    .,^r       -   r-                 -s.+.l&                                                                                                                               i!!;iitd;i*,,*drd!,
View original page 18Page 22 · Read text
2) Press the shutter button halfwayto focus
      the subject in the AF frame. The green
     lamp lightsup steadilywhen the subjectis
       in focus.          .            lf the greenlamp blinksslowly(4 times/
      second),you are too closeto the subject.
     Move at least0.65 m (2.1 ft.) away from
       the subjectand refocus.           .             lf the greenlamp blinksrapidly(16 times/
      second)in the FlashOFF mode,the shut-
        ter speed will be too slow for hand-held
       photography.Use the flash or place the
      camera on a tripod to ensure sharp re-
        sults.


47
View original page 22Page 23 · Read text
3) Gentlypressthe shutterbuttonall the way
            downto take the picture.                       -            When shooting at or near the closest
               shooling distance of 0.65 m (2.1 ft.),
            makesurethe subjectis positioned'inside
                the parallaxcorrectionlines.                   *               For shootingpicturesthrougha window,
                 set the camera at an appropriateangle
               from the camera-to-subjectdistanceof
               approx more than 20 cm.                           .              Care shouldbe taken to avoid hittingor
                scratchingthe AF windowsas eithermay
               lead to inaccuratefocusino.


        49www.orphancameras.com
View original page 23Page 25 · Read text
tl" Remaye tfie Filrn

         The film is rewoundautomaticallyat the end of
           the roll.The framecountercountsdownwhile
           the film is rewinding.Film rewindstops auto-
            maticallywhen the film has been completely
          rewound,and the countershows"S".
            1) Open the back cover by slidingthe back
             cover openinglatch in the directionof the
             arrowto removethe film.
            2) Make sure the frame counter shows "S"
              before opening the back cover to remove
              the film cartridge.
                     " lf morethan the numberof framesspeci-
                 fied on the film cartridgeis shot,the last
              framemay be cut off duringprocessing.


       53www.orphancameras.com
View original page 25Page 27 · Read text
1. Focus Lock

             Although Smart AF focuses most subjects,
            use Focus Lock for subjectsextremelySmall,
             extremelyoff-center,orif the camera is to be
             positionedvertically.
               1) Centerthe AF frame over the subjectand
                press the shutter button halfway. The
              greenlamplightssteadilyto indicateFocus
                Lock.
               2) Keeping the shutter button pressed half-
             way (green lamp remainslit), recompose
                the picture as desired and then press the
                 shutterbuttoncompletelydown to take the
                 picture.


        57www.orphancameras.com
View original page 27Page 28 · Read text
The self-timerfunctiondelaysshutterrelease
                                                for 10 secondsto allowyou to includeyourself
                                                 in the picture.Placethe cameraon a tripodor
                                            positionit on a flat, steadysurface.
                                            1) Composethe picturewhilelookingthrough
  oA.--t**=..-.....---S                             the vieMinder.
                                             2) Press the self-timerbutton for autofocus--:'h                                  ing and self-timeractivation.When the
                                           subjectis in focus,the greenlamplightsup
                                               steadily.,
                                                               " The red-eye reduction/self-timerlamp
                                                 starts blinkingslowlyfor the first B sec-
                                      onds and then rapidlyfor the last 2 sec-
                                      onds beforethe pictureis taken.
                                When the red-eye reductionfunctionis
                                             triggeredin the Flash ON with Red-Eye
                                         Reductionmode, the illuminatesfor the
                                                    last2 secondsbeforeshutterreleasing.

                          s9
View original page 28Page 30 · Read text
flVl Fonctionsadditionnelles
      pour le SURESHOTMAX
    DATE
   flVl Funcionesadicionalesde la
    SURESHOTMAX DATE
   flV] Additional Functionsfor the
    SURESHOTMAX DATE


63
View original page 30Page 31 · Read text
?" Selecfing the lmprint Format

                   The date/timecan be imprintedin one of four
                          differentformats or turned off. Press MODE
                       buttonto changethe date formatin the follow-
                       ing sequence:
                        (1)YearlMonth/Day
                                                            I
                     (2)Day/Hour/Minute

                    (3)Nolmprint
                                                           ,
                    (4)Month/Day/Year
                                                           t
                    (5)DaylMonth/Year

SimulatedDate
Datesimulee
Fechasimulada

         www.orphancameras.com65
View original page 31Related documents and language editions
From the M. Butkus archive. Original publisher and archive notices are retained.
Check the model and edition against your equipment.
PDF verified 2026-10-10.