Film cameras
Chinon CS-4 User manual
User manual for Chinon CS-4. 16 pages in English. Read the original PDF, download or print a copy without registration.
16 pagesEnglish1.1 MB PDF
Loading your manual…Open PDF directly
Document details
- Brand
- Chinon
- Model / document
- Chinon CS-4
- Document type
- User manual
- Language
- English
- Pages
- 16
- File size
- 1.1 MB
- Category
- Film cameras
- Document date
- Not specified in catalog
Search available document text
Find a term, then jump to its page in the original PDF. Image-only pages may not be searchable; check the PDF for exact wording and diagrams.
Page 3 · Read text
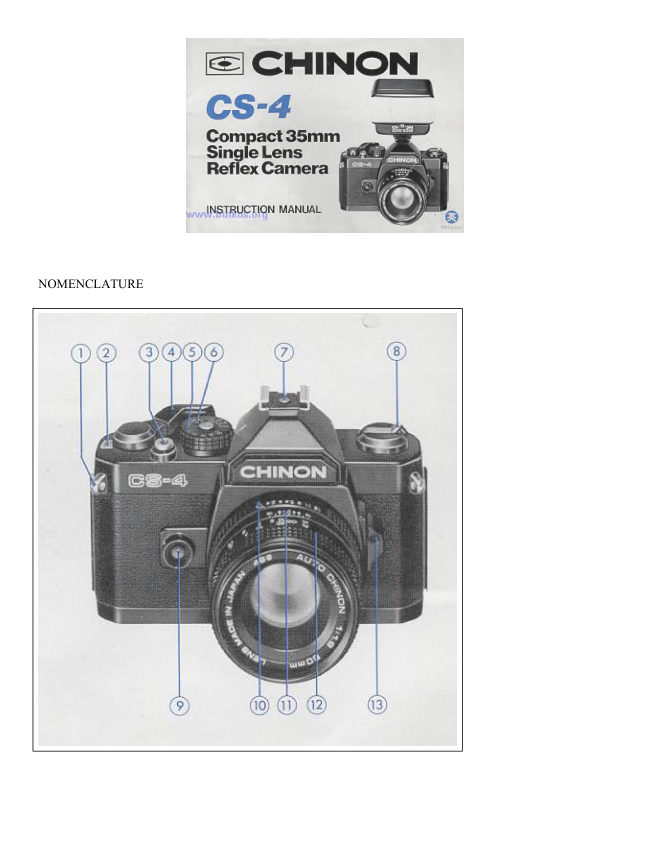
1. Shoulder Strap                                           8. Film Rewind Knob/Back Cover Opener

2. Frame Counter                                           9. Action Lamp

3. Shutter Release Button                               10. Aperture Ring

4. Film Advance Lever                                 11. Depth of Field Scale

5. Shutter Speed Dial                                   12. Focusing Ring

6. Film Speed Window (ASA/DIN)                     13. Exposure Meter Switch

7. Hot Shoe


                                                      21. Rewind Button
14. Film Chamber

                                                      22. Film Guide Rail
15. Exposure Indicator LED's/Battery Check Lamp

                                                      23. Film Rail
16. Viewfinder Eyepiece
View original page 3Page 4 · Read text
17. Sprocket Teeth                                    24. Tripod Socket

18. Take-up Spool                                    25. Shutter

19. Film Pressure Plate                                26. Battery Compartment Cover

20. Film Chamber Cover


SPECIFICATIONS OF CHINON CS-4 COMPACT SLR CAMERA

Type: 35mm SLR Compact with LED type light measuring system.

Picture Format: 24 X 36mm.

Lens Mount: M42 thread mount.

Mirror: Quick return, shockless system.

Shutter: Seiko MFC metal focal plane shutter, vertical path.

Shutter Speed: 1 sec. - 1/1000 sec., "B".

Viewfinder: Fixed eye-level pentaprism, central split image with microprism collar and ground glass.

Viewfinder Magnification: 0.87 X (@50mm, )

Viewfinder Visibility: 92%
View original page 4
Page 5 · Read text
Exposure Meter: TTL, center weighted measuring system employing a silicon blue cell, 3 step exposure
indicator with 3 LEDs.

Exposure Range: EV+2 (F/l.9, 1 sec.) to EV+18 (F/16, 1/1000 sec.)--ASA 100 F/1.9 lens.

ASA Range: 25 - 1600 (DIN 15 - 33) with safety lock.

Film Advance: Single stroke in an arc of 130° with 25° stand off.

Film Counter: Automatically indicates number of exposures and resets to "S" when camera back is opened.

Film Rewind: Folding crank type.

Accessory Shoe: Hot shoe type with X sync. Action Lamp: Red LED illuminates while the shutter operates.

Synchronization: Flash sync. at 1/60 sec.

Power Source: Two 1.5V Alkaline batteries (LR44, A76) or two 1.5V silver oxide batteries (SR44, S76, G-13).

Battery Test: Built-in with LED indicator.

Accessories: Multi-coated lenses, Auto electronics flashes, carrying case and many more.

Body Dimensions: 135 (W) X 86 (H) X 50.5 (D) mm. (5.33" X 3.38" X 1.99 )

Body Weight: 455 grams (16.05 oz.).


INTRODUCTION

Welcome to the world of Chinon photography! Your Chinon CS4 camera is one of the most advanced 35mm
SLR cameras incorporating features normally found only in higher priced models. This fantastic compact
camera employs the latest state-of-the-art electronics which will ensure carefree operation every time. In order
to take full advantage of the features of your CS4, please read the instruction manuals carefully so as to totally
familiarize yourself with your camera before actually starting to take pictures. We thank you for choosing
Chinon quality products and we wish you years of satisfaction and enjoyment.
View original page 5
Page 7 · Read text
INSTALLING THE BATTERIES

1. By using a coin, unlock the battery compartment cover by turning it counterclockwise (Fig. 1).
View original page 7
Page 8 · Read text
2. Place two 1.5V Alkaline batteries (LR44, A76) or two 1.5V silver oxide batteries (SR44, S76, G-13) with the
minus (A side facing upwards (Fig. 2).

3. Replace the battery compartment cover by turning fully clockwise (Fig. 3).

NOTE: Clean the batteries with a dry cloth or tissue paper before inserting and thereafter every six months.


Make sure that the batteries are inserted correctly, i.e., check polarity. The exposure indicator LEDs and the
action lamp will operate only when the batteries are correctly installed and not exhausted.

BATTERY TESTING
To test the batteries, push up the exposure meter switch. If the batteries are in good condition, one of three
LED's located at the left side of the viewfinder frame will illuminate (Fig. 4). If a LED fails to illuminate, the
batteries are too weak and need to be replaced, they are incorrectly inserted, or the shutter speed selector is set
to the "B" position.


FILM LOADING
Your Chinon CS4 camera can be used with any type of 35mm film.

1. Pull up the film rewind knob until the camera back pops open (Fig. 5).

2. Then, insert a film cartridge into the film chamber with the protruding end facing the bottom of the camera
(Fig. 6).

3. Push in the film rewind knob and slightly turn the knob in either direction until it engages the film cartridge
spool.

4. Insert the trimmed end of the film into a slot of the multi-slotted take-up spool.
View original page 8
Page 9 · Read text
5. Turn the shutter speed selector to any setting and advance the film while holding the film lightly down on to
the transport sprockets.

6. Release the shutter if necessary and advanced the film until the sprockets engage with the upper and lower
perforation of the film (Fig. 7).

7. Close the camera back firmly until it locks with a click.

8. Turn the film rewind knob gently until the film slack is taken up and the rewind knob stops. Do not force or
further rewind the film.

9. Advance the filth and release the shutter two times (Fig. 8). The rewind knob should rotate counterclockwise
when the film is advanced and the "1" marking should appear in the frame counter window (Fig. 9).


MEMO HOLDER
The Chinon CS-4 camera has a built-in memo holder feature. To utilize the memo holder, simply cut off the top
of the film box and insert it into the memo holder located on the back cover of your camera. This will enable
you to quickly and easily identify the type of film and ASA speed used in your camera (Fig. 10).

FRAME COUNTER
Your Chinon CS4 is equipped with a frame counter which displays the number of exposures and resets
automatically upon opening the camera back. When the camera is opened, the counter shows "S" indicating the
start of the picture taking process. When film is loaded according to the procedure previously described, the
counter displays "1" indicating the camera is ready for the first exposure. Every time the film advance lever is
turned the counter will proceed one stop forward. The numbers 24 and 36 are colored in orange to warn the end
of commonly available films (Fig. 11).
The action lamp (LED) located on the front of the camera body will illuminate while the shutter is activated.
The subject can easily observe when the shutter is released.

FILM ADVANCEMENT
Make sure the film has been loaded properly. Operate the film advance lever through a full stroke. When the
film end is reached the film advance lever may stop before the lever is fully turned. Do not force the lever. Stop
winding at once and rewind the film. Please refer to "Unloading Exposed film" (Fig. 12).
View original page 9
Page 10 · Read text
ASA/DIN SETTING
The ASA/DIN speed of the film is specified on the box or in the instruction sheet packed with the film. Set the
ASA/DIN speed by lifting up and rotating the shutter speed dial so that the correct ASA/DIN film speed appears
in the window. Be sure to check the ASA number whenever you put new film into the camera (Fig. 13).

SHUTTER SPEED SETTING
Rotate the shutter speed dial to the left or right to select a suitable shutter speed from the band of "B", 1 to
1/1000 sec., (Fig. 14).

APERTURE SETTING
The aperture is set in the usual way by rotating the lens aperture ring until the desired F stop is set against the
green index mark on the lens barrel. For further explanation see "Determining Correct Exposure" (Fig. 15 &
16.).


*F stop Selection: The following may be used as a guide to determine the lens F stop when you are using the
camera;

Sunny day outside F/8--F/16
Cloudy day outside F/4--F/5.6
Inside (without flash) . . F/l.9--F/2.8

(Webmaster: typical guess with full sun is F16 at ASA of film. So ASA 200 film speed would be F16 at 1/200,
ASA 400 would be F16 at 1/500)
View original page 10
Page 11 · Read text
FOCUSING
Your Chinon CS4 has three built-in focusing aids.


1. The center of the viewfinder is a split image with microprism collar which is surrounded by ground glass.
When the camera is in focus, the image of these focusing aids become sharpest. While observing the subject
through the viewfinder, turn the lens focusing ring until the upper and lower split image match up to form a
uniform image (Fig. 17). This split image focusing is particularly helpful when the subject is dominated by
vertical lines.

2. The microprism is also helpful. When it is out of focus, the image on the microprism will be composed of
collection of asterisks (Fig. 18). These sparkling asterisks will disappear when the focus is properly set. You can
double check the focus setting by the image on the ground glass.

3. You can also focus indirectly. Actually measure or estimate the camera-to-the subject distance and set the
lens focusing ring to the appropriate setting (Fig. 19).
View original page 11
Page 12 · Read text
1. Over Exposure Indicator (Red LED)

2. Correct Exposure Indicator (Green LED)

3. Under Exposure Indicator (Red LED)

4. Split-image Rangefinder Spot

5. Microprism Ring

6. Fine Matte Outer Field (ground glass)


DETERMINING CORRECT EXPOSURE
Your Chinon CS-4 camera has a Through The Lens (TTL) exposure metering system. Also called an instant
aperture closed measuring system. To determine the correct exposure, observe the subject through the
viewfinder in the center of the microprism area. Then, push up the exposure meter switch until it is locked and
the exposure indicator lamp (LED) located on the left side of the viewfinder frame illuminates (Fig. 20). Should
the green lamp (LED) not illuminate, you must turn either the shutter speed dial or the lens aperture ring until
the green lamp illuminates. By doing so, you will be assured of a correct exposure.

*The Exposure Indicator:
Your Chinon CS4 camera has three exposure indicator lamps (LED's) located at the left side of the viewfinder
frame. These three lamps control the condition of exposure of the camera. The condition of exposure can be
confirmed in the following three ways:

When rotating the shutter speed dial or the lens aperture ring, you must operate them slowly since the exposure
indicator lamps are very sensitive. Generally you should select a shutter speed first then operate the lens
aperture ring until the proper exposure is obtained. A tripod should be used for shutter speeds lower than 1/30
second.

NOTE: The exposure indicator lamp does not illuminate when the shutter speed dial is set at the "B" position,
batteries are incorrectly installed or too weak, or the meter switch is not pressed up to the "ON" position.

The exposure meter switch is automatically returned to the "OFF" position when the shutter release button is
depressed. You can also return the switch to the "OFF" position by pressing it down. Be sure not to keep the
switch in the "ON" position for a long period of time. This will prevent unnecessary battery drain.
View original page 12
Page 13 · Read text
UNLOADING EXPOSED FILM
When the film in the camera is fully exposed, the film advance lever will stop. Do not attempt to force the lever
any further. Rewind the film and replace with a new film.

1. Push in the rewind button at the bottom of the camera (Fig. 21).

2. Unfold the rewind crank of the rewind knob and turn the rewind crank clockwise (Fig. 22). You will feel
friction as the film is rewound. Suddenly, when the film is rewound completely the friction will decrease and
the rewind crank will turn with ease.

3. pull up the rewind knob to open the camera back (Fig. 23). When the camera back is opened, the frame
counter will automatically reset to the "S" position. The rewind button on the bottom of the camera will pop out
upon the next advancement of the film advance lever.

Your exposed film should be processed without delay for best result.


INTERCHANGEABLE LENSES


Your Chinon CS4 camera is equipped with a Chinon thread mount which accepts all interchangeable lenses
with M-42 lens mount. To remove the lens from the camera body, press down the exposure meter switch,
holding the camera body in one hand and grip the lens with the other, turning it counterclockwise until it is
removed (Fig. 24).
View original page 13
Page 14 · Read text
NOTE: Do not remove or
                                                                           replace the lens while the
                                                                 camera is functioning. To
                                                                           replace the lens, insert the
                                                                             lens into the camera body
                                                                and turn it clockwise until
                                                                       secured in position finger-
                                                                                     tight (Fig. 25).


USING THE ELECTRONIC FLASH

                                                                          It is advisable to use a flash when the exposure
                                                        indicators detect that the light level is too low, such
                                                     as indoors, at night time, or in daylight when the
                                                      subject is too dark to provide adequate exposure.

                                                      Electronic flash units as well as conventional flash
                                                         units using flash bulbs may be utilized. Your CS4
                                                 has a hot shoe (Accessory shoe with built-in flash
                                                       contact) for "X" synchronization (Fig. 26).
                                                      Electronic flash units having a hot-shoe (built-in
                                                       contact) may be used without connection cord. As
                                                      the hot shoe has "X" type synchronization, it can
                                               be used with electronic flash at 1/60 sec., or at
                                                 slower shutter speeds (Fig. 27).


The lens aperture is determined by the calculation table indicated on the flash unit. Specially designed and
developed automatic flash units are available for your Chinon CS4 camera as optional accessories. These highly
advanced electronic flash units permit carefree flash photography. Look at the following fantastic flash units by
Chinon:
View original page 14Page 15 · Read text
Depth of field designates the nearest and furthest limits of the area that will be sharp in the picture in front of
and beyond the subject. Depth of field is controlled by the F/stop. The larger the lens opening, the shallower the
depth of field. The smaller the lens opening, the greater the depth of field becomes (Fig. 28 & 29).

*Depth of Field Scale The depth of field scale indicates (after focusing) the approximate area that will be sharp
in the picture. Locate on the depth of field scale the corresponding pair of F/stop figures. The distance between
these two F/stop figures on the focusing ring will be the area of sharpness in your picture (Fig. 30).

INFRA-RED PHOTOGRAPHY
Your CS-4 camera accepts infra-red film. To use infra-red film an extra focusing adjustment must be made.
After focusing note the figure that is adjacent to the green index mark on the distance scale (Fig. 31), then move
that figure over to the infra-red mark engraved on the lens. This adjustment is only required for black and white
infra-red film. When using color infra-red film, focus should be performed in the normal manner.


NOTE: Read the instructions carefully packed with the infra-red film for further information.

CAMERA CARE
Your Chinon CS-4 is a precision instrument. When used with care, it will provide years of trouble free service.
Protect your camera from dirt, rain, dampness, and excessive heat. Avoid touching the lens. To clean the lens,
wipe it gently with a soft lintless cloth or lens tissue. Do not use eyeglass tissue as this might scratch the lens
coating.

*Standard lenses                         *Accessories

50mm f/2.8                           Auto Flash S-180
         f/l .9
                                     Auto Flash S-240
55mm f/ 1.7 multicoated
                                     Auto Flash S-280
        f/1.4 multicoated
                                        Synchro-eye for Flash (Slave unit)
        f/1.2
View original page 15Page 16 · Read text
Filter 49mm (Skylite, W. ND4X, Y2, PL)
*Wide-angle lenses
                                      Rubber Eyepiece
28mm f/2.8 multicoated
                                        Eyepiece Adaptor (-3, +1, +3)
35mm f/2.8 multicoated
                                      Rubber Lens Hood
*Telephoto lenses
                                     Auto Extension Ring
135mm f/2.8multicoated
                                       Bellows
200mm f/3.5 multicoated
                                       Mini-copy Stand
300mm f/5.6 multicoated
                                        Spare Ring for Mini-copy Stand
500mm f/8.0 mirror lens *Zoom lenses
                                        Cable Release Adaptor 13 inch
28-50mm f/3.5-4.5 multicoated
                                      Angle Finder
35-l00mm f/3.5-4.3 multicoated MACRO
                                        Table Tripod
80-200mm f/3.8 multicoated MACRO
                                   Neck Strap

                                     1.5V Alkaline Battery (2 pcs. in one set)

                                     2 Clips Lens Cap

                                        Eyepiece Cover

                                  Body Cap and many more
View original page 16Related documents and language editions
From the M. Butkus archive. Original publisher and archive notices are retained.
Check the model and edition against your equipment.
PDF verified 2026-10-10.