Film cameras
Cosina 107-SW camera User manual
User manual for Cosina 107-SW camera. 11 pages in English. Read the original PDF, download or print a copy without registration.
11 pagesEnglish1.1 MB PDF
Loading your manual…Open PDF directly
Document details
- Brand
- Cosina
- Model / document
- Cosina 107-SW camera
- Document type
- User manual
- Language
- English
- Pages
- 11
- File size
- 1.1 MB
- Category
- Film cameras
- Document date
- Not specified in catalog
Search available document text
Find a term, then jump to its page in the original PDF. Image-only pages may not be searchable; check the PDF for exact wording and diagrams.
Page 3 · Read text
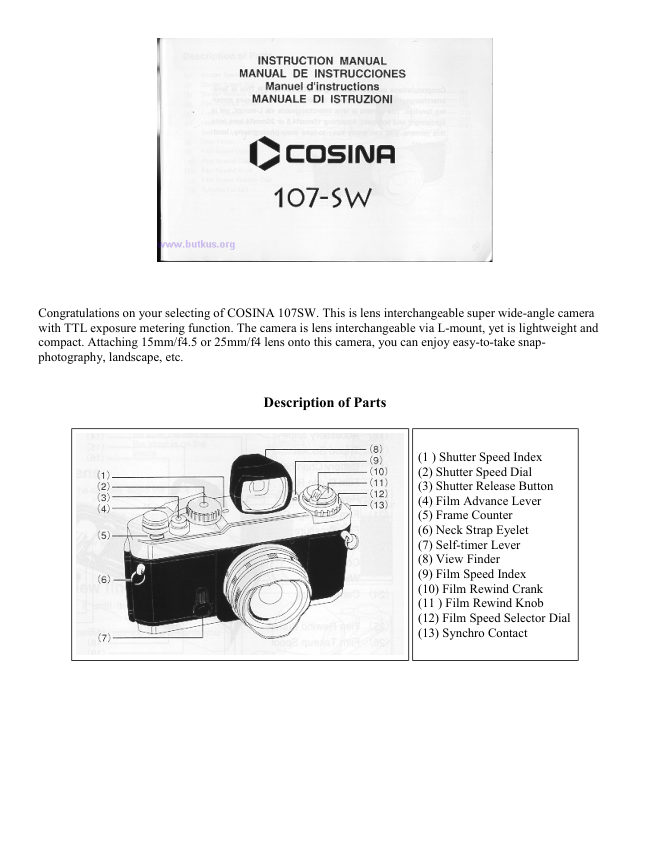
(14) LED Lamps
                                         (15) Viewfinder Eyepiece
                                         (16) Accessory Shoe
                                         (17) Tripod Socket _
                                         (18) Battery Chamber Lid
                                         (19) Film Guide Rails
                                         (20) Rewind Fork
                                      (21 ) Film Cartridge
                                Chamber _
                                         (22) Film Pressure Plate
                                         (23) Film Cartridge
                                      Confirmation Window
                                         (24) Camera Back
                                         (25) Film Rewind Button
                                         (26) Film Take-up Spool
                                         (27) Film Sprockets


Attaching Neck-strap
Attach the neck-strap to the camera as illustrated right:

Attaching detaching Lens
To detach or attach the lens from / to the camera, avoid the place
under direct sunshine.
1.Align the lens mount screw with that of the camera, then, turn the
lens clockwise.
  Pay attention not to tighten the lens screw too strongly.
2.To detach the lens from the camera, turn the lens counter-clockwise.

Attaching/detaching View finder
Attach the view finder by inserting it until it firmly clicks on the
camera's accessory shoe.(16)
When detaching the lens from the camera, pull the lens towards you
straightly not to turn it forcibly.
View original page 3Page 4 · Read text
Inserting Batteries

                              1.Turn the battery chamber lid (18) counterclockwise using a coin or
                             something similar.

                          2.Two LR44 type alkaline batteries or two SR44 type silver batteries are
                             used with camera.

                                3.Place the batteries so that both positive(+)sides are at the bottom of
                                 the compartment.

                              4.Turn the battery chamber lid clockwise until it close firmly.

                             Battery Check

                          1.Move the film advance lever (4) to the ready position.

                                2.Lightly press the shutter release button(3). Now the exposure metering
                             system is switched on. When one of three LED lamps (·,   or   )
                                      lights, then battery condition is satisfactory. lf no lamp lights, the
                                   batteries need replacing or have been loaded incorrectly.


3. Renew both batteries as necessary.

4. When not using of the camera, always return the film advance lever to the original position to prevent
accidentally releasing the shutter.

Caution: Keep batteries away from infants and small children. In case a battery is accidentally swallowed, call a
doctor immediately as the material inside the batteries can cause serious problems.


                         Loading Film

                                  1. To open the camera back(24), pull Film rewind knob (11) out. When
                                the back cover opens, the frame counter(5) automatically resets to "S".

                                  2. Insert the film cartridge into the film chamber so that the projecting end
                               of the film cartridge is downward. Do this in a place away from direct
                                  sunlight.

                                  3. Fold out and lift up the film rewind crank(10). Then rotate the crank
                                 carefully while push in it down lightly until the film locks on the film
                            rewind fork(20).

                                  4. return the film rewind knob to its original position.

                                  5. Insert the film leader into the groove of the film takeup spool (26) and
                               place it so that the film perforations engage with the spool teeth.
View original page 4Page 5 · Read text
6. Check that the film perforations engage properly with the teeth of Film
                               sprockets (27) and the film slides smoothly along the film guide rails (19)
                          by operating lightly the film advance lever (4) to advance the film.


Caution: Do not touch the shutter curtains.

7. Turn the film rewind crank gently in the direction of the arrow to properly tension the loaded film. Stop
turning the crank when it becomes stiff, and return the crank to its original position.

8. Gently close the back cover and push it until it clicks.


                                         9. Advance the film a couple of frames, pressing the shutter
                                       release button each time, until the frame counter indicates "1"
                                between 0 and 2. (1n this case, the film advance lever should
                                be at the ready position, because the shutter release is
                                     interlocked when the lever is in the stored position).


The film rewind knob rotates each time the film is advanced showing that the film is advancing properly.

When advancing the film, wind the film advance lever slowly and secure until the film is fully transported to the
next frame.


                      FILM SPEED SETTING


                              1.Filmspeed in indicated on the outside of film package, in the film
                                   instructions or on the film cartridge.

                                 2.Set Film speed Selector Dial (12) so that Film speed index(9)
                                  indicates the value on Film speed Selector Dial corresponding to the
                                film used. For example, if film speed shown on the film is ISO 100/21 ,
                                    set the Film speed Selector Dial to the 100 on the dial matches with the
                                 index.

                                3.Click points are provided at each step of film speed on the Film
                              speed Selector Dial. When setting the film speed, make sure that it
                                     clicks.
View original page 5Page 6 · Read text
Exposure Setting (shutter speed priority)


                                        1. Place the film advance lever (4) in the ready position and turn the
                                       shutter speed dial so that the indicator white line aligns with the
                                     desired shutter speed value. Then if the dial is set at the
                                    intermediate positions of the index, shutter speed will be incorrect.
                           Be sure that the dial clicks at the position where the white line
                                      aligns with the desired value.

                                 2.With brighter subjects, fast moving subjects or with the higher
                                   value film speed of the film used, it is recommended to use higher
                                       shutter speeds.

                             3.Recommended shutter speed with ISO 100/21 film under typical
                                       situation is as below:

                                4.To monitor exposure, lightly press the shutter release button (3)
                               and turn the aperture ring until the green · mark lights.


When the red left arrow  mark lights, it means over exposure. So turn the aperture ring in the direction of
greater f/value. It the red right arrow  mark lights, it means under exposure, so turn the aperture ring to a
smaller f/value.

Note: Outside the exposure metering range of your camera (EV 4 to EV19), the exposure meter will not
function properly and the green LED indicator may come on indicating incorrect exposure.


          Subject
           Stationary subject in         Shutter speed
          subdued Light              1~1/15
           Indoors in normal           1/30~1/60
           conditions                     1/ 125~1 /250
          Outdoors on a fine day       1/500~1/2000
           Seaside in midsummer      1 /500~ 1/2000
          Mountain area with snow    1/500~1/2000
           Fast moving subjects


Exposure Setting (aperture priority)

1.Place the film advance lever (4) in the ready position and turn the aperture ring until the index on the lens
barrel indicates the desired f/value.

2.The suitable aperture value changes according to the brightness of the subject, the depth-of-field desired or
filmspeed of the film in use, and typical settings of the aperture with ISO 100/21 film are as below.

3.Click points are provided each step of filmspeed on the Filmspeed Selector Dial. When setting the film speed,
make sure that it clicks.
View original page 6Page 7 · Read text
3.To monitor the exposure, lightly press the shutter release
                                      button (3) and turn the shutter speed dial until the green · mark
                                              lights. If the red left arrow  mark lights, turn the shutter speed
                                            dial to the higher shutter speed setting and if the red right arrow
                                  mark lights, then turn the shutter speed dial to the lower
                                          shutter speed setting.


                           When the green   mark lights at intermediate positions between                       ·
                                             click, first set the dial at a click on either side and make fine
                                         control by operating the aperture ring afterwards.


Note: Outside the exposure metering range of your camera (EV 4 to EV 19), the exposure meter will not
function properly and the green LED indicator may come on indicating incorrect exposure.

Subject    f/value

Indoors in normal conditions  F/4 to F/5.6

Outdoors on a cloudy day   F/4 to F/8

Outdoors on a fine day      F/8 to F/11

Seaside in midsummer       F/11 to F/16

Mountain areas with snow   F/11 to F/16


                             Composition
                                   1.Look at the subject through the view finder.

                                  ·As the viewfinders lens is separated from the cameras shooting
                                            lens, the actual shot image through the camera lens may differ
                                  from that seen through the viewfinder depending on the distance
                                          to the subject ( as illustrated right). When shooting the subject is
                                              at near distance, pay much attention so that the subject is within
                                        the frame.

                              Focusing
                                     This camera is provided the wide-angle lens offering a greater
                                     depth of field.
                                  Turn the distance ring of the lens until it aligns with the
                                    approximate distance to the subject on the distance index.
View original page 7Page 8 · Read text
Depth-of-field


         1. When you are focusing on a given subject, objects in the
        foreground and background will appear acceptably sharp in
        the picture. The range in which all objects appear acceptably
        sharp in the picture is called "depth-of-field."

         2. To obtain the depth-of-field range at different aperture
         settings, the depth-of field scale is used.
       The distance covered by the range between pairs of the same
         f/stops on the depth-of-field scale as the f/value used is the
         depth-of-field. To obtain the actual distance values of the
         depth-of-field, read the values within the range of the
        focusing scale.

        3.For instance, when the lens is focused on a subject at a
        distance of 1 m with the aperture set at f/8 the depth-of-field
       can be obtained by using the depth-of-field scale as follows:
        the values on the distance scale corresponding with the
         f/values shown on the depth-of-field scale are approximately
       0.5m and infinity respectively. This means that all objects
        within the range between 0.5m and infinity distance can be
        reproduced acceptably sharp in the picture with the aperture
         set at f/8.


Holding Camera
1. Hold the camera in the palm of the left hand so as to turn the lens
focusing ring easily with fingers.

2. Hold the camera body lightly by and place your right fore finger
lightly on the shutter release button.

3. Press your left elbow lightly against your body and look through the
viewfinder eyepiece (15) to 'steady the camera against your face. Then
relax your right arm holding the grip.

Flash Photography
Use the grip type (bracket type) flash unit.

1. Connect the synchro cord with the synchro contact of the camera.

2. Set the shutter speed dial (2) at 1/125 second or lower.

3. Set the aperture
View original page 8Page 9 · Read text
Rewinding the Film
                                     1. When the film is at its end, the advance lever no longer operates
                                smoothly, check the frame counter (5) display. If the frame counter
                            shows that the all frames of the loaded film have been exposed, the
                                 film then needs to be rewound.

                                  2.Press the film rewind button (25) on the camera base.

                                3.Fold out the film rewind crank (10) and turn it in the direction of the
                                arrow.

                                     4. 0nce the pressure eases, the film is completely wound into the
                                     cartridge.


5.Lift up the film rewind knob (11) and pull it out to open the camera back (24). Now the film cartridge can be
taken out.

6.Do this in a place away from direct sunlight.

Note: If the film reaches the end of the roll during film advance, the film advance lever will lock. Rewind the
entire roll, then complete the movement of the film advance lever and put it back into place.


                          " B" (bulb) Setting
                                      1. With the shutter speed dial (2) set at "B" position, the shutter will
                               remain open for as long as the shutter release button (3) is pressed.

                                      2. This setting is useful when an exposure longer than one second is
                                    required, such as in landscape photography at night.

                                      3. Be sure to use a tripod and/or cable release when using this long
                                time shutter speed setting.'


Note: We recommend that you remove the Batteries from the camera at this setting to avoid wasting the
batteries.
View original page 9Page 10 · Read text
Self-Timer
                                     1. Wind the film advance lever (4) and fully turn down the self-timer
                                  lever (7) counterclockwise. Now the self-timer is ready to use.

                                     2. Press the shutter release button (3) and the self-timer operates to
                                   release the shutter in approximately 10 seconds later.

                                     3. 0nce the self-timer becomes ready it is impossible to cancel it
                               manually. So operate it only when needed.


4. The self-timer is very useful when you wish to include yourself in a picture, or, you can use it in order to
prevent Camera shake in shutter releasing instead of using the cable release.

Specifications

Type: 35mm camera with focal plane shutter and TTL metering system

Film Format: 35mm film,24x36mm

Lens Mount: L-mount

Shutter: Vertically moving metal focal plane shutter B, 1-1/2000sec.

Self-Timer: Mechanical self-timer with 10 sec operating time


         Exposure
                      Red left arrow  mark LED Over exposure warning           display:


                         Green   mark LED Good exposure indication               ·

                      Red right arrow  mark LED Under exposure warning


Exposure Metering System: Center-weighted average metering by pressing Shutter Release Button

Exposure Coupling Range: EV4-19 (1SO 100. F4,1sec. - F16, 1/2000sec.)

Flash Terminal: X synchro contact Synchronized at 1/125 sec or lower speed

Film Advance: By single-lever action with 135 throw and 30 stand-off

Film Rewind: By film rewind button and film rewind crank

Frame Counter: Additive type with autoreset by opening the back cover

Film Speed Range: ISO 25-1600 by 1/3 steps
View original page 10Page 11 · Read text
Power Source: Two 1.5V Alkaline batteries (LR44) or Silver batteries (SR44)       4www.butkus.org

Dimensions: 135.5(W) 78.5(H) 33.5(D)mm

Weight: 320g


These specification and external appearance are subjected to change for improvement without prior notice.
View original page 11
Related documents and language editions

From the M. Butkus archive. Original publisher and archive notices are retained.
Check the model and edition against your equipment.
PDF verified 2026-10-10.