Film cameras
COSINA 107-SW User manual
User manual for COSINA 107-SW. 65 pages in Spanish, Italian. Read the original PDF, download or print a copy without registration.
65 pagesSpanish, Italian2.5 MB PDF

Loading your manual…Open PDF directly
Document details
- Brand
- Cosina
- Model / document
- COSINA 107-SW
- Document type
- User manual
- Language
- Spanish, Italian
- Pages
- 65
- File size
- 2.5 MB
- Category
- Film cameras
- Document date
- Not specified in catalog
Search available document text
Find a term, then jump to its page in the original PDF. Image-only pages may not be searchable; check the PDF for exact wording and diagrams.
Page 1 · Read text
www.butkus.us
   INSTRUCTION MANUAL
MANUAL DE INSTRUCCIONES
    Manuel d'instructions
  MANUALE DI ISTRUZIONI
 DtrostNn
  107-5W
View original page 1Page 2 · Read text
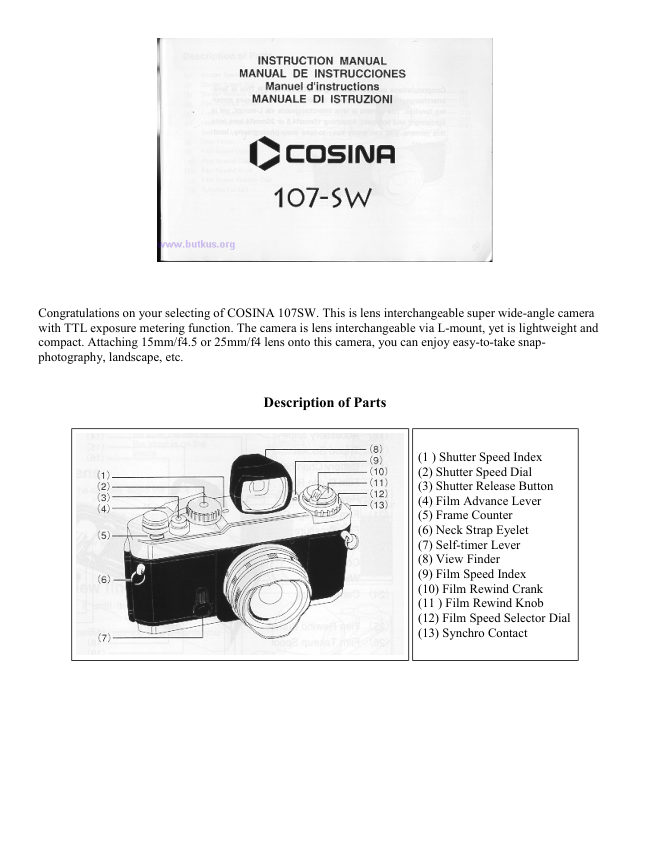
Congratulations on your selecting of COSINA 107SW.This is lens-
interchangeable super wide-angle camera with TTL exposure meter-
ing function. The camera is lens interchangeable via L-mount, yet is
lightweight and compact. Attaching 15mm/f4.5 or 25mm/f4 lens onto
this camera, you can enioy easy-to-take snap-photography, land-
scape, etc.
View original page 2
Page 4 · Read text
Bitte spenden Sie 2,50 Euro, um diese Website über E-Bay zu unterstützen ... www.PayPal.me/butkusView original page 4
Page 6 · Read text
www.butkus.us
    Attaching Neck-strap                                                                                                                                                                                    | /   ))- \   n6-t       Attach the neck-strapP totu thetrre camerauarrrel'1auas illustratedrrruutl'lteu
      right:                          A@    D,      |  &'   )                                                 Be sure the end ol --      I \+$a -)A   I                          ll3,i::tisonthel,*Wlffil\\lr<>1                            S-    Attachinqev detachinq Lens                I                                                              | Hr#
          'To detach or attach the lens from / to the camera, avoid the place under
             direct sunshine.
        l.Align the lens mount screw with that of the camera, then, turn
         the lens clockwise.
                   ' Pey attention not to tighten the lens screw too strongly.
I       2.To detach the lens from the camera, turn the lens counter-clock-
          wise.
     Attach ing/detach    i ng View finder
       Attach the view finder by inserting  it until it firmly clicks on the
       camera's accessory shoe.(1 6)
                ' When detaching the lens from the camera, pull the lens towards you
             straightly not to turn  it forcibly.
View original page 6Page 7 · Read text
Inserting Batteries
1.Turn the battery chamber lid (18) counterclockwise using a coin
   or something similar.
2.Two LR44 type alkaline batteries or two SR44 type silver batter-
   ies are used with camera.
3.Place the batteries so that both positive(+)sides are at the bot-
  tom of the compartment.
4.Turn the battery chamber  lid clockwise until  it close firmly.
Battery Check
1.Move the film advance lever (4) to the ready position.
2.Lightly press the shutter release button(3). Now the exposure
  metering system is switched on. When one of three LED lamps  (o  , > or <  )lights,then battery condition is satisfactory.lf no  g@6
  lamp lights,the batteries need replacing or have been loaded
   incorrectly.
3.Renew both batteries as necessary.
4.When not using of the camera, always return the film advance
   lever to the original position to prevent accidentally releasing the
   shutter.
Caution:Keep  batteries away from infants and small children. In case a bat-
   tery is  accidentally swallowed,  call a doctor immediately as the material
  inside the batteries can cause serious oroblems.
View original page 7
Page 8 · Read text
www.butkus.us
Loading Film
1. To open the camera back(24), pull Film rewind knob (11)out.
  When the back cover opens,the frame counter(5) automaticallly
   resets to "S".
2. Insert the film cartridge into the film chamber so that the project-
   ing end of  the film cartridge is downward.Do this in a place
  away from direct sunlight.
3. Fold out and lift up the film rewind crank(lO). Then rotate the
  crank carefully while push in  it down lightly until the film locks on
  the film rewind fork(20).
4. return the film rewind knob to its original position.
5. Insert the film leader into the groove of the film takeup spool
  (26) and place  it so that the film perforations engage with the
  spool teeth.
6. Check that the film pedorations engage properly with the teeth
  of Film sprockets (27) and the film slides smoothly along the
   film guide rails (19) by operating lightly the film advance lever
   (4) to advance the film.
Caution: Do not touch the shutter curtains.
7.f urn the film rewind crank gently in the direction of the arrow to
   properly tension the loaded film.Stop turning the crank when  it
  becomes  stiff, and return the crank to its original position.
S.Gently close the back cover and push  it until  it clicks.
View original page 8
Page 9 · Read text
FILMSPEED SETTING
 l.Filmspeed in indicated on the outside of film package,in the film
   instructions or on the film cartridge.
2.set Filmspeed setector Diat(12) so that Filmspeed index(9) indi-
  cates the varue on Firmspeed serector Diar corresponding to
  the film used. For exampre, if firmspeed shown on the firm is
  lso 100/21'  , set the Firmspeed derector Diar to the 100 on
  the dial matches with the index.
3.click points are provided at each step of firmspeed on the Film-
  speed serector Diar. when setting the firm speed, make sure
   that  it clicks.                      't^a
                                       f6r---N        V
View original page 9Page 10 · Read text
www.butkus.us                             1i
                                                                                                                                                                         { Exposure Setting (shutter speed priority)
   1. Place the film advance lever (4) in the ready position and turn
    the shutter speed dial so that the indicator white line aligns
     with the desired shutter speed value. Then if the dial is set at
    the intermediate positions of the index, shutter speed will be
     incorrect. Be sure that the dial clicks at the position where the
     white line aligns with the desired value.
  2.With brighter subjects, fast moving subjects or with the higher
    value film speed of the film used, it is recommended to use       Over exposure
     higher shutter speeds.                                                                            Slightly over
  3.Recommended  shutter speed with ISO 1OOl21' film under
     typical situation is as below:                                                          Correct exposure
  4.To monitor exposure, lightly press the shutter release button (3)
    and turn the aperture ring until the green r mark lights.                       Slightly under
   When the red { mark lights, it means over exposure. So turn the aper-
                                                                                                Under exposure     ture ring in the direction of greater flvalue.  lf the red )  mark lights,it
    means under exposure, so turn the aperture ring to a smaller f/value.
   Note;Outside the exposure metering range of your camera(EV 4    Subiect                      Sutter speed                                                                                                  t'n"   1-1',/is      toEV'l9), the exposure meter will not function properly and the    ,t"[j:ffl;::l"""lJHJ,?:::o        1,/30-1,/60
     green LED indicator may come on indicating incorrect expo-  Outdoors on a fine day                 1,/ 12s-1,/2so                                                                                                        't,/soo-1,/2ooo  sure'                                                ;':ili"?:[lililT;:-           1,/500-1,/2000
                                                                                    Fast moving subjects              1,/500-1,/2000

10
View original page 10Page 11 · Read text
Exposure Setting (aperture priority)
l.Place the film advance lever (4) in the ready position and turn                                                   \1,
  the aperture ring until the index on the lens barrel indicates the      Over exposure                                                                                                                                                                                                                  /t\
  desired f/value.                                                                                                                                                                     tlr      tl,
                                                                   o2.The suitable aperture value changes according to the brightness         Slightly over       ):   /t\                                                         !<:,tt
   of the subject, the depth-of-field desired or filmspeed of the film  in use, and typical settings of the aperture with ISO 10012'1"         Correct exposure    ;;o:{
   film are         as below.                                                            :)3 o ;<        points             are provided each step of filmspeed on the Film-        Slightly under3.Click
  speed Selector Dial. When setting the film speed, make sure       Under exposure       o                                                                 :):  that it clicks.
3.To monitor the exposure, lightly press the shutter release button
   (3) and turn the shutter speed dial until the green o mark lights.
     lf the red < mark lights, turn the shutter speed dial to the higher
  shutter speed setting and  if the red >mark lights, then turn the
  shutter speed dial to the lower shutter speed setting.When the
  green o mark lights at intermediate positions between  click, first
  set the dial at a click on either side and make fine control by  Subject                F/value                                                                                         lndoors in normal conditions F,/4loF,/5.6
  operating the aperture ring afterwards.                                      Outdoors on s cloudy day     F / 4 to F./8
Note: Outside the exposure metering range of your camera(EV 4 to EV 19),     Outdoors on a fine day      F,/8 to F ,/ 11
                                                                                                        F./11                                                                                                                toF,/16                                                     midsummer   the exposure meter will not function properly and the green LED indicator     SeasideMounlain inareas                                                                                                                                                      lo F ,/ 16                                                                                                                                                            F ,/ 11                                                                                                             with snow
  may come on indicating incorrect exposure.

                                                                                        11
View original page 11Page 13 · Read text
Depth-of-field
1.When you are focusing on a given subject, objects in the fore-
  ground and background  will appear acceptably sharp in the pic-
   ture. The range in which all objects appear acceptably sharp in
  the picture is called "depth-of-field."
2.To obtain the depth-of{ield range at different aperture settings,
  the depth-of field scale is used.
  The distance covered by the range between pairs of the same
  f/stops on the depth-of-field scale as the f/value used is the
  depth-of-field. To obtain the actual distance values of the
   depth-of-field, read the values within the range of the focusing
   scale.
3.For instance, when the lens is focused on a subject at a dis-
  tance of 1m with the aperture set at f/8 the depth-of-f ield can be
  obtained by using the depth-of-field scale as follows: the values
  on the distance scale corresponding with the f/values shown on
  the depth-of-field scale are approximately 0.5m and infinity
  respectively. This means that all objects within the range
  between 0.5m and infinity distance can be reproduced accept-
   ably sharp in the picture with the aperture set at f/8.


                                                                              13
                                                                                                                                                                                I
View original page 13Page 14 · Read text
www.butkus.us
   Holding Camera
     1.Hold the camera in the palm of the left hand so as to turn the
        lens focusing ring easily with fingers.
     2. Hold the camera body lightly by and place your right fore finger
          lightly on the shutter release button.
     3. Press your left elbow lightly against your body and look through
       the vieMinder eyepiece(l5) to steady the camera against your
       face.Then relax your right arm holding the grip.


                                                                     :   ',.   1.'

   Flash Photography
    Use the grip type (bracket type) flash unit.
     l.Connect the synchro cord with the synchro contact of the cam-
        era.
     2.Set the shutter speed dial (2) at 1/125 second or lower.
     3.Set the aperture.


    'rt 4
l" \z
View original page 14Page 15 · Read text
Rewinding the Film
1.When the film is at its end, the advance lever no longer operates
  smoothly, check the frame counter (5) display.  lf the frame
  counter shows that the all frames of the loaded film have been
  exposed, the film then needs to be rewound.
2.Press the film rewind button (25) on the camera base.
3.Fold out the film rewind crank (10) and turn it in the direction of
  the arrow.
4.Once the pressure eases, the film is completely wound into the
   cartridge.
5.Lift up the film rewind knob (1 1) and pull it out to open the cam-
  era back (24). Now the film cartridge can be taken out.
6.Do this in a place away from direct sunlight.
Note:  lf the film reaches the end of the roll during film advance,the film
  advance lever will lock. Rewind the entire roll, then complete the move-
  ment of the film advance lever and put it back into place.


                                                                             15
                                                                                                                                                                                                                                                                      '. 1.
View original page 15Page 16 · Read text
www.butkus.us
      " B"(bulb)Setting
    1.With the shutter speed dial (2) set at "8" position, the shutter will
      remain open for as long as the shutter release button (3) is
       pressed.
    2.This setting is useful when an exposure longer than one second
         is required, such as in landscape photography at night.
    3.Be sure to use a tripod and/or cable release when using this
       long time shutter speed setting.
    Note:We recommend that you remove the Batteries from the camera at this
         setting to avoid wasting the batteries.

   Self-Timer
    1.Wind the film advance lever (4) and fully turn down the self-timer
       lever (7) counterclockwise. Now the selftimer is ready to use.
    2.Press the shutter release button (3) and the selftimer operates
        to release the shutter in approximately 10 seconds later.
    3.Once the self-timer becomes ready  it is impossible to cancel  it
       manually. So operate  it only when needed.
    4.The self-timer is very useful when you wish to include yourself in
     a picture, or,you can use it in order to prevent camera shake in
       shutter releasing instead of using the cable release.
\  16
t
View original page 16Page 17 · Read text
Specifications
Type:               35mm camera with focal plane shutter and fiL metering system
Film Format:         35mm film,24x36mm
Lens Mount:             L-mount
shutter:                    Vertically moving metal focal plane shutter B, 1-1l20oosec.
Self-Timer:             Mechanical  self-timer with 10 sec operating time
Exposure display:    Red < mark LED......Over exposure warning
                       Green o mark LED.....Good exposure indication
               Red > mark LED......Under  exposure warning
Exposure Metering System: Center-weighted  average metering
                         By pressing Shutter Release Button
Exposure Coupling Range: EV4-1g(tSO 100. F4, 1sec.-F16, 1/20O0sec.)
Flash Terminal:       X synchro contact
                             Synchronized  at 1/125 sec or lower speed
Film Advance:         By single-lever action with 135' throw and 30' stand-off
Film Rewind:           By film rewind button and film rewind crank
Frame Counter:           Additive type with autoreset by opening the back cover
Film Speed Range:      tSO 25-1600 by 1/3 steps
Power Source:        Two 1.5V Alkaline batteries (LR44)or Silver batteries(SR44)
Dimensions:           135.5(W) 7S.5(H)33.5(D)mm
Weight:                3209
         *These                     specification and external appearance  are subjected to change for improvement  without prior notice.
                                                                              17
View original page 17Page 18 · Read text
www.butkus.us


        Le damos ta enhorabuena por haber escogido una COSINA 107-SW.
        Esta c6mara incluye un sistema de lentes intercambiables y estd
       dotada de gran angular con mecanismo de medicion de la
       exposicion TTL. El sistema de la cfmara es de lentes
         intercambiables mediante una montura L, es ligera y compacta.
        Colocando un objetivo de 15mm/4.5 o 25mml4 en esta cSmara,
        podrd realizar fotograf ias instant6neas, de paisaies, etc.


18
View original page 18Page 21 · Read text
Instalacion de la correa
Instale la correa a la c6mara seg0n se indica en el
dibujo a la derecha:                             Asegfrese de que la
                                                     punta de la correa -                                       pasa por el lado
                                                                     interior de la misma
Montaje y desmontaie del objetivo
  'Cuando monte o desmonte el objetivo de la c6mara, evite que le
   directamente  la luz del sol.
1. Alinee la parte con rosca de la montura del objetivo con la de la
  c6mara. A continuaci6n girelo hacia la derecha.
      ' Tenga cuidado de no realizar esta maniobra con excesiva luerza.
2. Para desmontar el objetivo de la c6mara girelo en sentido
   contrario.
Colocacion y retirada del visor
Coloque elvisor insertdndolo en la zapala (16)firmemente.
    ' Cuando extraiga el objetivo de la cdmara, p6ngale hacia usted
   directamente y no lo luerze al realizar el giro.
View original page 21Page 22 · Read text
www.butkus.us
  lnstalacion de las pilas
   1. Gire el cierre del compartimento de las pilas (18) hacia la
     izquierda mediante una
    moneda u objeto similar.
   2. Esta c6mara puede utilizar dos pilas alkalinas tipo LR44 o dos
    SR44 de plata.
  3.Coloque las pilas asegurdndose de que el polo positivo de
    ambas est6 situado hacia abajo.
 Comprobacion de la carga de las pilas
   1. Mueva la palanca de avance de la pelicula (4) para bobinarla.
   2. Presione suavemente el disparador (3). El sistema de medici6n
   de la exposici6n estd activado. Cuando una de las tres    l6mparas indicadoras LED (o, > 6      g@6
     funcionamiento de las pilas es satisfactorio. Si no se iluminasen
    estas l6mparas, significaria que las pilas est6n agotadas o que
    han sido colocadas incorrectamente.
  3.Reemplaze las baterias cuando sea necesario.
   4. Cuando no est6 utilizando  la c6mara, vuelva a situar la palanca
    de avance de la pellcula en su posici6n inicial para evitar el
      realizar un disparo accidental.
  PRECAUCION: Mantenga las pilas lejos de los nifios. En caso de que
      tragaran accidentalmente una pila, consulte inmediatamente a un m6dico
     ya que la composici6n  interna de la pila podria causar serios problemas..r^zz
View original page 22Page 23 · Read text
Colocacion de la pelicula
1. Para abrir la parte posterior de la cdmara (24) extraiga el bot6n
  de rebobinado (11) de la c6mara. Cuando se abre la tapa
   posterior, el contador (5) automdticamente  se pone en "S".
2. Inserte el carrete dentro de su alojamiento con la parte saliente
   delfinal del carrete hacia abajo. Haga esto en un sitio lejano de
   la luz directa del sol.
3. Avance la pel[cula y levante la manivela (10) de rebobinado. A
   continuaci6n  gire esta manivela con cuidado mientras avanza la
   pelicula lentamente hacia la horquilla de rebobinado(20).
4. Vuelva a situar la palanca de rebobinado en su posicion inicial.
5. Introduzca la pestafla de la pelfcula en la ranura del carrete
  receptor de la pelicula(26) y aseg0rese de que las
   perforaciones de la pelicula coinciden con la rueda dentada.
6. Asegurese de que las perforaciones de la pelicula coinciden
  exactamente con los dientes de las ruedas dentadas (27) y de
  que la pelicula estd correctamente situada sobre sus carriles
  (19) avanzando suavemente la misma con la palanca de
  avance (4).
Precauci6n: No toque las cortinas del obturador
7. Gire la manivela de rebobinado de la pelicula en la direcci6n de
   la flecha para tensar la pelicula. Deje de hacerlo cuando note
  que la pelicula estd tensa y vuelva a colocar la manivela en su
  posici6n original.
                                                                     23
View original page 23Page 24 · Read text
www.butkus.us  8. Cierre la tapa posterior con cuidado hasta que se oiga el
     sonido del mecanismo.
  9. Avance un par de fotografias de la pelicula y presione el
     disparador hasta que el contador de fotos indique "1". entre 0 y
     2. (En este caso, la palanca de avance de la pelicula deberia
     estar en la posici6n de preparada, ya que el disparador est6
     bloqueado cuando la palanca est6 en posicion de reposo).
    La palanca de rebobinado de la pelicula gira cada vez que la
   misma avanza mostrando que la pelfcula avanza
     correctamente.
     *Cuando avance la pelicula, mueva suavemente la palanca de avance
     para asegurarse de que la pelicula ha pasado del todo correctamente a
       la siguiente    f otograf  ia.


24
View original page 24Page 25 · Read text
Seleccion de la sensibilidad de la pelicula
1. La sensibilidad de la pelicula viene indicada en el exterior de la
  caja , en las instrucciones de la pelicula o en el propio carrete.
2. Situe el selectorde sensibilidad de la pelfcula (12) de manera
  que el indicador de sensibilidades (9) indique el valor en el
  selector de sensibilidades de acuerdo con la pelfcula que se
  est6 utilizando.
  Por ejemplo, si la sensibilidad que indica la pelicula es ISO
   100/2'1", seleccione en el aro indicador de sensibilidades de la
   pelicula el n0mero 100.
3. A lo largo de todo el aro existen puntos donde encaja el
  selector. Asegurese de que escucha este sonido cuando
  coloque la sensibilidad adecuada.


                                                                     25
View original page 25Related documents and language editions
From the M. Butkus archive. Original publisher and archive notices are retained.
Check the model and edition against your equipment.
PDF verified 2026-10-10.