Film cameras
Cosina CT9 User manual
User manual for Cosina CT9. 16 pages in English. Read the original PDF, download or print a copy without registration.
16 pagesEnglish0.8 MB PDF
Loading your manual…Open PDF directly
Document details
- Brand
- Cosina
- Model / document
- Cosina CT9
- Document type
- User manual
- Language
- English
- Pages
- 16
- File size
- 0.8 MB
- Category
- Film cameras
- Document date
- Not specified in catalog
Search available document text
Find a term, then jump to its page in the original PDF. Image-only pages may not be searchable; check the PDF for exact wording and diagrams.
Page 2 · Read text
Congratulations on your selecting the COSINA CT9 SLR camera. With this camera, you can carry out all
necessary steps while seeing your subject through viewfinder, because all necessary information on
photographing conditions are displayed within the viewfinder. Also both automatic and manual exposure setting
are possible. COSINA CT9 is an electronic SLR camera highly recommended for pros and advanced amateurs
alike.
Read this Instruction Booklet carefully and use this camera for your best enjoyment of photography.

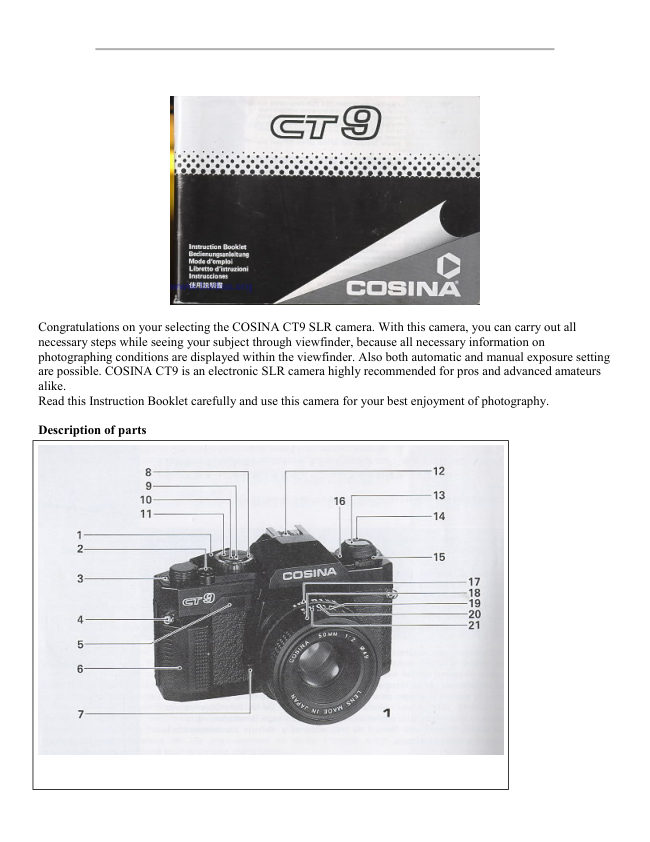
Description of parts
View original page 2
Page 4 · Read text
29. Back cover
22. Film guide rail
                                                          30. Pressure plate
23. Viewfinder window
                                                          31. Film rewind button
24. Film rewind shaft
                                                          32. Tripod socket
25. Film chamber
                                                          33. Battery compartment
26. Accessory attachment groove                        cover


Installing Batteries


                                           1. First, be sure to set mode selector dial (8) to
                          OFF position.

                                           2. Turn battery compartment cover (33)
                                     counterclockwise using a coin or something
                                        similar

                                           3. Two LR44 type alkaline batteries or two SR44
                                     type silver batteries are used with this camera.

                                           4. Place the batteries so that both positive (+)
                                        sides are at the bottom of the compartment.

                                           5. Replace the battery compartment cover and
                                        turn it clockwise until it locks firmly.
                                           6. Be sure to return mode select dial (8) to OFF
                                       position to save the batteries from use when
                                        storing or carrying this camera.


Battery Check
1. Advance the film by winding film advance lever (1).
2. Set mode selector dial (8) to your desired mode, AUTO or MANUAL position.
View original page 4Page 5 · Read text
3. Press the shutter release button (2) partly while looking through viewfinder (23).
4. If two or three red LED dots light and can be seen in the viewfinder, battery condition is satisfactory. If no
red dot appears, the batteries need replacing or have been loaded incorrectly.
5. If the batteries are fully consumed, replace both with new ones.
6. If the film does not advance or shutter cannot be released, even though the batteries are new or loaded
correctly, set selector dial (8) to OFF position and lift off the label "RESET" adjacent to the film rewind button
(31). Then, use a ball point pen or something with sharp end and insert it into the hole where the label used to
be.


Loading Film


                                             1. To open back cover (29), fold out the film rewind crank
                                        then pull it out. When the back cover opens, frame counter
                                            (3) automatically resets to "S".

                                             2. Insert the film cassette into film chamber so that the
                                          projecting end of the film cassette is downward. Do this in a
                                        place away from direct sunlight.

                                             3. Lift film rewind crank (13), and turn the crank carefully
                                      while pushing it lightly downward until film cassette locks
                                      onto the film rewind shaft (24). Return the film rewind knob
                                            to its original position by pushing it down.

                                             4. Insert the film leader in the groove of take-up-spool (28)
                                   and place it so that the one of the lower row of film
                                          perforations engages with the take-up spool's hook,

                                             5. Now hook the film perforation holes on the sprocket
                                               teeth. Operate film advance lever (1) carefully to advance
                                          the film so that the film is wound properly. At this time, be
                                         sure to align the film with film guide rail (22), if necessary,
                                       using your fingers and being careful.


Shutter releasing cannot be expected without camera movement. For example, in photography using 1 35mm
focal length lens with full aperture, if slower shutter speed than 1/125 is set and it is indicated by LED lighting,
camera movement may occur when releasing the shutter. Use of tripod and/or remote shutter release control
cable is recommended.
View original page 5Page 6 · Read text
Manual Exposure Photography


                                                 1. Advance the film and set the mode selector index
                                               (9) of mode selector dial (8) to MANUAL. Then 1/125
                                               shutter speed setting is obtained.

                                                 2. Looking through the viewfinder (23), two LED's
                                                  light and one LED blinks; one of lighting LED's is that
                                               for "M", meaning manual exposure mode, and the
                                            other is 1 25x, meaning that 1/125 shutter speed is
                                            used. And another blinking LED indicates the shutter
                                        speed recommended by automatic exposure system.
                                            Therefore, the value of blinking LED may change
                                          according to the change of the subject's luminance,
                                            or by turning aperture ring (17).


3. Press the LED-up button (10) and the value indicated by LED will change upward; 125x, 250, 500 and 1000.
After 1000, then returns to the lower end, "B", then upward again, LT, 1, 2, 4. Stop pressing LED-up button
when the LED of desired shutter speed lights, the desired shutter speed is set for manual exposure photography.

4. Mean while, press the LED-down button (11), each time when the button is pressed, the value pointed by
LED will change downward; slower shutter speed is set.
View original page 6Page 7 · Read text
5. The best way to find the appropriate exposure by manual operation is matching the shutter speed value which
the lighting LED indicates with the value which the blinking LED recommends.

6. It is also possible to get to the desired shutter speed quickly by pressing the LED-up/LED-down button
continuously. However, after getting near to the desired shutter speed value, it is recommended to press the
button quickly and repeatedly to get to the desired setting.


7. After the button is pressed quickly, the LED keeps lighting for approx. 10 seconds,

8. If the LED is set to LT manually, 2 seconds very slow shutter speed is set.

9. If the LED is set to "B", the mode changes to Bulb photography and no recommended shutter speed is given.

10. Before advancing the film, LED-up and LED-down buttons can be operated to set the shutter speed
manually. At this time, LED changes faster than after advancing the film.

11. The shutter speed once manually set is effective until the shutter speed is changed by operating the mode
selector dial or LED-up/LED-down button. Therefore, after once set the correct shutter speed to the subject, you
can repeat photographing with the same exposure without setting the shutter speed each time.
View original page 7
Page 8 · Read text
Bulb Photography in "B" Setting


                                                              1. Setting the mode into "B" (bulb), the
                                                  frame is exposed as long as the shutter
                                                          release button (12) is pressed. When
                                                  extreme slow shutter speed is necessary,
                                                            for example in night scene photography,
                                                    use of "B" setting is useful.

                                                              2. To set the mode to "B" (bulb), advance
                                                         the film and match the MANUAL on
                                                            selector dial (8) with mode selector index
                                                                 (9).


3. While looking through the viewfinder (23), press the LED-up or LED-down button until the LED pointing
"B" at lower-left in viewfinder lights.

4. At this time, 2 LED's, "M" and "B" will I Tight.

5. For photography in this "B" mode setting, use of a tripod and/or a remote shutter release control cable is
necessary.

6. Once the mode is set to "B", photography in any other mode is impossible until mode selector dial or LED-
up/LED-down button is operated to change the mode.

7. In "B" mode setting, self-timer cannot be used.

Flash Photography


                                                              1. Advance the film and set mode selector
                                                    index (8) to MANUAL of mode selector
                                                              dial (9).

                                                              2. Look into the viewfinder (23) while
                                                        pressing the shutter release button partly
                                                and confirm that two LED's light; one of
                                                           lighting LED's is LED for M, meaning
                                               manual exposure mode, and the other is 1
                                                     25x, meaning that 1/125 shutter speed is
                                                        used. At this time, another LED will be
                                                       blinking to indicate the shutter speed
View original page 8Page 9 · Read text
recommended by automatic exposure
                                                      system. However, the value of blinking
                                    LED does not affect flash photography.

                                                              3. Now you can repeat the synchronized
                                                            flash photography 1/125 shutter speed as
                                                    long as the LED-up/LED-down button is
                                                      not pressed,

                                                              4. When using the automatic flash unit, set
                                                         the aperture to the f-stop specified in the
                                                           instruction manual of the flash unit.


5. When using kite usual flash unit, use the f-stop value obtained by the formula show below:

F-stop value (Fn) = guide number (ISO 100 m) /distance to the subject (m) X ISO/100
For further detailed, follow the instruction manual of the flash unit.

6. In special use of the flash unit, flash photography at slower shutter speed than 125X including "LT" and "B"
is allowed.

Use of Self-timer


                                                            1. The self-timer is very useful when you
                                               wish to include yourself in a picture. Or, you
                                       may use the self-timer instead of remote
                                                         release cable to prevent camera movement
                                                          in shutter releasing.

                                                            2. To use the self-timer, advance the film
                                               and make sure that all settings, such as
                                                    composition, focusing, AK/MANUAL mode
                                                           selection, shutter speed, etc., are correct,
                                                    then press self-timer button (5).

                                                            3. Self-timer button has a self-timer display
                                   LED in it. The self-timer LED starts
                                                      blinking when the self-timer button is
                                                       pressed, then after ten seconds the shutter
                                                          will release.


4. Approx. two seconds before releasing the shutter the self-timer display LED accelerates blinking to tell that
the shutter will be released soon.

5. Even after the self-timer display LED starts blinking, you may cancel use of the self-timer by pressing partly
shutter release button (2).
View original page 9Page 10 · Read text
6. Turn the film rewind crank (13)
                                                   clockwise gently to properly tension the
                                                  loaded film. Stop turning the crank once it
                                             becomes stiff, and close the back cover by
                                                  pushing it until it clicks. Now, return the
                                                   crank to its original position.

                                                            7. Set mode selector dial (8) to "MANUAL"
                                                          position.

                                                            8. Advance the film a couple of frames each
                                                  time releasing the shutter release button
                                                             until the frame counter reaches the
                                                      intermediate position between "O" and "2".
                                            Check that film rewind knob (14) turns
                                                  while advancing the film as it means the
                                                      film advances properly.


Rewinding Film


                                                          1. When film advancing lever action feels
                                                 heavy, check frame counter (3). If all available
                                                frames are exposed change the film with a
                                       new one in a place away from direct sunlight
                                                 according to the following instructions:

                                                          2. Press film rewind button (31 ) and the
                                                   button is interlocked when pressed. If the film
                                          was advanced exceeding the specified frames,
                                                    film advance lever may stop half way of
                                               advancing the film. In such a case, never make
                                                  attempt to force it farther, leave the film
                                              advance lever at halfway and press the film
                                               rewind button.


3. Raise film rewind crank (13) and turn it clockwise. Once crank turning operation becomes lighter, it means
the film is fully rewound.
View original page 10Page 11 · Read text
4. Raise film rewind knob (14) and pull it upward to open back cover (29). The film cassette can now be
removed. Be sure not to open the back cover before fully rewinding all the film.

Film speed Setting


                                                            1. Film speed is indicated on the outside of
                                                      film package, in the film instructions or on
                                                       the film cartridge.

                                                            2. Set film speed selector dial (15) so that
                                                      film speed index (16) indicates the value on
                                                          selector dial (15) corresponding to the film
                                                      used. For example, if film speed shown on
                                                       the film is ISO 100/21°, set the film speed
                                                          selector dial so that 100 on the dial matches
                                                   with the index.

                                                            3. Click points are provided at each step of
                                                      film speed on the film speed selector dial.
                                      When setting the film speed, make sure that
                                                                                 it clicks.


Use of AE (Automatic Exposure) system


                                                            1. Advance the film and set mode selector
                                                            dial (8) so that "AUTO" on the dial matches
                                                  with mode selector index (9).

                                                            2. Press the shutter release button (2) partly,
                                                  while looking through the viewfinder (23)
                                              and two LED's will light; the uppermost
                                   LED "AUTO" means that the mode is now
                                                            set in AUTO exposure mode, and the other
                                                         indicates the shutter speed to be used when
View original page 11Page 12 · Read text
fully releasing the shutter. For instance, if
                                                       the LED "AUTO" and LED pointing "250"
                                                       are lighting, then fully release the shutter
                                              and 1/250 second shutter speed will be used
                                                         in auto exposure control mode.

                                                            3. If the LED pointing "OVER" is lighting, it
                                            means overexposure resulting in
                                                     unsuccessful photography. Turn aperture
                                                        ring (17) to set a greater F-stop value.

                                                            4. When the LED pointing to "LT" is
                                                            lighting, extreme slow shutter speed approx.
                                             2 to 8 seconds is used.

                                                            5. Even when setting the lens aperture to full
                                                         aperture, if the value of the LED lighting
                                                        indication is smaller than the value
                                                   corresponding to the focal length of lens,


Holding Camera


                                                      1. Hold the camera in the palm of the left hand so
                                         you can turn focusing ring (18) easily with the
                                                      fingers. Gently place your forefinger on the
                                                    shutter release button and thumb finger on film
                                            advance lever (1), and use the other three fingers
                                                    to hold the camera by grip (6).

                                                      2. Press your both elbows against your body
                                      when holding the camera horizontally and press
                                                             left elbows against your body when holding the
                                          camera vertically. To see the viewfinder, use
                                                      right eye while both eyes are open.

                                                      3. When releasing the shutter, stop breathing for a
                                     moment to prevent camera movement.
View original page 12Page 14 · Read text
Depth-Of- Field


                                                     1. When you are focusing on a given subject,
                                                 objects in the foreground and background will
                                             appear acceptably sharp in the picture. The range
                                                   in which all objects appear acceptably sharp in the
                                                  picture is called the "depth-of-field". The depth-
                                                     of-field changes depending on the following
                                                      rules;


a) The greater the f-stop value is set with the lens used, the wider range of depth of field is obtained meaning
that the range in which all objects appear in focus extends.

b) The more distant from the camera the subject moves, the wider is the depth of-field.

c) The smaller the focal length the lens used has, the depth of field becomes the wider.

d) When you are focusing on a given subject, the depth of field in front of the subject is narrower than that
behind the subject.


                                                2. To know the depth of field in your shooting situation,
                                        use depth-of-field scale (19). The depth of field scale is
                                       engraved with aperture index (20). For example, when
                                        a lens of 50mm focal length is focused on a subject at a
                                            distance of 3m with the aperture of f/8, the depth of
                                                 field is read as from 2.4m to 4.5m by reading the values
                                    on the depth-of-field scale corresponding to the set f-
                                           stop value "8". This means, in this shooting situation,
                                                      all objects within the range from approx. 2.4 to approx.
                                   4.5m distance from the camera will be reproduced with
                                           acceptable sharpness.
View original page 14Page 15 · Read text
Infrared Photographyb- (Go digital)


                                                 1. As infrared rays have a longer wavelength than
                                                visible rays, normal focusing point cannot be used
                                         with infrared photography using an infrared film and a
                                           red filter, To compensate for the difference between
                                       normal focusing and infrared focusing, infrared
                                        photography index (21 ) is used. The infrared
                                        photography index is a small red dot positioned
                                            adjacent to aperture index (20).

                                                 2. First secure focus in the normal ways without red
                                                          filter. Then, read off the subject's distance using the
                                       normal distance scale on the focusing ring (18).


3. Align the value on the normal distance scale which was first read with the infrared photography index (21).
The example photo shown is for setting to a subject at infinity.

4. Be sure to use a red filter for infrared photography.

5. When using an infrared film, auto exposure cannot be used. Set the shutter speed and f-stop value manually
following to the instructions for the infrared film used.

Mounting and Removing the Lens


                                                1. The type of lens mount for this camera is the "K"
                                      mount, meaning that all other lenses with a "K" mount
                                       can be mounted on this camera.

                                                2. To mount the lens: a) Align the red mark on the
                                     camera body with the red mark on the lens. b) Insert the
                                            lens into the camera body fully then turn the lens
                                        clockwise until it clicks, now the lens is interlocked
                                        with the camera body.

                                                3. To remove the lens from the camera body: While
                                           pressing down lens release button (7) in the arrow
                                               direction, turn the lens counterclockwise and the lens
                                       can be removed.
View original page 15Page 16 · Read text
SPECIFICATIONS

Type: Electronic controlled 35mm SLR camera with TTL metering and 1 6-dot LED display

Film format: 24mm x 36mm (in J135 film cartridge)

Mount type: Bayonet "K" mount

Shutter release: Electronic metal focal plane shutter with vertical operation When using electronic shutter in
AUTO; 1/1000 to 8 second, slide setting, with high-speed limit When using electronic shutter in MANUAL;
1/1000 to 2 seconds, and "B" Also electromagnetic release is used

Display in viewfinder: LED display lights or blinks using 16 dot array, lighting LED indicates the mode
selected by AUTO, M, 125X, B Lighting LED warns for OVER (overexposure) Lighting LED points one of 12
steps of shutter speed to be used, from 1/1000 to LT. Blinking LED displays recommended shutter speed
1/1000 to LT

Flash synchronization: Hot-shoe, X contact

Self-timer: Electronic controlled, LED display provided (specially approx. 2 seconds before releasing shutter,
x: blinking accelerates), activation requires one touch action, canceling is allowed by pressing the shutter partly,
working time is approx. 10 seconds

Viewfinder: Pentaprism type, three focusing method available; matching the divided image through
horizontally split image spot, focusing through microprism collar, and focusing through entire matte surface
screen, image magnification ratio on the finder is 0.86 x, field of view 93% horizontally and vertically of the
actual picture area, (with standard 50mm focal length lens set to infinity 00)

Exposure control: TTL center-weighed metering photo sensor SPD is used. In AUTO setting aperture priority
exposure automatically controlling shutter speed, in M setting manually set the exposure by matching lighting
and blinking LED's

Metering range: EV-1 (F2,8 seconds) to EV-18 (F16, 1/1000 seconds) with ISO 100/21° films and the lens of
50mm focal length and F2.

Film speed setting: ISO 25/15° - 1600/33°, by 1/3 steps

Film advance: One frame advance by single lever action with 135° throw and 30° stand-off

Film rewinding: by operating the film rewind knob and film rewind crank the button returns automatically to
the original position at the completion of film winding

Frame counter: Progressive type with auto reset

Power source: Two 1.5V alkaline batteries (LR44) or silver batteries (SR44)

Battery checking: LED in the finder warns the battery condition whether being lit.

Size and weight: 136 x 85 x 50 mm, 410g (camera body only) These specifications and external appearance are
subjected to change for improvement without prior notice.
View original page 16
Related documents and language editions

From the M. Butkus archive. Original publisher and archive notices are retained.
Check the model and edition against your equipment.
PDF verified 2026-10-10.