Film cameras
Cosina CX 55 User manual
User manual for Cosina CX 55. 34 pages in English. Read the original PDF, download or print a copy without registration.
34 pagesEnglish1.9 MB PDF
Loading your manual…Open PDF directly
Document details
- Brand
- Cosina
- Model / document
- Cosina CX 55
- Document type
- User manual
- Language
- English
- Pages
- 34
- File size
- 1.9 MB
- Category
- Film cameras
- Document date
- Not specified in catalog
Search available document text
Find a term, then jump to its page in the original PDF. Image-only pages may not be searchable; check the PDF for exact wording and diagrams.
Page 2 · Read text
English
Congratulations on your choice of "COSINA CX55".
This is a compact 35mm camera with auto-focusing - you can forget abouthaving to focus. And it has a built-in flash and automatic film loading and
winding system, so taking good photography  is made simple -  just frame the            press                                                        necessary!                                                           all that's      and                          button                the shuttersubject                                     - that's                           manual                                          carefully                      instructionBe sure                                            to                 this       to read                                                           familiarize yourself with    P3 - P30the camera's features, and in turn the enjoyment of photography is now yours.

Wir begti-ickwiinschen  $ie zur Wahl einer COSINA CX$5.                        Deutsch
Es handelt sich dabei um eine kompekte Kleinbildformat-Kamera (?4x3$mm)
mit Autc-Fokussiereinrichtung. Sie brauchen sich damit nicht mehr um die                                :iScharfeinstellung zu kiimmern. AuBerdem verfiigt die Kamera tiber ein ein-
gebautes Blitzgerdt sowie iiber automatisches Filmeinlegen und automatischen                                                  .1
Filmtransport. Deshalb sind gute Aufnahmen einfacher denn je zu machen -Sie brauchen lhr Motiv nur in den Sucherrahmen zv bringen und dan Ausloser   P3-P31'zu driicken * und schon haben Sie ein perfektes Bild!
Sitte lesen Sie diese Gebrauchsanweisung genau durch, urn sich rnitden Beson-
derheiten der Karnera vertraut zu machen. So werden Sie noch mehr Freude
an lhrer Photographie haben.

Merci pour avoir port6 votre choix sur le COSINA CX55.                           FrangaisCet appareil photo 35mm compact, ir mise au point automatique libdre
l'utilisateur des tracas de la mise au point. Equip6 d'un  f lash incorpor6  et
d'un systdme de chargement et d'enroulement automatique de la pellicule,
cet appareil simplif ier au maximum les prises de vues      il suffit de cadrer le                                                         -
sujet et d'appuyer sur le d6clencheur -  rien de plus!Lire attentivement ce mode d'emploi afin de se familiariser avec les caract6ris-    P3 * P32
tiques de cet appareil et en obtenir les meilleures performances.
View original page 2
Page 3 · Read text
a>+  CX55 Af-;Ht(JL./: t: Z &> I) h: L ) :d  u' * f       www.butkus.us a>+  CX55[J- y'> l.€.td)L,bat\=>/\2    Fh./-T_{"          H AsFF
z l-.tr,rd:JH"a(th't-. 7 4 )vLo+<k    - #LibAqh4t  L(r.,6t=d>.  L"re
 /: ( b FSHt-* L u'5F &*fr.:> ( Lr/: fafi &'f  "
 v>^htt-tr>        +,'y L7.4      t: ?) > L(ft,+I(: >?../ t                  ,B.r'                                                    -A++rt[f.a* *a>->ht+t-^L)   tT     ifttl*-ffiEil-. oIFffiEH,Ei=+ J < b;ft.dlr./:/:'                                                            P33   P59 3 *EE L L.,E L. H \';d,i* tr*. L( T d r"'                                        -
ffionsruTrl*;J .on uoi pl' r*qrr;tl-iir" ,,;bl;*o ;i;!:'.                      Italiano Essa d una macchina fotografica compatta da 35mm, can rnessa a fuoco auto-
matica in modo da potervi tranquiltamente dimenticare di mettere a fuoco.
lnoltre essa possiede un lampeggiatore incorporato e cjei sistemi automatici di
inserimento della pellicola e di riavvolgimento della stessa, in modo da renderepit semplice la realizzazione di buone fotografie: dovrete infatti solamente
inquadrare                                                                          P61                   il soggetto                e premere il tasto dell'otturatore, poi la macchina non    P33 -necessita ne$$una                    altra regolazionel
Assicuratevi di leggere attentamente questo manuale di istruzioni per familiariz-
zarvi con le carattsristiche di questa macchina fotografica e in cambio tutte le
gioie e le soddisfazioni del fotografare saranno uostre.

Enhorabuena por haber elegido la "COSINA CXSS,,.                                                                                EspafiolEsta es una compacta cSmara de 35mm con enfoque automdtico    para que                                                                     -pueda olvidarse de enfocar.
Ademds tiene un flash incorporado y un sistema de carga y avance de la pel fcula
automdticos, por lo que serd fdcil sacar buenas fotbgraf fas   simpiemente                                                                 -encuadre el motivo y presione el obturador   jeso es todo lo                                                   que tendrd quehacer  !                                         -                                                            P33   P62Lea cuidadosamente este manual de instrucciones para familizrizarse con las        -
caracterfsticas de la c5mara y para poder disfrutar plenamente de la fotograffa.               2
View original page 3Page 5 · Read text
Bitte spenden Sie 2,50 Euro, um diese Website über E-Bay zu unterstützen ... www.PayPal.me/butkusView original page 5
Page 6 · Read text
www.butkus.us
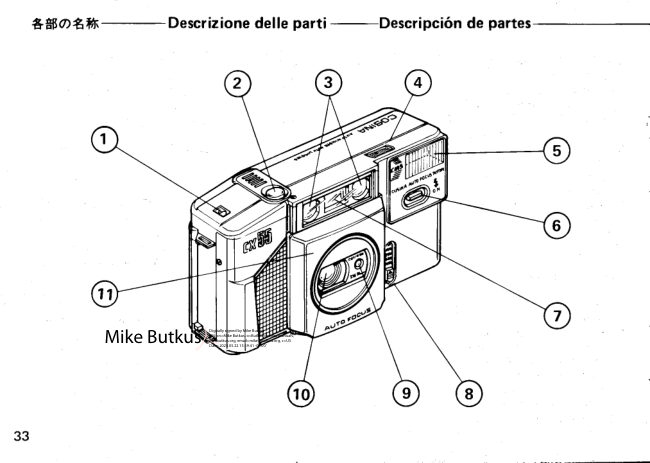
 1) Fif m counter           1)gildzanter                1)Compteur de vues
 2l Shutter button              2) Ausloser                        2) Driclencheur
 3) Autofocusing window     3) Fenster fiir automatische  3) Fen€tres de mise au point
 4l  Flash ready indicator      Scharfeinstellung          automatique
 5) Flash unit                4)Blitz-Bereitschaftsanzeige 4)Tdmoin du flash
 6) Flash-on button          5lBlitzeinheit                 S)Flash
 7l Viewfinder window      6)Blitz-Einschalteknopf   6)Touche de mise en
 8) Filmspeed (lSO)        7)Sucherfenster                service du flash
    selector                     8) Wdhler   f iir Filmemp-         7 )Viseu r
 9) Photosensor eye                               f indlichkeit (lSO)            8)Sdlecteur de sensibilitd
10) Camera lens                 9) Fotosensor-Auge        du film (1SO)
1 1 )  Lens cover           1O)Objektiv                    9)Cellule photosensible
                       11)Objektivdeckel         10)Objectif
                                                                                   1 1 )Capot d'objectif
View original page 6Page 7 · Read text
Digitally signed by Mike Butkus
                                                 DN: cn=Mike Butkus, o=Butkus camera manuals,
                                                       ou=butkus.org, email=mike@butkus.org, c=USMike Butkus     Date: 2023.05.22 15:29:40 -04'00'
View original page 7Page 8 · Read text
www.butkus.us


121  Viewfinder eyepiece           1 2) Suchervi  si er                  12)Oculaire
13)  Film advance indicator        1 3) Fi lmvorspulanzei ge         13)Tdmoin d'avance du film
141  Film takeup spool           14) Filmauf nahmespule          14)Bobine r6ceptrice du film
15)  Back cover                  15) Kamera-RLickwand                 1 5) Dos
16)  Film advance sorocket         1 6) Filmtransportrolle            16)Galet d'avance du film
171  Film rewlnd button         17) Ri.jckspulknopf                      1 7)Touche de rembobinage
18)  Film advance indicator        1 8) Fil mtransportanzei ge-        18)Galet de contr6le
      soroc ket                        Rolle                           d'avance du film
19)  Film chamber            19)Filmkammer               19)Logement du film
201  Battery compartment      20) Batterief ach- Deckel          20)Couvercle du logement
     cove r                      21) Riicksoulhebel                  des piles
21l' Film rewinding arm           22l, F ilmt nhru ngssti  f te (4  )       21)Axe de rembobinage
22l. Film guide pin x 4          23) Hebel zum Offnen der        22lErgots de guidage du  f ilm (4)
231 Back cover opening           Kamera-Riickwand            23) Bouton d'ouvertu re du
                                            24l. Vorlaufmarkierung              dos
                                                                     24) Repdre d'amorce du  f ilm
View original page 8Page 9 · Read text
Fitting Batteries
1. Place the finger nail in the groove in
   the battery compartment cover (20),
   then slide toward the mark, and
   gently pull upward to open the cover.
    (Fig. 1 )
2. Insert 2 AAA(LRG) alkaline batteries
   positioned correctly according to the
   indicated (+) (-) polarity. Return the
   cover to its original position. (Figs.2,3)

Opening Lens Cover
To open the lens cover  ( 1 1 ), push the
upper part of lens cove r downward    .
When the lens cover is closed the shutter
button (2) is interlocked because of
safety lock mechanism. (Fig. 4)


                                                                 www.butkus.us
View original page 9Page 10 · Read text
www.butkus.us
    Einsetzen der Batterien                  Mise en place des piles
I   1. Fingernagel  in die Rille des Batteriefach-        1 . Engagez un ongle dans l'encoche du
I       Deckels (20)  ei nsetzen und in Richtung der       couvercle du du logement des piles (20),
       Markierung schieben. Dabei leicht nach         appuyez dans le sens indiquci et relevez
      oben ziehen. um den Deckel zu ciffnen            dtilicatement le couvercle. (Fig. 1)
      (Abb. 1).                              2. Introduisez 2 piles alcalines AAA (LR6)
   2. 2 AAA (LRG) Atkati-Batterien wie             en respectant les indications de polarit6
       abgebildet einsetzen. Dabei auf die                (+ ) et (-). Remettez le couvercle dans
      angegebene (+) (-) Potaritiit (Abb. 2,3)          sa position initiale. (Fig.2,3l
       achten. Den Deckel wieder  ei nsetzen.
                                          Ouverture du capuchon d'objectif    0ff nen des Objektivdeckels
                                               Pour ouvrir le capuchon d'objectif (1 1),
   Zum Enf fernen des Objektivdeckels (11)          pousser vers le bas la partie sup6rieure du
   schieben Sie dessen oberen Teil nach unten.      capuchon. Ouand le capuchon est fermd,   Durch Anbringen des Objektivdeckels                                                                     le d6clencheur (21 est verrouill6 grSce A un   wird der Ausloser (2) aufgrund  ei nes                                                            dispositif de blocage de securit6. (Fig.      )    Sicherhei tsverri egelu n gsmecha ni sm us
    ebenfalls verriegelt. (Abb. 4)

   Batteriekontrolle
   Den Ausioser (2) leicht drUcken. Dabei
    leuchtet im oberen oder unteren linken
   des Suchers (7) ein rotes Lempchen auf
View original page 10Page 11 · Read text
Battery Checking
Press the shutter button (2) slightly,
then in the upper or lower lef t of the
viewfinder (7) a red lamp lights telling
battery condition  is okay.  lf the lamp does
not light, either the batteries are not
correctly positioned or are too weak and
need replacement. (Fig. 5)
                                                                                   liWhen replacing batteries, be sure to                                                                   Ill   rnS'  -r;flU l]U   f'n(Jreplace both used batteries with new ones                                                                                                                            flU
of the same brand and capacity.                  "\-:J-r--J "E
Film loading
i.  Slide the back cover opening lever (23)
    in the direction of mark to open the
   back cover. Then, the  f ilm counter (1  )
    returns to "S" position automatically.
    (Fig.6)
2. place the projecting part of the film
    cassette downward and insert the film
    into the film chamber (19) while
    aligning  it with the film rewind arm
    (21l,. (Fis.7l
View original page 11Page 12 · Read text
www.butkus.us
um anzuzeigen, daB der Batteriezustand  in      ContrOle des piles
Ordnung ist. Wenn das Liimpchen nicht        Appuyez ltigdrement sur le d6clencheur Q\:le
aufleuchtet. sind'die Batterien entweder         voyant rouge de l'angle sup6rieur ou inf6rieur
nicht richtig eingesetzt, oder sie sind zu         gauche du viseur (7) doit alors s'allumer
schwach und mi.issen ausgewechselt werden      pour indiquer le bon dtat des piles. Si ce n'est
(Abb. 5).                                      pas le cas, les piles sont soit incorrectement
Beim Auswechseln der Batterien unbedingt       mises en place, soit 6puisdes et demandent
darauf achten, beide Batterien durch neue der    d 6tre remplac6es. (Fig. 5)
gleichen Marke und Leistung zu ersetzen.         Lors du remplacement des piles, mettez
                                                 touiours deux nouvelles piles (de marque et
                                             de capacit6) identiques.

Einlegen des Filmes
1. Den Hebel zum Off nen der Kamera-        Chargement de I'appareil
   Rirckwand (23) in Richtung der             1. Poussez le bouton d'ouverture du dos (23)
   Markierung schieben, um die Ruckwand         dans le sens indiqud (pour ouvrir  le
   zu off nen. Der Bildzdhler  (l ) stellt dabei          dos). Le compteur de vues (1) revient
   automatisch auf "S" zu ruck (Abb. 6 ).          automatiquement a la position,,S,,.
2. Den vorragenden Teil der Filmkassette              (Fig. 6)
   nach unten richten und den Film in die      2. Introduisez  le film dans son logement (19)
   Filmkammer (19) einlegen, sodaB er wie         dans I'alignement de l'axe de rembobinage
   der Rtickspulhebel (21 ) ausgerichtet ist            (21l,la saillie de la bobine dirig6e vers le
   (Abb. 7).                                           bas. (Fig.7)

                                                                                      10
View original page 12Page 13 · Read text
3. Draw out the film so that the film
      leader exceeds the film leader mark
      Q4t.
     Then set the film perforations firmly
      engaged with the teeth of film advance
     sprocket (16) while paying attention
      that the film does not come off film
     guide pins       (Fis. 8)                  '221.   4.  Be sure that the film is not be curled.          o
       (Fig. 9) lf curled, correct it. Check
      again that the film perforations are
     engaged with the teeth of film advance
      sprocket, then close the back cover                                     I
      firmly until a click is heard. (Fig. 10)


11                                   1 o
View original page 13Page 14 · Read text
www.butkus.usde manidre i ce que l'amorce3. Den Film herausziehen bis der Vorlauf         3.  Tirez le film
    iiber die Vor aufmarkierung (24)                   dtipasse le repdre (24).
     h  i nausragt.                                   Engagez alors les perforations du film
   Den Film so einlegen, daB die                   dans les dents du galet d'avance (16) en
   Fuhrungsstifte der Filmtransportrolle (16)         vdrifiant que le film suit bien les ergots
   genau in die Perf oration des Films greifen.       de guidage (221. lFis. B)
   Dabei darauf achten, daB der Film sich         4.  Assurez-vous que le  fi lm ne gondole pas.
    nicht von den Filmf tihrungsstiften (22) lost      (Fig.9) Si c'6tait le cas, redressez-le.
   (Abb.8).                                             VErifiez d nouveau que les perforations
4. Darauf achten, daR sich der Film nicht           sont engag6es dans les dents du galet
    einrollt (Abb.9).                               d'avance du film, puis refermez le dos;
    Sollte dies der Fall sei n, den Film wieder         vous devez entendre un ddcl ic. (Fig. 1O)
   gerade machen. Vergewissern  Sie sich
   nochmals. daB die Fiihrungsstifte  der
   Filmtransportrolle in die Perforation des
   Films greifen, und schlieBen Sie dann
   die Kamera-Riickwand. Dabei sollte ein
   Klick-Gerausch zu horen sein (Abb. 10).
5. Den Ausloser dri.icken und horchen, ob
   das Gerdusch des Verschlusses zu
   vernehmen ist. Wenn lhr Finger sich
  vom Ausloser entfernt, wird der
   Film automatisch um ein Bild weiter-
    transportiert, wobei das Gerdusch des

                                                                                                                                  "t2
View original page 14Page 15 · Read text
5. Press the shutter button and listen for
     the sound of the shutter release. When                   L-     your finger leaves the shutter button,     the one  f rame of film advances   mEl  I
     automatically with sound of the
     advance motor heard. Normally a
            f rame of  f ilm advances automatical ly,
     however, sometimes the frame may                                                             F,rf         -._/4\----\     not advance in spite of sound the     motor being heard because the  f ilm  wtm
    was not loaded ProPerlY or other
                                                                                                                                                                                                                                                                                                lffiilff      reasons. Always check if the film  is
     advancing properly as the motor is            1 1
     heard by looking at the film advance
      indicator window (13), in which the
      red and white pattern will appear.
      (Fig. 11 ) lf no movement appears at
     the window, it means film is not
     advancing properly, so, open the bac k
     cover and set it correctly.
  Note: After making sure that the film has
  been fully advanced, gently press the shutter
  button to take the next Picture.


13
View original page 15Page 16 · Read text
www.butkus.us                                                              sur le dtlclencheur et 6coutez   Filmtransportmotors zu horen ist.           5. Appuyez
   Normalerweise wird der Film um ei n Bild          le bruit de l'obturateur. Lorsque vous
    weitertransportiert. Gelegentlich fun k-           relSchez le ddclencheur,le film avance
    tioniert der automatische Filmtransport        automatiquement d'une vue; vous
   jedoch nicht, selbst wenn Sie das Gerdusch      entendez  al ors le bruit du moteur
   des Motors vernehmen. Dies ist meist            dtintrainement. Normalement,  le film
   dann der Fall, wenn der Film nicht richtig       avance automatiquement d'une vue;
    eingelegt wurde. Uberprrifen Sie daher           cependant,  il arrive que, bien qu'on
   immer, ob der Film richtig wei ter-              entende le moteur fonctionner, le film
   transportiert wird, wenn Sie das Gerdusch        n'avance pas parce qu'il a mal 6t6 cha196
   des Motors horen, indem Sie die              ou oour une autre raison. Assurez-vous
   Filmvorspulanzeige  (1 3) beachten, in            toujours que le film avance bien lorsqu'on
   deren Fenster sich ein rot-weiBes                entend le moteur en observant le temoin
   Muster zeigt (Abb. 1 1). Wenn in diesem          d'avance (13) et ses barres rouges et
   Fenster keine Bewegung zu sehen ist, heiBt       blanches. (Fig. 1 1 ) Si les barres restent
   das, daB der Film nicht richtig weiter-           immobiles,le film n'avance pas correcte-
    transportiert wird. In einem solchen Fall        ment. Ouvrez le dos et mettez-le en place
   die Kamera-Rlickwand offenen und den       comme  il faut.
   Film richtig einlegen.                      Remarque: Aprds que le film completement
Anmerkung: Nach dem automatischen Vor-       soit avancd, appuyer ldgerement sur le
supulen des Films konnen Sie die nechste        declencheur afin de pouvoir exposer une
Auf nahme machen, indem Sie leicht auf den      prochaine image.
Ausloser dri.icken.


                                                                                                    t4
View original page 16Page 17 · Read text
Film Counter
  1. The  f ilm counter (1) displays the
     number of exposures made. When
     the back cover (15) is opened the
     counter automatically resets to "S".
  2. Once a film has been loaded as
     described earlier, the counter should
     show " 1  ' ', mean ing th at the camera        is ready for exposing the  f irst frame.      ffi       (Fig. 1 2)            E"EoE*E
  3. The number 12,20,24 and 36 orange      are to indicate the ends of usually          F@e      available films.                       1 2             1 3
  Film Speed Setting
  1. The speed rating (lSO) of the film
         is specified on the film package or
       in the  f ilm's instruction sheet. (Fig.
      13)
  2. Slide the film speed selector (8) until
      the index mark A indicates the speed
      rating of the  f ilm in use.
         lf the film's speed rating is an
      intermediate value, align it with
      nearest value. (Fig. 13)
15
View original page 17Page 18 · Read text
www.butkus.us
Bildzdhler                           Compteur de vues
1. lm Bildz6hler (1) wird die Anzahl der       1. Le compteur de vues (t ) atticfre le nombre
    belichteten Auf nahmen angezei gt. Durch        de vues prises. Lors de l'ouverture du dos
   Offnen der Ruckwand wird der Bildzbhler         (15), le compteur revient automatique
   automatisch auf "S" zuriickgestellt.             ment sur "S" (d6part).
2. Falls Sie den Film wie vorher beschrieben    2. Lorsqu'un film a 6t6 chargd comme d6crit
   eingelegt haben, wird im Bildzdhler "1"         pr6c6demment,  le compteur doit afflcher
   angezeigt. Dies bedeutet, daB die Kamera           "1", ce qui signif ie que I'appareil est prtlt
    fur die Belichtung des ersten Bildes bereit        a prendre la premidre vue. (Fig. 12)
     ist. (Abb. 12)                           3. Les chif  f res 12, 20,24 et 36 oranges
3. Die orangen Zahlen'12,20,24 und 36            servent i signaler la fin des  f ilms couram-
   zeigen die Enden der im Handel               ment disponibles.
   erhaltlichen Film an.
                                         R6glage de la sensibilat6 du film
Einstellen der Filmempfindlichkeit        1. La sensibilit6 du  f ilm (lSO) est indiquCe
1. Die Belichtungszeit (lSO) des Films               sur son emballage ou sa notice d'accom-
     ist jeweils auf der Verpackung oder             pagnement. (Fig. 13)
    in der Anleitung angegeben (Abb. 13)
2 Schieben Sie den Filmemfindlichkeits-       2. Faire coulisser le s6lecteur de sensibilit6
   wdhler (B), bis die Indexmarkierung  I          de film (8) pour amener le repdre A
   die Belichtungszeit des verwendeten Films      en face de la valeur de sensibilit6 du  f ilm
    an ze   i gt.                                    empoye.
    Falls die Belichtungszeit des Films ein             Si cette sensibilit6 corresoond d une valeur
   Zwischenwert  ist, stellen Sie den nbchst            intermtidiaire, prendre la valeur la plus
   liegenden Wert ein. (Abb. 13).                  proche. (Fis. 13)
                                                                                     16
View original page 18Page 19 · Read text
Handling the Camera
    1. As illustrated, support the camera
       with your left hand holding the lower
           left corner and with your right
        forefinger lightly resting on the shutter
         release button (2).
      To prevent camera movement, Press       your left elbow lightly against your R
       body and look into the viewfi nder        eyepiece (1 2) steadying the camera  [@l
         against your face. Relax the right       arm while holding the camera.     I u\l         (Fig. 14)                  14
:   2. When you hold the camera vertically,
        the window of flash unit (5) should
       be uppermost of the camera as
                          il  I ustrated.
    Noter Be careful not to accidently shield
     the photosensor eye (9) or flash window
    with your fingers while holding the
     camera.


   17
View original page 19Page 20 · Read text
www.butkus.us
 Handhabung der Kamera                     Prise en mains de l'appareil
 1. Halten Sie die untere linke Ecke der         1. Comme le montre I'illustration, tenir
   Kamera wie in der Abbildung gezeigt, und        l'appareil dans son coin inftirieur gauche
    legen Sie den Zeigefi nger der rechten            avec la main gauche et laisser reposer
   Hand leicht auf den Ausloser (2).               ldgdrement l'index droit sur le declencheur
    Stijtzen Sie den linken Ellbogen leicht an          l2l.
   lhrem Korper ab, um unabsichtliches           Pour dviter les vibrations, appuyer  le
   Verschieben der Kamera zu vermeiden.         coude gauche contre le corps et regarder
    Halten Sie die Kamera ruhig vor lhrem          dans l'oculaire fi2l.en appuyant l'appareil
    Gesicht, und schauen Sie in das                 contre le visage. Garder le bras droit
    Suchervisier ('121. Entspannen Sie den          d6tendu en tenant l'appareil. (Fig. 14)
   rechten Arm, wdhrend Sie die Kamera       2. Si l'on tient I'appareil verticalement,  la
    halten. (Abb. 14)                                  fen€tre du flash (5) doit se trouver vers
                                                               le haut, comme sur l'illustration.
2. Wenn Sie die Kamera senkrecht halten,      Remarque: Faire bien attention a ne pas
    sollte sich das Fenster der Blitzeinheit (5)    masquer involontairement la cellule photo-
   wie in der Abbildung gezeigt zuoberst         6lectrique (19) ou le  f lash avec les doigts en
     befi nden   .                                   tenant l'appareil.
Hinweis: Achten Sie darauf  , daB das Foto-
sensorauge  ( 1 9) oder das Fenster der Blitz-
einheit nicht durch lhre Finger verdeckt wird,
wahrend Sie die Kamera halten.


                                                                                     18
View original page 20Page 21 · Read text
Composing the Picture
   1 . Place the subject your want to take
     within the bright line frame in the
     viewfinder. (Fig. 15)
    When taking a picture of a subject at
      short distance with the 9 mark
      setting, the subject should not extend
     beyond the parallax compensation
     mark. (Fig. 15 upper)
    A tip for better pictures  is that you
     should move one step nearer the
      subject within the bright line  f rame.        5


19
View original page 21Page 22 · Read text
www.butkus.us
Zusammenstellen einer Aufnahme        Composition de l'image
1. Richten Sie die Kamera so aus, daB                1 . Placer le sujet d photographier i l'int6rieur
   der Gegenstand, den Sie fotografieren         du cadre lumineux du viseur. (Fig. 15)
   mochten, sich im Leuchtrahmensucher           Lors de la prise de vue d'un sujet d faible
   befindet. (Abb. 15)                              distance avec le signal 9  , le sujet ne doit
   Beim Fotografieren eines nahen Gegen-          pas d6passer le repdre de compensation de
   stands mit der 9 Einstellung sollte der            parallaxe. (Fig. 15, en haut) Pour obtenir
   Gegenstand nicht hinter der Parallaxen-        de meilleures images, nous vous conseil-
   Ausgleichsmarkierung    I iegen. (Abb.               lons de vous approcher du sujet et de lui
   15 oben) In einem solchen Falle ist es             faire remplir tout l'espace d6f ini par le
   empfehlenswert, wenn Sie ei nen Schritt         cadre lumineux.
   ndher zum Gegenstand gehen, bis dieser
  den Leuchtrahmensucher vollstandig
   au sf iil lt  .


                                                                               20
View original page 22Related documents and language editions
From the M. Butkus archive. Original publisher and archive notices are retained.
Check the model and edition against your equipment.
PDF verified 2026-10-10.