Film cameras
Cosina E-1 solar" User manual
User manual for Cosina E-1 solar". 15 pages in English. Read the original PDF, download or print a copy without registration.
15 pagesEnglish1.3 MB PDF
Loading your manual…Open PDF directly
Document details
- Brand
- Cosina
- Model / document
- Cosina E-1 solar"
- Document type
- User manual
- Language
- English
- Pages
- 15
- File size
- 1.3 MB
- Category
- Film cameras
- Document date
- Not specified in catalog
Search available document text
Find a term, then jump to its page in the original PDF. Image-only pages may not be searchable; check the PDF for exact wording and diagrams.
Page 2 · Read text
Congratulations on your selecting of the COSINA E1 camera. This compact and lightweight SLR camera
functions on solar energy only. The E1 has full open aperture TTL exposure metering with a LCD display and
many other nice features to allow you good photography. With carefully reading this booklet, you can enjoy
easy-to-take highest quality photography for the years ahead.

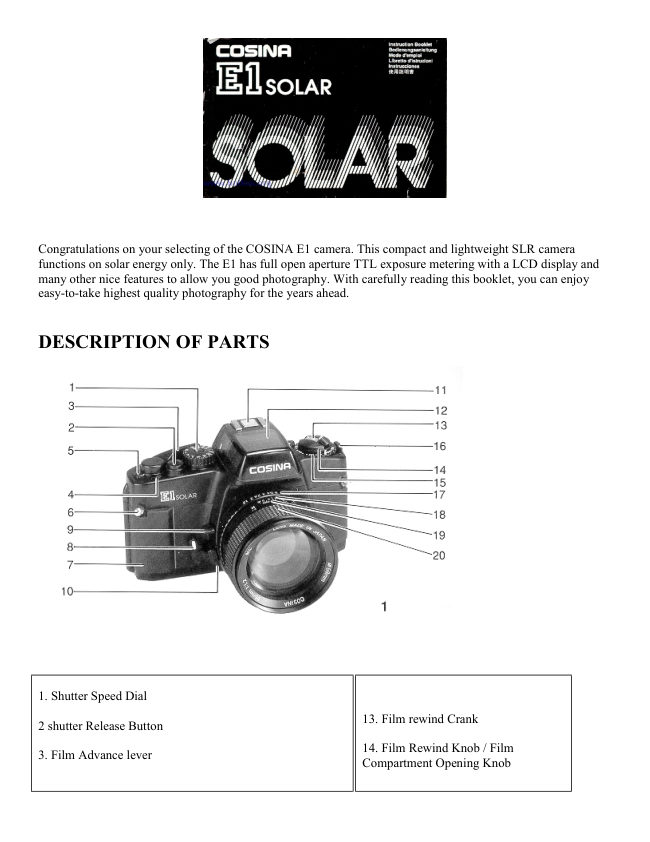
DESCRIPTION OF PARTS


1. Shutter Speed Dial

                                                             13. Film rewind Crank
2 shutter Release Button

                                                             14. Film Rewind Knob / Film
3. Film Advance lever
                                                   Compartment Opening Knob
View original page 2Page 4 · Read text
Solar Battery


                                                       1. As the camera is equipped with a solar battery
                                                      (12), installing an ordinary battery is not
                                                    required. Light reflected on the solar battery is
                                                converted into electricity and used as it is or
                                                   stored for later use.

                                                       2. Set the solar battery for ordinary use by
                                                  turning the solar lever (16) to let the green O
                                        mark be seen.

                                                       3.
                                                  (1 ) Irradiate bright light (4,000 lux or over) to
                                                   the solar battery for several minutes and put the
                                           camera into operation if it was taken out of the
                                          box or any dark place immediately before where
                                                                           it was stored for hours. Immediately after the
                                                     solar battery is charged, it will be available
                                                continuously for 10 minutes or longer without
                                               being irradiated by light.


                                                       4. Even immediately after the camera is taken
                                                 out from a dark place, and if it is intended to use
                                                   the camera with a light of 400 lux or over
                                               approximately being irradiated to the solar
                                                       battery, set the solar lever to let the red O mark
                                                  appear.


(Note) In general, 4,000 lux or over is as bright as when irradiating from a height of 20cm approximately with a
20W-fluorescent lamp. 400 lux is as bright as a room illuminated at night. Leave the camera in the light and it
will be always charged, regardless of where the solar battery is positioned.

4. Follow 3 if no exposure mark (see P. 17) is displayed in the viewfinder upon releasing the shutter button (2)
half and looking through the viewfinder eyepiece (21 ) except when the camera is set at "B".
View original page 4Page 5 · Read text
Loading film


                                                       1. To open the film chamber back cover (27),
                                                    fold out the film rewind knob (14), then pull it
                                                      out. When the back cover opens, the frame
                                                 counter (4) automatically resets to "S".

                                                       2. Insert the film cassette into the film chamber
                                               so that the projecting end of the film cassette is
                                          downward. Do this in a place away from direct
                                                      sunlight.


                                                       3. Fold out and lift up the film rewind crank
                                                      (13). Then rotate the crank carefully while push
                                                     in it down lightly untie the film locks on the film
                                             rewind shaft (22).

                                                       4. Return the film rewind knob to its original
                                                      position.


                                                       5. Insert the film leader into the groove of the
                                                 take-up spool (31 ) and place it so that the film
                                                    perforations engage with the spool teeth.

                                                       6. Check that the film perforations engage
                                                 properly with the teeth of sprocket (26) and the
                                                  film slides smoothly along the film guide bars
                                                  (25) by operating lightly the film advance lever
                                                     (3) to advance the film.


7. Turn the film rewind crank gently in the direction of the arrow to properly tension the loaded film. Stop
turning the crank when it becomes stiff, and return the crank to its original position.


                                                       8. Close the back cover and push it until a click
                                                              is heard.
View original page 5Page 6 · Read text
9. Advance the film a couple of frames, pressing
                                                   the shutter release button each time, until the
                                             frame counter indicates "1" . (In this case, the
                                                  film advance lever should be at the ready
                                                      position, because the shutter release is
                                                   interlocked when the lever is in the stored
                                                      position). The film rewind knob rotates each
                                              time the film is advanced meaning that the film
                                                              is advancing properly.

Film speed Setting
1. Film speed is indicated on the outside of the him package or in the film instructions.

2. Set the film speed index (15) by turning the film speed dial according to the value indicated of the film.


Exposure Setting
(shutter speed priority)

1. Place the film advance lever (3) in the ready position and turn the shutter speed dial so that the indicator
white line aligns with the desired shutter speed value. Then if the dial is set at the intermediate positions of the
index, shutter speed will be incorrect. Be sure that the dial clicks at the position where the white line aligns with
the desired value. With setting at "B" (bulb) position, exposure monitoring is impossible.
View original page 6Page 7 · Read text
2. With brighter subjects, fast moving subjects or with the higher value film speed of the film used, it is
recommended to use higher shutter speeds.

3. In photography using, telephoto lenses, use the highest shutter speed possible to avoid camera movement
affecting your pictures. Generally higher than the same value of the shutter speed as that of the focal length of
the lens is recommended, i.e. 1/250s shutter speed is recommended for a telephoto lens with 135mm focal
length, and 1 /500s for 300mm focal length.

4. Recommended shutter speed with ISO 100/21° film and standard 50mm focal length lens under typical
situation is as follows:

           Subject                    Shutter speed

               Stationary subjects
                                                          1 to 1/15
                In subdued light

         Indoors in normal conditions                            1/30 to 1/60

           Outdoors on a fine day                             1/125 to 1/250

            Seaside in midsummer

          Mountain area with snow                            1/500 to 1/2000

              Fast moving subjects

5. To monitor exposure, partly press the shutter release button (2), turn the aperture ring (17) until O mark
appears in the viewfinder. When + mark appears, meaning that the exposure is too great, turn the aperture ring
in the direction of greater f/value. But if an - mark shows, exposure is below that necessary, so turn the aperture
ring (17) to a smaller f/value.

(Webmaster: This is a typical "auto" exposure program with LED lights in the viewfinder. You many also
have the aperture half-way between "click stops" on the lens, but NEVER on the shutter speeds)
View original page 7Page 8 · Read text
Exposure setting
(Aperture priority)

1 Place the film advance lever (3) in the ready position and turn the aperture ring (17) until the index on the lens
barrel indicates the desired f/value.
(Webmaster: this means you want a particular F-stop. Either a small one, F16, or more for lots of depth of field
or a wide one, F2, for little depth of field to blur out the foreground or background)

2. The suitable aperture value changes according to the brightness of the subject, the depth-of-field desired or
film speed of the film in use, and typical settings of the aperture with ISO 100/21 ° (ASA100/DIN21) film are
as follows:


                  Subject                                       F/value

                In subdued light
                                                                    F/1.2 to F/2
         To narrow depth-of-field

          Indoors in normal condition                              F/2 to F/4

           Outdoors on a cloud day                               F/4 to F/8

           Outdoors on a fine day                                F/8 to F/11

            Seaside in midsummer
                                                              F/11 to F/16
         Mountain areas with snow

When O mark appears at intermediate positions between two clicks, set the dial at either click and make
minute control by operating the aperture ring afterwards.

Holding Camera
1. Hold the camera in the palm of the left hand so as to turn the lens focusing ring (20) easily with fingers.

2. Hold the camera body lightly by holding grip (7) and place your right fore finger lightly on the shutter release
button.

3. Press your left elbow lightly against your body and look through the viewfinder eyepiece (21 ) to steady the
camera against your face. Then relax your right arm holding the grip.
View original page 8Page 9 · Read text
4. With telephoto lenses or lower shutter speeds, it is recommended to use a tripod and/or remote shutter release
control cable. (Webmaster: a monopod works great too)

5. The exposure marks in the viewfinder may become difficult to recognize with a polarizing filter attached.
This is not malfunction.

Focusing


                                                                1. Focusing is done by observing
                                                      through the circled area in the center of
                                                           the viewfinder screen. Within the circle
                                                                        is the split image spot prism and around
                                                           the circle there is the microprism collar.


                                                                2. In focusing through the split image
                                                              spot, when the image divided
                                                           horizontally is brought into alignment by
                                                          focusing, focus in correct. When the
                                                     upper-and lower-half images do not
                                                                align, it is out-of-focus.


3. To focus through the microprism collar outside center spot, a broken shimmering image is seen when it is
out-of-focus and correct focus is at the setting in which the image becomes clear and sharp.

4. Focusing through the entire matte surface of the viewfinder is also possible. In this case, at the setting where
the sharpest image is obtained, precise focusing is secured.

5. Choose the most effective focusing method from the above according to the shooting situation, such as the
lens used, the subject, etc.
View original page 9Page 10 · Read text
6. For viewfinder adjustment, optionally available accessories, such as a rubber eyecup piece, 3 dioptor lenses,
optional angle finders or magnifiers can be used.

Rewinding the film

1. When the film advance lever no longer operates smoothly, check the frame counter (4) display. If the frame
counter shows that the all frames of the loaded film have been exposed, replace the film.


2. Press the film rewind button (30) on the camera base.

3. Fold out the film rewind crank (13) and turn n in the direction of the arrow.

4. Once the pressure eases, the film is completely wound into the cassette.

5. Lift up the film rewind knob (14) and pull it out to open the back cover (27). Now the film cassette can be
taken out.

6. Do this in a place away from direct sunlight.

"B" (bulb) Setting

1. With the shutter speed dial (1) set at "B" position' the shutter will remain open for as long as the shutter
release button (2) is pressed.


2. This setting is useful when an exposure longer than one second is required, such as in landscape photography
at night. Or it can be used for the special effect photography by employing the flash test button together with
insufficient light conditions.

3. Be sure to use a tripod and/or remote shutter release control when using this shutter speed setting.

Self-Timer
View original page 10
Page 11 · Read text
1. Wind the film advance lever (3) and fully turn the self-timer lever (8) counterclockwise. Now the self-timer is
ready to set.

2. Press the shutter release button (2) and the self timer operates to release the shutter in approximately 10
seconds later.

3. Once the self-timer becomes ready it is impossible to return it manually. So operate it only when you really
need it.

4. The self-timer is very useful when you wish to include yourself in a picture, or, you can use it in order to
prevent camera movement in shutter Releasing instead of using the remote shutter release control.


Flash Photography

1. You only have to directly set the flash unit in the hot-shoe (11) with the flash unit having no cable and direct
synchronization features.

2. Set the shutter speed dial (1 ) at 1/125 second or lower.


3. Set the corresponding aperture value with the Guide Number (G.N.) of your flash unit by operating the
aperture ring (17). For details on how to determine the correct aperture value to use, follow the instructions
given in the manual of your flash unit.


Multi-exposure Photography

Multi-exposure photography is a technique used to take several different images on the same frame.

1. Release the shutter (2) and take a picture.

2. Turn the film advance lever (3) while pulling the multi-exposure lever (5) toward you till it stops. When the
film advance lever (3) reaches the arrow mark (photo 26), finger off the multi-exposure lever and turn the film
advance lever (3) till it stops. Check to see then that the film is not advanced and the film counter (4) does not
increment.
View original page 11
Page 12 · Read text
3. Release the shutter button and take a picture. (Multi-exposure photography)

4. Repeat 2 and 3 above, and multi-exposure photography will be made any desired times.

Caution: Tell your shop in advance that you did multi-exposure photography with the film. If not, multi-
exposed frame may be regarded as an erroneous double exposure and the frame may not be processed.


Depth-of-field

1. When you are focusing on a given subject, objects in the foreground and background will appear acceptably
sharp in the picture.
The range in which all objects appear acceptably sharp in the picture is called "depth-of-field."


2. To obtain the depth-of-field scale at different aperture settings, the depth-of-field scale (18) is used. The
depth-of-field scale is positioned between the focusing ring (20) and aperture ring (17), and the distance within
the range between pairs of the same F-stops on the depth-of-field scale as the used f/value is the depth-of-field.

To obtain the actual distance values of the depth-of-field, read the values within the range off the focusing scale.

3. For instance, when the lens is focused on a subject at a distance of am with the aperture set at F8, the depth-
of-field can be obtained by using the depth-of-field scale as follows: the values on the distance scale
corresponding with the f/values shown on the depth-of-field scale are approximately 2.4m and 4.5m
respectively. This means that all objects within the range between 2.4m and 4.5m distance can be reproduced 33
acceptably sharp in the picture with the aperture set at F8.
View original page 12
Page 13 · Read text
Depth-of-Field Preview
 In the Viewfinder eyepiece (21 ) you can visually observe the depth-of-field provided by the manually selected
F-stop. Press the Preview Button. Observe the results of increased sharpness on the (darkened) image in the
viewfinder.


Caution: As it will cause the camera to malfunction, please refrain from pushing the shutter release button or
winding the film while holding down the preview lever.


Infrared Photography
1. The stripe engraved in red on the depth-of-field scale (18) is the infrared distance indicator. This is used for
reading the distance scale in infrared photography using infrared film.


2. First, secure focus in the normal manner. Then, read off the subject distance on the normal distance scale
(19), then align it with the infrared distance indicator.

3. For instance, when you focus on a subject at am in the normal manner, read off the value "3" on the focusing
scale and move the focusing ring until the infrared distance indicator points to "3".

4. Use the red filter always when attempting infrared photography. For other details concerning infrared
photography, follow the instructions of the infrared film used.
View original page 13
Page 14 · Read text
Mounting/Removing the Lens
1. The lens mounting of this camera is the "K" mount. All other lenses with a "K" mount can be mounted on
this camera.


2. To mount the lens, after matching the red mark on the camera body with the red mark of the lens barrel,
insert the lens in the camera body and turn the lens clockwise until it clicks.

3. To remove the lens from the camera body, turn the lens all the way counterclockwise while keeping the lens
release button (10) pressed, then lift it straight out of the mount.

SPECIFICATIONS

Type: 35mm SLR camera with focal plane shutter and TTL metering with 3 LCD display, exposure setting
obtained by matching O mark.

Film format: 24mm x 36mm

Mount type: Bayonet "K" mount

Shutter release: Metal focal plane shutter operating vertically B,1--1/2000s

Flash Synchronization: Hot-shoe, X contact, synchronized at 1/125 or higher shutter speed.

Viewfinder: Eye-level finder with use of pentaprism image magnification ratio on the finder 0.84x. (with
standard 50mm focal length lens at °°) Field-of-view 93% horizontally and vertically to the actual picture area.
Focusing method; Matching the divided image through horizontal split image prism center spot. Focusing
through microprism collar or entire matte surface is also possible.

                        + mark - overexposure warning
Displays in viewfinder:             O mark - good exposure indication
                                          - mark - underexposure warning


Exposure metering: Full aperture TTL metering system. Center weighted area measurement.

Display: overexposure, underexposure warnings and good exposure indication. Desired setting is obtained by
matching O mark. (zero method)

Measurement range: ISO 100/21° EV5 (F2,1/8s)--EV17 (F16,1/2000s)
View original page 14Page 15 · Read text
Film speed setting: ISO 25/15°--1600/33°, by 1/3 steps. Film transportation indicator window

Film advancing: One frame advance by single-lever action with 135° throw and 30° stand-off. With Multi-
Exposure mechanism. Shutter release button is interlocked with the advance lever stored at unused position.

Film rewinding: By operating the film rewind knob and film rewind crank, the button returns automatically to
the original position at the completion of film winding.

Frame counter: Progressive type with auto reset by opening the back cover.

Self-timer: Mechanical self-timer, approx.10 sec. duration

Power source: Solar battery with condenser

Size and weight: 138.5 x 91.0 x 66.2mm, 380g (camera body only)

These specifications and external appearance are subjected to change for improvement without prior notice.
View original page 15
Related documents and language editions

From the M. Butkus archive. Original publisher and archive notices are retained.
Check the model and edition against your equipment.
PDF verified 2026-10-10.