Film cameras
EXA User manual
User manual for EXA. 16 pages in English. Read the original PDF, download or print a copy without registration.
16 pagesEnglish1.4 MB PDF
Loading your manual…Open PDF directly
Document details
- Brand
- Exa
- Model / document
- EXA
- Document type
- User manual
- Language
- English
- Pages
- 16
- File size
- 1.4 MB
- Category
- Film cameras
- Document date
- Not specified in catalog
Search available document text
Find a term, then jump to its page in the original PDF. Image-only pages may not be searchable; check the PDF for exact wording and diagrams.
Page 3 · Read text
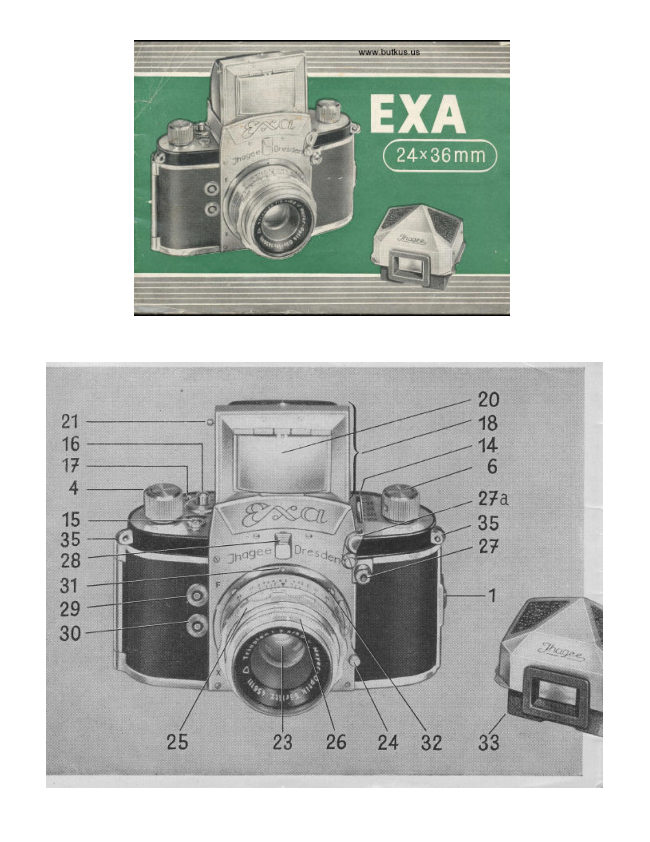
1 = camera back catch

2 = film chamber for feeder cartridge            19 --: back wall of finder-hood with frame-finder
(unexposed film)                                    rear sight

D = cassette guide with film roller              20 = protecting cover for hinged focusing
                                                magnifier
3 =film chamber for take-up spool or take-up
cartridge                                  21 = button for folding magnifier up and down

4 = film transport knob                       22 = finder-hood catch

5 = take-up spool for exposed film              23 --- lens

6 = film rewinding knob                      24 = lens bayonet catch

7 = pivot of film rewinding knob No. 6          25 = distance ring
View original page 3Page 4 · Read text
8 = image frame                            26 = stop ring

9 = film guide                              27 = shutter release knob

10 = film transport sprockets                  27a= movable release lock

l I = hinged camera bade                      28 = milled knob for interchange of finder-hood
                                           and Special Prism
13 = film pressure plate
                                         29 = contact nipple "F" regular flash
14 = shutter speed lever
                                         30 = contact nipple "X" electronic and regular
15 = exposure counter                              flash

16 = rewind button (Push button before          31 = red mark on camera
rewinding film!)
                                         32 = red mark on lens
17 = reversing lever
                                         33 = Special Prism (delivered as accessory
18 = reflex finder-hood
                                         35 = Loops for carrying
View original page 4Page 5 · Read text
There may be slight deviations between the camera models and the illustrations in this booklet


The 35 mm EXA
is yours now and we wish you good luck with it. The camera will give you much pleasure, for it is handy, easy
to operate, and ready for use at a moment's notice. So it is well suited to be your constant companion.
We would advise you, however, to read this instruction booklet attentively before setting out to make
photographs with your new camera. Having acquired sufficient experience in correctly manipulating all parts
that eventually lead to taking pictures, you will obtain better results in every case and avoid damaging the
camera mechanism.
You are, no doubt, well aware of the unique advantages of the EXA which is a single-lens reflex camera. In its
interior there is a small mirror which reflects the image taken by the lens on to the ground-glass focusing screen.
For that reason the future picture is always strictly the same as the reflex image. This image permits critical
focusing and composition of the picture on the ground-glass screen to an unexcelled degree of precision.
We hope and wish you will obtain excellent results with the EXA and are at your disposal for all questions
concerning your camera.

Before loading the camera
it is advisable to get thoroughly acquainted with the camera without film. To begin with, one should train
oneself to master all the movements: to release the shutter, to open and shut the camera, to use the finder-hood,
to compose and focus the picture, always handling the camera as though it where loaded with film. It is only
when a complete mastery of the camera has been achieved that it should be loaded with film. To start with, the
use of an old exposed film is recommended.

A. How to open and shut the camera back


                                          Press camera back catch (1) to the Left (111. 3), and
                                    open hinged back (11) completely. When closing the
                                        camera, care must be taken that the camera back
                                       engages correctly in the groove on the body of the
                                        camera. Press back (11) lightly towards camera body
                                                until the catch (1) snaps into position.
View original page 5Page 6 · Read text
B. How to open and shut the finder-hood


                          When the catch (22) is pressed inward, the finder-hood
                                     automatically opens into working position llll. 4). A detailed
                                      description of the various possibilities which it offers for
                                  composition and observation of the image, will be found in
                                      section E of this booklet. For the present let us stress the most
                                    important feet only: The ground-glass image is always strictly
                                      the same as the future photograph. That is the reason why the
                                    ground-glass image is the decisive factor for all operations
                                which lead to taking a picture: composition, choice of frame,
                                             critical focusing, stopping down. The degree of brightness of
                                      the ground-glass image even permits of determining the
                                  exposure time fairly accurately. - If there is no image visible
                                        in the finder-hood, wind the film transport knob 14) once in
                                      the direction of the arrow as far as it will go.

                                  Before shutting the finder-hood make sure that the focusing
                                    magnifier is in its neutral (vertical) position (Section E).
                                  Then, beginning at either side, fold down the side walls, the
                                 back wall (19), and finally the front part until it snaps into
                                      position (111. 5b)


C. Shutter and film transport


                              The EXA camera possesses a very simple and sturdy shutter.
                                      In order to observe how it works, open the back of the
                                  unloaded camera or remove the lens (see Section D). With the
                                       release of the shutter for exposure the mirror swings upwards
                                        into a position parallel with the focusing screen so that no
                                        stray light can get into the camera. Therefore no image is
                                         visible when a picture has been taken and the shutter has not
                                 been wound up again. The shutter speeds are set by means of
                                      the lever (14), it does not matter, weather this is done before
                                     or after winding up the shutter. The mark on the lever must
                             come to lie against the mark of the speed required (Ill. 6). 6).
                              The figures engraved on the camera top plate indicate
                                        fractions of seconds, so that e. g. 25 stands for l/25 sec.
                                   Release by pressing the shutter release knob (27) gently
                                       (111.7). A cable release can be screwed into the release
                                    button screw thread. The movable release lock (27a) acts as a
                                  guard against unintentional tripping of the shutter (important
                                        for storing and carrying the camera). The locking lever has to
                                 be swung up in order to disengage the release knob. If the
                                      speed-setting lever (14) is set to "B", the shutter will open
                               upon pressure on the release knob (27) and remain so as long
                                     as the knob (27) is pressed.
View original page 6Page 7 · Read text
It will close as soon as the pressure ceases. For "T" setting (after pressure on the release knob (27) the shutter
will remain open, until a second pressure will close it again) a special cable release is available. Long exposure
times can be easily measured by counting the seconds or checked by a watch. In this case it is absolutely
necessary to use a tripod (tripod bush in camera base) or to place the camera on a stable support (a table, a wall,
etc.). Handheld instantaneous exposures, however, are unconditionally possible. After exposure wind the film
transport knob (4) in the direction of the arrow` as far as it will go. With this action the shutter is wound up, the
film advanced one frame, the mirror swung into focusing position (the reflex image is visible again), and the
exposure counter (15) advanced one mark.

Film advance and shutter winder being coupled, double exposure of one section of film is impossible.

D. How to focus the EXA


                              The lens (23) of the EXA is interchangeable, but the camera
                                   should always be kept with the lens or it will be spoilt by
                                         dust. The front element of the lens should be protected by a
                                       lens cover which must be taken off before making an
                                    exposure. To remove the lens press the lens catch (24) lightly
                                  towards the lens (Ill. 8) 8) and, holding the lens by the back
                                          ring, turn it to the left, until the red mark on the camera (31)
                              comes to lie opposite the red dot on the lens (32), and the lens
                                  can be lifted from the camera body. To insert a lens this
                                   procedure is reversed: Insert lens (23) into the bayonet mount
                                   so that the red mark on the lens (31) comes to lie against the
                                    red mark on the camera body (32). Now the lens is turned to
                                      the right until it is heard to slip into the catch (24) on the
                                   camera.
View original page 7Page 8 · Read text
The best way to arrive at critical sharpness is to turn the
                                      distance ring (25) to and fro until the main subject appears
                                      absolutely sharp on the focusing screen in the finder hood.
                              The figure on the distance ring (25) that comes to lie opposite
                                      the red mark, indicates to which distance the lens is set (lens-
                                       to-subject distance) (111. 9-11).The diaphragm is adjusted by
                                      turning the knurled stop ring (26) until the stop required is
                                     opposite the red mark. The figures on the ring indicate the
                                        effective lens opening, i. e

                               low figures (2.9, 4, etc.) = large aperture = short exposure
                                   time

                                   high figures (22, 16, etc.) = small aperture = long exposure
                                   time


When increasing (or decreasing) the lens aperture, (or longer) exposure time is required, namely for one stop
double (or half) the normal exposure time; e. g. if the normal exposure is 1/50 sec. for an aperture of f/8, it will
be 1/25 sec. for f/11 or 1/100 sec. for f/5.6. A reduction of lens aperture (higher figures) produces an increase in
depth of field, that is to say, also points some distance in front of and behind the main subject focused at appear
to be sharp. For further details see the following table. For instance: lens set at 5 m, stop 8: extent of depth of
field from 3.02 m to 15.08 m, but lens set at 5 m, stop 4: extent of depth of field from 3.76 m to 7.47 m.

The lenses of the EXA have the distance ring (25) behind the front stop ring (26)(111.9-11). The depth of field
scale engraved in the back ring of the lens mount tells practically the same as the table.


                               The aperture figures diverge from either side of the red
                                     index mark. The index lines on the left hand side indicate
                                        the distance in meters from which sufficient sharpness can
                                   be expected, those on the right hand side the distance in
                                     meters up to which sharpness can be expected (= range of
                                     depth of field). The respective distances are opposite the
                                         figures of the aperture chosen. If the aperture figure on the
                                           right hand side comes to lie to the right of the infinity sign
                                       (00) sharpness will extend to infinity. Taking Illustration 9
                                       as an example: lens set at 5 m., stop 8: range of sharpness
                                  form about 3 m to nearly 15m.
View original page 8Page 9 · Read text
EXA Depth of Field


The Meritar (111.11) lens for the EXA has recently become available with pre-set iris diaphragm as an optional
extra. These lenses may be recognized by the ad adjustable stop ring R. Having decided the aperture to use for
your picture, press back the knurled stop ring towards the camera body. Now turn the normal iris ring until the
required stop number is set against the red mark and release the stop ring which will spring back to its original
position.

For critical focusing use the lens at full aperture and immediately before releasing the shutter turn the
diaphragm ring up to the stop, an operation which is carried out by "feel" alone and without the necessity to
move the camera from the sighting position.
View original page 9
Page 10 · Read text
E. How to use and exchange the finder-hood and Special Prism


                              A bright ground-glass image is visible in the
                                EXA finder-hood. It is magnified by the
                                              ground glass (a piano-convex lens) to such a
                                                 degree that accurate focusing is possible. For
                                          more critical focusing the built in magnifier is
                                               employed: To bring it into position move the
                                                   button (21) upward along the guide in the
                                                   finder-hood front wall (111.12) while holding
                                                      the index finger along top of finder-hood front
                                                       wall. To bring the magnifier back to its
                                                       neutral (vertical) position move button (21)
                                           downwards again.


The sharp outline of the ground-glass image facilities composition and determination of picture frame. While
turning the stop ring (26) the varying extent of depth of field can be observed. Focusing should always be done
at full aperture and the lens stopped down afterwards.

Normally the camera is held at chest level (111.13). Illustration 14 shows how to hold it when the magnifier is
used.

When using the finder-hood vertical pictures can be taken at right angles to the object to be photographed, so
that the photographer can work without being hindered or observed (111.15).
View original page 10Page 11 · Read text
The Special Prism (see Section F)
                                                        permits vertical pictures in direct vision
                                                  and shows an upright and laterally
                                                            correct image. Control of the ground-
                                                            glass image is also possible when
                                                          turning the camera upside down and
                                                      looking up into the finder-hood (111.16),
                                                         as it is necessary when shooting from
                                                     behind a wall, over a crowd, etc. In order
                                                             to use the finder-hood (18) as a frame-
                                                            finder (111. 18), bring magnifier into
                                                  working position by moving button (21)
                                                 upwards and swing protective cover (20)
                                                        forward. The rectangular opening in the
                                                        finder-hood back wall (19) serves as
                                                         frame-finder rear sight (111. 17). The
                                                      use of the frame-finder is particularly
                                                           indicated for sports shots etc.


The EXA is a two-system camera: the finder-hood is interchangeable and can be replaced by a Special Prism
(111.19 and 20). This Special Prism (see also 111. 1 and 2) is delivered separately as a camera accessory and
specially designed for snapshots. The camera is raised to eye level position (111. 21) and the object to be
photographed is viewed in direct vision through the finder. The Special Prism shows an upright and laterally
correct reflex image which corresponds to nature in all details for both vertical and horizontal pictures ([11. 22).
The image in the Special Prism moves in the same direction as the object. Holding the camera at eye level it is
easy to follow moving subjects.
View original page 11Page 12 · Read text
Interchange of finder-hood

Close finder-hood (18). Push milled knob (28) downwards and lift closed finder-hood (18) from camera body
(111.19). When replacing the finder-hood insert finder-hood carefully in perpendicular direction into the
opening and press it down until it snaps in audibly. The Special Prism (33) is inserted into and removed from
the camera in exactly the same way as the finder-hood (18).

Never use forcer

F. How to load the EXA


                          The EXA uses perforated miniature cine-film of 35 mm, width for
                           36 exposures 1 1/2 x 1 in. (=24x36 mm.) on a strip of the usual
                                length of 1.60m. The film is supplied either in factory filled
                                  cartridges or an empty cartridge is loaded with refill film or with
                              bulk film. For further details apply to your photo dealer. When
                               using bulk film no special trimming of the film end is necessary
                              except rounding off the angles.

                         Open camera back (see Section A). The film chamber (2) of the
                   EXA is provided with a cassette guide (D) (see legend in margin of
                                      illustration). The loaded film cartridge should therefore be inserted
                           from beneath the camera so that the mouth of the cartridge lies
                                 against the edge of the guide. The film is then led over the rollers
                            and sprockets to the transport spool (10). Insert pivot (7) of
                             rewinding knob (6) into hollow part of cartridge so that the groove
                                of the pivot (7) engages in the bar of the center spool. The cartridge
                           must not be larger than the chamber(2) or else it will not be
                                possible to shut the camera.


                          Make sure that the free end of the film runs straight into the
                                   film track (9, film guide), the emulsion (mat) side of the film
                              showing towards the lens. Take care not to pull more than 10
                              cm. of film from the cartridge. Remove take-up spool from film
                              chamber (3) and push free end of film under spring of take-up
                                  spool until film keeps fast (111.24) The film is wound into the
                                  take-up spool with the emulsion side outwards (See Diagram
                                     25). Insert take-up spool (5) again and make sure that the
                                groove of the pivot of the film transport knob (4) engages in the
                                  bar of the center spool. The strip of film must run perfectly
                                       straight from film track to film transport sprockets [ 10) and
                                  take-up spool (111. 26).

                        When closing camera back (11) make sure that cartridge, film,
                              and spool are kept in their proper positions. Now two "blind"
                                 exposures must be made: Open finder-hood (18) as described in
                                  Section B.
View original page 12Page 13 · Read text
If there is no image visible in the finder-hood, wind film
                                     transport knob (4) up to the stop in the direction of the arrow.
                                 Release by pressing shutter release knob (27): first "blind"
                                  exposure. Wind knob (4) again up to the stop and release again:
                                second "blind" exposure. (webmaster: these are the typical
                                  "blank" shots to move exposed film out of shutter area) Wind
                                   film transport knob a third time as far as it will go: an
                               unexposed piece of film is brought into position in the image
                               frame (8).


Now set picture counter (15) by turning the milled knob with the right hand forefinger in the direction of the
(Ill. 27) until No. 1 points to the picture counting mark, and the camera is ready for the first "real" exposure.

If one does not wish to rewind the exposed film after 36 exposures into the cartridge, but to remove it from the
camera in a second cartridge, the procedure is strictly the same as described above. Simply remove take-up
spool (5) and replace it by a second cartridge. Spare cartridges are on sale for this purpose, or used ones may
be employed. In order to load the cartridge, open it and fix film on its center spool. Place it into film chamber
and make sure that the pivot of the film transport knob (4) engages in the bar of the center spool and that the
film is wound up emulsion side outwards. Illustration 28 shows the path the film must take.


G. How to change films


                                             If the film is wound on the take-up spool belonging to the
                                 camera, one length of film will take more than 36 exposures.
                             Even if the picture counter points to "36' already, one or two
                             more exposures can be made, until the film transport knob (4)
                                 cannot be wound any more. Now the film must be rewound in
                                    the following manner: Holding the camera in your left hand,
                                    press down the button (16) with the thumb, while the other hand
                                     turns the rewinding knob (6) in the direction of the arrow (111.
                                     29). As long as the film is being rewound, the film transport
                             knob (4) will rotate in an anti-clockwise direction. Once the
                                   film is rewound into the cartridge, the transport knob (4) will
                                      stop. Now open the camera (see Section A) and remove the
                                     cartridge containing the exposed film. To make the camera
                                 ready for loading and regular film transport again, make sure
                                       that the small reversing lever (17) is pushed at once towards the
                              camera back and springs back again (111. 30)
View original page 13Page 14 · Read text
If, on the other hand, the film is wound into an empty cartridge
                                    instead of into the take-up spool, only 36 exposures can be
                              made. As soon as the counter (15) points to "36", make two
                             more "blind" exposures, so that all 36 exposed frames will
                                  disappear into the cartridge. Open camera back, take out feeder
                                       cartridge, open the latter and detach the film end from the
                                    center spool. This done, remove the take-up cartridge and wind
                             up the rest of the film by turning the top of the center spool.


H. Flashlight


                                For flash exposures, the EXA has two synchronized contacts:
                                    the X-contact and the F-contact.

                            The X-contact is closed as soon as light falls on the entire
                                     picture gate. The lower contact nipple (30) belongs to the X-
                                     contact. This is where the contact plugs of flashtube equipment
                                   (111. 31) (electronic flash units) are inserted. The shutter
                                      setting in connection with electronic flashes has to be l/60 sec.
                            The flash duration is equal to the burning period of the flash
                                  tube which, as a rule, is 1/500 to l/6000 sec. This is sufficiently
                                     short to capture the quickest movement. Literature on electronic
                                      flash units is available at the special dealers or straight from the
                                  manufacturers.


With the shutter set at "B" the X-contact also synchronizes all regular flash units according to the open flash
method.


                                      In this case, the Ihagee flash unit (111. 32), or. any other
                                        flash equipment, has to be used with its connecting plug
                                       inserted into the X-contact of the EXA (details are given in
                                      the Instruction Booklet for "The Ihagee Flashgun").
                              The F-contact, closes 11 to 13 ms. sooner than the X-contact,
                                which means, a moment before the entire picture gate is
                                       illuminated. The upper contact nipple (29) belongs to the F-
                                      contact and is designed to accept the contact plug of the
                                   Ihagee Flashgun (111. 32) or of any other regular flash
                                   equipment.
View original page 14Page 15 · Read text
The EXA F-contact permits employing such lamps as the small, moderately priced F 19 of RET Elektroteeknik
Eisenach, the Osram XM 1, and A XM 5 and the Philips PF 1, and PF 5, (or American flash bulbs: Amplex No.
5, Dura Flash No. 5, General Electric Ph 5, Westinghouse No. 5), shutter speed: 1/25 sec. The actual flash
duration is equal to the burning period of the flash bulb and may range from l/260 to l/l00 sec. For further
particulars, please refer to the slips enclosed with the flash bulbs.

I. Treatment and care of camera and lens
The camera with lens should always be kept in the ever ready case or wrapped in a piece of cloth that will not
ravel out. All easily accessible parts should be kept clean and, if necessary, dusted with a soft brush. Above all
the film track with the film guide (9), the film chambers (2 and 3), the camera back (11), the two springs (12),
and the film pressure plate (13) should always be kept clean.

The reflex mirror of the EXA is surface-silvered and extremely liable to suffer from careless handling. A very
soft hair-brush should be used when cleaning it a long intervals. The EXA must be carefully protected against
dust, sand, etc. as well as against moisture in any form. Never touch the glass surfaces of the lens with the
fingers 1 If necessary, the lens surfaces may be cleaned with a soft chamois leather or a piece of soft linen that
will not ravel out.

We would advise against tampering with the camera mechanism under any circumstances Only expert
mechanics being able to do repairs properly, our advice to you is to have repairs done in our works whenever
that is possible.

K. EXA accessories


                         The EXA takes practically all EXAKTA accessories with the
                              exception of the ever ready case of the EXAKTA. Special lenses
                             with focal lengths exceeding 100 mm. cannot be used
                               unconditionally in the EXA (vignette).

                         The EXA Everready Case has been designed to protect the camera
                             without impairing its operative speed. All mechanical parts which
                                are important for picture taking, can be operated even if the camera
                                      is in the case. A camera retaining screw with tripod socket secures
                                the camera in the carrying case for safety (111. 33).
View original page 15Page 16 · Read text
Other accessories:

                          The Giant Release button (111. 34) is screwed into the
                                   shutter release knob (27) whose effective surface it
                                  increases. It allows of releasing the shutter with ease
                            and security when wearing gloves or when the fingers
                                 are numb with cold.. Color Filters. The purpose of
                                        filters in black-and-white photography is to render the
                                 colors of the object to be photographed in the grey tone
                               values that correspond to the impression received by
                                 the human eye, as the film registers several colors
                               otherwise than the human eye. All filters are corrective
                                         filters: they lighten objects of their own color, while
                              darkening those of their complementary color; e. g. a
                              yellow filter ill produce tones of a lighter gray for the
                              yellow areas, and darker gray tones for the blue areas of
                                 the object, for, to the human eye, yellow appears to be
                                 the lightest, and blue the darkest color. Consequently,
                                 the blue sky will appear darker in the picture and the
                              white clouds will offer a good contrast. The results
                               obtained when using filters, further depend upon the
                                     light conditions and the color sensitivity of the film
                                used. For more detailed information consult the
                                 technical literature.


The filters are pushed on to the lens front mount. The filter mounts will take, if required, a lens hood or a soft-focus disc.
As the color filters cut out certain parts of the light, an increase in exposure time is necessary when using them:

Yellow filters, light and medium 2-3 times the normal exposure time

Green filters, light 3 times the normal exposure time

Blue filters, light 3 times the normal exposure time

Red filters, light 8 times the normal exposure time

The Lens Hood [III. 34) is far more important than is generally believed. It protects the lens not only against frontal stray
light when photographing against the sun, but in every case against side stray light and glares, enhancing thereby the
contrasts in the picture. The lens hood is pushed on to the lens front mount or the front ring of the filter mount.

Soft - Focus Discs are widely used to catch 'atmosphere". Causing the bright areas to appear
slightly over-emphasized towards the darker areas it is their purpose to register sunny atmosphere
in a picture. The soft-focus discs are also pushed on to the lens front mount.
View original page 16Related documents and language editions
From the M. Butkus Camera Manual Library. Original publisher and archive notices are retained.
Check the model and edition against your equipment.
PDF verified 2026-10-10.