Film cameras
Fujica AX Multi Program Illustrated reference
Illustrated reference for Fujica AX Multi Program. 27 pages in English. Read the original PDF, download or print a copy without registration.
27 pagesEnglish3.5 MB PDF
Loading your manual…Open PDF directly
Document details
- Brand
- Fujica
- Model / document
- Fujica AX Multi Program
- Document type
- Illustrated reference
- Language
- English
- Pages
- 27
- File size
- 3.5 MB
- Category
- Film cameras
- Document date
- Not specified in catalog
Search available document text
Find a term, then jump to its page in the original PDF. Image-only pages may not be searchable; check the PDF for exact wording and diagrams.
Page 2 · Read text
SECTIONS
     •   Names of parts
     •   Mounting and dismounting the lens
     •  A word about the battery
     •   Load the film
     •   Multi-program auto exposure
     •   Taking pictures
     •   End of film
     •   Camera functions
     •   Taking self-timer pictures
     •   Exposure compensation
   •   Multiple exposures
     •   Taking flash pictures
     •    Optional accessories
     •   Camera care
     •    Specifications
View original page 2Page 3 · Read text
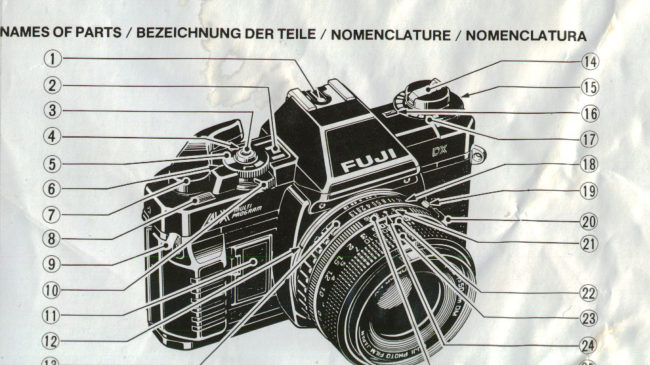
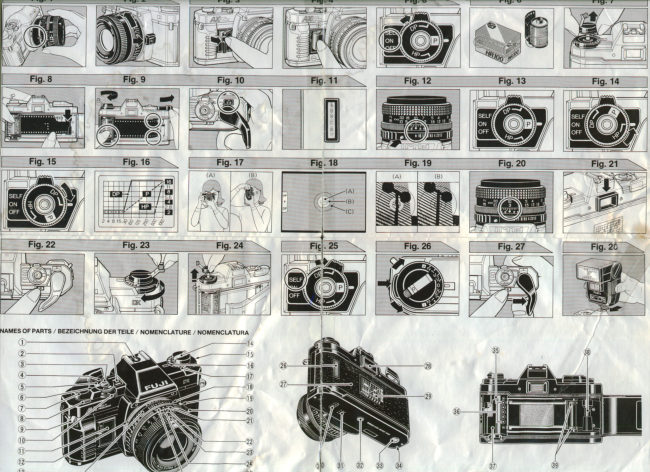
NAMES OF PARTS

(1) Accessory Shoe (Hotshoe)
(2) Main Switch Display
(3) Shutter Release
(4) Rewind Button
(5) Program Selector
(6) Selector Setting Mark
(7) Film Advance Lever
(8) Exposure Counter
(9) Strap Eyelet
(10) Main Switch
(11) Battery Compartment Cover
(12) Lens Mounting Guide
(13) Aperture Ring/Aperture Scale
(14) Rewind Crank/Knob
(15) Fractional Exposure Control Lock
(16) Fractional Exposure Control Setting Mark
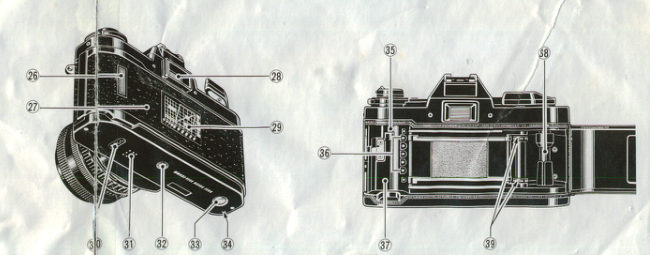
                                                              (31) Electronic-Signal Generator
(17) Fractional Exposure Control
                                                              (32) Tripod Socket
(18) Auto Mark (diamond-shaped mark)
                                                              (33) Auto-Winder Coupling
(19) Auto Lock Pin
                                                              (34) Auto-Winder Positioning Hole
(20) Lens Lock
                                                              (35) Film Rewind Spindle
(21) Infrared Setting Mark
                                                              (36) Film Speed Sensor (DX system)
(22) Distance Scale
                                                              (37) Film Chamber
(23) Focusing Ring
                                                              (38) Take-up Spool
(24) Aperture/Distance Setting Mark
                                                              (39) Sprocket Wheel
(25) Depth of Field Scale
(26) Film Confirmation Window
(27) Camera Back
(28) Viewfinder Eyepiece
(29) Program Chart
(30) Auto-Winder Contact
View original page 3Page 6 · Read text
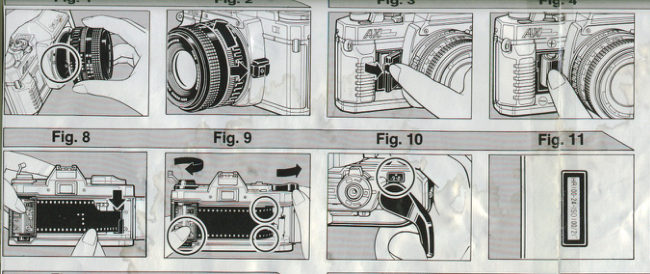
MOUNTING AND DISMOUNTING THE LENS             and provided with an Auto Mark A) can be used on this
                                                      camera.

1. Mounting (Fig. 1)
Position the red dot on the lens rear end opposite the
Lens Mounting Guide (red dot), push the lens in, then
turn it to the right (clockwise) so that it locks into place
with a click.


                                                       Figure 2 — Dismounting


                                       A WORD ABOUT THE BATTERY


                                                                  1. You can use any one of the following batteries but
Figure 1 — Mounting                            make sure it is new.

2. Dismounting (Fig. 2)                                                             · 6-Volt alkaline-manganese battery (4LR44).
While pressing in the Lens Lock, turn the lens to the left            · 6-Volt silver oxide battery (4SR44).
(counterclockwise). (The Body Cap is removed in the                · 6-Volt lithium battery (2CR-1/3N).
same way as the lens).
                                                          Notice:
* Only Fuji X-mount DM lenses (lenses marked ADD"                                             Low temperature will reduce battery efficiency. If you are
View original page 6Page 7 · Read text
shooting in cold weather, do as follows:

(1 ) If the temperature is 0°C or under, use a new
battery.

(2) Bring an extra battery so that you can use two bat-i
series alternately while warming one of them in your:
pocket.

(3) If you are taking a lot of pictures, use silver oxide'
batteries because they are more efficient than the others
in low temperature.


2. Load the battery                                                       Figure 3 — Opening the battery compartment

(1 ) Open the Battery Compartment Cover by pushing
the Cover Lock toward the Lens with your fingernail and        (2) Insert the battery plus (+) and minus (-) ends
lifting it up. (Fig. 3)                                               correctly in the Battery Compartment. (Always insert the
                                                    minus (-) end first). (Fig. 4)
View original page 7Page 8 · Read text
you continue to use it, the shutter may malfunction. (You


Figure 4 — Inserting the battery                                                            won't hear a "beep", however, if the battery is completely
                                                           exhausted).
(3) To unload, press down and pull out the plus (+) end
first.                                       LOAD THE FILM
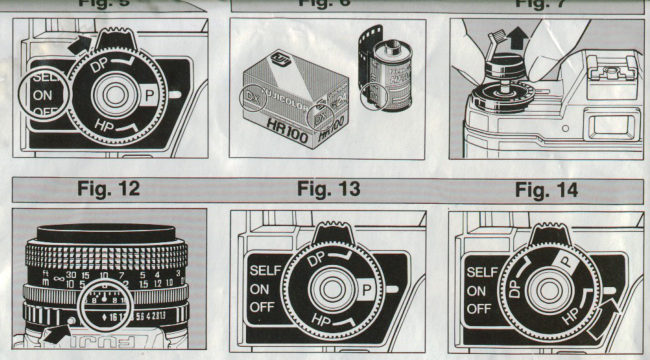
(4) Replace the Battery Compartment Cover. (Fit in the                                                                  1. Film to use (Fig. 6)
inner edge first).                                               Use 35mm film marked with the letters "DX" on the
                                                    box and cartridge.
3. Check the battery (Fig. 5)
Turn on the Main Switch and press the Shutter Releaser
about half-way down. If you don't hear a "beep, beep",
the battery is in good condition. If you hear a "beep,
beep", you'll have to change the battery immediately. If


                                                       Figure 6 — Use DX type film
View original page 8Page 9 · Read text
2. Film speed setting is automatic
Use DX films with speeds ranging from ISO 50 to 1600
The camera will automatically set itself to the speed of
the film loaded in it.

· If any other film is loaded in the camera, it will
automatically set itself to ISO100.

3. Open the camera back (Fig. 7)
Open the Camera Back by pulling up the Rewind Knob.


                                                       Figure 8 — Loading the film

                                                                  5. Wind the film
                                                 Wind the film with a stroke or two of the Film Advance
                                                        Lever to make sure the Sprocket Teeth catch the film
                                                                 perforations.

                                                                  6. Take up the film slack (Fig. 9)Figure 7 — Pull up on rewind to open back
                                                                                   Lift the Rewind Crank and turn it in the direction of the
                                                        arrow to take up any slack in the film. Next, make sure4. Load the film (Fig. 8)
                                                            the film is running between the Guide Rails, then close(1) Drop the film cartridge into the Film Chamber then
                                                            the Camera Back.push down the Rewind Knob.

(2) Pull out the film tip and insert it into the slot of the
Take-up Spool.
View original page 9Page 10 · Read text
Figure 9 — Turn rewind crank clockwise to take up
slack                                                  Figure 10 — Advance to the first frame at position 1

.                                                                  7. Position the first frame (Fig. 10)
                                                        While watching the Exposure Counter, wind the film with
                                                            the Film Advance Lever and press down the Shutter
                                                        Release. Repeat until the white dot between the red "0"
                                                  and the number "2" comes opposite the white index
                                                        mark. (The white dots between the even numbers
                                                                 indicate odd numbers).

                                                                       * If the Film Rewind Crank turns when the Film Advance
                                                        Lever is wound, the film is advancing properly.

                                                                       * When taking blank shots, be sure to put the lens cap
                                                  on to prevent light from entering the camera
View original page 10Page 11 · Read text
Figure 11 — Check the film conformation window

8. Check the film conformation window (Fig. 11)
The Film Confirmation Window will show you at a glance
the type of film loaded in the camera, the number of
exposures it contains, as well as its ISO speed.
View original page 11
Page 12 · Read text
MULTI-PROGRAM AUTO EXPOSURE
1. What it means
Your camera is equipped to select both aperture and
shutter speed automatically to provide optimum settings,
and you can choose the type of combination (program
mode) you want to suit your purpose.


2. Set the aperture ring to "auto" (Fig. 12)
If you are using programmed auto-exposure, press in
the Auto Lock Pin and set the Auto Mark (diamond
shaped mark on the Aperture Ring) to the Aperture
Setting Mark. * You cannot take programmed auto-
exposure pictures unless the Auto Mark is set to the red
Aperture Setting Mark.


                                                       Figure 13 — Set to “P” for ordinary pictues

                                                                  3. Taking ordinary pictures (Fig. 13)
                                                To take snapshots, souvenir pictures, and so forth, set
                                                            the Program Selector to "P".


* To move the auto mark off the setting mark to take
flash pictures, etc., just press in the Auto Lock Pin and
turn the Aperture Ring.
View original page 12Page 13 · Read text
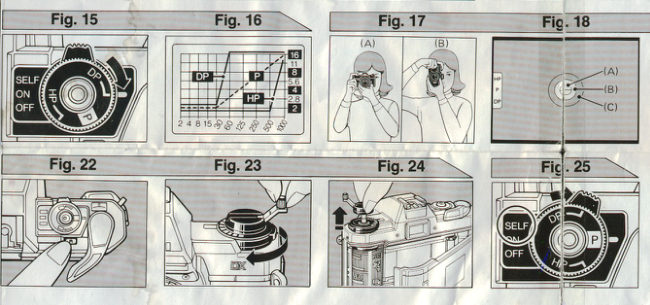
4. Stopping fast-moving subjects (Fig. 14)                   5. Taking wide depth-of-field pictures (Fig. 15)
To take sports pictures and pictures of fast-moving         To take pictures that are sharp all the way from
subjects, set the Program Selector to "HP'.                  foreground to the far background, set the Program
                                                             Selector to "DP'.


Figure 14 — Use “HP” for fast-moving subjects
                                                       Figure 15 — Use “DP” for sharp pictures over the
The "HP" mode is used for the following:                  entire depth of the photograph
(1 ) To take sharp pictures of sports action and other
fast-moving subjects.                               The "DP" mode is used for the following
                                                              (1 ) To take subjects having great depth so that they turn
(2) To take sharp pictures of your main subject but with       out sharp from front to back.
the fore- and the background blurred.
                                                                    (2) To take pictures that convey a sense of motion by
                                                                    intentionally introducing some degree of blur in the
                                                movement of your subject.
View original page 13Page 14 · Read text
possible and the shutter will trip as slowly as necessary
                                                                   to provide correct exposure.


                                           TAKING PICTURES
                                                                  1. Aiming the camera (Fig. 17)


Figure 16 — The exposure you get will always be
correct no matter which mode you select

6. Program chart (Fig. 16)
The aperture and shutter-speed combination will differ
depending on the program mode selected. But                  (1) Hold the camera with your left hand, press the left
regardless of the combination, the exposure you'll get        elbow against the side of your chest, relax your right
will always be correct.                                hand and press the Shutter Release gently down.
P Mode -- Both the aperture and shutter speed (normal
mode) will automatically shift together to provide                (2) When shooting with the camera held vertically, try to
optimum exposure.                                    keep it extra steady because it will be less stable in that
HP Mode --The aperture will open up as much (high           position.
speed as possible, and the shutter will priority mode) trip
as fast as necessary to provide correct exposure.
DP Mode --To insure a wide zone of sharpness, (depth-
of- the aperture will close down as field mode) much as
View original page 14Page 15 · Read text
2. What you will see through the viewfinder (Fig. 18)      Press the shutter release about halfway down

                                                                                                    · When you press the Shutter Release about halfway
                                                    down, a red lamp will turn on opposite the letters HP, P.
                                                              or DP to confirm the program mode you selected.

                                                                                                    · If the red lamp blinks slowly (2 times a second), the
                                                                shutter speed is going to be slow, so you'll have to hold
                                                            the camera extra still to prevent camera shake.

                                                                                                    · If the red lamp blinks fast (8 times a second), your
                                                                 picture is going to be underexposed or overexposed. If
                                                            the light is insufficient, use flash to take it, and if the light
(A)-- Split-image Focusing Spot [Fib. 18-(A)]                       is too bright, use the accessory ND filter to reduce the
                                                                quantity of light.
(B)-- Microprism Collar [Fig. 18-(B)]
                                                                                                    · If the red lamp turns on for an instant then goes out,
(C)-- Ground-glass Screen [Fig. 18-(C)]                      the Auto Mark is not set to the Aperture Setting Mark. It
                                              means the camera is not set for automatic exposure.

(A) Split-image Focusing Spot                                                                  3. Focus the lens
Your subject is in sharp focus when the upper and lower                                                   Look at your subject through the Split-image Focusing
segments of the image seen through Hhis spot fall in                                                      Spot and bring it into sharp focus by turning the
line.                                                       Focusing Ring.

(B) Microprism Collar
Your subject is in sharp focus when its outline appears
smooth and clear through this collar.

(C) Ground-glass Screen
You can check how blurred or clear your subject is
through this screen.
View original page 15Page 16 · Read text
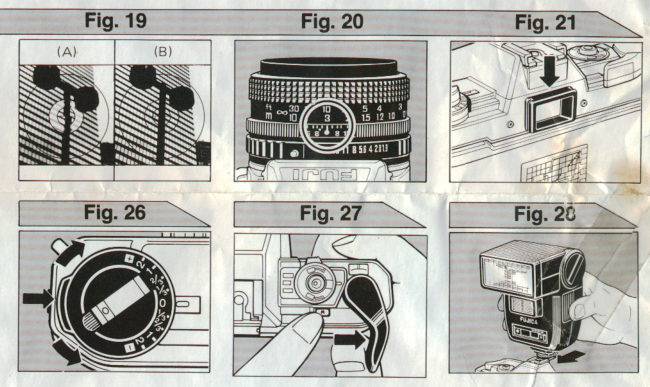
4. Incorrect focus [Fig. 19-(A)]                                   in a straight line.
If the lens is incorrectly focused, your subject will appear      (2)The image in the Microprism Collar will be smooth
as follows:                                          and clear.
(1) The upper and lower segments of the image seen           (3) The image in the Ground-glass Screen will be sharp
through the Split-image Focusing Spot will be out of         and crisp.
alignment.
(2) The outline of the image seen through the                   6. Focusing by eye estimation (Fig. 20)
Microprism Collar will look coarse and grainy.             To take quick snapshots with a wide-angle lens, just
(3) The image seen through the Ground-glass Screen         estimate the distance from camera to subject with your
will look blurred.                                       eye then turn and set the Focusing Ring to that distance.

                                                      (The white numbers on the Focusing Ring indicate
                                                          meters, the green numbers, feet.)


5. Correct focus [Fig. 19-(B)]
If the lens is correctly focused, your subject will appear
                                                       Figure 20 — Focusing by using the distanceas follows:
                                               measurement ring
(1 ) The image in the Split-image Focusing Spot will be
View original page 16Page 17 · Read text
lens as you would normally do then set the distance
                                                shown on the Focusing Ring to the Infrared Setting
                                                        Mark.


                                        END OF FILM
                                                                  After you have finished exposing a roll of film, you'll have
                                                                   to rewind it back into its cartridge.

                                                                       * Do not try to squeeze an extra frame into your roll
                                                   because your photofinisher may not be able to print it.
                                                                       * If the Film Advance Lever feels tight and heavy at the
                                                  end of a roll, do not force it through. Just return it to its
                                                       normal position and rewind the film into its cartridge.

                                                                  1. Press In the rewind button (Fig. 22)
                                                To rewind, first press in the Rewind Button.

Figure 21 —Optional viewing lens is available if you
want to focus without glasses or contact lenses

7. Eyesight adjustment lens (Fig. 21)
If you are far- or near-sighted, use an eyepiece that can
be adjusted to your eyesight. It will let you focus the lens
without glasses. (The following diopter-correction lenses
are available at an extra cost: +2, +0.5, -2.5, -4).

· Infrared photography

The small red dot next to the Aperture/Distance Setting                                                                       * Before pressing in the Rewind Button, pull out the Film
Mark is the Infrared Setting Mark.                                                  Advance Lever by a stand-off angle of the lever, or the
                                                  Rewind Button may disengage and the film may not be
To focus the lens for infrared photography, just focus the                                                      rewound.
View original page 17Page 18 · Read text
* If the Film Advance Lever is wound after the Rewind      CAMERA FUNCTIONS
Button is pressed down, it may pop up again.            TAKING SELF-TIMER PICTURES

2. Turn the rewind crank (Fig. 23)                             1. Set the self-timer (Fig. 25)
Lift the Rewind Crank and turn it in the direction of the       Wind the film and activate the Self-timer by setting the
arrow. Rewinding is completed when the Exposure          Main Switch to "SELF".
Counter returns to "S" and the Rewind Crank feels
suddenly light.


                                                       Figure 25 — Self-timer setting
Figure 23 — Lift rewind lever and wind in clockwise
direction until crack suddenly feels loose                    2. Press down the shutter release
                                                                  Start the Self-timer by pressing down the Shutter
3. Open the camera back (Fig. 24)                        Release. You will hear a beep-beep-beep for 7 seconds
Open the Camera Back by pulling the Rewind Knob all       and then a long b~e-e~e-p for 3 seconds at the end of
the way out, unload the film, and take it to your              which the shutter will trip.
photofinisher as soon as possible.
                                                                       * To turn off the Self-timer after it has been started, just
Caution:                                                       turn the Main Switch away from "SELF".
* Be sure to open the Camera Back only after you have
rewound the film back into its cartridge.
View original page 18Page 19 · Read text
EXPOSURE COMPENSATION

If you are shooting under adverse lighting conditions
(against the light, etc.), or if you want to take high key
pictures (intentional overexposure) or low-key pictures
(intentional underexposure), or if you are shooting some
special type of subject, use the Fractional Exposure
Control. (Fig. 26)

· To make intentional overexposures, just press in the
Fractional Exposure Control Lock and turn the control
dial to the right (clockwise); to make intentional
underexposures, turn it to the left (counterclockwise).
View original page 19
Page 20 · Read text
Figure 26 — Intentional overexposure (+) or               the shutter will cock, and the Exposure Counter will
underexposures (-) control dial                          remain where it is).
MULTIPLE EXPOSURES
Multiple exposure is the technique used to create               (3) After winding the Film Advance Lever, release the
special picture effects by superimposing the same scene     Rewind Button and take your second picture.
or another scene once or several times on the same        You can repeat (2) and (3) above as many times as you
frame. It is easy to do with your FUJI AX MULTI              want.
PROGRAM.
                                                                    (4) Exposure compensation
This is the way to do it (Fig. 27):                       To take multiple-exposure pictures, you may have to use
                                                      exposure compensation depending on your subject and
                                                            the number of times you are exposing the same frame. If
                                                    you are exposing two different brightly lit scenes or the
                                              same scene twice on the same frame set the Fractional
                                                     Exposure Control to -1, and if you are superimposing the
                                                     scenes just mentioned four times on the same frame,
                                                              set it to -2.

                                                                                                    · Exposure compensation is not necessary if you are
                                                        superimposing a person's face on a nighttime fireworks
                                                    scene or any other night scene.


                                           TAKING FLASH PICTURES

                                                To take flash pictures, move the auto mark off the
                                                                  setting mark and set the Aperture Ring to the specified
Figure 27 — Cocking the shutter without advancing      F-number (Fig.-12). The shutter speed will be
the film to create a multiple exposure                       automatically set to 1/60 sec. t. Using the Fujica Auto
                                                         Strobo 300X (extra cost) (Fig. 28) This unit will let you
(1 ) Take your first picture.                                  take fully automatic flash pictures by merely clipping it
(2) While pressing down the Rewind Button firmly, wind        into the camera's Hotshoe and setting the camera's
the Film Advance Lever. (The film will remain stationary,      Aperture Ring to the value read off the strobo's
View original page 20Page 21 · Read text
calculating disk.

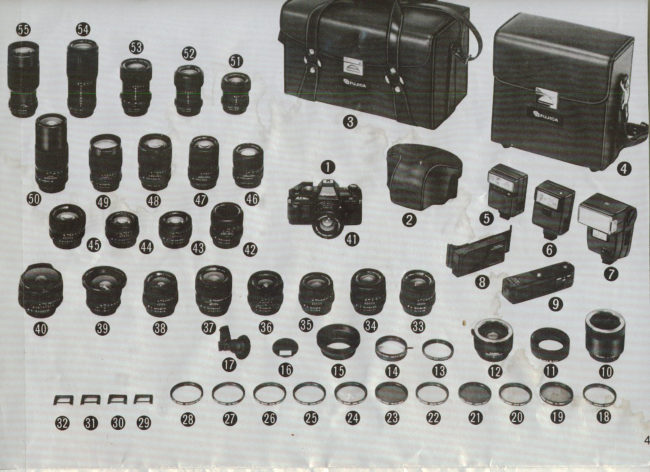
2. Using the Fujica Auto Strobo 200X (extra cost)         OPTIONAL ACCESSORIES
To take fully automatic flash pictures, you just clip this          1. Fujica Auto Winder-X:
unit into the camera's Hotshoe and set the Lens              This is attached to the bottom of your camera to wind
aperture to F4.                                              the film automatically each ante the shutter is tripped. It
                                                                                will also let you take rapid-sequence pictures by
                                                       advancing the film continuously as long as the Shutter
                                                     Release is depressed.


                                                                  2. Fujica Photo Recorser
                                                           This is interchangeable with the Camera Back and will
                                                                              let you print up to 30 letters in the bottom left corner of
                                                         your picture.


                                                                  3. Fujka Teleconverter 2X
                                                  Mounted between the Lens and camera body,. it will
                                                        double the focal length of your lens to let you take take
                                                       photo pictures.

                                                                  4. Fujica Close-up Lens
3. Using the Fujica Auto Strobo AZ (extra cost)             Attached to a normal lens, it lets you take pictures of
If you are using this flash, you'll have to find the correct        subjects 32 to 48 centimeters away from the camera
aperture to use by dividing the flash guide number 17          lens.
(ISO 100 m) by the distance from flash to subject.
                                                                  5. Fujica Auto Extension Tubes
4. Using other flash units                           Two units are available for taking extreme close-ups:
You'll have to use a direct-contact unit (hotshoe flash)       X25 and X50. Combined with a normal lens, the X25
and do your own calculation to find the correct Fnumber       yields 1/2-actual size, and the X50 life size, pictures.
to use.
View original page 21Page 22 · Read text
6. Filters                                                          bright sunlight, this lens hood attaches to the front of the
· Skylight (1B) · UV · SY48 · S056 · SR60 · ND-4X          camera lens.
· LBA-12 ~ LBB-12 ~ FL-W ~ PL ~ CROSS-4 (4 points)
· MULTI-5 (5 faces)
                                      CAMERA CARE

Twelve different Fujica filters are available to meet a
                                                                                                    · After you are through taking pictures, be sure to trip the
wide array of needs. From basic to special creative
                                                                shutter by pressing down the shutter release.
effects, they are indispensable. Made with the finest
materials, to the highest optical standards, Fujica filters
                                                                                                    · Periodically, dust off your camera and wipe it with
perfectly complement your photographic aspirations.
                                                              clean, linffree cloth: Use an air blower to remove dust
                                                  and film debris from the interior.
7. Maginifier X
The Fujica Magnifier X simply attaches to the camera's
                                                                                                    · Guard the lens and viewfinder from finger marks and
viewfinder eyepiece. Providing 2.5X magnification of the
                                                                dust. Use an air blower to remove dust. Finger marks
center of the viewfinder, this new accessory helps make
                                                          are removed with Fuji Lens Cleaning Paper moistened
accurate focusing easier in any situation, especially in
                                                               with Fuji Lens Cleaning Fluid. Do not touch the mirror
close-up photography and low-light applications.
                                                   because it is easily damaged.
— The Fujica Magnifier X offers eyesight adjustment
from +3 to -5 diopters.
                                                                                                    · If you are taking the lens along with you separately, be
Complete with rubber eyecup and case.
                                                         sure to cap both ends to protect it from dust and
                                                             scratches.
8. Gadget Bag L&S
A pair of gadget bags, large and small, stylishly
                                                                                                    · If you are shooting sea-side scenes, carry the camera
designed in chestnut-brown artificial leather, interior
                                                                       in a vinyl bag to protect it from salt and sand and take it
compartments provide complete convenience with fully
                                                            out only when you need it. As soon as you Return home,
adjustable (or removable) partitions. Both with an
                                                  be sure to wipe off salt and sand with a piece of clean,
adjustable length shoulder trap with pad protector, the
                                                                         lintless cloth.
"L" version additionally comes with a sturdy pair of
handles for hand carrying.
                                                                                                    · Take your camera to your service technician for
                                                        checking about once every two years. It will give you
9. Lens Hood
                                                                 better and longer service if you do.
To eliminate any possible ghost and flare caused by
View original page 22Page 23 · Read text
· Guard against dropping your camera on the floor and
do not leave it in direct sunlight.

· Normally, your camera does not need lubricating. It
should never be oiled or taken apart except by a           SPECIFICATIONS
qualified service technician.
                                                                                                    · Classification
· If you are not using your camera for a long interval,         Auto-exposure 35 mm SLR with focal plane shutter.
take it out of its case, remove the battery, and keep it
away from heat, dust, and moisture. The best way to
                                                                                                    · Picture Size 24 x 36 mm
store it is to keep it in a ridded container together with
some desiccant, such as silica gel.
                                                                                                    · Lens X- Fujinon- D M/X-Fujinar-DM
· Keep a note of your camera and lens numbers so that
you can trace them in case they are misplaced or stolen.
                                                                                                    · Lens Mount X-mount (bayonet), 65° turn.


· On hot days, do not leave your camera in your car or in          · Viewfinder Eye-level, pentaprism system.
moist places except temporarily for a very short time.

                                                                                                    · Field of View 92% vertically and horizontally.
· In freezing weather, keep your camera warm by putting
it in its case and carrying it inside your windbreaker, and
taking it out only when you need it.                                             · Magnification 0.86X

                                                                                                    · Information
                                                   Three LED program-mode indicators
                                                                 (P. HP, and DP).

                                                 Warnings
                                                   Camera-shake warning — (LED blinks 2X sec.)
                                                          Situation-beyond-AE-range warning — (LED blinks 8X
                                                                sec.)
View original page 23Related documents and language editions
FujicaPDF
Fujica AX Multiprogram
User manual
57 pages · EnglishRead →
FujicaPDF
Fujica fuji ax multiprogram
User manual
43 pages · German, French, SpanishRead →
FujicaPDF
Fujica AX Multi Program
Illustrated reference
1 pages · Not specifiedRead →
FujicaPDF
Fujica AX Multi Program
Illustrated reference
1 pages · Not specifiedRead →
FujicaPDF
Fujica AX Multi Program
Illustrated reference
1 pages · Not specifiedRead →
FujicaPDF
Fujica AX Multi Program
Illustrated reference
1 pages · Not specifiedRead →
FujicaPDF
Fujica AX Multi Program
Illustrated reference
1 pages · Not specifiedRead →
FujicaPDF
Fujica AX Multi Program
Illustrated reference
1 pages · Not specifiedRead →
FujicaPDF
Fujica AX Multi Program
Illustrated reference
1 pages · Not specifiedRead →
FujicaPDF
Fujica AX Multi Program
Illustrated reference
1 pages · Not specifiedRead →
FujicaPDF
Fujica AX Multi Program
Illustrated reference
1 pages · Not specifiedRead →
FujicaPDF
Fujica AX Multi Program
Illustrated reference
1 pages · Not specifiedRead →
From the M. Butkus archive. Original publisher and archive notices are retained.
Check the model and edition against your equipment.
PDF verified 2026-10-10.