Film cameras
Fujica 35MM CAMERA GUIDE — part 2 Reference guide
Reference guide for Fujica 35MM CAMERA GUIDE — part 2. 57 pages in English. Read the original PDF, download or print a copy without registration.
57 pagesEnglish6.2 MB PDF
Loading your manual…Open PDF directly
Document details
- Brand
- Fujica
- Model / document
- Fujica 35MM CAMERA GUIDE — part 2
- Document type
- Reference guide
- Language
- English
- Pages
- 57
- File size
- 6.2 MB
- Category
- Film cameras
- Document date
- Not specified in catalog
Search available document text
Find a term, then jump to its page in the original PDF. Image-only pages may not be searchable; check the PDF for exact wording and diagrams.
Page 2 · Read text
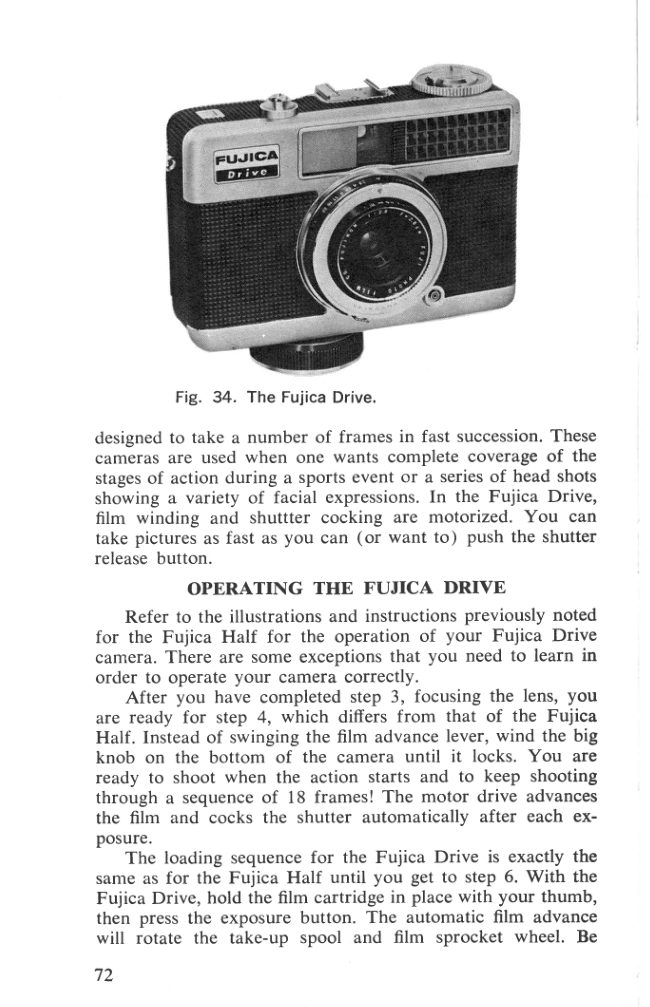
Fig. 34. The Fujica Drrve.

designed to take a number of frames in fast succession. These
cameras are used when one wants complete coverage of the
stagesof action during a sports event or a series of head shots
showing a variety of facial expressions. In the Fujica Drive,
film winding and shuttter cocking are motorized. You  can
take pictures as fast as you can  ( or want to ) push the shutter
release button.
        OPERATING  THE  FUJICA  DRIVE
    Refer to the illustrations and instructions previously noted
for  the Fujica  Half  for  the operation  of your  Fujica  Drive
camera. There are some exceptions that you need to learn in
order to operate your camera correctly.
    After you have completed step 3, focusing the lens, you
are ready for  step 4, which  differs from  that  of the Fujica
Half. Instead of swinging the film advance lever, wind the big
knob on the bottom  of  the camera  until   it  locks. You  are
ready to shoot when the action  starts and to keep shooting
through a sequence of 18 frames ! The motor  drive advances
the film and cocks the shutter automatically  after each ex-
posure.
   The loading sequence for the Fujica Drive  is exactly the
same as for the Fujica Half  until you get to step 6. With  the
Fujica Drive, hold the film cartridge in place with your thumb,
then press the exposure button. The automatic  film advance
will  rotate  the take-up  spool and  film  sprocket wheel. Be
72
View original page 2Page 3 · Read text
sure the film  perforations are engaged in the sprocket teeth
before you close the back. On step 7, press the shutter release          660"until the       appears. Then  wind  the motor  knob  fully.
You are now set to take 18 pictures before having to rewind.
When you reach the last frame, the exposure counter will read
72, 40, or 24, depending on the size cartridge used. You  will
find that you cannot depress the exposure button  all the way.
Check this by  winding  the motor  knob  and pressing the
exposure button again. If the film does not advance, it is your
signal that the end of the roll has been reached. The unload-
ing procedure is the same as for the Fujica Half, except that
you close the camera back as soon as the cartridge has been
lifted out.
                 FUJICA  HALF   1.9
   Newest in the Fujica line of half-frame cameras, the Half
1.9 has a 3 3mm   f /  r .9 Fujinon  lens, which  gives you  the
added advantage of being able to shoot in lower  light  situa-
tions.
                                  -& *rtu's ,e"7


Fig. 35. The new Fujica Half  1.9, improved model of  the
Fujica Half.
                                            (1) 33mm  tll.9  lens
                                                  (2,  Electric eye exposure  control
                                                (3) Viewfinder
                                                (4) Fast focus  lever

                                             73                           www.orphancameras.com
View original page 3Page 4 · Read text
The  loading and unloading procedures are the same as
have been described earlier for the Fujica Half.
   The focusing bar, located on the  left side of the lens, is
coupled  to  its own  indicator  needle, giving you  complete
control through the finder.  It takes but a touch of the finger
to  align  the needle with  the symbol  for  subject-portrait,
group, or scenic view. The great depth of field of the Fujinon
lens assures sharp pictures even if you have had to focus in a
hurry, and not quite as accurately as you should have.
   The Fujica Half  I.9 has a calibrated footage scale right
under the focusing bar, which makes  it possible to focus the
lens from 3 feet to infinity, or to determine the correct distance
for flash shots.
   Your Half 1.9 has match-needle exposure automation with a
selenium cell, and speedsfrom  1/ Sth to  | / 50}th sec. plus "B."
By turning the wheel, conveniently situated under your  right
index finger, you bring the needle within the wide area of the
luminous  frame,  to show  the  correct  exposure. Over- and
underexposure indicators warn when the light is too dim or.too
bright  for  perfect exposure. There  is also an  indicator  for
bracketing exposures  if you  desire. The  shutter speed and
the lens opening are visible at the top of the viewfinder. They
are cross-coupled so they can be changed both with a single
adjustment and without  upsetting the indicated, correct expo-
sure. It  is also possible to set the lens and the shutter speed
separately. The electric eye can be programmed  for any film
throughout an ASA range from 25 to 400.


          Fig. 36. The Fujica Mini.

74
View original page 4Page 5 · Read text
The  Half  1.9 shutter  is automatically  synchronized  for
electronic flash at  all speeds, and  for  Class M  flashbulbs at
1/30th sec. (See Chapter 4, Part  II,  for  further  information
on flash photography.)
   As with the Fujica Half, you obtain twice as many pictures
with the standard 35mm  cartridge-72   from  a 36-exposure
cartridge; 40 from a 20-exposure roll. The automatic resetting
exposure counter  is also the same as the Fujica  Half.
                   FUJICA  MINI
   This  is the world's smallest half-frame  35. Weighing  only
11 ounces, it is an ideal pocket or purse camera. As with the
other half-frame cameras,  it  will  yield twice as many pictures
per 35mm cartridge as a full frame 35mm camera.
              LOADING   THE  MINI
   Following  these simple steps will  enable you  to properly
load your Fujica Mini.
    1. Rotate the grooved button  at the bottom  of the camera
counter clockwise until the red dot aligns with the "O"  (open)
position. The back cover is now unlocked.
    2. Remove the back cover from  the camera body.
    3. Rotate the film take-up spool with your thumb so that
the split metal band  is uppermost.
    4. Swing open the hinged pressure plate.
    5. Insert a roll  of 35mm  film  into the film chamber with
the narrow leader of the film  at the bottom. Push the end of
the film leader as far as it  will go into the split metal band on
the take-up spool. Be sure that the teeth of the sprocket wheel
in the bottom center  fit into the perforations  in the film.
    6. Close the hinged pressure plate and double check that
the sprocket teeth  fit into the perforations  of. the film.
    7. Slide the back cover onto the camera. Lock the back by
rotating the bottom button clockwise to the "L"  (lock)  posi-
tion. Turn the exposure counter wheel (just above) to line up
the first dot to the right  of the "O"  mark  with  the triangular
mark.
             OPERATING   THE  MINI
   Set the ASA  rating  of the film you have just loaded into
the camera by rotating the film speed selector until the short
film speed needle points to the proper "Jewel." There are four
such Jewel markings. The red is for film with an ASA rating of
25, blue for 50, yellow for 100, and green for 200. For films
                          www.orphancameras.com          75
View original page 5Page 6 · Read text
that have a rating in between, set the needle half-way between
the two Jewels. For instance, if your  film has an ASA  rating
of  32, the needle should be set half-way between red and
blue. Don't forget that  if you load the next time with a different
ASA  rating, you must reset the  film speed selector for  that
number.
            THE  MINI  ELECTRIC  EYE
   The meter cell surrounding the 25mm  f /2.8  Fujinar fixed-
focus lens has a match-needle indicator on the camera top.
In use, you aim the camera at the subject and look down at the
top of your Mini.  In the same window  that has the short film
speed needle, you will see a long (electric eye) needle. Rotate
the electric eye bar until you align the long and short needles.
The camera  is now  set  for  the  correct  exposure  for  that
specific picture.
      If  the long needle does not move up  to the short needle
as you move the electric eye bar, there is not enough light  for
an adequate exposure.
             ADVANCING   THE  FILM
   The  Mini  has a unique method  of advancing  film.  Hold
the Mini  up  to your eye with  your  right  forefinger pressed
on the grooved winding wheel on top and your thumb  on
the bottom.  With  your  left  hand, swing the  right  side of
the camera around  in  a quarter  circle. (See Fig.  37.)  A
click  will be heard, which  indicates that the  film has been
auton-ratically transported  and  the  shutter  set for  the  next
picture. With  a  little practice, you should be able to shoot
a whole series of pictures without removing the camera from
shooting position. Double  exposure is prevented, since the
shutter release button cannot be pressed down unless the film
is  fully  advanced. Accidental  exposure  is  also impossible,
because the film can't advance until after you press the expo-
sure button.
       WHEN  THE  LIGHT   IS DIFFICULT
       If you want  to make backlighted  pictures and be assured
of  the correct exposure, rotate the  electric eye bar so the
long needle moves one "Jewel" to the left of the small needle
position.  If  the background  is very dark, rotate the electric
eye bar so the long needle moves one Jewel to the right  of
the small needle position.

76
View original page 6Page 7 · Read text
Fie. 37 . To  advance  the
 film, turn the whole Mini
 clockwise, while  holding
down the winding wheel.


            UNLOADING   THE  MINI
    At  the end of a roll  of  film, the grooved winding wheel
locks so you cannot turn   it. Do  not force  it. This  is your
warning that the entire roll has been exposed. You can antici-
pate the end of the roll, or check  it out, by looking  at the
exposure counter. The number 40 (2O-exposure roll)  or 72
(36-exposureroll)  will indicate that the full number of frames
has been exposed.
   You are now ready to unload the film, but  first  it has to
be rewound into the original cartridge. These are the steps
to follow.
    1. Press the small button in on the bottom of the camera
and hold  it in.
    2. Rotate the notched wheel on the back of the camera
in the direction of the arrow until  all resistance is eliminated.
This means that the film has been rewound into the original
cartridge.
    3. Open the back by turning the grooved button on the
bottom of  the camera counter clockwise until  the red dot
             660"aligns with the      position.
    4. Slide the back  off, take out  the  filrn cartridge, and
return the back. The  film  should be processed as soon as
possible.Tuck  it into the film box for safe keeping.
            CARING  FOR THE  MINI
   Following a few easy rules will keep your Mini  in perfect
working order.  If the camera is not in use, be sure it  is stored
in a cool, dry place-not   in a car's glove compartment  or
similar spot. Keep the camera in  its case to avoid contamina-
tion or damage. Should you accidentally fingermark the view-
finder window  or the glass cover window  that  protects the
electric eye and lens, use either lens tissue or  liquid  lens
cleaner to remove the marks.

                                            77                          www.orphancameras.com
View original page 7Page 9 · Read text
PART  II
BasicInformation
       "for
 Photographers


          www.orphancameras.com
View original page 9Page 10 · Read text
CHAPTER  1
    Techniques  Better                  n t , ,     "for        rnorcgrapns

   Your  Fujica camera gives you almost unlimited  latitude
for  taking  pictures under a great variety  of  conditions. With
it you can produce a chronological  history  of  your  family,
your  friends, your  business or  professional acquaintances.
You can specialize in one subject area or run the gamut from
A  to Z. Perhaps you will want to use your Fujica as a visual
notebook, recording the growth  of a flower garden, the change
of  seasons in  your  community,   or  to  provide  illustrations
for a slide lecture on a companion  hobby:  birding,  butterfly
collecting, rock  studies, and so on. We leave the choice of
subject matter up to you, but we do want  to give you some
pointers  or guides to help you make  the very  best possible
photographs.
                 COMPOSITION
   The arrangement  of the contents of the picture  within  its
physical boundary is called composition. Every time you look
into the viewfinder you are exercising your sense of composi-
tion  by  the very  act  of choosing what  will  or  will  not be
included  in the picture. What takes more practice  is the exer-
cise of conscious judgment  in organizing and simplifying the
picture  contents so the viewer has a clear and effective idea
of what you are telling him through the picture. Every photo-
graph you take should have a reason behind  it:  a statement
of  fact, a story-telling  quality,  a mood  or emotion  revealed,
or a relationship  established. To use composition  effectively,
try  to select and emphasize only the things that help to put
your ideas across, and subdue or eliminate those that distract.
   A strongly composed picture is one with a single dominant
subject or  area  in  the  picture  that  attracts and holds the

80
View original page 10Page 11 · Read text
F i g s . 3 9  a n d 4 0 .  L i n e a n d  p o s i t i o n   i n c o m p o s i t i o n . T h e    l i t t l e
boy  is more  interesting off  to one sde than  he would be  in
the center of the picture. The branches below him suggest he
is on something  high. The boat below  is similarly off-center.
H e r e , c l e a n  l i n e s a n d s i m p l i c i t y a d d   i m p a c t . S i m p l i c i t y , b u t n o t
monotony; the foreground provides good contrast. Cover this
open water with you r ha nd; the photo  is much less interesting.


                         www.orphancameras.com
View original page 11Page 12 · Read text
Figs. 4l  and 42. The background in com position. The dark,
out-of-focus background behind the  cat creates an  unsual
pattern a nd sets the  light  f u r  off .   I n the Venetian scene,
the sharp lines of the buildings draw the eye into the photo.


82
View original page 12
Page 13 · Read text
viewer's attention-the   center of interest There  is a difference
  i   between competing  detail and  supporting  detail. The  sup-
    porting detail  is always relevant and contributory  but does
    not draw  attention away from  the main  subject.
       Experienced photographers try  to compose their pictures
    on the groundglass or  in the viewfinder  exactly as they wish
        it to appear in the finished print or color slide. This  is not al-
    ways possible, but errors can be remedied in the darkroom  by
    cropping  or  eliminating  the  unimportant  and  distracting
     details when making enlargements. Altering  a slide is more
      difficult, but  it can be done by masking or the use of cut-out
    mounts of various size openings.
                       FRAMING
       The technique of framing  is used as a creative tool  of
    composing by many  photographers because  it  isolates the
    center of interest, invites the viewer to look  into the picture,
    and creates a three-dimensional feeling or  illusion  of depth.
    The frame  for  your  subject can be almost any foreground
     object-an   archway  or  doorway,  a  tree branch,  part  of  a
     building, a fence, rocks, and so on. The  important  thing
      is to be sure  that enough  of  the frame  or  foreground   is
     included so  it  is recognizable, and accomplishes the  effect
    you want.
              HORIZONTAL    VS. VERTICAL
       Your 35mm or half-frame  Fujica allows for either a verti-
     cal or horizontal composition. More often than not, the begin-
    ning photographer shoots horizontally because it  is the more
     natural way  to hold  the camera. However,  not  all  subject
     matter lends itself to this treatment. A good many professional
    photographers with long years of training shoot both, just to
    be sure they have the best possible picture. Here are a few
    suggestions that might be helpful  in formulating  your own
    way of "seeing."
        Objects  that  are arranged  horizontally  tend  to evoke a
   mood of  restfulness, peace, or  quiet. They suggest repose:
     the human figure in a reclining position, the long sweep of a
    deserted beach, a majestic mountain view. Vertical composi-
     tions, on the other hand, suggest strength, height, dignity, or
     severity: a tall and stately tree stark against the horizon, the
    columns of a public building, or the spire of a church. After
    you have studied the subject in your viewfinder, lou  will  find
                              www.orphancameras.com           83
ft
View original page 13Page 14 · Read text
Fig. 43. Framing. The feeling of  depth  is accentuated by
throwing the foreground framing object out of focus.

84
View original page 14
Page 15 · Read text
Fig. 44. The frame is the subject. The small part of the boy
only serves to relate the subject, the tuba, to  its use.
                           www.orphancameras.com          85
View original page 15Page 16 · Read text
Fig. 45. A naturally horizontal scene may be made even more
 so by judicious cropping. Don't hesitate to try.

 with experience that you can come rather quickly  to a choice
 between vertical and horizontal format.  Offen, the directional
 lines within  the picture decide this  for  you:  landscap€s, a
 group  of  children  playing, a person resting on the biach-
 all  fit naturally  into the horizontal frame, Just as a standing
 figure, a tall building, or a cluster of treer'rugg.st the vertical
 treatment.

               DEPTH  OF FIELD
   we have explained in part  I, "The Fujica cameras,,, how
 each model should be operated to obtain maximum sharpness
 in  the in-rage. We  also discussed rather  fleetingly the term
 depth ol  field, with  the promise that  it would bi-more   fully
 explained in this chapter. Depth of field, &S we mentioned,  i;
 the zone of acceptable sharpness extending  in  front  of and
 behind the point  of sharpest focus. Controlling  the zone of
sharpness is one of the most important  tools of the creative
photographer.
    There are times when  it is most important  that everything
 in the picture from  front  to back and rid.  to side be in sharp
fssus-a    still life arrangement, a documentary scene, a picnil
group, might- be examples. There will be times, as well, when
you want to limit the zo.ne of sharpnessto the principal object
of interest, as in portraiture.
    FACTORS  CONTROLLING   DEPTH  OF FIELD
   Depth  of field is governed by two factors: camera-to-sub-
ject distance and lens opening.

86
View original page 16Page 17 · Read text
Fig. 46. With verticals also, cropping may accentuate
desiredlines, in thrs case narrowing in on the subject.

                                            87
                         www.orphancameras.com
View original page 17Page 18 · Read text
Rules governing distance are:
      1. The closer the object is to the camera, the narrower
  (shallower)  will  be the zone of sharpness in  front  of and
 behind that object.
      2. The  farther away the object  is from  the camera, the
 wider (deeper)  will be the zone of sharpness in front  of and
 behind the object.
    Rules governing lens opening are:
         l. The wider the lens opening U/stop;,  the narrower the
 zone of sharpness.
     2. The  smaller                          lens aperture  (the more you  stop                       -the
 down), the greater the zone of sharpness.
    The zone of sharpness is usually more than twice as great
 behind the object as in  front  of  it. As the zone of sharf,ness
 is increased, it eventually reaches a point where
 beyond a close distance is in apparent sharp focus "u"tything<eig.  47i.


                                                       f/5.6 fr
                     OF FOCUS
    CAMERA
F
 Fg. 47. Increased depth of  field at reduced apertures.

          GUIDES  TO DBPTH  OF FIELD
   Two  guides to depth  of  field  are available  to you:  the
depth-of-field scale or indicator  (Fig.  IZA)  and the depth-of-
field tables (Fig. 48).
   On Fujica models 35-EE, 35-SE, and 35-ML, the depth-of- _
field indicator  is located opposite the rotating distance scale
on top of the camera. (Minor  differences in the arrangement
of the depth-of-field scale for each model are explained in the
chapter concerning the various cameras.)  Users of  Fujica
models without such a scale can obtain the necessarv informa-
tion from  the depth-of-field  tables. with  your  Fujicarex   II,
depth of  field may be determined by using the depth-of-field
preview button (explained in the chapter on Fujicarex  II)  or
may be read on the table.                                             I

88                                                                                                                !I
                                                                                                                                                                                                                   ii
View original page 18Page 20 · Read text
the respective l/stops. when  the camera is focused on a given
 object or distance, the two lines on either side of the partiiular
 lens opening that is being used will encorupass the actual zone
 of  sharpness for  that  lens  setting. For  example, when  the
 distance is set at 6  ft. and the lens opening  is  f / B, anything
 within  the range of 4  ft. to 10 ft.  will appear sharply focused.
 If the lens opening is stopped down to  f / 16, the depth of field
 will extend from 3 ft. to 2l   ft.
    To use the depth-of-field  table,  find  the  l/stop  you  are
 using in the left-hand column, reading from  top  to bottom.
 Then carry your eye or finger across to the vertical column  of
 figures appearing under each of the distance settings until you
 come to the number of feet that corresponds to the distance
 setting on your camera. You  will  then read two  figures, the
 smaller one being the near limit  of sharpness and the larger
 one being the distant limit  of sharpness. For  instance, using
 the same example we did for the scale, we find that with a leni
 opening of   f /8  (#8  in the vertical column)  and a distance
 of  6  ft.  (6'  in  horizontal  column)  the zone  of  sharpness
 extends from  4.41'  to  9.39'-a    little more  precise, bui  for
 simplification reduce to the 4' to 1O'we used on the camera
 depth-of-field scale. You can regard these distances as approxi-
mate safe limits.  If you keep your main  subject well inside
them,voushouron';K;HffirJ*:     sharpimage.

    Another  aid to the photographer  is zone focusing. News
photographers, who often have to shoot fast action, are very
adept  at  it.  All    it means actually  is that you  prefocus  the
camera on  the  spot where you know  the  action  will  take
place, and click  the shutter as the subject reaches that area.
In order to have the image as sharp as possible, be sure your
depth  of  field  (zone  of  sharp focus)  covers the area you
aimed  at. You might want  to catch some group action about
eight feet away, a sports event from  about 50 feet, or some
street activity from  about 15 feet. By checking the depth-of-
field scale or table, you  will  learn just what the near and far
limits  of sharp focus are at the lens opening you have set on
your camera. (Remember, the more you can stop'the  lens
down, the greater the zone of sharp focus.)  Foi  example:
If you are using a film with an ASA speed that permitJ an
exposure in bright sunlight of  l/  l25th sec. at f /g, you can set
these two values in the windows  for  shutter speed and lens
opening. Then  rotate the focusing knob  until  the figure 20
90
View original page 20Page 21 · Read text
Fig. 49. Here is a dramatic example of selective focus, the
use of a lens' depth of field to obtain better photographs. By
using a wide aperture, the camera can focus only on the tobacco
plant, thereby graying out the background.Were the lens'full
focusing abilities employed, by "stopping down," the in-focus
grass would be obtrusive.
                                                 9 T
                          www.orphancameras.com
View original page 21Page 22 · Read text
appears opposite the distance pointer.  All  objects from  9  ft.
to infinity will then be in focus. By turning the shutter ring to
60 and the lens opening to  f/  ll,  you  will be in sharp focus
from 7  ft.  to  infinity. By using a faster film, you should be
able to set the lens opening at  f /16, which would permit a
depth of field ranging from 4.5 ft. to infinity. In any case the
sharpest point will be the point focused on.
                SELECTIVE  FOCUS
     In contrast to a wide depth of field, a shallow depth of field
can often turn the ordinary  into the extraordinary picture by
forcing the viewer's attention to the dominant, or center-of-
interest, area. In  other words, you record that part  of  the
picture  in  sharp  detail  and  throw  the  rest  out  of  focus
deliberately so the less important details are hazy, muted, soft.
There are three ways you can accomplish this:   I . Focus on
the foreground subject so the background  is an out-of-focus
blur. 2. Focus on the background object, so the foreground
is blurred.3. Focus on an object in the middle ground, which
will mean the foreground and background are out of focus.
That is, the areas will be far out of focus if you also use a wide
lens opening to obtain a shallow depth of  field, or a very
narrow space between in- and out-of-focus.

Fig. 50. Extraneouselements are eliminatedfrom this informal
child portrait by the use of selective focus.


92
View original page 22Page 24 · Read text
across the path of the camera. The ratio is about 5 to 1. Thus,
 a pedestrian moving  directly toward  the camera could be
 photographed at a speed as slow as  | / 30th sec.; a diagonal
 walk would  require    l / 60th sec.; while a walk  acrosi the
 camera path would mean a speed of   | / lzsth sec. (See Table,
 page 93.)  It  is besr, if lighting permits, to shoot any kind of
 action at not less than  | / l25th sec. For active sports, moving
 veh icles, some performers, you should use the fastest shutter
 speed that film and lighting permit.
    Also take  into  consideration that  with many  types of
 action there is a peak, a momentary halt, when a slo*  ihutter
 speed can be used. For instance, if a ball is thrown high in the
 air,  it hovers n'romentarily at the peak of the throw before  it
 begins to come down. Similarly, a dancer moving back and
 forth  has a momentary  stopping  point  before  iltering  the
 direction  of movement. -The trick  is to capture the action at
 these peaks,


Fig. 52. Don't freeze everything.A shutter speed of L / I25 sec.
is fast enough catch the couple but shows the rice in motion.

94
View original page 24Related documents and language editions
From the M. Butkus archive. Original publisher and archive notices are retained.
Check the model and edition against your equipment.
PDF verified 2026-10-10.