Film cameras
Kodak Browne Six-20 Six-16 User manual
User manual for Kodak Browne Six-20 Six-16. 37 pages in English. Read the original PDF, download or print a copy without registration.
37 pagesEnglish3.8 MB PDF
Loading your manual…Open PDF directly
Document details
- Brand
- Kodak
- Model / document
- Kodak Browne Six-20 Six-16
- Document type
- User manual
- Language
- English
- Pages
- 37
- File size
- 3.8 MB
- Category
- Film cameras
- Document date
- Not specified in catalog
Search available document text
Find a term, then jump to its page in the original PDF. Image-only pages may not be searchable; check the PDF for exact wording and diagrams.
Page 1 · Read text
www.butkus.us

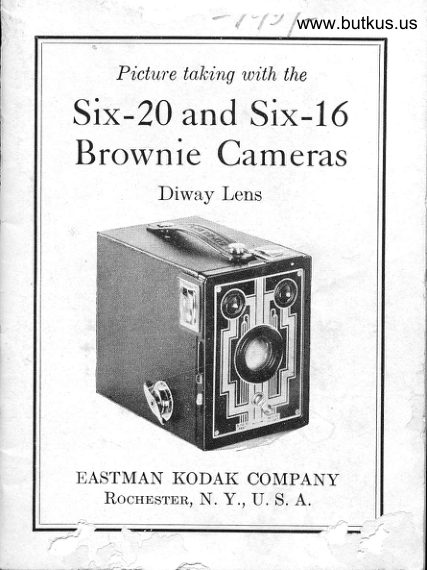
     Picture taking wi,th the
Six-20 and Six-16
Brownie Cameras
       Diway Lens


trASTMAN KODAK COMPANY
    Rocnnsrnn, N. Y., U. S. A.
View original page 1Page 2 · Read text
A PRACTICAL book for amateurs.  lt  fa  describes in a simple, understandable
  way every phase of photography that they
  are likely to be interested in, such as various
  methods of making exposures, developing,
   printing, enlarging, coloring, and other inter-
   esting subjects. Profusely illustrated.
    EASTMAN KODAK COMPANY
  SoId at your dealer's  Rocnnsrnn, N. Y.
ll        a  tL
View original page 2Page 3 · Read text
www.butkus.us

       Picture takin4 wi.th the
 Six-20 and Six-16
 Brownie Cameras
         Diway Lens


               Published by
EASTMAN KODAK COMPANY
      Rocunsrnn, N. Y., U. S. A.
View original page 3Page 4 · Read text
THB CeuBne


Mike
                                      DigitallyDN:ou=Butkus.org,email=mike@butkus.org,Date:cn=Mike2026.04.19signedButkus,by14:43:02Mikeo, Butkusc=US-04'00'Butkus


   A-Catch for locking D-Sli4e controlling     Camera           Stop Openings
   B-Exposure slide
   C-Exposure Lever  G-Lens"t"4liitlfr"""
        H-Lever for Changing Lens
View original page 4Page 5 · Read text
www.butkus.us

        IMPORTA}{T
p EFORE loading your camera with
I-l  film, and before taking any pic-
tures with it, read these instructions
carefully. Take especial care to learn
how to operate the shutter.
  While loading and unloading, be
very careful to keep the protective
paper wound tightly around the film
to prevent light striking it. The camera
can be loaded or unloaded in daylight.
This should be done in a subdued
light, not in direct sunlight.

        To Loen
         Use film number:
  V 620, SS 620, F 620 or 620 for
         the Six-20 Brownie.
  V 616, SS 616, F 616 or 616 for
         the Six-16 Brownie.
View original page 5Page 6 · Read text
!Itr;|!W-

                Draw out
                  the winding
                   key as far as
                                it will come,
                  turning   it
                        slightly.
                  Holding
                  the camer&
                   against the
                       body, pull out
the cateh A and remove the roll holder
I, see illustration.


  There is an empty spool in the re-
cess on the winding side of the roll
holder; this is to be used as the reel.
View original page 6Page 7 · Read text
Venmo @mike-butkus-camera  Ph. 2083
PayPal Name  Lynn@butkus.org      www.PayPal.me/lynnbutkus
View original page 7
Page 8 · Read text
www.butkus.us
  The winding side may always be
distinguished by the round opening in
the roll holder, directly behind the
exposure lever.


  Insert the spool of film in the recess
opposite the winding side, see illus-
tration. The flanges of the spool are
held between the two lugs, roller, and
the tension spring.
  Important: The word ((TOP"
which is printed on the protective
paper near the top of the spool must
View original page 8
Page 9 · Read text
be next to the side of the roll holder,
which has the round opening through
which the key is inserted in the reel.
If the spool of film is inserted the
wrong w&y, the protective paper would
come between the lens and the film,
and no pictures could be made.


  Remove the band that holds the
end of the protective paper, and pass
the paper ouer the rollers and across tfre
opening in the back of the roll holder.
  Thread the paper through the longer
View original page 9
Page 10 · Read text
www.butkus.us
opening of the slit in the reel as far asit will go. Give the spool two or three
forward turns to make the paper hold
securely on the spool.


 Be sure that the paper is started
straight. Do not unroll too much pro-
tective paper or the film will be fogged
and ruined.
  Insert the roll holder in the outside
box, so that the slotted end of the
spool comes next to the winding key.
  Push in the roll holder until the
catch A, see illustration on page 2,
snaps into position.
View original page 10
Page 11 · Read text
Press in and at
                  the same time turn
                   the winding key un-
                         til the web at the
               lower end of the
                 key fits into the slot
                    in the spool end.
                  Turn the key and
  www.butkus.us     watch the red win-
                dow. After a, few
                turns, a  warning
hand will appear;  then turn slowly
until the figure 1 is in the center of
the window.


  Press in the winding key slightly,
when turning  it.
  The film is now in position for the
first picture. After each exposure be
                        8
View original page 11Page 12 · Read text
www.butkus.us
sure to wind the film, bringing the
next number into position. This pre-
vents making two pictures on the
s&me section of film.
  When using Kodak Super Sensitive
Panchromatic or Panatomic Film in
this camera, it is unnecessary to cover
the red window with the adhesive tape
included with the film.
  MAKING THE EXPOSURES
   lNsreNrANpous Exposunps
1-UP Six-20 and Six-16 Brownie I  Cameras are fitted with the Diway
Lens and subjects ten feet and beyond
will be photographed sharply. To pho-
tograph subjects five to ten feet from
the camera, push the lever H (see page
10) in the direction of the arrow as faras it will go, and hold it in this position
while the exposure is made.
  For subjects that are closer to the
camera than about five feet, use the
KodakPortrait Attachment, see page 27.
View original page 12
Page 13 · Read text
The shutter of the camera is released
by pushing the exposure lever C from
one end of slot to the other with the
thumb. Push the lever slowly, in one
direction only, and as far as it wzll go. If.    ttclick"no        isheard, no exposure is made.
  Do not jerk the lever as any move-
ment of the camera, at the instant of
                  exposure, will blur
                  the picture.
               When making in-
                 stantaneous expo-
                   sures or snapshots,
                 the subject should
            be in the broad,
               open sunlight, but
              the camera must
               not. The sun
  B-Exposure Slide    should be behind
               Lever  C-Exposure                your back or over                        Slide  D-Stop Opening  H-Lever for Changing the shoulder. If  it        Lens
  This illustration                  shows  shines directly into
     positionthe                 slide            of              D the lens it will blurwhen      the second                     small                 orstop opening  is in position. and fog the picture.

                          10
View original page 13Page 14 · Read text
www.butkus.us
   Special instructions for making por-
 traits are given on pages 23 to 28.-
   Slide B (see illustration) controls the
shutter for time and instantaneous or
snapshot exposures. For instantaneous
exposures or snapshots this slide must
be pushed all the way in; it must be
drawn out as far as it will come, for
time exposures.
  Slide D  controls the two stop
openings.
       Srop OpBNrNcs
  The stop openings regulate the
amoun-t of light passing through the
lens. When slide D, pag-e 10, is att ttre
way in, the large stop opening is in
p_ositiol. Tlis is the one to use for snap-sl-to!,s of all ordinary subjects. When
slide D is drawn out as fai as it will go,
the small stop opening is in position,
see    pa_ge 10. For ordinary snapshots       -
both the slides B and D, shownln the
illustration on page 10, should be
pushed all the wag in.

                             11
View original page 14Page 15 · Read text
The stop openings (diaphragms)
should be used as follows:
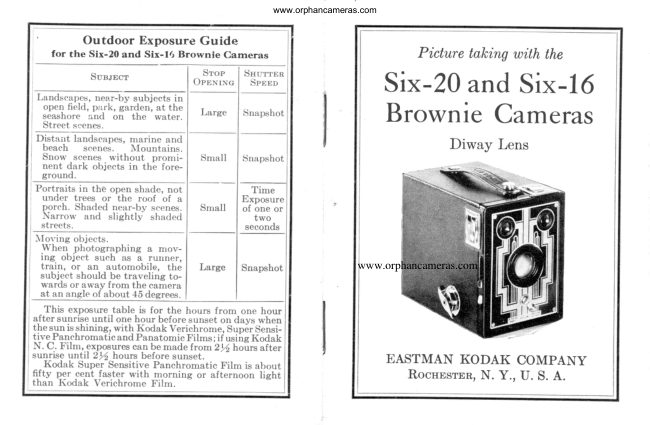
   l. The Large-For snapshots of
all ordinary outdoor subjects such as
landscapes, groups and street scenes,
when the subject is in the bright sun-
Iight; for nearby subjects at the sea-
shore and on the water. For Interior
Time Exposures, the time for which is
given in the table on page 24.
  2. The Small-For instantaneous
or snapshot exposures of extremely
distant views, beach scenes, marines,
snow scenes without prominent dark
objects in the foreground, and clouds
only, in bright sunlight. For Interior
Time Exposures, see table on pages
23 and 24, and for Time Exposures
Outdoors on cloudy days, see page 29.  'When       the small stop opening is
used, nearby objects will be sharper.
  AII the exposures given for outdoor
subjects are for hours from one hour

                          12
View original page 15Page 16 · Read text
www.butkus.us
after sunrise until one hour before sun-
!et, when using Kodak Verichrome,
Super Sensitive Panchromatic or Pana-
tomic Film. If Kodak N. C. Film is used,
exposures can be made from 2f holrs
after sunrise until 21k hours before
sunset. If earlier or later the exposures
must be longer. For a subject in the
shade, under the roof of a porch or
under a tree, a time exposure must
be made, see page 29, and the camera
must be placed on some steady, firm
support-not held in the hands.
       TnB FrNnnRs
  q


           www.butkus.us

        Holdi,ng leuer for changi,ng lens
               i,n positi,on for close-up.
                          13
View original page 16Page 17 · Read text
When making instantaneous exposures or snap-
shots, hold the camera firmly against the body.
When pushing the exposure lever, hold the breath
for the instant. If the carnera is rnoved during the
exposure, the picture will be blurred.

                             74
View original page 17Page 18 · Read text
www.butkus.us
  There are two finders, one for hori-
zontal and the other for vertical pic-
tures. Only what is seen in the finder
will show in the picture.
  For a horizontal picture hold the
camera as shown on page 13.
  For a vertical picture the camera
should be held as in the illustration
below.


  For photographing a subject five to
ten feet from the camera, push the
lever H in the direction of the arrow
as far as it will go and hold it there, as
shown in the illustration on page 13.
  Be sure the lever H is pushed as far
                          15
View original page 18Page 19 · Read text
as it will go and that no part of the
hand comes before the lens opening.
  Point the camera at the subject to
be photographed and looking into the
finder from directly over the center of
it, include what you want and com-
pose the picture by turning to the
right or left, see page 14.
    Marrxc THE ExPoSURE
  Hold the camera steady and level
as shown in the illustration on page 14,
and push the exposure lever once,
as far as it will go. This maltes the
efrposure.
  Important: The exposure lever
must be pushed slowly to avoid jarring
the camera. If the camera is not held
steadily the picture will be blurred.
     Hor,o Caunna Lnvnr,
  The camera must be held level. If
all of the subject cannot be included

                          16
View original page 19Page 20 · Read text
www.butkus.us
     in the finder without tilting the cam-
    era upwards, move backwards until
        is all included with the camera held,     ^tI      leuel.
I


I
          Efect procluced by tilting the camera.
I
        If the subject is below the normal
     height, like a small child or a dog, the
    camera should be held down level with
    the center of the subject.


                                 L7
View original page 20Related documents and language editions
From the M. Butkus archive. Original publisher and archive notices are retained.
Check the model and edition against your equipment.
PDF verified 2026-10-10.