Film cameras
Kodak Brownie Six 20 Six-16 User manual
User manual for Kodak Brownie Six 20 Six-16. 19 pages in English. Read the original PDF, download or print a copy without registration.
19 pagesEnglish1.7 MB PDF
Loading your manual…Open PDF directly
Document details
- Brand
- Kodak
- Model / document
- Kodak Brownie Six 20 Six-16
- Document type
- User manual
- Language
- English
- Pages
- 19
- File size
- 1.7 MB
- Category
- Film cameras
- Document date
- Not specified in catalog
Search available document text
Find a term, then jump to its page in the original PDF. Image-only pages may not be searchable; check the PDF for exact wording and diagrams.
Page 2 · Read text
www.orphancameras.com

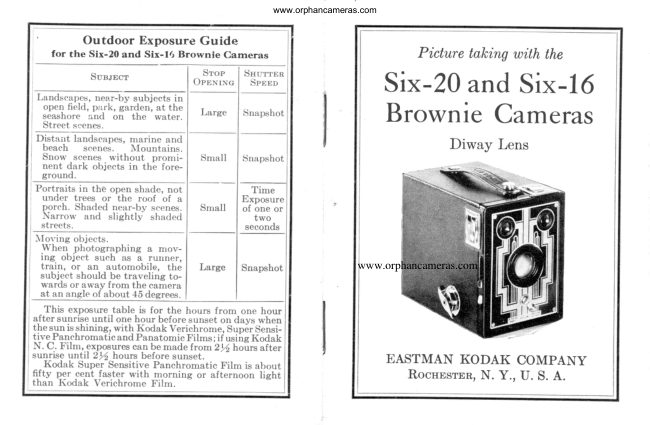
        Outdoor  Exposure Guide
     for the Six-20 and  Six-l/r Brownie  Carneras                       Picture taking uith the
                                     Srop     SHurrBn              Sun.rpct
                               OppNrxc    Spppn                         Six-20and Six-16 Landseapes, near-by  subjeets  in
                  p:lrk,  open  field,                   garden                               &t the                                                      ,                                      Large    Snapshot  seashore            and                 on                         the                              water.   Street scenes.                    Brownie Cameras
 Distarrt        landscapes,                   marine                         and                                  Diway Lens  beaeh          scenes.                    Mountains.
  Snow scenes without  promi-     Small    Snapshot
  nent dark objects in the fore-
  ground.


                                                                                                                                                                                n \ Portraits in the open shade, not                                                         .I rme
  under  trees or  the  roof  of a           Exposure
  porch. Shacled near-by scenes.   Small    of one or
  Narrow  and  slightly  shaded              two
  streets.                                seconds
Moving objects.
 When  photographing  a mov-
  ing  object sueh as a runner,
  train,  or an  automobile,  the    Large   Snapshot             www.orphancameras.com
  subjeet should be traveling  to-
  wards or away from the camera
  at an angle of about 15 degrees.
  This exposure table is for the hours from one hour
after sunrise until one hour before sunset on days when
the sun is shining, with Kodak Verichrome, Sup6r Sensi-
tive Panehromatie and Panatomic Films;  if usiire Kodak
I\T.C.. Film,.ex_posgrescan be made from z% hoilrs after
sunrise          until         2%                hours before                             sunset                                    EASTMAN KODAK COMPAI{Y  Kodak         Super                 Sensitive                        Panehromatic                                         Film  is about
{ftv     per gelt  faster with rn_orning or afternoon  light                 RocHESTER,N. Y.,  If. S. A.than Kodak  Verichrome Film
View original page 2Page 3 · Read text
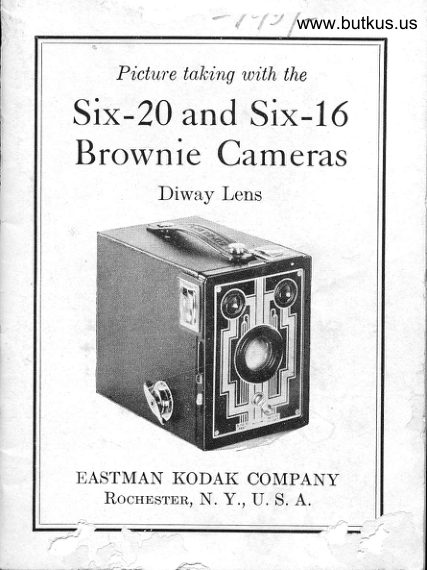
Picture taldng with the
                           -20                         Six   and Six-16
                      BrownieCameras
                                                    Diwav Lens


  A PRACTICAL   book  for  amateurs.   It
  lL   dgssli[ss  in  a  simple, understandable
 way every phase of photography  that  they
  are likely to be interested in, such as various
 methods of making exposures, developing,
  printing, enlarging, coloring, and other inter-
  esting subjects. Profusely illustrated.                                                    .   Published,bE
                              EASTMAN KODAK COMPANY    EASTMAN KODAK COMPANY
  Sold at your dealer's       Rocnnsrpn,   N. Y.               Rocnnsrnn, N.Y., U. S. A.

-a
View original page 3Page 4 · Read text
www.orphancameras.com

        TUB CIUERA                         IMPORTAI{T
                             DEFORE   loading your camerawith
                                               L)   film, and before taking any Pic-
                                             tures with  it, read these instructions
                                                 carefully. Take especial care to learn
                                 how to operate the shutter.
                                          While  loading and unloading, be


                                           This should be done in a subdued
                                                      light, not in direct sunlight.

                                        To Loen
                                        Usefilm number:A-Catch  for locking   D-Slide   controlling
     Camera              Stop Openings       V 620,SS 620,F 620or 620for                     E-Winding  KeyB-Exposure  Slide                                   the Six-20Brownie.                      FF-Finders
C-Exposure Lever    G-Lens               V 616, SS 616,F 616or 616for
       H-Lever   for Changing Lens                     the Six-16Brownie.
View original page 4Page 5 · Read text
Draw  out         The winding side may always be
                     the winding         distinguishedby the round opening in
                     key as far as        the  roll holder, directly behind the
                                        it  will come,       exposurelever.
                     turning     it
                        slightly.
                     Holding
                     the camera
                    against the
                     body, pull out
the catch A and remove the roll holder
I, see illustration.


                                                   Insert the spool of film in the recess
                                           opposite the winding side, see illus-
                                                    tration. The flanges of the spool are
                                           held between the two lugs, roller, and
                                           the tension spring.
                                                                ((TOP"  There is an empty spoolTin the re-          Important:   The  word
cess on the winding side of the  roll                                        which  is  printed on the  protective
holder; this is to be used as the reel.         paper near the top of the spool must
View original page 5Page 6 · Read text
www.orphancameras.com
be next to the side of the roll holder,       opening of the slit in the reel as far as
which has the round opening through                it will go. Give the spool two or three
which the key is inserted in the reel.        forward turns to make the paper hold
If  the spool of  film  is inserted the         securelyon the spool.
wrong w&y, the protective paper would
come between the lens and the film,
and no pictures could be made.


                                    Be sure that the paper is started
                                                   straight. Do not unroll too much pro-
                                                 tective paper or the film will be fogged
                                      and ruined.
                                                   Insert the roll holder in the outside
  Remove the band  that  holds the         box, so that the slotted end of the
end of the protective paper, and pass        spool comes next to the winding key.
the pap er ouer the rollers and across the         Push in the  roll holder until  the
opening in the back of the roll holder.         catch A, see illustration on page 2,
  Thread the paper through the longer        snapsinto position.
View original page 6Page 7 · Read text
Press in and at                                          sure to wind the  film, bringing the
                  the same time turn                                           next number into position. This pre-
                  the winding k"y un-                                           vents making two  pictures on  the
                                 til the web at the                                  same section of film.
                 lower end  of  the                                  When using Kodak Super Sensitive
                key fits into the slot                                        Panchromatic or Panatomic Film  in
                     in the spool end.                                                    this camera, it is unnecessaryto cover
                  Turn the key and                                             the red window with the adhesivetape
                watch the red win-                                            included with the film.
                dow. After  a  few
                    turns,  a  warning        MAKING  THE EXPOSURES
                  then turn  slowlv           INsrexrANEous  ExposuRES
                       is in the center of        tTtHE                                                    Six-20 and Six-16 Brownie
                                                                                 I  Camerasare fitted with the Diway
                                      Lens and subjectsten feet and beyond
                                                          will be photographedsharply. To pho-
                                          tograph subjects five to ten feet from
                                             the camera,push the lever H (seepage
                                           10) in the direction of the arrow as far
                                        as it will go, and hold it in this position
  Press in the winding key  slightly,         while the exposureis made.
when turning  it.                                            For subjects that are closer to the
  The film  is now in position for the        camera than about five feet, use the
first  picture. After each exposure be       Kodak Portrait Attachment,seepage27.
View original page 7Page 8 · Read text
www.orphancameras.com
  The shutter of the camerais released                                             Special instructiorrs for making por-
by pushing the exposurelever C from                                                     traits are given on pages23 to 28.
one end of slot to the other with the                                               Slide B (seeillustration) controls the
thumb. Push the lever slowly, in one                                             shutter for time and instantaneousor
d'irectiononly, and asfar as it will go.If.       snapshotexposures.For instantaneous
no "click" is heard,no exposureis made.       exposuresor snapshotsthis slide must  Do not jerk the lever as any move-                                     be pushed all the way in;  it must be
ment of the camera,htr the instant of                                     drawn out as far as it  will come, for
                 exposure,will blur                                          time exposures.
                  the picture.                                              Slide D  controls the  two  stop              When making in-                                         openings.
                 stantaneous expo-                                              Srop OpBwINGS
                 suresor snapshots,                                     The  stop openings regulate the
                  the subject should                                    amount of light passing through the
               be  in  the broad,             H                            lens. When slide D, page 10, is all the               open sunlight, but                                  way in, the large stop opening is in
                  the camera must                                                position. Th'is is the one to usefor snap-                  not.  The  sun                                           shots ,f  all ord'inary subjects. When
                 should be behind                                                 slide D is drawn out as far as it will go,
  C-Exposure  Lever    your back or over  D-Stop   Opening Slide                           the small stop opening is in position,  H-Lever    for Changing  the shoulder. If   it                                      see page 10. For ordinary snapshots        Lens
   This  illustration                 shows shinesdirectly into        both the slidesB and D, shown in the
the  position  of  slide D  the lens it will blurwhen the second or small                                illustration on page 10, should bestop opening is in position. and fog the picture.                                     pushed all the uay in,.
                     10                                                                              1 1
View original page 8Page 9 · Read text
The  stop openings (diaphragms)         after sunriseuntil one hour beforesun-
should be used as follows:                       set, when using Kodak Verichrome,
                                      SuperSensitivePanchromaticor Pana-  1. The  Large-For   snapshots of
                                          tomic Film. If Kodak N. C. Film is used,all ordinary outdoor subjects such as
                                       exposurescan be made from 2rh hourslandscap€s,groups and street scenes,
                                                  after sunrise until 2% hours beforewhen the subject is in the bright sun-
                                           sunset.If earlier or later the exposureslight; for nearby subjects al the sea-
                                      must be longer. For a subject in theshore and on the water. For Interior                                        shade, under the roof of a porch orTime Exposures,the time for which is
                                        under a tree, a time exposure mustgiven in the table on page 24.                                     be made, seepage 29, and the camera  2. The  Small-For   instantaneous                                      must be placed on some steady, firmor snapshot exposuresof extremely                                           support-not held in the hands.distant views, beach scenes,marines,
snow sceneswithout prominent dark              TsB Fmnpns
objects in the foreground,and clouds
only, in bright sunlight. For Interior                       H
Time Exposures,see table on pages
23 and 24, and for Time Exposures
Outdoorson cloudy days, seepage 29.                             {
  When the  small stop opening is
used, nearby objects will be sharper.
   All the exposuresgiven for outdoor                   Holding leuerfor changing lens
subjects are for hours from one hour                             i,n positi,onfor close-up.
                    12                                                  13
View original page 9Page 10 · Read text
www.orphancameras.com
                                          There are two finders, one for hori-
                                              zontal and the other for vertical pic-
                                                 tures. Only what is seen in the finder
                                                         will show in the picture.
                                           For a horizontal picture hold the
                                     cameraas shown on page 13.
                                           For a vertical picture the camera
                                         should be held as in the illustration
                                         below.


                                           For photographinga subject five to
                                            ten feet from the camera, push the
  When  rnaking  instantaneous  exposures or snap-          lever H  in the direction of the arrow
shots,  hold  the  carnera  firrnly  ap,ainst  the  body.         as far as it will go and hold it there, as
When pushing  the exposure lever, hold  the breath        shown in the illustration on page 13.for the instant.     If the carnera  is rnoved durinp, the
exposure, the picture  will be blurred.                Be sure the lever H is pushed as far
                              l4                                                        15
View original page 10Page 11 · Read text
as it  wil,l go and that no part  of the           in the finder without  tilting  the cam-
hand comes before the lens opening.           era upwards, move backwards  until
  Point the camera al the subject to                  it  is all included with the c&nl,eraheld
be photographed and looking into the           leuel.
finder from directly over the center of        IIit, include what you want and com-
pose the  picture by  turning  to  the
right or left, see page 14.
    Marmc  THE BxposuRE
  Hold the camera steady and level
as shownin the illustration on page 14,
and push the exposure lever once,
as far as it  will go.  Thi,s malres the
erposure.
  Important.'   The exposure lever
must be pushed slowlyto avoid jarring                Efect produced by tilti.ng the camera.
the camera. If the eamerais not held
steadily the picture will be blurred.                                                                           If the subject is below the normal
                                              height, like a small child or a dog, the      Horn  CauBnE LBvBI,                                                  fI   camerashould be held down level with
  The camera must be held level. If         the center of the subject.
all of the subject cannot be included
                      16                                                       1 7
View original page 11Page 12 · Read text
www.orphancameras.com
 TunN A NBw SBcrrox oF Frunr          tive paper and the sticker together to
        INTo Posrrrox                  prevent paper from loosening.If the
                 Press in the wind-         sticker has been wound under the roll,
                 ing key slightly and
                  turn   it  slowly until
               No.  2, or the next
               number, is in the cen-
                   ter of the red window.
  The  warning hand appears only
beforesectionNo. 1.
  Turn the next section of film into
positionimmediatelyafter making each
exposure; this prevents making two
pictures on the same sectionof film.
     RBvrovrNG THE Frlvr
  After  all the exposureshave been        revolve the spool to bring it up. Lift
made, turn the winding key until the        out the roll of exposedfilm, &s shown
end of the protective paper passesthe          in the illustration above.
window. The film is now ready for          Fold under about half-an-inch of the
removal from the camera.                    protective paper, and fasten it  with
  In a subduedlight, open the camera        the sticker.
and remove the roll holder as shown          "Cinch"   Marks:  After removing
on page4. Hold the endsof the protec-        the film from the camera,do not wind
                      18                                                        19
View original page 12Page 13 · Read text
it  tightly  with  a trvisting motion,  or         your  camera should be loaded with
the film may be scratched.                 Kodak  Film.
  Wrap up the exposed film.  It  is now
ready for development. This may be             TrIrB  ExpoSuRES_INDooRS
done by a photo finisher, or by your-                                               For time exposures the eamera mustself. Our Service Department  will be                                           always be placed on a table, chair, orglad to send you, upon request, com-                                               other firm support. The camera mustplete instructions  for developing and                                               not be more than two or three inchesprinting.                                            from the edge, to avoid including part
  Importanzf.'   Film  should be devel-          of the support  in the picture.  I{euer
oped as soon as possible after expo-         hold the camera in the hands.
sure. The quality  of the image on all
sensitized products   is  retained  by
prompt  development  after  exposure.
  Remove the empty spool and place
it  in the recess on the winding side of
the roll holder. The slotted end of the
spool must show through  the round                n
opening in the roll holder.
    It   is a good plan  to  reload  the
camera as soon as an exposed film has          Place the camera in such a position
been removed,  to  be ready  for  the          that  the finder  will  include the view
next  pictures.  For  the  best  results,         desired.  The  diagram  above shows
                                                                          2L
View original page 13Page 14 · Read text
www.orphancameras.com
                                                  to open the shutter; give the properthree positions for  the camera.  It                                             time (using a watch if more than fiveshould not be pointed directly  at' a                                         seeonds),and push the exposureleverwindow, &s the glare of light may blur                               C in the opposite direction or push inthe picture. If  all the windows cannot                                            the slide B, to closethe shutter.be avoided, draw the shadesof those                                           Press in and turn the winding keywithin range of the lens.                                                       until the next number appears in the  Draw out the exposure slide B as                                            center of the red window.far as  it  will come, see illustration
below. When this slide is drawn out,           Bxposure Table  for  Interiors
                and the exposure         The table on page 24 gives suitable
                   lever C is pushed        exposuresrequired for varying condi-
                     to  the  opposite         tions of  light, when using the large
                end of the slot, the         stop opening.When the secondor small
                   shutter opensand         stop is used, give twice the time of the
                 remainsopenuntil           table. The large stop opening gives the
                 the  lever C  is         best averageresults for interiors.
           H pushed again to                                         To MErB A PonrnAIT                          its  original posi-                                      The subject should be seated in a                      tion.                                               chair partly facing the light, with the                 To  make  the
                                       body turned slightly away from, andB-Exposure  Slide      exposure, steady
C-Exposure  Lever                                the face turned towards the camera,                   the camera with
D-Stop  Opening Slide                                         which should be a  little higher than                onehand and pushH-Lever            for Changirrg                                      an ordinary table. The subject should      Lens                   the lever C slowly
                    22
View original page 14Page 16 · Read text
www.orphancameras.com
other high piece of furniture will make          Kodak  Portrait  Attachment
a suitable reflector; it should be at an         The Kodak  Portrait  Attachment
angle and in the position indicated in       makes head and shoulder portraits.
the diagram on page 25.                                    It can also be used for photographing
    If the above suggestionfor lighting         flowers and similar subjetts.
is followed, an exposure of about two
seconds with  the large stop opening          Place the Attachment  in  front  of                                                                                                                                                       iiq.    the lens and compose the picture inwould be sufficient on a bright day.
                                             the finder. The subject must be about   Makin$  Portraits  Outdoors  'When                                                                                            ;     8' lu feet from the lens. A larger image        making  portraits  outdoors,                                       can be obtained by having the camerawith the sun shining brightly, the sub-                                       2 feet 8 inches from the subject, andject should be in the shadowof a build-                                          pushing lever H (page 22) as far as iting or a large tree, but with clear and                                                           will  got holding   it  in  this  positionunobstructed sky overhead.Place the                                              while  the exposure is being made.camera on some steady, firm suPPort,                                      Measure the distance from the lensuse the secondor small stop opening,                                                                                   I    to  the  face. The same exposure isand make a very short time exposureof                                                                                                                                                                                                                                                                                               l    required as without the Attachment.about one or two seconds.By following          t+
this  rule, unpleasant and  distortin-g        Use Kodak Portrait Attachment No.
shadows on the face will be avoided.        I   7A  with  the Six-20 and the Six-16
  When the subject is five to ten feet       Brownie Cameras.
from the camera,the lever H (page 22)                                      The Kodak  Diffusion Portrait  At-must be pushed in the direction of the                                       tachment is a supplementary lens usedarrow as far as it will go.
                      26                                                   27


            I                        .'-'   :  :                       r    r  ni+,iar:            :ii                                                :             ,,        1lg-             .  r,tit.r               '
View original page 16Page 17 · Read text
in the same manner as the regular        TrwrBExposuREs-OuroooRs
Kodak Portrait Attachment. It makes        When the secondor small stop open-
portraits more artistic, due to the soft-         ing is used, the light passing through
ening effect of diffusion.                      the lens is so much reduced that short
                                            time exposuresmay be made outdoors.  Use the  Kodalt, Diffusion  Portrait
Attachment ^l/o. 7A  with  the Six-20          With  Light  Clouds-From  one to
                                             three secondswill be sufficient.and Six-16 Brownie Cameras.
                                            With Heavy Clouds-Four   to eight  "Ar Houn wrrH Youn Kooer"  is a                                      seeondswill be required.book containing many diagrams and                                            With  Sunshine-Time   Exposuresillustrations showing various lighting                                          should not be made.effects. It gives suggestionsfor making
pictures in and around the home.            The cameramust be placed on some
                                            steady, firm support; do not hold it in
  "Ptctunn  Terrwc AT Nrcnrtt  is a,        the hands or the picture will be blurred.
book  that  describes in  detail  the
methods of making pictures by electric
light,  flash-l.ight exposures, campfire         The pictures on page 30 show the
scenes,fireworks, lightning, moonlight          results of using a dirty and a clean lens.
effeets, silhouettes and other novel         Lensesshould be cleanedas follows:
and unusual pictures.                  Remove the four screwsfrom the front
                                               plate and lift  it from the camera; wipe  Thesetwo books are free, and copies
of them will be sent upon request to        both sides of the lens attached to this
                                                plate with Lens Cleaning Paper or aour ServiceDepartment.
                                                                           29                     28

                                                                                                                                                                                                                                                                                       '*..                                               '.  ^;-:    ,   -..r#u-                           ..*dlb**;;:,*,r,,;      L                                           i"tiiiil#,"      ;                       *.g4li':t'   -;,-,-';  ..  '
View original page 17Related documents and language editions
From the M. Butkus archive. Original publisher and archive notices are retained.
Check the model and edition against your equipment.
PDF verified 2026-10-10.