Film cameras
Kodak Retina I User manual
User manual for Kodak Retina I. 15 pages in English. Read the original PDF, download or print a copy without registration.
15 pagesEnglish1.5 MB PDF
Loading your manual…Open PDF directly
Document details
- Brand
- Kodak
- Model / document
- Kodak Retina I
- Document type
- User manual
- Language
- English
- Pages
- 15
- File size
- 1.5 MB
- Category
- Film cameras
- Document date
- Not specified in catalog
Search available document text
Find a term, then jump to its page in the original PDF. Image-only pages may not be searchable; check the PDF for exact wording and diagrams.
Page 3 · Read text
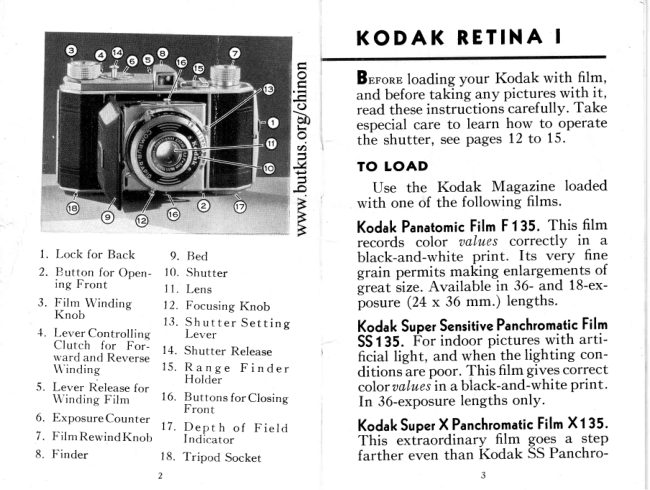
matic Film. In spite of its great speed,           Insert the end of the film in a slot of
 Super. X does not show any increase        the reel, seeillustration . Do not attempt
 in grain size. In 36- and 18-exposure         to removetlt,ereel from th'ecamera.
 lengths.                                                    The lever 4,
                                                                       c o n t r o l l i n gKodachrorneFilm K135 or K135A.                                                                      the clutch for For color film positives, use the K 135                                                           winding for- for  daylight, and  the K 135A  for                                                                 ward, must be Photoflood or Photoflash light. Both                                                                               at  the  letter in  1S-exposure lengths  only.  The                                   "A."                                                                 Turn theKodachrome Film must be returned                                                                                 film  windingto  an Eastman  Kodak  Laborator\z                                                            knob 3, in thefor processing.                                                                   direction  of
  Load and unload your camera in          the arrow, to bind the film on the reel
subdued light, never in  direct sun-           until the full width of film just emerges
light or in exceptionally strong artifi-         from the magazine. See illustration on
cial  light. The magazine should not        page 6 " Be sure that the film will ride
be allowed to remain unprotected in
the light ; any slight light-leak through
the slot will fog the film.
   Lift  the lock  I, page 2, and open
the back of the Kodak. Draw out the
film rewind knob 7, page 5, as far as it
will come and insert the Kodak Maga-          properly in the path provided for  it.
zine in the recess opposite the  reel,        Should the  film winding knob 3 be
with the end in which a crosspieceis          locked, push the lever release 5 to the
seen, towards the rewind knob. Push         opposite end of the slot. This release
in the rewind knob as far as it will go.            will automatically return to its original
View original page 3Page 5 · Read text
Before  making  a  horizontal   expo-
                                                    sure, when  using  the  focusing  scale
                                          marked  in red,  tilt  the Kodak  a  trifle
                                                          to see if  it  is correctlv  focused.
                              KODAK POCKETRANGE FINDER


                                       To  be sure of  obtaining  sharply
                                          focused pictures, a Kodak  Pocket
                                    Range Finder is recommended, which
                                        can be attached to
                                                                                    t h e    t o p  o f    t h e
                                     Kodak  Retina by
                                                  sliding  the  roundFOCUSINGTHE KODAK                                       end of the Range
  To focus the Kodak move the focus-        Finder between the   knob 12 until the figure represent-irg                                          two grooves of theirg- the distance between the^subject
and camera comes to the focusing iit e
     see page 13. The focusing collar!21,.,
is engraved for the followirg distances:
3 . 5 ,1 , 5 , 6 , 8 , 1 0 , 1 2 , 1 5 , 2 5a,n d 5 0 f e e t ,
and Inf . (infinity).
View original page 5Page 8 · Read text
1/50 and l/100.  Intermediate expo-         release 14, page 2, or the release D,
sures cannot be made between 1/100        page 13, pressed down; the shutter
and  11250 or between l/250  and         remains open as long as the release is
1/500 second.                               held down.
  Revolve the knurled collar G on the            Automatic  exposures of 1 second,
front  of the shutter  until  the figure             l/2,  t/5, or lll0  secondmust not be
representing the time of exposure de-        made with  the camera held  in  the
sired is at white pointer A, Page 13.                      Iil    hands; a tripod or other firm suPPort                                         must be used for  exposures slower  Before an exposure from 1 to 1/500              I
second can be made, the shutter must          than l/25 second.
                                                 lmportant:  Neaero'il the shulter.be set by pressing the lever 13 towards                     {I{
the top of the shutter. The exposure is                                STOP OPENINGSthen made by  pressing the shutter
release 14, page 2, or the release D,            Stop openings regulate the amount
page 13. It  is not advisable to change           of  light  passing through  the  lens.
the speed of the shutter from I/250 to         These openings are enlarged or  re-
1/500 or vice versa after the shutter has         duced by moving  the  lever B, see                   "Bulb"beenset. Time and       Exposures        page 13. Lever B moves pointer C.
do not require setting the shutter.             A  knowledge of  the comparative
  To make a Time  Exposure, the          values of the stop openings is neces-       "T"letter           engraved on the shutter          I    sary for correctly timing exposures.
must be at the white pointer A and                 l,     The stop openingsare marked/.3.5,
the shutter release14 (or the releaseD)           I    4.5, 5.6, 8, 11, and 16.
pressedtwice, once to open the shutter,     J     The largest stop opening is /.3.5.and again to close it.                           This  opening  allows  approximately
       "Bulb"              Exposures, the letter            sixty per cent more light to enter than  For"8"     engraved on the shutter must be            f.4.5. and about two and a half times
at the white pointer A and the shutter        more than /.5.6. From J.5.6 to J.l6

                                                                                                                                                                                                                                                                           t . )
View original page 8Page 9 · Read text
each smaller opening (larger number)       DEPTH OF FIELD
admits half the light of the preceding           Deoth of field is the distance from
 larger stop  opening. Thus,   if  the           the nearest to the farthest objects that
correct exposure is  1i 100 second at                rvill appear sharp in the negative or
J.5.6, then  the  exposure for  /.3.5             print.  It depends upon the distance
should be i1250 second;for/.8, 1/50         between subject and lens, the focal
second; for,f-.1i, 11/25second; and for           length of the lens, and the size of the
J .16, 1/ 10 second.                           stop opening used; the smaller the
                                               stop opening the greater the range of  The exposure for the average out-                                           snarpness.door subject, when the sun is shining,
is /.5.6 and 1/100 second. If the day       DEPTHOF FIELD INDICATOR
is hazy or  slightly cloudy, use the           The Depth  of Field Indicator, en-
largest opening, that   is, /.3.5 and          graved on the disk 17, page 2, is a
1/100 second. If  the day  is excep-          help  in  obtaining correctly focused
tionally brilliant, use the next smaller           oictures.-
stop to /.5.6, that  is, /.8 and 1,/100             After adjusting the focus of the lens
second. The imporlant thi,ng to remem-            for a certain number of feet, turn the
ber is the averageexposureof f .5.6 and           outer rins of the indicator until the
1/100 second.When the light condi-         number for which the lens is focused
tions differ from the average, change                                     i s  a f    f h e   nt  ' o. - i"n.  't _p' r
the aperture, keeping in mind  the          II      Example 1: To findbasicexposure/.5.6and 1/100 second.          the depth when  the
See the exposure guide on the back           lens is focused for five
cover. (For Kodachrome Film follou'            feet, turn  the outer
the guide included with the film.)                ring of the indicator
                                            u n t i l  5   i s a t   t h e
  The smaller the stop opening the           pointer; we now can
greater is the range of sharpness.                            r e a d     t h e     r a n g e   o f     E x a n p l e1
                                                                                                                                                         t 7
View original page 9Page 10 · Read text
sharpness which will be obtained with        HOLD KODAK STEADY
                                                                                                                 e4      When making instantaneous expo-the various stop openings. With  f .lI                                                                                                                                                                                                        t-(Eo                                                                       :     sures or snapshots, hold the Kodakeverything from about 4 feet to almost                     . t ll                                                                                                                                                                                             -                                                                                                                                                       Fl        firmly against the face, see page 8; and7 feet will be sharp.
                                                                               F<o     when pressing the shutter release 14,
  Example 2: When the lens is focused    b0     page 2, or the releaseD, p"ge 13, hold
                   for ten feet, turn the              t-io      the breath for the instant. If the Kodak
                outer ring of the  in-      a         is moved during the exposure,the pic-
                 dicator until 10 is at          t-,-v+-)       ture will be blurred
                the pointer; we then                                                                                   J,o        The Kodak should be held level if  it                  find  that  with  f .5.6,                            !' a  l        is desired to have the vertical lines of
                objects as near as 8       K       the subject parallel with the sides of
                  feet and as distant as            the  picture.  lJnusual effects can be
               about 13 feet will be           obtained by tilting the Kodak.
    Example2    sharp ;with/. 16 every-
thing from a little less than 6 feet to        CLOSING THE KODAK
about 50 feet will be sharP.                     Before  closing  the  Kodak,   f,rst
                                       make sure  'it  'is f ocused f orinf,n'ity.  When the subject is 3% feet from                                         The Kodak cannot be closed when thethe camera, the dePth of  field indi-                                                   shutter  is set. To  close the Kodak,cator shows the range of sharpness to                                              press the two buttons 16, P29e 2, andthe rear only, with  the various stop                                                   raise the bed 9.openings.
  With the Kodak focused at 3% feet,        REMOVING THE FILM
the range of sharpness when using               After the thirty-sixth  exposure has
f .3.5 is 3 feet 4 inches to 3 feet 9 inches;          been made (eighteenth exposure with
with  f .5.6, the depth is 3 f eet 2 inches          an lS-exposure magazine), push the
to 3 feet 10 inches; and at  f .ll,  the            lever"R."4, page 5, controlling the clutch,range is 3 feet to 4 feet 4 inches.                 to      The film should now be re-
                         1 8                                                         19
View original page 10Page 11 · Read text
ryould into the magazineby rurning       KODAK RETINA I FILTERS
 the film rewind knob 7, page S, in thi                                             There are four filters obtainable for direction of the arrow. Rer.indins the                                                 the Kodak  Retina   I  for  black-and-
 film after the  thirty-sixth eroosure'1S-ex-           u'hite  pictures: N-1  Light  Yellow, (eighteenthexposure u ith an                                          N-2 Medium Yellow, N-3 Green, and posule  magazine)   r,vill prevent  any                                           N-4 Orange. These filters are screwed possibility of the film winding too far                                                       into  the  inside  flange  of  the  lensand tearingloosef rom the supplyspool                                            mount. The factors for Kodak Super
  When  rervinding the film  with  re-           Sensitive Panchromatic, Kodak Super
rvind knob 7, page 5, the hlm rvindinq        X  Panchromatic, and Kodak Pana-
knob 3 will turn. \\'hen the 6tm wind-          tomic Films are:
ing knob 3 stops turning,  give a ferv
more turns to the rer,vindknob 7. The                     Retina  I Filter    Daylight     Tungsten                                       N - 1      1 . 5      1 . 5film is now rervound into the magazrne.                                             N-2      2.A      1.5The magazine should be replacedin                                             N-3      2.5      1.5the aluminum tube, in u-hichit wa,                                              N-4       .1.0originally packed, immediately after
removal from  the Kodak,  to avoid           By a filter factor is meant the num-
light leaking into the slot.                     ber  of times the exposure must be
  lmportant:  Film should be devel-          increasedwhen using a filter.
oped as soon as possible after expo-                                         The  N-1   filter  is recommendedsure. The quality of the image on-all                                             rvhen only a partial correction of color.;ensitized products  is  retained bv
prompt developmeni aiter "*poru.e.           values in a black-and-white negative                                                               is desired; the N-2 filter gives a better
    it   is a good plan  to  reload the            color correction; and the N-3, a full
camera as soon as an exposed film has            correction with daylight. Write to the
been removed. to be ieady  for the           Service Department, Eastman Kodakne\t  plctures.                                      Company, Rochester, N.  Y.,  for a
View original page 11Page 12 · Read text
"Color                                    Filters           Screw the Attachment  into the lens free copy of the booklet
and Kodak Films."                          mount. When  making  a  horizontal
  The N-4  filter should be used only            picture, center the subject in the fin4er;
                                                          When                                                                              tp  sli'ghtly.                                                   camera                                                          the                                              then tilt for     cutting          ha?e when making a dis-                                      o-e                                                                                       finder                                                                             the                                                              exposure,                                                   a                                                                  vertical                                          making     landscaoe. tant
  Use the Xo. tZ Kodachrome Filters   H       should not be used, as the short dis-
 with Kodachrome Film, see directions          tances at which the subject must be                                                                                           a/.      from the shutter make it necessary to included with  the lilm.                       .Y
  TheNo.17 Kodak Skv Filter. Diffu-    P        center the subject by eye instead of
 sion Portrait Attachment, and  Pic-          bv the finder. This is done by sighting torial Diffusion Disk can be used with   ts     over the top of the camera, the eYe
 the Kodak Retina  I.                          being very close to the camera.                                              Fv                                         The subject must be at one of theKODAK RETINA I PORTRAIT                                               distances from  the Kodak  given  inATTACHMENTS A, B, AND C                                                 the tables on pages 24 and 25, depend-
  While  this Kodak can be focused           ing upon which Attachment  is used.
 for subjects as close as 3)4 feet, per-         Measure the distance carefuily from
mitting  the  obtaining  of head and                                                 the shutter to the face, and turn the
shoulder portraits.   it can be focused          focusing knob 12, page 13, until the
for much- closer distances when the            correct figure is at the focusing line
Kodak Retina  I Portrait Attachments                                           12A, page 13, according to the table.
are used.                                          The same exposure is required as  By  using  the  Kodak  Retina    I                                                 without  the Attachment. Portrait Attachments, large images of                            "stillflowers and similar                                  life" subjects           The fronts of the Kodak  Retina  I
can be obtained. For the best results             Portrait   Attachment   Mounts   are
when making pictures of subjects at           threaded so that a color filter can be
short distances, it  is advisable to use          screwed into the front of the Attach-
f .8 or a smaller opening.                     ment.
                   22
View original page 12Page 15 · Read text
OUTDOOR EXPOSUREGUIDE

                               Srop     I SHU'f'r'r,iR
             Surlncr               OpBNrNr;   SpBRo

 Near-by  landscapes  with   little  or
   no  sky.            Near-by                        subjects                                          in    f.s.6    r/1oo                 park   open             field,                           or  garden.
   Street  scenes.
 Ordina.ry   landscapes   with   sk1,,
   and  a  principal   ohject   in  the     ./.u     t/roo
   roregrouno.
 Marine  and  beach  scenes.  Ex-
    trerrrely   distant   landscapes.   i   f.rr      |/10o
    llountains.  Snow scenes with-                                             -   out        prorninent  dark  objects  in     It|                                         /.8            t /zstt   the foresround.
 Portraits  in  the open shade,  not   under   trees  or  the  rool   c.f a   Ili  f.3.s    r/roo
--,qsts\-q!eg9q"9er!8s9ry..
Narrow          and    slightly   shaded   I                                                                          l. -i.5     r/r0o    sr reet s.
 lvloving  objects:  When   photo-
   graphing             a rnoving                         object,                            such                         | /zso   ar^      a runner,                    train,                          or an auto-
   rnobiie,  the  subject  should  be     J..r.J      or
   traveling  towards  or away   f rol  r
   the camera  at an angle of about
   45 degrees.

   Expostrres   are  for  t.he hours   froru  one  hour   after
sunrise  until  one hour  before  sunset  on days  rn'hen the
sun is shirring.     If pictrrres are nrade earlier  or iater,  or
 rf  it  is a slishtly  cloudy   or hazy  day,  use a larger  stop
 lpening.  The above exposure  table  is for use witb  Kodak
 .l'anatomic  iTihn. Koda.k Super X  Panchrornatic   Film
iri twice  as fast as Kodak   Panaton-ric  Film  by daylight,
 if  the  films   zLre developed    in  Developer    D-''a.  F or
 Iiodachrome    F'ilrn,  follow  the  exposure  guide  suppiied
rvith  the  film;  do not  use the above  griide.
   Kodak   Super  X  Panchromatic     l.-ilm  is about    fifty
 iiej  cent  faster  than  Kodak  Super  Sensitive  Panchro-
rrreric Filrn.
View original page 15Related documents and language editions
From the M. Butkus archive. Original publisher and archive notices are retained.
Check the model and edition against your equipment.
PDF verified 2026-10-10.