Film cameras
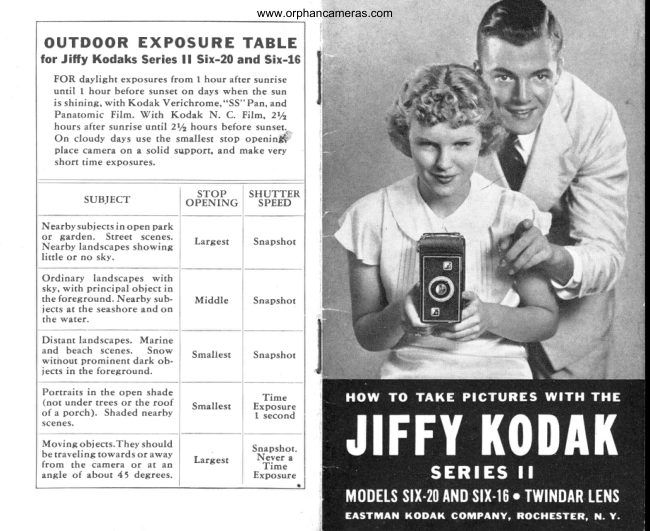
Kodak Jiffy Series II User manual
User manual for Kodak Jiffy Series II. 26 pages in English. Read the original PDF, download or print a copy without registration.
26 pagesEnglish3.0 MB PDF

Loading your manual…Open PDF directly
Document details
- Brand
- Kodak
- Model / document
- Kodak Jiffy Series II
- Document type
- User manual
- Language
- English
- Pages
- 26
- File size
- 3.0 MB
- Category
- Film cameras
- Document date
- Not specified in catalog
Search available document text
Find a term, then jump to its page in the original PDF. Image-only pages may not be searchable; check the PDF for exact wording and diagrams.
Page 4 · Read text
*:J,Th,'L1il/5::HifK ;,?',Ai:;1"",']#i:
    Jitry picture made with Kodak Verichrome Film.
  wlTH  the Jitry Kodak Series II  it  is easy to
  rnake clear, sharp pictures, right  from  the
   start, outdoors or indoors) in the daytime
   or at night. You need only become famlliar
   with  the few workin g parts of the camera
   and observe the simple suggestions on the
  pages that follow.

KODAK WITH KODAK  Fl LM  (See Page 20)
View original page 4Page 5 · Read text
This  extension should  be used when
making   horizontal   time  exposures,
see illustration   at right.  (No  €Xt€o.
sion  needed on  Six- t 6 Model.)


              4
                     www.orphancameras.com
View original page 5Page 6 · Read text
The JIFFY KODAK SERIES ll
Simplicity   ls  lts Keynote Throughout

A CLOSE-UP  of the Jitry Kodak  Series II.
Its simple working   parts  are labeled  for
your  convenience . Locate  them  on  your
own  camera as you'     identifv  them  in  the
illustration  .
1. Lock for Back. Fastensthe backof the c^mera.
To openthe back,movethe slideto "OPEN."
2. Camera Standard. Holds the cameralevel when
set on a table. Folds back when not in use.
3. Twindar  Lens. Adjustable for takine pictures of
subjects "5 to 10 Feet" from the cameta or "Beyond
10 Feet."
4.  Finders  for locating subjectsto be photographed
vertically or horizont ally.
5. Button for opening front of camera.When pressed,
camerafront "pops" out to proper position.
9.  Vinding   l(nob  for turning a new section of film
into position after each picture.
7.  Indicator  Lever. Set at "I"  to take snapshots.
Set at "T"  to take time exposures.
8. Exposure Lever. Pressdown asfar as it will go-
once fot a snapshot; twice for a time exposure.
9. Diaphragm   Slide. Has three sizes of lens open-
ings through which light is allowed to enter the cam-
era. It is pulled out to bring the two
smaller size openings into  position.
10. Metal  Cover  for red window
on back of camerathrough which pic-
trlre numbers are visible.
View original page 6
Page 7 · Read text
HOW TO LOAD
the J I FFY KODAK SERI ES  I I


                      www.orphancameras.com
View original page 7Page 8 · Read text
The  word  TOP
                       on the papet rnusr
                      be on the side op-
                          posite the wind-
                              irg knob.
                         Thread the pa-
                         per through  the
                         longer slit in the
                    empy  reel as far
                        a s    i t w i l l   g o
                         (Figure  3).
                         Turn the wind-
                                 itg knob once or
                         twice to bind the
                       paper on the reel
                       (Figure  4). Be
                        sure the paper is
                          started straight.
                         Close the back
                     and rnove slide
                       under the handle
                         to "LOCK."
  Push the round metal slide that covers
the red window on the back of the camera
to one side and rurn the windirg  knob until
a srnall hand W    appearsin rhe cenrer of
the window.  Then rurn the knob slowly
until  the  figure one  ( 1) appears in  the
window.
  After each picrure, rurn the knob until a
new number appears in the red window.
View original page 8Page 9 · Read text
How to take SNAPSHOTS with
the JIFFY KODAK SERIES  ll
TO take snapshots with  the Jitry Kodak
SeriesII no special knowledge of photog-
nphy  is necessafY . Observe these simple
rules and you'll get good pictures frorn the
s taf t.

1. When  ready to take a snapshot, press tbe but-
ton on the side of the cameta,  and  the  carrl'era
front   will  automatically   "pop"   out  to the cor-
rect  picture-taking   position.
2.  Set tbe indicator   leuer on  top  of  the  camera
front  at position   "I."
3 . Reaolae the lens so the white  dot on the flange
is at the arrow  marked  "Beyond  1O Feetr" ot  at
the arrow  marked   " 5 to  10 Feetr" depending
upon  the distance between camera and subject.
4. See tbat  tbe sun is bebind  your  back  or  over
your  right  or  left shoulder.  Do  not  let the sun
shine directly  into  the lens.
5. Be sure your  subject  is in tbe open sunligbt,

How  to hold the Jiffy to      How  to hold  the Jiffy to
take  a  vertical  picture.        take a hofizontal  picture.


                      www.orphancameras.com
View original page 9Page 10 · Read text
6. For a snapsbot of a nearby sub-
ject  in the open,  or  a nearby
 landscape showing   little  or no
 sky, use the largest lens open-
 itg,   utitb  tbe  diapbragm    slide
pusbed in  as  far as  it  will   go.
   For an ordinary  landscape  in
which  sky shows, with  a prin-
 cipal object  in the foreground,
use the middle  lens opening.
Pull  tbe diapbragm   slide balfutay
out, until the middle  lens open-
ing  is centered  in  front  of the
lens, where   it  will  catch.
   For distant  landscapes, marine
or  beach scenes, or  for snow
scenes without  dark  obiects  in
foreground,   use  the  smallest
lens  opening.   Pull   the  dia-
phragm  slide out as far  as  it  ur;ll
go, where  it  will  catch.
7 . Locate tbe object or scene you wish  to photo-
graph   in eitber  tbe uertical  or horizontalfi.nder.
Be sure to hold the camera level.
8. Hold tbe cantera steady, and press tbe exposure
leuer downward  once, as far as it will  go. Do not
jerk the leuefr' press  it slouly.
9. After  eacb picture,  push  the metal  slide  on
the back of the camera  in the direction  of the
arrot'  and  turn  the uinding  knob until  a new
nuniber appears in the red window.
 1O. Keep tbe lens clean and  occasionally  wipe
out the inside of the camera.
 I 1.  If the subiect is below normal  height,  like
a child  or  a dog,  the Kodak  should  be held
down  level with  the center of the subiect.
                  9
View original page 10Page 11 · Read text
HOW TO UNLOAD
the J I FFY KODAK SERI ES  I t
TO unload the Jitry Kodak SeriesII  after
 the last picture on a roll  of film has been
rn_ade,turn the winding  knob until  the end
 of the paper on the roll passes the red win-
dow on the back of the camera.
   In  a subdued  light,  open the back  of
 the camera. Hold  the end of the paper tavt
 and turn the knob  until  all the plper  is on
the roll (Figure  1).  If the sticker folds un-
der the roll,_ rurn the knob  to bring  it up.
  Take hold  of the end of the protective
papet            sticker ro prevenr the paper from      ?nd
loosenirg. Draw our the winding Lnob and
remove  the  film  (Figure  2).  Fold  under
about one-half inch of the prorective paper,
and fasten it with  the sticker.
  The film  is now  rcady for developrnenr,
which  should be done as soon as possible.
You may have the work  done by ^ photo-
finishe r,  or you may do   it  yoorrelf.  Our


                     www.orphancameras.com
View original page 11Page 12 · Read text
Service Departrnenr  will  be glad ro send
you, upon request, cornplete instructions
for developing and printing.
  Remove the ernpty spool in the catnera
by pushing one end of the spool ro one
side, zt the sarne tirne pressing back the
spring on the opposite end of the spool
(Figure 3).
  Place the spool in the windirg end of the
camera (Figure  4). The Jltry is-then ready
for reloadirg. Load with Kodak Filrn-the
filrn that cornes in the famrhar yellow  box.
Keep a roll  in the came'ra and it  will  be
ready at  aII tirnes to  take pictures. (See
Page 20, "What   Filrn To  Use  in  Jitry
Kodak SeriesII and Why.")

  IMPORTANT:    After removing  the film
   from  the l(odak,  do nor wind  the film
   tightly with a twisting motion, or  it may
  become scratched.

               11
View original page 12Page 13 · Read text
DAYTIME PORTRAITS INDOORS
With J I FFY KODAK SER I ES  I I
TO make an indoor   poftrait  by  ordinary
daylight,  simrlar  to that shown here, have
the subject stand or be seated in front of an
unshaded window,  with  the body  prefer-
ably at a diagonal  to the camera.
  Place a reflector (a sheet or table-cloth
thrown  over a screen or  chat   will  do) a
few feet from  the sub lect and at the angle


                    Set the indicator lever
                 on  top  of  the  camera
                     front  at  "T.  " The  dia-
               phragm  slide should be
                        aII  the  way   in;   this
                   brings   ,!.   largest. lens
                 openlng lnto poslrlon.
                    Place  the  camera  in
                     either a vertical  or hori-
                    z o n t a l  p o s i t i o n  o n a
                    solid  support  a   little
                    higher  than an ord rnarv
                      table. The camera musr
                   not be rnore than two or
                   three  inches  frorn  the
                edge of the support.
                    Locate  the sub lect in
                T 2
                      www.orphancameras.com
View original page 13Page 14 · Read text
the finder. Turn the lens so that the white
dot is at the arrow marked "5 to 10 Feet,"                                                                  ' 'Beyond                           'or at the arrow marked         10 Feet,'
dependirg upon the distance between the
subject and the camera.


    If  in doubt  as to  the proper exposure,
take two  pictures  of  the  sarne subigct,                                     ,
allowing  twice as long an exposure time
for the second picture as for the first.

Time Exposure
PORTRAITS OUTDOORS
CLOSE-UP  time  exposures can be made
outdoors with  the sun shining brigh dy, by
placing the  subiect  in  the shadow  of a
building  or  a large  tree, but  with   clear
and  unobstructed   sky  overhead.  This
avoids unpleasant shadows on  the  face.


one to two seconds for the exposure.
               L1
View original page 14Page 15 · Read text
R O O M  I N T E R I O R S
by DAYLIGHT

TO make a picture  of a room  interior  by
dayltght,  set the indicator  lever on top of
the  camera front  at  "T r"  and  pull  the
diaphr agm  slide  half  way  out  until    it
catches to bring  the middle  lens opening
into position.
  Place the camera on a solid support  in
either  a  vertrcal  or  hortzontal   position,
and compose your  subiect in the finder to
include more of the floor of the room  than
of the ceiling.
  So far as possible, leave the furniture  in
the room  in  its usual  place, but be sure
there are no pieces close to the camera lens.
  Turn  the lens until  the white  dot  is at                                                           ' '5                                         'the  arrow  marked       to  10  Feet,'   or
at the  arrow marked "Beyond  10 Feet, "
dependirg  upon the average distance the
objects are from  the camera.


                       www.orphancameras.com
View original page 15Page 16 · Read text
tI3
 l
 Fg          EXPOSURE GUIDE
        Openins                    or                        "Stop."E,       For  Daylight   Interiors  Using  the Middle  Lens        With                largest                      lens                         opening  gjve one-half the time;
         with the smallest opening,  double the time.

                                 Bright   I Hazv  lC      CIoudy
                           sun    I  sun  lbrightl   dull
      rU(hite walls and more     4 l 1 0 l z o                4 0
      than one window.           s e c s . l s e c s . l s e c s .      secs.
      Vhite  walls and only     6              3 0       1rrt   one window.              secs.            secs.    min.
     Medium-colored  walls                                  1     and  furnishings   and     8     2 0     40      min.
     morethan one window.    secs.   secs.   secs.     2 0
                                                                secs.
      M"dt"*."1"r"d      *"11.
     and  furnishings   and         30              I       2
      only one window.               secs.   min.    mins.

     Dark.colored                      walls                               2 0     40    mrn.1 t ?I mrns.     and  furnishings                      and
     more than onewindow.     secs.   secs.    2 0 1 4 0                                                      secs.    I  secs.
     Dar k -c olo red  w a l l s             1     and  furnishings   and    40     min.    -irr.   | ,.,ir,..
      only one window.        secs.    2 0     4 0 l z o
                                       secs.   secs.    I  secs.
    These _exposures are for rooms where windows  set the
     direct light from  the sky and for hours from  three hours
     after sunrise  until  three hours  before sunset.  If  earlier
     or later the exposures must be longer.
    When  ready'to  take the picture, sready
    the cameta and press the exposure  lever
   o.ncet9 opel  the shutter. When the proper
    time has elapsed (see Exposure  Guide),
   press the lever again ro close the shutter.
      After  the  last  time  exposure has been
   made, move indicator  lever on rop of cam-
   era front  to  "I"   to be ready for snapshots.
                15
View original page 16Page 17 · Read text
SNAPS HOTS and  other
I N D O O R  P I C T U R E S  A T N I G H T
by  Artificial   Light
TO take snapshotsor other indoor pictures
at night with  theJitry Kodak SeriesII, you
need-only a roll  of Kodak Film, a few
Kodak Handy Reflectors,and a few Photo-
flood or Photo/ash bulbs. The bulbs can be
screwedinto ail regular lamp sockets.
               PhotoFLOoD  gives a steady light  ol
                  g r e a t b r i l l i a n ce . Co n te s in twc1 size s
                     for  the amateur: No.  1, 25 cents;
                 No. 2, 50 cents. The No. 2 bulb gives
                   twice the light  and lasts three times
                 as long.

               PhotoFLASH  si ves an irrstantaneous
                     flash;  it  is good  for one picture. No
                smoke. no noise. Comes in twcr sizes
                     for the amateur: No.  10, 15 cents;
                 No. 20, 25 cents. The No. 10 size is
                    suitable  for most indoor  shots.

SNAPSHOTS with PHOTOFLOODS
TO take snapshots at night  with  the Jiffy
Kodak SeriesII in rooms with  light-colored
wails, load camera with  Kodak  "SS" Pan
Film.  Arrange two  bridge-type lamps* as
*Rooms  with  dark-colored  walls  usually  require  the
use of additional  Photoflood  lamps and reflectors.
               16
                       www.orphancameras.com
View original page 17Page 18 · Read text
shown in the illus tration, one about three
feet from the sub lect; the other about four
feet from  the sub lect,
  Replace the regular shades on the lamps
with inexpensive Kodak Handy Reflectors,
Model  B,  and place a No.  2 Photoflood
bulb in each of the lamps.
  See that  the
indicator  lever
on  top  of  the
camera front   is
set at  "Ir  "  and
be sure that the
diaphr agmslide
is pushed in as
far as it will  go.
 Compose your
sublect in either
the  vertical  or
horrzontal  finder  of the camera and press
the exposure lever just as you would  to
take a inapshot outdoors.
  After  each picture  you  take be sure to
turn the winding  knob until  the next num-
ber appears in the red window  on the back
of the camera.
CAUTION:  Photoflood  lamps,  especially
the No . 2 size, become quite hot and should
not be kept burnin g any longer than neces-
sary to take a picture. Do not permit  the
bulbs to come into  contact with  the fabrtc
of shades on home lamps.
               17
View original page 18Page 19 · Read text
Q u i c k T I M E E X P O S U R E S
with PHOTOFLOODS
TO make quick time exposureswith Pho-
tofloods,  load  the  camera with  Kodak
"SS" Pan,Panatomic,  or Verichrome  Film.
Set the  indicator  lever on top  of. camera
front  at "T."  Place camera on a solid sup-
port. Compose picture  in  finder. Revolve
lens until white  dor is in proper position.
To make the exposure, press exposure lever
once to open shutter,  and. again ro close it.
  Use the Exposure Table Felow:
       EXPOSURE TABLE
   FOR TWO PHOTOFLOOD LAMPS
             Using Kodak "SS" Pan Film
        Double  the exposure with  Panatomic  or
                   Verichrome  Film

        (J                    Exposure in Seconds
          q')

                                                                      L EA9{-o                   In Kodak                                               c( | 4lor 5
         Lens  e                   Handy                 !                                                                                     !                                           ?                                              Vithout AHq       Opening                      Reflectors   ti                                               Reflectors                                   A                                           q       Oi
                   (Model B)         al                           a &
        F,l
                  No.   I  N o . 2   No. 1  No.   t  N o . 2
                Lamps Lamps Lamps Lamps Lamps
 6  ft.    Largest                  L 1 2        t a     Middle    u,                      t              I)       Utt        Smallest           t      L 1 2    2     4      2
toa a f"     t*tl"*        Llz                 2           t
      a a     Middle                I      L / 2           4     2
        Smallest      2       1            8     4
*Vith  No. 2 Photofloods  the exposure should  be one-
half  or  two-thirds   of the exposule  given  for the No.   r
Lamps, depending upon kind  of reflettors  used.
                 1 8
                      www.orphancameras.com
View original page 19Page 20 · Read text
P h o t o F L A S H P I C T U R E S
FOR using the Photof,asb bulb, adjust rhe
 camerathe same as fot making  tirne ex-
po-sureswith  Photofloods, see page 18.
  Usea Phot of,ashbulb in any home lamp
or aa porDortabletab
reflector   uni t
having  flash-
light  batteries.
To make  the
exposure,  turn
out   aII  lights
(except a small
l i g h t  b e h i n d
camera), direct
the Pho tof,ash
atat subsuDlect,lect, openopen
shutter, flash the bulb , and close shutter.
       EXPOSURE TABLE
  FOR NO. 10 PHOTOFLASH LAMP
Use the  larS;est  lens  opening.    tJfith   the  No.  2O  Photo-
flash Lamp  use the  middle   lens  opening.

                       In Kodak                                   l(/ithout
              Handy   Reflector      In Ordinary      Reflec-
                     (either  size)        Reflector             tof

                                                   .6SS"           "ss"   tomrcPana-     ..SS"   tomrcPana-
               Pan         of     Pan        of      Pan
                 Film      Veri-     Film      Veri-      Film
                       chrome           chrome

  Distance
  Lamp  to     15 ft.                        6   ft.      6  ft.
   Subiect
View original page 20Page 21 · Read text
W h a t  F I L M  T O U S E    i n  J I F F Y
K O D A K  S E R I E S   I I a n d W H Y
THE kind of Kodak Film ro use in your
Jitry Ko_dakSeriesII Iargely dependsupon
the kind of picturesyou wish to take. The
films referredto here will  fill every pLcture-
taking need.
Kodak verichrome  Film-The     finest all-purpose  film.
Has great speed and is well balanced for recording tone
values  of various  colors  in  a black-and-white    print.
Its  double  coating  guards  against  over-  and  under-
exposure. 8 exposures. V616, 35 cents; V620, 30 cents.
Kodak Super Sensitive Panchromatic   Film-Gives
correct  color  ualues  in  a  black-and-white     print.     It
lengthens the snapshot  day.  Its speed makes  ir  ideal
for taking  pictures at night  by  attificial  lighr,  and out-
door snapshots in  the shade. B exposures; 55616, 40
cents; 55620, 35 cents.
Kodak Panatomis  pilm-I1    records  color  ualues cof-
rectly  in.ablack-and-white    print.   It has an especially
fine  grVin enabling  the  making   of  enlargemenrs  of
astonishing  size from  J|try Kodak  negativEs. 8 expo-
sures. F616, 40 cents ; F620, 35 cents.
Kodak  N.C, Film-The    srand-by  of millions   of  ama-
teurs  for  rnore  than  thirry   years. A  film   that  has
sufficient  speed  for  average use. 8 exposures.  616,
30 cents; 620, 25 cents.


                      www.orphancameras.com
View original page 21Page 22 · Read text
U s e f u l AC C E S S O R I E S f o r  t h e
 J I F F Y K O D A K S E R I E S  I I
                    Kodak Portrait Attachment
                          Slip  it over the lens of the
                               Itry  Kodak and mak e cLear,
                        detailed "close-ups" of Deo-
                                pl., and sharp, short-r"nge
                         pictures of flowers, aft ob-
                          jects and other srill-life sub-
                          jects.With white dot on lens
Feet,"ptaceobjects                                   i: lens. with  the dot at the"'^:i;';":"ffttX1.ffmtarrow marked "5 to 10 Feer,"
 place objects  exactly 2 feet 8 inches from  rhe lens. size
No. 7A  for Jitry  Six-16; 6A  for  Jitry six-20.  75 cents.
Kodak Diflusion  Portrait  Attachmsnt-F'its     over the
 camera lens  and works   like  the  above  attachmenr.
Adds a charm                _to pictures by giving  them  a pleasing
softness. Size No. 7A  for Jitry 5i"-r5;  No.  6A'for   Jiff'y
Six-20.  $1.50.
Kodak  Pictorial  Diffusion  Disk-For    softening  scenic
pictures. Size No. 7A  for Jiffy  Six-16; No.  64, {or  Jitry
Six-20. $2.50.
Kodak skv  Fitter-A     special  disk  that   fits over  the
cameta lens,  half  yellow,   half  clear. Beautifies  scenic
pictures by causing clouds  to show  up rnore clearly
against a blue sky. colored  part of diskhr^t   be turnei
to cover the upper  half  of-the  lens. Size No. 7A  for
Iltry Six-16; No. 6A  for Jitry Six-20. 91.50.
Garrying gass-gaves    weut  and  tear on  the  carnera.
Sturdily built.  For Jiffy Six-16, $1.85. ForJiffy  Six-20,
$1.65.
Kodak  Negative  Album   -  A  rransparenr  en'elooe
album  for  storing  100 negatives.  Protects rhem from
loss and damage. $1.25.
                      2l
View original page 22Page 23 · Read text
Darkroom Outflts-All
                             the necessary supplies
                                                    f o r d e . v e l o p i n g a n d
                          p r i n t i n g  a t h o m e .
                       Kodak Darkroom Out-
                                           fit No. 1, $8.75;No. 2,
                           $3.25. Other outfits as
                          low as $2.
Eastman Albums-Keep     your  prints   in  an album-
safe from  loss and damige. Eastman albums are good
looking  and make  your  prints  aPPea! at  their  best.
Many styles to choose from-in    abroadrangeof   prices.

Kodak Snap-Sticftsrs-Mount    your prints with  Kodak
Snap-Stickers. Gummed  on  both  sides they  are  first
,ttuthed   to the  print,  then  to the album Page where
thev hold the piCture firmly.  In books of 800. 10 cents.

Every Picture Taker Should Read
I'HOWTO MAKE GOOD P ICTURES''
                      A PHOTOGRAPHIC
                             "best seller." Explains
                                  in non-technical lan-
                       guage every phase of
                           p.hotographl in which
                              the amateur is apt to be
                                                                   i n t e r e s t e d ,i n c l u d i n g
                        methods of making pic-
                                                     t u r e s , d e v e l o p i n g ,
                             printing,  enl ar grng,
                               coloring, interior pho-
                             tography,  horn. - po.r-
                                  ttatturq  etc. Profusely
                                illustrated. 50 cents at
                            vouf dealer's.
 All  brices  in  this manual   are  subject  to cbange  uitbout   notice,
                 72
                    www.orphancameras.com
View original page 23Related documents and language editions
From the M. Butkus archive. Original publisher and archive notices are retained.
Check the model and edition against your equipment.
PDF verified 2026-10-10.