Film cameras
Kodak Six-20 & Six-16 User manual
User manual for Kodak Six-20 & Six-16. 19 pages in English. Read the original PDF, download or print a copy without registration.
19 pagesEnglish2.2 MB PDF

Loading your manual…Open PDF directly
Document details
- Brand
- Kodak
- Model / document
- Kodak Six-20 & Six-16
- Document type
- User manual
- Language
- English
- Pages
- 19
- File size
- 2.2 MB
- Category
- Film cameras
- Document date
- Not specified in catalog
Search available document text
Find a term, then jump to its page in the original PDF. Image-only pages may not be searchable; check the PDF for exact wording and diagrams.
Page 2 · Read text
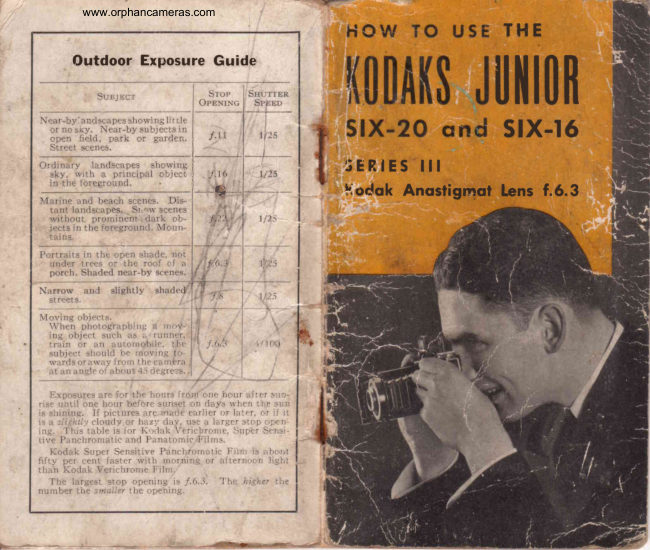
Outdoor Exposure Guide
for thc Kodaks Junior  Six-20 and Six-I6 fitted wlth                Picture taking with the
              the Kodak Doublet Lens
                   KodaksJunior
   opel)   fielcl.  park   or  gardcrr    I
   Street s('enes.                          Six-2O and Six-L6
 Ordinarl'    landscapes    slrou ing
   eky.  u ith  a  principal   object    in  tlre foreground.                                  Kodak  l)oublet  Lens
Marine   alrcl beach  scenes.   I)is-
   tant  lands('apes.  Snou'  scenes
   u'ithout   prorrrinent  dark  ob-                   f    . ) ,
   jects  itr the foreground.  Iloun-
   tatns.

Portraits   irr the open  shade, not
                   or   under           trees                      the  roof                                         <-lf a
                                                                                                         t 9 9           IJ   porch.           Shadetl                   nearby                          Ecenes.
   Narrt,u    alrrl  sliglrtly  shaded                            I sec.
   street s.                       -----{
\Ioving   objec'ts.
   \\-helr  plrott-,graphing  a  nl()v-
   ing  t'bject  such  as  a  runner,
   train   ()r an  automobile,   the      f . r r      l/100
   subject  shr,uld  be moving   to-
   n'ards  ()r a\\ ay  f ronr the camera
   at an angle of about 45 degrees.

  Lxpt,srrres are for  tlre hours  fxlm  one hour  after sun-
rise urrtil  r,tre trt;ur before  sunset on days when  the sun
is shinirrg.    If pictures  are made  earlief  or later,  or  if  it
is a slightltl  cloudy  9r \qzy-  day,  use a  larger  etop  open-
        l'hising.             table  is for                     Kodak                                  \-erichrome,                                            Supei                                                       S6nsi-                                                                        -t !( v5tive      Panchrc,niatic                     and                            Panatonric                                                 Filrns;-                                                                                             if                                                     using                                                                                                                l,i
Kodak   N. C. Film,  exposures  e&n be made   fron   2ft
hours  after  sunrise  until  2rl  hours before  srrnset.
         .Super                 Sensitive  Kodak                        Panehromatic                                         Film                                                             is fifty                                 EASTMAN KODAK COMPANYper                    u'ith                    morning    cent faster                                 or afternoon                                                       light,                                           and
three      times
Verichrome              faster with  artificial light, than Kodak           Rochester, l{ew York, {J. S. A.              Film.
  The  largest  stop  opening   is  /.11.   The  higher  the
number  tbe  szraller tbe opening.
View original page 2Page 3 · Read text
Picture taldng w.ith the
   SERVICE
 DEPARTMENT       Kodaks                            Junior
                          Six-20 and Six-16  ArnrrroNlr  AssrsrANCEFoR
  MexrNc  BerrBn  PrcrunBs                      Kodak Doublet Lens

 A LTHOUGH we givein this manual
fI   ths essentialdirectionsfor using
the camera   it  accompanies,  there  are
amateurs  who  wish  for  further  knowl-
edge of photography.
  The Service Department    is at  their
service, yotn  service.
  Do  not  hesitate  to  call on us for  in-
formation  on any photographic  subject.

We  are  at  your  seru'i,ce, write  to  us-
    there is no charge, no obli,gation.


       Addreseall Communications

     SBNVICE DEPARTMENT
Eesrnre.N Kooar< CovrpANY                        Publiehed,bu
                                 EASTMAN KODAK COMPANY      RocnBsrER, N. Y.                                           RocsogrnR,N. Y., U. S. A.

                   www.orphancameras.com
View original page 3Page 5 · Read text
l'ict,ut't' Lakirrg witlr Llrr,                                    Kodaks Junior Six-20 and Six-lrt


                                   Remove the paper band and pass the
                                  ( )pen l,he ba,ck.      protective paper oaer the two  rollers,
                                      and thread  it through  the longer slit
                                                      in the empty  reel, as far as it  will go.


                                   Lift up the
                     spool holder'
                             in the recess
                       adjoining the
             ,A\          hinge  of  the
                      b a c k   a n d

                                      Turn the winding key once or twice
                                              to bind the paper on the reel, and be
                                      sure that the paper is started itraight.
                   www.orphancameras.com
View original page 5Page 6 · Read text
Piettrre tlrkirrg rvitlr tlrt'                                              liodaks Junior Six-20 and Six-l(i
  Close the back, pressing it so that        sure to wind  the  film,  bringing  the
the spring lock snaps into place, s€-       next number into position.  This pre-
eurely fastening the back.                   vents making  two  pictures on  the
                                   same section of film.
             Push the round slide
              that covers the red win-             OpBxING  THE FRON'I'
          dow on the back of the
             I(odak  in the direction          Raise  t,he locking  lever  ancl dral
               of the arrow.                   rklwn t,he bed until   it locks; this a,ut,o-
                                                        rrratically brings the lens antl  shut,ter'   'I'urn         the  winding  key,  watching          in t o posit ion .
bhe red windorv. After a few turns, a
warning hand will appear; then turn
slowly until the figure 1 is in the center
of the window.


  Push back the slide over the recl
rvindow. This slide prevents fogging
rvhen using Super Sensitive Panchro-
matic or Panatomic trilm, and makes it             'I'he                                           Kodaks Junior Six-20 and Six-
unnecessaryto use the adhesive fabrie        16, when  fitted  wit h  the  I(odak
included with each roll of the film.          Doublet Lens, are fixed focus models,
  The film  is now in position for the         :lnd therefore no further adjust,rnents
first exposllre. After eaeh exposttre be         for foeusing are neeessa,ry.
View original page 6Page 7 · Read text
Kodaks Junior Six-20 and Six-16Picture taking with the
                                   on the top of.the shutter as well as on         Tnr SnurtBn                                        thLefront, for greaterconveniencewhen
           A                    making pictures with the Kodak in
                                         the vertical position.
                                       Presslever C. T his makestheerposure.
                                           Time Exposures
                                  Move indicator A to the letter "T."
                                Move pointerB to/.11, 16,22or 32,
                                        according to the time of exposureand
                                         nature of the subject. See tables on
                                 pagesII,12,23,24 and 28.
                                        Press lever C.  This  opens the
                                             shutter.  Time  the exposure by  a,
            B                       watch.  Again press lever C.  This
         A-Speed  Indicator                  closesthe shutter.
          B-Stop OpeningPointer               For short time exposuresfrom one-
          C-Exposure  Lever                     half second to ten seconds, "Bulb"
                                    Exposuresare recommended.
    Instantaneous  Exposures
  Move indicator A to 25, 50, or 100               "Bulbtt Exposures    ((8."(seeExposureGuide on back cover or       Move indicator A to the letter
table on pages11 and 12).              Move pointerB to/.11, 16,22 or 32.
                                Seepages11, 12,23,24 and 28.  Move pointer B to the correct stop
opening (seeExposure Guide on back        Press lever C to open the shutter
cover or table on pages11 and 12).        which will remain open as long as
                                            lever C is held down.  The Kodon Shutter has the stop                                      Time und "Bulb"  Erposures mustopeningsand shutter speedsengraved
                    www.orphancameras.com
View original page 7Page 8 · Read text
Picture taking with the                                  Kodaks Junior Six-20 and Six-16

neaer be mad,e with  the Kodak  held in       Therefore,  if the  correct exposure is
the hands.                               1/100 secondat f .11 the same amount
   Impottant:    Neaer odl the shutter.       of exposure would be obtained with
In case of accident, return the camera       /.16 and 1/50 second, and ,I125second
to your dealer or to us for repairs.           with f.22.
  Cable  Release:  A  cable release        /.11-For     all ordinary outdoor pic-
(No. 29) can be used with  the Kodak        tures, such  as  nearby  landscapes
if desired, but the camera should not      showing  little  or no sky, groups and
then be closed without   first removing        street scenes, when the subject  is in
the cable release.                             bright sunlight, use speed 25;for mov-
                                              ing objects in very bright sunlight, use  To attach the cable release, remove                                     speed 100.the screw directly behind the lever C
and replace  it  with  the cable release.         /.16-For   open views, when  the
After using the cable release, detach  it        sunlight on the subject  is unusually
and replace the screw in the opening.       strongand there are no heavyshadows,
The  screw may  be  loosened and      such as views at the seashore and on
tightened with a small coin.                 the water, use speed 50; for ordinary
                                           landscapes, in  bright  sunlight,  with
         Srop OpBNrNcs                   clear skyoverhead, use speed 25; also
  The  stop  openings  regulate  the         for Interior Time Exposures, the time
amount  of  light  passing through  the         for which is given on page 24.
lens.  The openings are enlarged or
reduced by moving the pointer B, see         f.22-For    instantaneous exposures
page 8.                                          of extremely distant landscapes, ma-
                                                 rines, snow sceneswithout  prominent  The  largest stop opening  is /.11.                                           dark objects in  the foreground, andThis  opening  allows  approximately                                            clouds only,  in  bright  sunlight,  usetwice the  light  to enter the lens as                                      speed 25; also for Time Exposures.f.I6;   f.l6  admits  twice  the  light  of
f .22; and f .22 twice the light of f .32.         J.3T-F  or Time Exposures Outdoors
                           l0                                                           1 l
View original page 8Page 9 · Read text
Picture taking with  the                                       Kodaks  Junior  Six-20 and Six-16

on cloudy days, see page 28. For In-        varies with the size of the stop open-
terior Time Exposures,see pages 23 and        ing used; the smaller the opening the
24.  Ir{euerfor instantaneous efrpos,u,res.     shorter the distance. When using f .ll
F ailure  will  result,  if stop f .32 is used       the distance between the Kodak and
f or instantaneous efiposures.                 subject must be at least ten feet.
  The smaller the stop opening the        /1            These circles are                                                               the same size as thesharper the nearby objects will 6e.                       'f'tl                                                            t              stop openings of the   AII the exposures given for outdoor.                                                                shutters used on thesubjects are for the hours from one                                                                           -f. 16  KodaksJuniorSix-20hour after sunrise until one hour be-                                                    and  Six-16.  Theyfore sunset, when using Kodak  Veri-                                                                               -f. ?2  show  the   relativechrome, Super Sensitive Panchromatic                  oo         sizes of the variousor   Panatomic                  tr'ilm.  If Kodak                              N.                                 C.                               o  -f.32
                                                                          COPYRIGHT                                                                                                     1922 BY   stop  openings andFilm       is used, exposures                        made                     can be                                                                      EASTMAN  KODAK  CO.  how theirareas differ.from 2rh hours after sunrise until 21h
hours before sunset.  If  earlier or latei              THB FrxoBn
the exposuresmust be longer.               The finder
  For a subject in the shade, under      shows what
the roof of a porch or under. a tree,          will  appear
a time exposure must be made, see        in  the  pic-
page 28. When making pictures under         ture, but on
these conditions, the camera, must be       a much  re-
placed on some steady, firm support.       duced scale.
                                                                                  I t  c a n  b e
     NBInNESS oF SUBJECT                         t u r n e d
  To get the subject sharp and distinct        quickly   for
in the picture, the Kodak must not         either  verti-
be nearer than a certain number  of        cal  or  horizontal  pictures, see dia-
feet  to  the  subject.  This  distance      grams on page 15.
                                                                                               l3
                   www.orphancameras.com
View original page 9Page 11 · Read text
Picture  taking  with  the                                    Kodaks Junior Six-20 and Six-l6
    MerrNG  INSteNTANEoUs            The Kodak must be held level.  If
   ExposuRES oR SNepsHors                 all the subject cannot be included in
                                                                    I   the finder without  tilting  the lens  When          ordinary                   instantaneous                                   ex-                                                                    I   upwards, move backwards until  it  isposures         or           snapshots                      are made, the                                                         all included with the cameraheld leael.subject should be in the broad, open                                                                    t         If the subject is below the normalsunlight,  but  the camera must  not.      {                                              !_eigh!,like a small child or a dog, theThe sun should be behind your back                                  Kodak should be held down level-with
or over the shoulder.   If  it shines di-        the center of the subject.rectly into the lens it  will blur and fog
the picture.
  Special instructions for making por-
traits are given on pages 25 to 27.
    HOrn THE KoneK LEvEL                             next number)  is in
                                              the center of the red window.
                                        CrosrNG THE Kooer


                                           I                            il
     Efrect producedba tilting the Kodak.
                              l6
                    www.orphancameras.com
View original page 11Page 12 · Read text
Kodaks Junior Six-20 and Six-ltiPicture taking  with  the

  Close the Kodak  by pressing the
knurled flanges on each side of the
front standard, as shown on page 17.
The front and bellorvs fold automati-
eally. Be sure the finder is in   t he
upright position.
  After the bed is closetl, be sure it
is properly loeked.
      RBtvrovING THE Ftrnr
   After  the  last section of  film has
been exposed, turn  the winding key         Take hold of the ends of the paper
until the end of the paper passes the       and sticker to prevent the paper from
red window.                                loosening. Draw out the key and re-
   In a subdued light, open the back       rnove the film.  l't-rldunder about half-
of the Kodak, see prlges3 and 4.             rrn-inch of the protective paper, a,nd
                                           fnsten it with the sticker.
                                             "Cinch"   Marks:  After removing
                                                                                   t he film from the I(odak, do not wind
                                                                                it  tightly with a twisting motion, or
                                              the film might be scratched.
                                      Wrap up the exposedfilm.   It is now
                                          ready for development. This may be
                                      done by a photo finisher, or by your-
                                                       self. Our Service Department  will be  Hold the end of the paper taut and                                           glad to send you, upon request, com-turn the key until  all the paper is on                                               plete instructions for developing andthe roll.  If the sticker folds under the                                                printing.roll, turn the key to bring it, up.
                                                                                                                                                                                                                                                                      l 1 )
                                                   lti
View original page 12Page 13 · Read text
Picture taking with  tht'                                                 liodaks  Junior Six-20 and Six-l(i

  Important:    Film  should be de-           TruB ExposuREs-f  NDooRS
veloped as soon as possible after ex-                                             For time exposuresthe camera mustposure. The quality  of the image on                                          always be placed on a firm support like
tll  sensitized produets is retained by         a tripod, Optipod, table or chair, neuerprompt development after exposure.                                             hold  it in the hands. The Kodak has
  Remove the empty spool and Place             rrr€ tripod socket for use with a  tri-
it in the winding end of the camera,        pod, an Optipod or a Kodapod, with
                                                                                     I he t(odak in the vertical position.


                                             Place the Kodak  in such a position
                                                   that the finder  will include the view
                                                desired. The above diagram shows
                                               three  positions  for  the  camera.    It
with the slotted end of the spool next        should not be pointed at a window as
to the winding key.  The I(odak  is             !tr" -glare of light  will blur the picture.
now ready for reloading.                                     If all the windows can not be avoided,
                                        draw the shades of those within range    It is a good plan to reload the Kodak                                                    of the lens.&s soon as an exposed film has been
removed, to be ready for the next pic-                  If the Kodak  is placed on a table,
tures. For the best results. load with           for  making- &  vertical  picture,  use
Kodak Film.                                 the locking lever 2 as a support.' The
                                                                                       2 l
                    www.orphancameras.com
View original page 13Page 14 · Read text
Picture  taking  with  the                                          Kodaks  Junior  Six-20 and Six-lti

camer& must  not be more than two
or three inches from the edge of the
table.
  To make a horizontal picture, turn
the finder and place the camera in the
position shown in the illustration on
page 23.


                                                      After making an exposure, turn the
                                             winding key  until  the next number
                                          appears in the red window.
                                                                                  If no more time exposures are to be
                                             rnade, adjust the shutter for an instan-
                                          taneous exposure, see page 8.
                                            Exposure Table  for  Interiors
                                          The table on page 24 gives suitable
                                          exposures for  varying  conditions  of
                                                          light, when using stop .f.16.
                                   with't'?P
   Adjust  the shutter  for a time  ex-                    tL.h',*t:i'!l'?;31--
posure as described on page g.                rheexp;,"{;t'h;;tf tlJtmi"
   All being ready, press the exposure          The smaller the stop opening the
lever carefully, once to open, time the         sharper the nearby objects  will  be.
exposure by a watch, and again press         Stop,f.16 gives the best average results
the exposure lever to close the shutter.            for Interiors.
                           .).)
View original page 14Page 16 · Read text
Picture taking with the                                    Kodaks Junior Six-20 and Six-lti
a suitable reflector; it should be at an         The subject must be exactlySftf.eet
angle and in the position indicated in        from the lens. Measure the distance
the diagram on page 25.                        carefully from the lens to the face.
                                         The same exposure is required as
   Making  Portraits Outdoors             without  the Attachment.
  When making portraits outdoors,        Use the Kodalt  Portrait Attachment
with  the sun shining brightly,  the        No. 73, with the Kodaks Junior Six-20
subject should be in the shadow of a       and Six-16, with Kodak Doublet Lens.
building or a large tree, but with clear
and unobstructedsky overhead.Place           Kodak  Diffusion   Portrait
the Kodak on a tripod or other steady                   Attachment
support,usestop/.22orf .32andmakea         The Kodak  Diffusion  Portrait  At-
Time Exposure("Bulb") of about one       tachment   is  a  supplementary   lens
or two seconds.By following this rule       used in the same manner as the regu-
unpleasant and  distorting shadows          lar Kodak  Portrait  Attachment.     It
on the face will be avoided.                 produces a true, soft-focus effect.
                                       Use the Kod,ak Di,fusi,on  Portrait   Kodak Portrait  Attachment                                          Attachment I{o. 18, with  the Kodaks
  The Kodak  Portrait  Attachment         Junior  Six-20 and  Six-16,  with  the
makeshead and shoulderportraits. It        Kodak Doublet Lens.
can also be used for photographing
flowersand similar subjects.                     "Ar HouE rvITH Youn Koolr"    is a                                               booklet  containing  many  diagrams  Place the Attachment over the lens                                        and illustrations showing various light-and composethe picture in the finder.                                                 ing effects. It gives suggestions for mak-Turn the Kodak just a  little to the                                                ing pictures, in and around the home.left, as the short distances at which
the subject must, be from the lens          "Prcrunp  Tar<rNc AT NIGHI"  is a
make it necessaryto center the sub-        booklet  that  describes in  detail  the
jeet by eye instead.ofby the finder.         methods of making pictures by electric
                                                                     27
View original page 16Page 17 · Read text
l'icture taking with the                                                Iiodaks Junior Six-20 and Six-lti
light,  flash-light exposures, campfire
scenes,fireworks, lightning, moonlight
effects, silhouettes and other unusual
pictures.
  These two  booklets are free, and
copies of them  will be sent upon re-
quest to our Service Department.
                                                                    I[acle ruith Dirtgl Lans. Made uith Clean Lans.
  TruB ExposuREs-OurDooRS
  When  the  smaller stop openings          Lenses should be cleaned as follows:
(1.22 or 1.32) are  used, the  light                                      Open the back of the Kodak,  seepassing through the  lens is so much                                        pages 3 and 4, then open the front asreduced that  very  short time expo-                                             described on page 7. Wipe the frontsures mey be made outdoors.                                        and back  of the  lens with  a  clean  With  Light  Clouds-From   one to                                              handkerchief. Never unscrew the lens.three seconds will be sufficient.
  With   I Ieavy Clouds-Four  seconds                                        Keep Dust  Out  of the Camerato eight seconds will be required.
                                         Wipe the inside of the ca,mer& and  With  Sunshine-Time    Exposures                                                 bellows, occasionally, with  a, slightlyshould not be made.                                    damp  cloth,  especially  if the camera  When making  time exposures the                                         has not been used for some time.Kodak must be placed on some steady,
firm  support, do not  hold   it  in  the                                EASTMAN KODAK  COMPANY,hands or the picture will be blurred.
                                                  RocnBsrER, NBw YoRK.
         CrneN LnNsBs
  The pictures on page 29 illustrate
the difference between results with a
dirty and clean lens.

                    www.orphancameras.com
View original page 17Page 19 · Read text
IMPORTANT
                                                             This  manual  should  be read  thoroughly,
                                                           before you make any pictures.
                                                          While  loading  and unloading  the eamer&'
                                                    be very  eareful  to keep the proteetive  paper
                                                wound  tightly  around  the  film  to  prevent
                                                                          light  striking   it.
                                                           Before making  an exposure be sure  that
                                                             the  shutter   is adjusted  properly,   for an  in-
                                                        stantaneous  or  time  exposure, whichever   is
                                                              required.  Use the  correct  stop gpening and
                                                        speed. An unexposed seetion of film must be
                                                                         in position.
                                                   The sun must be behind your back or over
                                                           the shoulder.   If  the sun shines directly  into
                                                           the lens it  will blur and fog the picture.
                                                         Hold  the camera leuel.
                                                        Hold  the camera steady when making  in-
                                                        stantaneous  exposures  or  snapshots.   The
                                                  eamera should be held firmly  against the body
                                                   and when  pressing the exposure  lever,  hold
                                                           the  breath-for  the instant.    If  the camera is
 A PRACTICAL  book for amateurs.         moved during  the exposure, the  picture  will
A     tt  describes in a simple, under-          be blurred.
standable way every phase of photog-             Turn a new section of film into position im-
raphy  that  they are likely  to be in-            mediately   after  making  an  exposure.   This
terested in, such as various methods of           prevents making  two  pictures on  the same
rnaking exposures, developing, print-             section of film.
ing, enlarging, coloring, making lantern               I(eep the lens and inside of camera clean.
slides, and other interesting strbjects.            Never  oil the shutter.
Profusely illustrated.                                     Instructions  for making time exposures, in-
                                                        doors  and  outdoors,  are  included   in   this
 EASTMAN  KODAK  COMPANY             manual.
Soldat yourd,ealer's RocunsrER, N. Y.             EASTMAN   I{ODAI{  CO}IPA\   Y,
                                                                                                           l2-314H-20                  RocnpsrER, N. Y.
                    www.orphancameras.com
View original page 19Related documents and language editions
From the M. Butkus archive. Original publisher and archive notices are retained.
Check the model and edition against your equipment.
PDF verified 2026-10-10.