Film cameras
Konica Autoreflex A3 User manual
User manual for Konica Autoreflex A3. 41 pages in English. Read the original PDF, download or print a copy without registration.
41 pagesEnglish4.3 MB PDF

Loading your manual…Open PDF directly
Document details
- Brand
- Konica
- Model / document
- Konica Autoreflex A3
- Document type
- User manual
- Language
- English
- Pages
- 41
- File size
- 4.3 MB
- Category
- Film cameras
- Document date
- Not specified in catalog
Search available document text
Find a term, then jump to its page in the original PDF. Image-only pages may not be searchable; check the PDF for exact wording and diagrams.
Page 3 · Read text
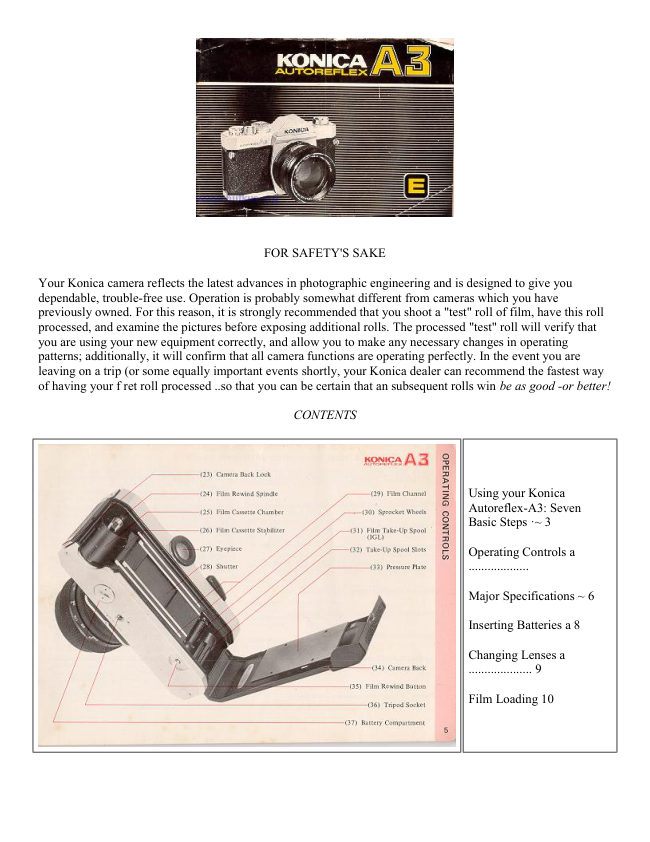
CONTENTS

                                                        Using your Konica Autoreflex-A3: Seven Basic Steps     3
FOR SAFETY'S SAKE..  . I                                                            Operating Controls                                 4
Your  new Konico  camera  reflects  the  latest  ad-            Major Specifications                                6
vances in photographic  engineering and is designed              Inserting Batteries                                 8
to give you dependoble,  trouble-free  use. Operatton           Changing Lenses...........                            9
r's probobly  somewhat   different   from  cameros             Film Loading                                                                                           l 0
which you have previously owned. For  this reason,             Shutter Speedsand Lens Apertures .......              1 3
it  is strongly recommended  that you shoot a "test"             Automatic and Non-Automatic Operation ........                     l 5
roll  of  film,  hove this  roll  processed, and exarnine              "Control Center" Viewfinder                                                I 6
the  pictures  before exposing  additional   rolls.  The            Using Automatic Exposure Control (AEC)             1 8
processed "test"   roll  will  verify  that you are using           Under/Over-Exposure Safeguards ......               20
your new equipment  correctly,  and allow you  to            Semi-Automatic Operation                          2 I
make any necessary changes in operuting  patterns;              Hints for Unusual Exposure Situations               23
additionally,     it  witt confirm  thot  all camera func-             Holding Your Camera                            24
tions are operating  perfectly.  In  the event yoa are            Focusing                                    25
leaving on a trip  (or some equally tmportant  event)             Depth-of-Field Contr ol                          26
shortly,  yaur  Konico  dealer c&n recommend  the             Depth-of-Field Tables                          27
fastest way  of having your  first  rolt processed...so             Film Rewind and Unloadine                      28
that you  can be certain  that  all subsequent  rolls             Flash Photography                              29
 will be as good-or   better!                                Time Exposures                              30
                                                                         Filters                                          3 l
                                                        Konica Accessories                               3 2
                                                         Konica Interchaneeable Lenses                      3 8
                         www.orphancameras.com
View original page 3Page 4 · Read text
a
                                                                            ln                ffiTTgEAts
USINGYOUR
KONICAAUTOREFLEX-A3:                  mz
SEVEN BASIC STEPS              w
 1. Insert the two 1.35 Volt mercury photographic batteries     2c)
    supplied  with  your  camera into  the compartment  at    u,
   bottom   of  camera. (This  supplies power  to  the cds    meter.)                                           {m
                                                                                                                             !(t)
 2. Load camera. Konica's "Insta-Grip" take-up spool assures
    trouble-free operation.
3. Set ASA rating required for your film speed.
4. Move Aperture Control Ring to "AE"  position ("EE" on
   some Lenses).

5. Select desired shutter speed. (For most shots, l/125th  is
   recommended.)
6. Focus and compose picture in viewfinder.
7. Shoot...as long as the  needle in  the  finder  is  in  the
    "white"   area, you  pictures  will  be perfectly  exposed-
   automatically !
View original page 4Page 7 · Read text
MAJORSPECIFICATIONSOF KONICAAUTOREFLEX.A3
Camera Type: 35mm TTL  (Through-the-Lens metering)      Shutter Speeds: Convenient top-mounted selector for  all
AEC (Automatic Exposure Control) SLR (Single-Lens-Re-    speedsfrom 1 secondto l/l000th secondplus "B" (for time
flex)                                                     exposures)

Film: Standard35mm 20 or 36-exposurecassettes
                                                          Flash Synchronization: Electronic flash synchronizationat
                                                                                    all speedsto and including lll2lth  second.PositivePC flash
Format: 24x36mm                                          cord terminal. Optional Konica AccessoryClip 3 attachesto
                                                    cameraeyepiece.
StandardLens0ptions:
Konica HexanonAR 50mm f ll.7 (6 elements,5 groups)          Viewing System: Parallax-FreeSingle Lens Reflex System.
Konica HexanonAR 50mm f ll.4 (7 elements,6 groups)          Coated, eye-level pentaprism shows upright, unreversed
Konica HexanonAR 57mm tll,2  (7 elements,6 groups)          image;apparentmagnification0.78X with 50mm lens.

Minimum FocusingDistance: 17.4" fromfilm plane            FocusingScreen: StandardKonicaMicrodiaprismscreen.

LensMount: Konica Bayonet(47mm diameter)                  In-Finder Readouts: "Control-Center" viewfinder shows
                                                                              vital data at a glance: exact lens aperturebeing set automa-
                                                                               tically; maximum aperture of  lens; under/over-exposure
Flange/Film0istance: 40.5mm                              ranges; match-needleindicator for semi-automaticoperation.

Aperture Control System: Automatically sets correct f/stop        Reflex Mirror:  Oversize, coated mirror prevents image cutoff
(or fractional f/stop) with  all Konica Automatic Hexanon        in finder even with bellows extensions at  I :1 magnification.
lenses                                                                  Mirror design permits automatic operation even with extreme
                                                                  wide-angle lenses. Instant-return mirror action prevents image
                                                                    blackout after exposure.
Shutter: Metallic, vertical-scanningCopal Square-S


                           www.orphancameras.com
View original page 7Page 9 · Read text
INSERTINGBATTERIES


     \,,1


Open  Battery  Compartment  (32;  by  turning  the  cover      To obtain  longest service from  your  batteries, always cover
counter-clockwise  as shown. Remove  batteries  from  pro-        the lens when your camera is not being used. If the lens cap
tective  packing  (handle them  by  the edges to  keep  the       has been lost, you may obtain a replacement Konica Lens
surfaces clean).  If the batteries appeat to have a thin deposit      Cap from your dealer.
of dust on them, wipe clean with a dry cloth.
                                                   When needle movement becomes extremely  sluggish or stops
Insert the two batteries into the compartment,  with "+"  sides        altogether, replace your batteries with a fresh set. Normal  life
facing  up.  (For  your  convenienc€,  *  and  - indicators  are         of PX-675 mercury batteries all one year in normal use.
marked in the compartment.)
                                                               Prolonged heat and moisture may reduce battery  life. Always
After the batteries are in the chamber, replace cover.               keep your  camera (and any spare batteries)  in a cool, dry
                                                                        place. And, when obtaining new batteries, make certain they
                                                                  are photographic type  1.35 Volt  PX-675(Mallory PX-675,
                                                               Everready  EPX-675,   or  exact  equivalent).  Many  other
                                                                          batteries  are  similar  in  appearance, but  the  difference  in
                                                                     voltage and construction may cause incorrect exposures.

                           www.orphancameras.com
View original page 9Page 11 · Read text
FILM LOADING


                                                                                                                                                "rC.*

     Loading  your  Konica  Autoreflex-A3   is exceptionally   fast,            Press down Camera Back Lock (23), and swing the back
     accurate, and foolproof,  because of Konica's Insta-Grip Load            open.
     take-up spool...another Konica innovation. Here's how:
                                                                                Slide the film cassetteinto the CassetteChamber (25) as                            2  shown above.


1 0                            www.orphancameras.com
View original page 11Page 13 · Read text
6  Presstransportthe leverShutteruntilReleasethe NumberButtonI appears(1) and inoperatethe centerthe     To CheckFilmAdvance
           of the Film Counter (2).                                                       It's easy to make sure your camera is loaded correctly. While
                                                                          operating  the  transport  lever, watch  the  Film  Transport
                                                                            Indicator (17) to see if  it rotates. If  it does, you know that
                                                                                    film is going through properly;if   it doesn't it's not.


1 2                            www.orphancameras.com
View original page 13Page 17 · Read text
,,CONTROL           CENTER''VIEWFINDER


    As long as the Meter Needle (41) is in the white area between       between   fl2  and- f12.8.  Here,  your  camera  is  preventing
     the upper (40) and lower (43) red bands, shoot...your picture         incorrect  exposure by  actually showing you  that,  with  this
       will  be perfectly  exposed!                                           film/lens/shutter-speed  combination,   f 12.4 is the widest lens
                                                                    opening at wtrich your camera will automatically operate. As
    The  upper  red band  (40)  also shows you  the maximum        always, your photograph  will be perfectly exposed, so long as
     aperture of the lens in use; in the illustration on the opposite        the  Meter  Indicator  Needle  (41)  does not  go  into  the
     page, an  f/1.7  lens  is on  the  camera, so the band  rests       red-band. Thus, with  your Konica  Autoreflex-A3  you need
    between  f ll.4  and  f 12. When you mount a faster or slower       never worry  about  whether  or not you're operating within
     lens on the camera, this band will more up or down to show       your  meter's "coupling  range"  -  You are, and will obtain a
     the new maximum  aperture  (and, simultaneously,  the new        perfectly-exposed  photograph  autonatically,   so long as the
     underexposure zone.)                                            meter needle is out of the red!

     "Your Konica's sensitive through-the-lens  meter automatically
     determines correct exposure over an exceptionally wide range
      of lighting conditions...with ASA 100 film, from a subject so        Konica's Control-Center  viewfinder  also shows you:
      dimly-lit   it  requires an exposure of  ll2  second at  fll.l   to a
     scene almost 50,000  times brtghter   -  so bright   it requires an      r) Underexposure Indicator  for  f/l.2  Lens (38);
     exposure  of  1/l000th  second  at   fll6l   Within   this  basic       2) Complete Aperture Scale (42); and
     "range"   of  meter  sensitivity,  the  red band  (40)  in  the      3) Match-Needle Index  Mark  for stop-down metering  with
     viewfinder  remains  at  a  position  corresponding  to  the          uncoupled lenses or accessories(39).
    maximum aperture of your lens (f/1.7  in the illustration).

    Under certain conditions, the red band (40)  will drop below
     the maximum-aperture  position. For example, with an  fll.7
     lens and ASA  100  film,  selecting a shutter speed of one
    second will cause the red band to drop down  to a position
1 6                            www.orphancameras.com
View original page 17Page 21 · Read text
UNDER/OVER.EXPOSURE SAFEGUARDS
                   ill.7      t11.4      fl1.2


                q)                                                                  q)
      =                         =
                           rtloCL                                                                                 cnoCL                                         x        x
                                                                                                                                                                                                                                                                                                                                                 I                6)a                                                                                                   (l)
                6)                                                                                                  (l)
          E                        o           :)


          If the meter needle goes to the upper red band (shown above    WhentheAutomaticExposureis Not Used. . . .
       for the three standed Lenses), choose a slower shutter speed.
         If, at the slowest shutter speed (1 second), the needle's still in        For  full manual operation,  just  dial the desired lens aperture
      the red zone, there's not  enough  light  to get a perfectly-       on  the  aperture ring  (t15.6  is shown above). The meter
     exposed picture.  (Naturally,  when using speeds of  1/30       needle will continue to indicate therecommended  f/stop, but
     second or slower, use a tripod  or brace the camera on a firm         the camera will actually shoot at the aperture you've set.
     support  if  at  all possible, and  trip  the shutter  with a cable
      release.)

          If the needle goes down  to the lower red band (as shown in
      the fourth example above), there's too much  light; choose a
      faster shutter speed.


20                            www.orphancameras.com
View original page 21Page 23 · Read text
SEMI.AUTOMATIC OPERATIONWITHUNC0UPLEDLENSES/ACCESSORIES:REMINDERS


                      q)                         o
        =                =                                             ,rlo
             CL                                 (l)xI                                                                                                                       al,oaxc)a
                         orc,                         o
                               l                o


    When using the stop-down metering system with uncoupled     UsingPresetLenses. . . .
     lenses or accessories,keep in mind that the f/stop scale in the
     viewfinder  no  longer  applies;  neither  do  the  under  or       Lenses of  this type do not automatically close down to the
     over-exposure warning bands. If the needle's above the Index        desired aperture; you turn the aperture control  ring by hand
     Mark (39) as shown (above, left) there's not enough light; if         to select the desired f/stop. Still, you can speed up operation
        it's below  this mark (above, right)there's too much  light.        considerably by setting both  control  rings of these lenses to
      Solution: change lens aperture and/or shutter speed until the        the smallesf f/stop  (f122 in the example shown above), then
     needle lines up with the Index Mark.                                   turning them  together  until  the meter needle lines up with
                                                                            the Index  Mark  in  the  viewfinder. As soon as it  lines up,
      In  full-aperture  metering  with  Konica Automatic  Hexanon        you're ready to shoot . . .
      stray light which may enter the eyepiece and reach the meter
      cells hav  virtually  no  effect  on  exposures. In  stop-down
     metering with uncoupled lenses or accessories,however, such
       light  can have  the  effect  of  incorrectly  influencing  the
     meter's reading. Whenever you're using the stop-down meter-
     ing system, be sure to place your eye as close as possible to
     the eyepiece, to prevent stray light from entering. (A Konica
     Rubber Eyecup, available from your dealer, helps here.)
22                              www.orphancameras.com
View original page 23Page 25 · Read text
HOLDINGYOUR CAMERA


    o Holdthe Camerasecurely- comfortablyf or yourhand
     one  secret  for  getting  ultra-sharp  pictures  is  to  prevent         Vertical  shots add veriety  to a series of  pictures. They  are
      accidental camera movement. To do this  it  is suggested that        especially desirable when making head and shoulder portraits
     you hold  the camera frrmly, as shown in the picture above,       and architectural  shots. Hold  the .camera as shown above.
     crading  the  body  of  the  Autoreflex-A3   against the  face.       This position  prevents accidentally pushing the lens release
     Depress the shutter release button  firmly  but gently. Do not        button.
     punch the shutter release button  but squeeze the exposure                          'Jar-free"       off smoothly  for            operation.
24                             www.orphancameras.com
View original page 25Page 26 · Read text
FOCUSING                                 rdgJTg.EAB o'Tl

                     (44) Focusing Screen                                                                                                                                                                                                                                                                              C)c2z
                                                                                                                       6)
                                                              2
                                                                   2.8
                                                             4
                                                             5 6
                                                             a
                                                             1 1
                                                             1 6
                    (45) Fine Ground Glass Area
                                        OUT OF FOCUS                              I N F O C U S


With Microdiaprism  Focusing Screen:  Turn the Focus-     With  Microdiaprism.    .  . when  using 35mm   (or  shorter)
ing Ring (6) of the lens until  the image within  the center of      wide-angle lenses, and lenses slower than  f14.5, or any lens
the viewfinder (44) is sharpest and clearest. (When you're out      used with  substantial bellows extension, the grid-like pattern
of  focus,  this  central  atea  -  composed  of  hundreds  of        in the center of the viewfinder may remain visible regardless
microscopic prisms - appears quite hazy and unsharp.)               of focusing ring adjustment.  (This phenomenon  is caused by
                                                                     the angles at which  light rays enter the focusing screen, and
Under almost  all  conditions,  this precision focusing screen     does  not  indicate  any  defect  in  your  camera  or  lens.)
works easily and with great accuracy. However, under certain       Solution:  focus by  concentrating on the  circular doughnut-
conditions problems can develop: here's what they are ... and     shaped Fine Ground  Glass Areas (45) around the Microdia-
how to overcome them.                                             prism. Most people find this easiest to do by starting out with
                                                                     the lens deliberately  thrown  out  of focus, then turning the
                                                                   focusing ring very swiftly  until the point of greatest apparent
                                                             sharpness is reached.   If  you  turn  the  focusing  ring very
                                                                        slowly, your eye will  find   it more  difficult  to determine the
                                                                        point  of greatest sharpness.


                                                                                     2 5
View original page 26Page 27 · Read text
DEPTH.OF.FIELD CONTROL
     Depth-of-Field   is  the  distance between  the  nearest and                         Depth-of-Field  for  f/l 6
     farthest objects in the scene that  will be sharp in the finished
      picture.  In practical terms this means that when you bring an
     object  into  sharp focus, objects behind and in front  of this
       will  be rendered more  or  less sharply as well.  For more
     Depth-of-Field,  use a  smaller  f/stop   (for  example,  f/11
     instead of f/5.6).  For less Depth-of-Field, use a larger f/stop
      (for example, f 14.0 instead of f/8).

   UsingDepth-of-FieldScaleon Lens:                                                                                   (46) Distance
                                                                              Scale    On  the  Depth-of-Field  Scale, f/stop  markings  identical  to                                                                                Index                                                                            Mark     (47)  lnfrared Film     those on  tlre Manual Aperture  Scale (7), are repeated to the                                               Compensation
                                                                                     (4)  Depth-of-Field  Scale                  Mark      right and  left  of the Distance Scale lndex Mark  (46). The
     Depth-of-Field   for  any  focused  distance  will  be  found
    between any two  identical  f/stop markings on the Depth-of-        Infrared  Film Compensation  Mark:    Infrared rays come
     Field Scale. Thus,  if  the lens is focused at 15 feet and the         to a different  focus than  visible light  rays. When shooting
     picture  is to be made at  ff 16, rcfening  to  fll6  on both sides        infrared  film  with  the appropriate  filter, focus as usual. Then
      of the  scale tells us that  the Depth-of-Field  extends from         bring the distance figure opposite the Distance Scale Index
      Infinity   to  about  8  feet.  For maximum  Depth-of-Field,       Mark  (46)  into  line  with  the Infrared  Film Compensation
     including  Infinity,  set the Infinity  mark at the f/stop  in use,      Mark (47).
    on the right hand side of the scale.

     Film  Plane  Mark:     For certain highly specialized appli-
     cations,  it  is sometimes desirable to place your  subject at a
     specihc distance from the film  (focal) plane. Should you wish
      to do this, measure the distance from the center-of-interest of
     the subject (the part you'll  focus on) to the Film Plane Mark
     "<>"   (16) atop the camera body.


26                            www.orphancameras.com
View original page 27Page 31 · Read text
TIME EXPOSURES
    FlashSynchronizationfor KONICA Autoreflex- A3
          ----.-
                   Shutter
                                                         N    ('r     con- f{oeeo                      ----  @       N   F  @   or   q)o  o)o     N('r    olo    oo     ooo      tact                  I Bulb
              Electronic                                                   X  X  X             Flash     o o o o o o o o o
      X   Class M   o o o o o o     X  X  X  X  X
            Class MF              (flashcube) o o o o    o o  X  X  X  X  X
              O-  Synchronized   x - Not synchronized

    Determining'EXposurefor FlashPictures              When the shutter speed dial  is set at "B",  the shutter  will                                                                     remain open as long as the shutter release is held down. As a          IIt
     Manual  settings  are required   for  flash  shooting.  The AEC          result, exposures longer than one second - as long, in fact, as
     system is not applicable. Exposures are usually calculated on        several hours may be taken  at night,  or in dimly-   lit places
      the basis of "Flash Guide Numbers" furnished by the makers       where  there  is no moving  subject.  If an exposure of more
      of  flashbulbs (and flashcubes) or electronic  flash units. To        than several seconds is desired, attach a Konica Cable Release
      find the correct f/stop  to use, the guide number is divided by         (available from  your  dealer) to the Shutter Release Button
      the flash-to-subject distance. Thus  if the guide number is lL0           (1). Set the shutter speed dial to "8".  Press down the cable
     and the subject is 10 feet away:                                      release "plunger",  and hold  it down  for as long an exposure
                                                                          time as is desired. When the cable release plunger is released,              1 1 0                   =  flll                                                 the shutter closes.               10-
         If  in  doubt,  refer  to  the  table above as to which  shutter       Manual diaphragm  settings must be made when the Copal
     speeds are useable with a specific type of flash illumination.        Square-S shutter  is set at "B".  The AEC (AE)  setting on the
     Guide numbers  for  flashbulbs  are generally  printed  on the        lens is not used. Instead the lens is set manualJryat the desired
     package.  Electronic   flash  guide numbers  are generally  fur-         f/stop.
     nished by the maker of the unit. Guide numbers are exactly
      that  -  they can serve as guides but  all other existing light  will              It  is necessary that you use a tripod or other support for..B"
      affect your exposures to some extent and you should make        time exposures and  all other exposures longer than  l/30th
     allowance in your settings for intermediate f/stops which also       second. Use  of  a cable release will  minimize  jarring  the
       click into place.                                                 cameta.
30                               www.orphancameras.com
View original page 31Page 34 · Read text
TgTgEAts  c)
o ExtensionRingSet3            o AutoHelicoid               o X-20ElectronicFlash           omSix-piece set allows 14 different  ex-     Automatic,   continuously-variable  fo-      Exceptionally compact electronic flash    u,
tensions from 1Omm - 88mm; magni-     cusing mount enables 105mm f/4 Auto       for  cordless or  cord-type  operation.                                                                                                                                                                                           c/)ofication to 1.88X (almost twice actual     Macro Hexanon AR lens to focus from     Guide Number 64  with ASA 801125
size) with standard lens. Supplied with        Infinity  to 23".  Retains full AE (EE)       film  permits shooting distances to 40                                                                                                                  2m5mm camera and body mounting rings,     and  automatic  diaphragm  coupling.      feet with   f ll.7  lens. Up to 400 flashes   a
8mm, 16mm, and 24mm screw-in ex-    May also be used with 105mm lens and      with  four standard AA  Alkaline  batte-
tension   rings,  and  30mm   reverse     Konica  Auto  Bellows  for  semi-auto-     nes.
adapter  for  5 5 mm     thread  lenses.     matic  operation  with  magnifications
N{anual diaphragm control; stop-down      greater than 1.28X.
(match-needle) metering. Converts to
automatic diaphragm control  with  ac-
cessory Auto-Ring  2 and double cable
release. Does not accept Macrostand or
Slide Copie- ).


                                                         o CubeFlash
                            o AccessoryClip3                      With PC cord  contact.  Built-in  test
                                          For use with cord-type flash-guns. May       circuit  with  indicator  light that shows
                                       be left on camera at all times.             when  cube   is  rcady   to   fire.  With
                                                                               exposure guide table and case. Use at
                                                                                       1/30th second or slower with A,3.


                                                                              33
View original page 34Page 35 · Read text
ACCESSORIES
    o     AutoBellowswith DoubleCableRelease                        o SlideCopier2
      Maintains automatic diaphragm operation.  Extension Range 47 mm         I 70mm,      Attaches to Auto Bellows or Standard
      magnifications from 0.9X  - 3.5X with standard lens. Entire front standard reverses     Bellows 3, allows same-sizeor cropped
      without  accessories, retains automatic diaphragm coupling   in reversed position.       duplicates of standard 24 x 36mm or
     Geared front  and rear focusing controls  with  positive locks.  Main focusing rail       smaller transparencies. Accepts mount-
      permits moving entire assembly over 1l4mm range for focusing at predetermined     ed slides or uncut strips, rolls. 18mm
      magnifications ratios. Focusing rail may be used laterally,  for sideways movement       horizontal,    I 2mm  vertical  shift.  Re-
       of  entire assembly over 114mm range. Locking  depth-of-field preview control.        quire  special  Slide  Copier  Reverse
     European and  American-style  tripod                                                   Ring;  auxiliary  Reversal Ring  to  re-
      sockets. Cable release supplied simul-                                              verse-mount lens on bellows.
      taneously  activates  lens  diaphragm,    o     body  shutter release. Used with stop-     MacroStand
                   down (match-needle)      For  use with  Konica  Auto  Bellows:
                        metering. Accepts ac-     Positions  subject  absolutely  parallel
                      cessory Macro Stand,      with camera and lens. Rotating (75mm
                        Slide Copier 2.            diameter) specimen "stage" has hold-
                                        down  spring clamps to secure subject                                        t . r y t \
                                                                                                                                                                                                                                                                                                  ,     t                                  in desire position.  Stage has 1 8% grey
                                                   reflectance factor for correct exposure
                                                readings irrespective  of  subject  size,
                                                    coloration  (exposure  readings taken    o                                                         directly from  stage). Used at magnifi-      SlideCopierReverseRing
                                                 cations from 0.9X  -  2.3X with stand-      This ring  is required for photography
                                                 ard lens. Superb tool for photography       with the slide copier and used together
                                                         of  stamps, coins, insects, any  small       with  a lens  reversal ring. The  Slide
                                                easily-moved subject.                       Copier Reverse Ring  is usable at the
                                                                                               magnification ratios of 1.4X to 4X with
                                                                                        a standard lens (50mm  f ll.7).


34                             www.orphancameras.com
View original page 35Related documents and language editions
From the M. Butkus archive. Original publisher and archive notices are retained.
Check the model and edition against your equipment.
PDF verified 2026-10-10.