Camera accessories
Mamiya NC P adapter User manual
User manual for Mamiya NC P adapter. 2 pages in English. Read the original PDF, download or print a copy without registration.
2 pagesEnglish0.6 MB PDF
Loading your manual…Open PDF directly
Document details
- Brand
- Mamiya
- Model / document
- Mamiya NC P adapter
- Document type
- User manual
- Language
- English
- Pages
- 2
- File size
- 0.6 MB
- Category
- Camera accessories
- Document date
- Not specified in catalog
Search available document text
Find a term, then jump to its page in the original PDF. Image-only pages may not be searchable; check the PDF for exact wording and diagrams.
Page 1 · Read text
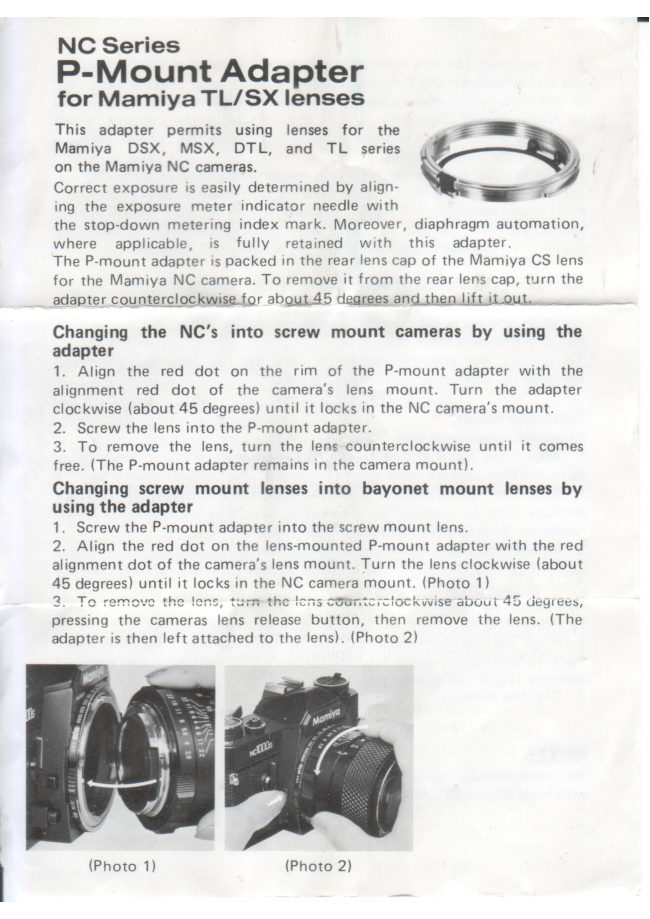
NC Series

P-Mount Adapter
for Mamiya TL/SX lenses

This adapter permits using lenses for the 2 m=

Mamiya DSX, MSX, DTL, and TL series £t

on the Mamiya NC cameras. y |
7m Z

Correct exposure is easily determined by align-

ing the exposure meter indicator needle with

the stop-down metering index mark. Moreover, diaphragm automation,
where applicable, is fully retained with this adapter.

The P-mount adapter is packed in the rear lens cap of the Mamiya CS lens
for the Mamiya NC camera. To remove it from the rear lens cap, turn the

adapter counterclockwise for about 45 degrees and_then lift i —

Changing the NC’s into screw mount cameras by using the
adapter

1. Align the red dot on the rim of the P-mount adapter with the
alignment red dot of the camera’s lens mount. Turn the adapter
clockwise (about 45 degrees) until it locks in the NC camera’s mount.

2. Screw the lens into the P-mount adapter.

3. To remove the lens, turn the lens counterclockwise until it comes
free. (The P-mount adapter remains in the camera mount).

Changing screw mount lenses into bayonet mount lenses by
using the adapter

1. Screw the P-mount adapter into the screw mount lens.

2. Align the red dot on the lens-mounted P-mount adapter with the red
alignment dot of the camera's lens mount. Turn the lens clockwise (about
45 degrees) until it locks in the NC camera mount. (Photo 1)

3=To athe cKwise about 45 degrees,

pressing the cameras lens release button, then remove the lens. (The
adapter is then left attached to the lens). (Photo 2)

(Photo 2)
View original page 1
Page 2 · Read text
* If you turn the lens more than 45 degrees to remove, you will loosen
the screw between the P-mount adapter and the lens. (Taking advantage
of this loosened P-mount adapter, you can remove it from the lens mount
by your fingers after you remove the lens from the camera). When
mounting a jens whose adapter screw is loose onto the camera, turn the
lens until the screw tightens.

* Use the cap from which you first removed the adapter as the rear cap
for the lens you have removed with the P-mount adapter attached.

* If you mount the P-mount adapters on all of your screw mount
lenses, you will be able to interchange the lenses quickly as with the
bayonet mount Mamiya CS lenses for the Mamiya NC cameras.

Removing the P-mount adapter from the camera mount

Press the camera lens releasc betton aneturn the. Pmount adapter-
about 45 degrees in the cpntarclockwice direction. Then, lift the adapter

out of the camera mount.

To protect the adapter, replace it into the rear lens cap after you

removed the adapter from the camera.

Exposure setting

Automatic diaphragm lens

1. Adjust the focus and turn on the exposure meter switch by pulling
away the film advance lever.

2. With the depth-of-field preview button pressed down, turn the
aperture ring or the shutter speed ring, and align the exposure meter
needle to the stop-down metering index mark.

3. Release the depth-of-field preview button and trip the shutter. There
will not be any trouble if you trip the shutter while you are pressing the
depth-of-field preview button.

"Aperture Preset Lens — ~ ~ ~ as

1. Adjust the focus and turn on the exposure meter switch.

2. Align the exposure meter pointer to the stop-down metering index
mark in the finder, while looking through the viewfinder and turn the
aperture ring or the shutter speed ring.

3. Trip the shutter.

NOTE:

We recommend use of this adapter

with only Mamiya TL/SX lenses.
CAMERA Mami LTo.

Printed in Japan
View original page 2
Related documents and language editions
From the M. Butkus Camera Manual Library. Original publisher and archive notices are retained.
Check the model and edition against your equipment.
PDF verified 2026-10-10.