Camera accessories
Mamiya Winder Ze User manual
User manual for Mamiya Winder Ze. 28 pages in German, French, Spanish, Italian, Dutch. Read the original PDF, download or print a copy without registration.
28 pagesGerman, French, Spanish, Italian, Dutch2.9 MB PDF

Loading your manual…Open PDF directly
Document details
- Brand
- Mamiya
- Model / document
- Mamiya Winder Ze
- Document type
- User manual
- Language
- German, French, Spanish, Italian, Dutch
- Pages
- 28
- File size
- 2.9 MB
- Category
- Camera accessories
- Document date
- Not specified in catalog
Search available document text
Find a term, then jump to its page in the original PDF. Image-only pages may not be searchable; check the PDF for exact wording and diagrams.
Page 7 · Read text
@
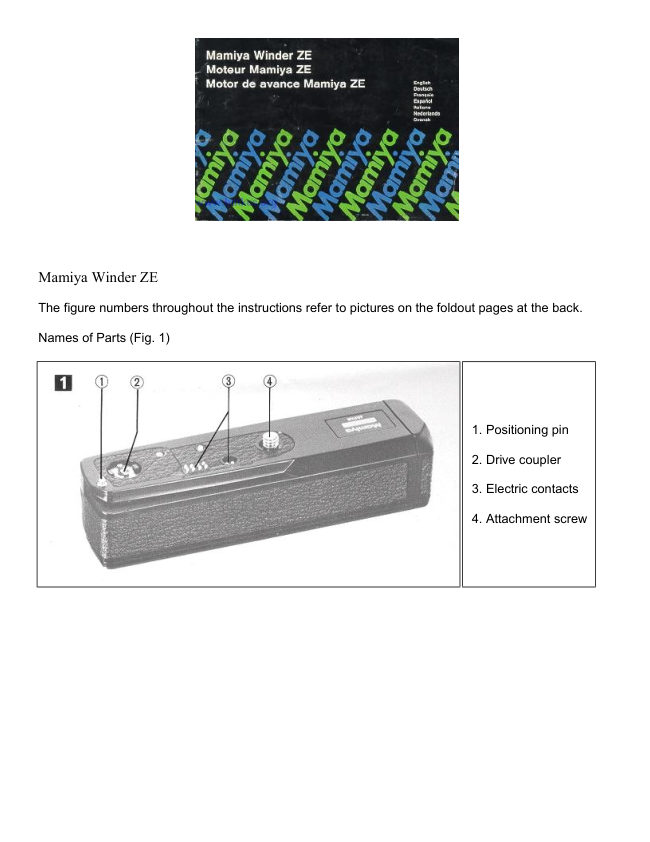
                                               Attaching the Mamiya Winder ZE to the   Mamiya Winder ZE                                              Camera
      The figure numbers throughout the instructions refer to    1. Make sure the Power Switch is turned off (Fig.
         pictures on the fold-out pagps at the brk.                                                                     El).
                                                  2. Put the Mamiya Winder ZE in place on the base     Names of Parts (Fis.g1                                                       of the camera, using the Positioning Pin for correct
        1. Positioning pin                                 alignment (Fi9.61.
         2. .Drive coupler                                3. Turn the Attachment Screw Key to fasten the
       3. Electric contacts                             Winder to the camera. After turning on the Power
       4. Attachment screw                              Switch, the Mamiya Winder ZE is ready for use
       5. Battery chamber cap                                   (Fis.fl1.
       6. Battery chamber lock slide                   When the camera is set at "AUTO" when used with
       7. Pilot LED                              the Mamiya Winder ZE, each frame will be
       8. Power switch                                      correctly exposed even if light conditions change
      9. Attachment screw key                          while shooting a sequence. AE Lock operation  is
      10. Tripod socket                                      also possible. ln this case, however, all frames will
            I 1. Rewind button                           be exposed at the value determined for the first
      Loading the Batteries                             frame. Use only as required.
      Push up on the Battery Chamber Lock Slide and
     remore the Battery Chamber Cap by pulling out    Releasing the Shutter
       (Fis.91.                            The operation of the Mamiya Winder ZE  is
      Load the batteries, making sure the plus and minus    controlled by the shutter releise of the camera.
       poles are located as indicated; then replace the Cap    After the shutter operates, the Winder automatical-
       (Fis.91.                                                      ly advances the film and cocks the shutter for the
     The batteries may also be first loaded into the cap    next shot.
      and then inserted into the Battery Chamber as the
      Cap is replaced (Fig.4;.                          www.butkus.us
View original page 7Page 8 · Read text
@
For single frame operation, remo\re the  f inger from    3. Remorre the exposed roll of  f ilm by opening the
the shutter release as soon as the shutter  is    back of the camera and reload  if desired.
released. The Winder will advance the film one
frame and stop automatically.  lf the shutter release    Manual Operation
button is held down, the camera and Winder will   To operate the camera manually with the Winder
continue .operating for sequence photography at    attached, just turn off the Power Switch and use
the rate of approxim ately 2 f rames per second.        the film advance lever of the camera as you would
                                                   normally. There is no need to detach the Winder
Operation lndicator                                    for manual oper€taon.
Each time an exposure is made, the LED on the
back of the Winder lights to indicate that operate is    Detaching the Winder
normal. This indicator will flash each time an    1. Turn off the Power Switch.
exposure is made.                               2. Turn the Attachment Screw Key counterclock-
                                                    wise until the Winder  is detached from the camera.
At the End of the Roll
When the end of a roll of film is reached, both the    Notes:
camera and Winder will automatically stop operat-    1. Be sure to turn off the Power Switch when
ing. And the pilot LED will light constantly to     using the self -timer with the Winder ZE attached
indicate that the end of the film has been reached.     to the camera; otherwise, the camera will continue
                                               to shoot several frames onoe the shutter is tripped
Rewinding the Film                          by the self-timer.
1. Turn off the Power Switch and press the    2. Be sure to turn the Power Switch off when
Rewind Button (Fb.@1.                               detaching the Winder from the camera. And do not
2. Rewind thd fllm by turning the rewind crank of     try to operate the winder by shorting the contacts
the camera clockwise until you feel the crank begin    directly when the Winder is detached from the
to turn lightly (Fig.p1.                                     c€rrnera. This will damage the Winder, making  it
                                                          inoperable, because the internal fuse will be blown.
View original page 8Page 9 · Read text
-t@
       Specifications                                Notes on Batteries
       Applicable camera: Mamiya ZE                   1. Remove the batteries when the Mamiya Winder
      Operating speed: Up to approx. 2 frames per  ZE is not to be used for an extended period in
              second, continuous or single frame.             order to prevent possible damage due to leakage.
       Operational shutter speed range: 1/1000 to 1 sec.   2. Manganese batteries can also be used, but the
         and B (Automatically switches to single   number of rolls of film that can be exposed per set
             frame operation at B.)                                     is less.
       Shooting control: Using camera shutter release.      3. Battery performance is less under low tempera-
       Operation indicator: Flashing pilot LED.              ture conditions, so Ni-Cad batteries should always
       Film end indicator: Continuously  lit pilot LED.      be used fully charged. Alkaline-manganese batteries
     Power source: Four 1.5V AA-type alkaline-    should be kept warm during use.
            manganese or Ni-Cad batteries.              4. All four batteries should be replaced at the
     Number of  rolls: (Using 36+xposure film at   same time. Never mix new and old batteries, or
             normal temperature.)                             batteries of different brands, as leakage may result.
            AA-type  al kaline-manganese  batteries   :        5. Battery life varies depending on the type of
               approx.6O rolls or more.                     battery, the storage after manufacture, the amount
            AA-type Ni-Cad batteries:                  of time that has elapsed since manufacture, on
                approx. 120 rolls or more                whether usage is continuous or intermittent, the
       Dimensions: 139.5(W) x 36.5(D) x 32.5{H) mm.      type of film used and the ambient temperature.
               l5-112 x 1-7116 x tgl32 in.l
       Weight: 210 g. (7.4 oz.l, without batteries.
    o  All specifications are subject to change without
           notice.


                                                www.butkus.us
View original page 9Page 10 · Read text
Ansetzen des Mamiva Winders ZE an dieMamiya Winder ZE                                                       '          t                         Kamera
 Die im Text verwendeten Zahlen beziehen sich auf die    1. Vergewissern Sie sich, daB das Gerdt ausgeschal- Abbildungen            auf den ausklappbaren Seiten am Ende                                                              tet ist (Abb. E). dieser       Anleitung.                                               2. Setzen Sie den Mamiya Winder ZEan die Boden-
Teilebezeichnu ngen (Abb. E  )                        platte der Kamera an, so daB der PaBstift in diese
  1 .  PaRstift                                                eingreift (Abb.E).
 2. Transportkupplung                         3. Drehen Sie den Knebel der Anzugsschraube im
 3. Steuerkontakte                                     Uhrzeigersinn,  bis der Winder fest an der Kamera
 4. Anzugsschraube                                          sitzt. Nach dem Einschalten  ist der Mamiya Winder
 5. Batteriefachdeckel                        ZE damit einsatzbereit (Abb. E).
 6.  Batteriefach-Entriegelung                      Der Mamiya Winder ZE tihrt zum automatischen
 7. Leuchtdiode                                      Filmtransport nach ieder Aufnahme. Damit ist es
 8. Hauptschalter                                    lhnen im Verein mit der automatischen Belichtungs-
 9. Knebel der Anzugsschraube                     regelung der Kamera moglich, lhrem Motiv blitz-
10. Stativbuchse                                      schnell durch Licht und Schatten zu folgen. Auch
11. Freilauf knopf                              der Betrieb mit MeBwertspeicherung  ist moglich,
                                           doch werden in diesem Fall alle Aufnahmen einer
Einlegen der Batterien                               Serie mit dem gespeicherten MeBwert belichtet.
Batteriefach-Entriegelung  nach oben schieben und
Batteriefachdeckel abziehen (Abb. El).                Ausliisung
Batterien unter Beachtung der erforderlichen Polung    Die Steuerung des Mamiya Winders ZE erfolgt fiber
(siehe Skizze im Deckel) einlegen und Deckel wie-   den Kamera-Ausliiser. Nach dem Ablauf des Ver-
der aufsetzen (Abb. El).                                  schlusses transportiert der Winder den Film auto-
Alternativ konnen die Batterien erst in den Deckel     matisch weiter und spannt den VerschluB f0r die
eingesetzt und dann zusammen mit diesem in das     ndchste Aufnahme.
Batteriefach eingeschoben werden (Abb. El).
View original page 10Page 11 · Read text
Fiir Einzelbildaufnahmen geben Sie den Ausloser    Filmtransport von Hand
sofort wieder frei. Halten Sie den Ausloser gedrfickt,    Wenn Sie den Film einmal mit angesetztem Mamiya
so schaltet der Winder automatisch auf Reihenauf-    Winder ZE von Hand transportieren mochten, ge-
nahmen mit bis zu zwet Bildern pro Sekunde.            ntigt es, den Winder einfach auszuschalten und den
                                                     Schnellschalthebel der Kamera zu benutzen. Der
Kontrolleuchte                             Winder braucht hierzu nicht abgenommen zu
Eine Leuchtdiode an der Riickseite des Mamiya    werden.
Winders ZE zeigt bei jeder Aufnahme durch kurzes
Aufleuchten einwandfreien  Betrieb an.           Abnehmen des Winders
                                                 1. Winder ausschalten.
Am Filmende                                2. Knebel der Anzugsschraube nach links drehen,
Bei Erreichen des Filmendes bleibt die Kamera -      bis sich der Winder von der Kamera abnehmen l6Bt.gegebenenfalls vor dem Ende eines Transportvor-
gangs -  stehen. Die Leuchtdiode am Winder zeigt   Anmerkungen:durch Dauerlicht an, daB das Filmende erreicht ist.    1. Beachten Sie, daB der Winder beiSelbstausloser-
                                            aufnahmen abgeschaltet sein muB, da die Kamera
Rtickspulen des Films                              sonst meh rere Auf nahmen h  i ntere ina nder bel ichten
1. Winder ausschalten und Freilaufknopf  driicken    wUrde.
(Abb.E).                                       2. Schalten Sie den Winder vor dem Abnehmen von
2. Film durch Rechtsdrehung der Ri.ickspulkurbel    der Kamera unbedingt aus. Versuchen Sie nicht,
zurtickspulen, bis der Widerstand an der Kurbel    einen abgenommenen Winder durch KurzschlieBen
nachlsBt (Abb. g).                                 der Steuerkontakte in Betrieb zu setzen. Das Ge-
3. Patrone mit dem belichteten Film durch Offnen     r6t wiirde dadurch auBer Betrieb gesetzt, denn seine
der R0ckwand entnehmen und gegebenenfalls einen    eingebaute Sicherung wtirde durchbrennen.
neuen Film einlegen.

                                           www.butkus.us
View original page 11Page 12 · Read text
Technische Daten                               Batteriehinweise
Geeignet  ftir: Mamiya ZE.                         1. Bei ldngerer Nichtbenutzung sollten die Batte-
Aufnahmefrequenz: max. etwa zwei Bilder pro Se-    rien entnommen werden, um mogliche S6ureschS-
       kunde; Einzel- oder Reihenaufnahmen.        den zu vermeiden.
Verwendbarer VerschluBzeitenbereich:  l/10O0 s -   2. Mangan-Batterien sind gleichfalls verwendbar,     1 s und B (automatische Umschaltung auf   dobh sind sie nicht so ergiebig.
       E  i nzel auf nah men bei Versch   I u Rzeltenei nstel  -   3. Bei niedrigen Temperaturen lSBt die Leistungie-
       lung B).                                     der Batterie nach. Es empfiehlt sich deshalb in die-
Steuerung  : tiber Kamera-Ausloser.                sem Fall die Verwendung vollgeladener NC-Zellen.
Betriebsanzeige  : mittels Leuchtdiode.                      Al kal i-Batterien sol lten bis unmittel bar vor dem E  i n -
Filmend-Anzeige: mittels Leuchtdiode (Dauerlicht).    satz gut temperiert werden.
Spannungsquelle: vier Alkali- oder NC-Mignonzellen   4. Wechseln sie stets alle vier Batterien gleichzeitig.
       1,5 V.                                   Mischen Sie grundsdtzlich keine neuen und alten
Anzahl Filme pro Batteriesatz (zu 36 Aufnahmen;    Batterien oder Batterien verschiedenen Fabrikats,
       bei Normaltemperatur)     :                      da dies zur vorzeitigen Entladung fiihren konnte.
       Alkali-Mignonzellen: ca. 6O oder mehr.        5. Die Lebensdauer der Batterien schwankt ie nach
      NC-Mignonzellen : ca. 1 20 oder mehr.         Typ, Lagerung, Herstellungsdatum, Umgebungstem-
Abmessungen (mm): 139,5 x 36,5 x 32,5 (BxTxH).    peratur und Einsatz (intermittierender oder Dauer-
Gewicht (ohne Batterien): 21O g.                         betrieb).
o Anderungen im Sinne des technischen Fort-
schritts vorbehalten.
View original page 12Page 14 · Read text
Frangais

                                       vuedddendtement.                                une             Le motew avan@ra                                                      manuel                                            - Armement    s'arr€tera automatiotrement.                                 d6den-                                     Si le                                                                        de I'aooareil awc leet                                         Pour                                                                   utiliser lhrmement
cheur est maintenu apbuv6. I'apoareil et le   moteur mont6. il suffit de metlie I'interrup-
moteur continueront dtoridrbr en's erie conti-    tetrr de ce defnier sur off. puis dhvancer Ienue i une cadence d'd p€u prds deux images   film avec le levier d'armetbnt de I'appareilpar seconde.                        comme en utilisation.normale.  Il n€sl pas
                                             ndessaire de ddmonter le moteur pour op6-
            d'exposition                                                     rer ainsi.- Contrdle            qulune exposition est faite, laChaque         fois
            I'arridre                           shllume pour              du                   mbteurLED sur
                      passe        que                        normalement.indiquer             tout se                                      Ce    -l- DdmontaseMettre lliterruoteurdu moteursur off.t6moin s'allume i draque prise de vue.         2- Tor.nner le papillon de la vis dans le sens                                                  inverse des aigfilles d'une montre jusqu'i d6-
- En fin de film                            tachement du moteur.Lorsque I'on arrirrc i la fin du film. I'aDDa-reil 6t le moteur s'arr€tent autoriratiqire-   Notes  :ment. A ce moment la lampe tdmoin LED    l- S'assurer que f interruptetrr du moteur est
reste allumee continuellemenl, pour indiquer    sur off. Si. @lui-ci 6tant inontd surlhppareilque la dernidre vue a 6t6 prise."          on utilise'le retardateur. sinon I'abbareil
                                               fonctionnera en continu ef orendra oliriieurs
- Rembobinage du film                      vues jusqu'd ce que le retdrdateur libdrel- Mettre I'interrupteur sur off et appuyer   d6clencheur.                                      lesur le d6brayage du rembobinage (Fig.tr).   2- S'assurer que llnterrupteur est sur off2- Rembobiner le film en tournant la mani-   lorsque l'on d6tadre le mbteur du boitier.
velle dans le sens des aiguilles d'une montre   Ne pas essayer de mettrele moteuren mardrejuqu'au moment otr celle-ci tournera libre-  en mettant en contact direct les bornes de
ment (Fig.9).                                        celui-ci quand il est enlevd du boitier. Cette
                                            avoir   faqgn de proc6d-er endommagerait le moteur,3- Enlever la cassette du film aprds-rechargerourert le dos de I'appareil, et               et risquerait de le mettre en panne parce que
un autre film, si besoin^e'st.                         le fusible interne sauterait.
View original page 14Page 15 · Read text
Frangais


                                                         :                                          Remarques                                                         au                                                                  des                                                                          suiet                                                                                 oiles  :  - Caract6ristioues                                                                           pil6s            comolatible   Aooareil                                                 : Mamiva ZE                                                                                             I - Enle?er les                                                                                                  si                                                                   Mamiya n'est                                                                               le inoteur  Cidene d'utflisation  : i peu prds der.rx ima-   pas utilis6 pendant une lonsue oeriode afin
        ges/seconde en continu et vue Dar vue.      il'6viter un6 06t6rioration pbssi6le par fuite  Gamm]e de vitesse utilisable  : au 1/1d00o s. i    des piles.         I seconde et pose B (connecter auto-    2- l*,s piles au manqandse oeurent ar.rssi €tre       matiquement au vue par vue arec la    utilisees mais le no'mbre de films exploita-
        pose B).                                   ble par -ieu de piles est moindre.  Commande de mise en marche : par le d6-   3- Les  perfor'mances des piles sont moins
        clencheur de I'appareil.                                          bonnes far basse temp6ratfre, aussi les piles                           -par  T6moin de marchg :     allumage p€riodi-  au cadriium nickel cloiventelles €tre iou-       que de la LED.                           -dcalineioun chareees comoldtement. Irs  oiles                                                                                         gardee^s au  T6moin {e fin de film  : 6dairage en continu            nrahgandse dbivent €tre        de la LED.                            chaud dwant leur utilisation.
  Alimentation  : ouatre oiles  l -5 volt tvoe AA   4- Les quatre piles doivent €tre remplacees
             al caline, niangandse ou'cedniurir hictet    ensembl-e. Ne lamais m€langer d'anciennes  Autonomie  : (arrec des films 36 poses A tem-    piles avec des neures. ne Das utiliser des oiles
       p6ratwe normale).                         louillees sinon il poundit en r6trlter'des        ftO films ou phis arrcc piles alcaline     fuites.
        mangandse.                              5- Ia duee des piles varie suivant leur tvoe.
       120 films ou plus avec piles cadnium     le stockage aordsTabrication.le temm 6cbil6
         nickel                                 depuis la fa6rication, leur dsage en'continu
  Dimensions  : largeur 139,5 mm, profondeur   ou par intermittan@,le type de film utilis6
        36.5 mm.hauteur 32.5 mm.                  et la temp6ratwe ambiante.
  Poids* Ces:270caract6ristiques$ sins piles.sont susceptibles de
  changer sans nouvelle notioe.


                                             www.butkus.us
View original page 15Page 16 · Read text
ffiMotor de avance MamiyaZE   Montaje del motor de avance Mamiya ZE                                        en la cilmara
                       que Los n0meros                            se                                    citan          de                                en todas las                 la figuras                                              1. El lntenuptor debe estar en posicion de apagado                                     pdginas                                        las                                              desplegables               se instrucciones                   refieren                       a las de                                                                           al                                                                            (ris El) final del folleto.                                          2. Colocar el motor de avance Mamiya ZE en la
 Nombre de las piezas (Fig.ll)                base de la camara, alinedndolo correctamente
 1. Clavija de posicion                                 mediante  la Clavija de Posici6n  (fig Gl). 2. Acoplamientodelmotor                      3. Sujetar el motor de avance a la c6mara girando
 3. Contactosel6ctricos                             la Palomilla de Sujeci6n, poner el lnterruptor en
 4. Tornillo de sujeci6n                                  posicion de encendido V con esto queda listo para
 5. Tapa delalojamiento de las pilas                    funcionar el motor de avance Mamiya ZE (fig.E).
 6. Cierre delalojamiento de las pilas                Con el motor de avance montado y la cdmara puesta
 7. LAmpara piloto (diodo emisor de luz)            en "AUTO" se pueden tomar series db fotos en
 8. lnterruptor                                      secuencia, cada una con la exposici6n debida.
 9. Palomilla de sujecion                         Tambien se pueden tomar fotos con la cdmara
10. Boquilla para adaptar tripode                   en posici6n "AE Lock", en cuyo caso la exposicion
 1 1. Bot6n de rebobinado                      de todas las tomas se efectuard con los valores
                                                            fijados en la primera. Utilicese de este modo soloColocaci6n de las pilas                           cuando sea necesario.
Abrir el CIERRE DEL ALOJAMIENTO DE LAS ptLAS
empujAndolo.y sacar la tapa tirando hacia afuera    Disparo
(rig.El  )                                                El funcionamiento del motor de avance Mamiya ZE
Colocar las pilas con los polos positivo y negativo    se dirige mediante el disparador de la cAmara.
como se indica y volver a colocar la tapa (fig.ED.    Al efectuarse un disparo el motor avanza auto-
Tambi6n se pueden colocar las pilas en la Tapa     m6ticamente la pelicula y deja montado eldisparadordel Alojamiento e introducirlas en el mismo al     para la siguiente toma.
colocar dicha tapa (fig 4).
                                             l0
View original page 16Page 17 · Read text
Para tomar fotos una a una hay que quitar el dedo    2. Rebobinar la pelicula girando hacia la derecha
del disparador inmediatamente despu6s de disparar.     la manivela de rebobinado de la c6mara, hasta
De este modo, la pelicula avanza un cuadro y se   que se sienta que cesa la resistencia (fig 9).
detiene automaticamente. Pero si se mantiene la    3. Sacar de la cAmara la pelicula expuesta, abriendo
presion sobre el disparador, la cdmara y el motor       la tapa trasera de la misma.
de avance seguirdn   f uncionando ininterrumpidamente,
sacando fotos en secuencia a (azon de 2 cuadros   Avance manual
por segundo, aproximadamente.                       Sise desea avanzar la pelicula manualmente estando
                                                       el motor de avance montado, basta apagar 6ste ylndicador de disparo                                                avanza( la pelicula accionando la palanca de la
El diodo emisor de luz situado en la parte de atrds    camara normalmente sin necesidad de desmontar
del motor de avance se enciende cada vez que se     elmotor.
toma una foto, indicando que el funcionamiento es
normal. Esta indicacion se hace mediante el parpadeo   Desmontaje del motor de avance
de la luz.                                    1. Poner el lnterruptor en posicion de apagado.
                                            2. Girar la palomilla de sujecion hacia la izquierda,
Al final del carrete                              hasta que se separe el motor de avance de laCuando se acaba la pelicula se detienen auto-    camara.mdticamente la c6mara y el motor se detienen
autom6ticamente y la lampara piloto se queda    Notas
encendida sin parpadeo, indicando con esto que    1. Cuando se deseen tomar fotos de disparos
el carrete se ha terminado.                              retardados estando el motor de avance ZE montado
                                              en la c6mara, debe apagarse el interruptor de aqu6l;
Rebobinado de la pelicula                     de lo contrario la c6mara seguird disparAndose auto-1. Apagar el lnterruptor y pulsar el Boton de    m6ticamente de6pu6s del primer disparo retardado.
Rebobinado (fig.tr).
                                           www.butkus.us
                                                  11
View original page 17Page 18 · Read text
II

i

I

I

I
I       2. No olvidar apagar el lnterruptor del motor de        Con pilas AA de niquel-cadmio: aprox. 120
       avance antes de desmontarlo de la c6mara. No               rollos o mds.
           intentar hacer funcionar el motor de avance haciendo      Dimensiones:139,5largo  x 32,5 alto x 36,5 mm. ancho.
        conexion directa en los contactos cuando est6     Peso: 210 g. sin pilas.
        desmontado de la camara. De este modo se quema   a  Estas especificaciones pueden variar sin previo
         el fusible interno y el motor no podr6 seguir fun-      aviso.
         cionando.
                                                   Notas sobre las pilas
        Especif icaciones                             1. Quitar las pilas del motor de avance Mamiya ZE
       CAmara en la que se puede montar: Mamiya ZE.    cuando no se vaya a utilizar durante un cierto tiempo
        Velocidad de disparo: aproximadamente 2 cuadros     para evitar que se estropee por escape de las pilas.
             por segundo continuamente o foto a foto.    2. Tambi6n puede funcionar con pilas de manganeso,
        Velocidades del obturador: 1/10OO hasta 1 seg. y B    pero su duraci6n, en cuanto al numero de rollos,
               (estando la c6mara en B el motor de avance     es menor.
             cambia automaticamente a funcionamiento    3.  El rendimiento de las baterias baja a temperaturas
                   foto por foto).                                                frias, por lo que las pilas de Ni-Cad deben estar a
        Disparo: mediante el disparador de la cdmara.     plena carga. Las pilas de 6lcali-manganeso deben
         lndicacion de disparo: por diodo fotoemisor  in-     conservarse calientes mientras se trabaja.
                  termitente.                                4. Las cuatro pilas deben cambiarse al mismo
         lndicacion de fin del carrete: por diodo fotoemisor  fijo.     tiempo, sin mezclar nunca nuevas y viejas ni las de
  il     Fuente de energia: 4 pilas de 1,5V. tamano AA,      distintas marcas, para que no se produzcan fugas.
           ya sean de 6lcali-manganeso o de niquel-    5. La vida de las pilas varia seg0n varios factores:
                cadmio.                                     su tipo, el modo en gue hayan estado almacenadas,
   il       Duracion de las pilas con pelicula de 36 exp. a tem-     el tiempo transcurrido desde su fabricaci6n, el tipo
                 peratura normal:                          de pelicula, la temperatura ambiente y seg0n hayan
            Con pilas AA de 6lcali-manganeso: aprox. 60     trabajado continua o intermitentemente.
                 rolloso mds.
                                                                                                    tt
                                                                /zz                                                 /
View original page 18Page 19 · Read text
Mamiya Winder ZE             Accoppiamento alla macchina fotografica                                           1. Controllate che l'interruttore d'accensione sia     illustrazioni                   citate                       nel Le                           testo sono raccolte nel riwolto                                                                        in posizione di esclusione (fig. El). di   copertina,                in fondo                            al                              libretto.                                         2. Sistemate  il Mamiya Winder ZE alla base della
Elementi costitutivi  (fig. E  )                             della fotocamera, badando che  il perno di centraggio
 1. Perno di centraggio                            vada a incastrarsi nel foro corrispondente del corpo
 2. Accoppiatore                                 macchina (fig.Gl).
 3. Contattielettrici                           3. Girate in senso orario la chiave di bloccaggio
 4. Vite difissaggio alla fotocamera                  per rendere il motore solidale alla macchina foto-
 5. Coperchio del vano portabatteria                       grafica. Una volta attivato I'interruttore d'accensione,
 6. Chiavistello del vano portabatteria                                  il Mamiya Winder ZE e pronto a entrare in azione
 7. Luce pilota (LED)                                    (lig.E)
 8. lnterruttored'accensione              A questo punto, se il selettore di funzionamento
 9. Chiave di bloccaggio                                 della Mamiya ZE d impostato su "AUTO" tutte le
10. Attacco filettato per treppiede                          fotografie scattate successivamente risulteranno cor-
1 1. Pulsante di sblocco del riavvolgimento               rettamente esposte anche qualora le condizioni  di
                                                  luce dovessero cambiare nel frattempo. C'e purelntroduzione della batteria                                                           la possibilitd di fotografare in "AE LOCK", cio6 colSpingete in su  il cursore che funge da chiavistello                                             blocco dell'esposizione automatica; in tal casb,di chiusura del vano portabatteria e liberate  il     pero, tutte le fotografie della serie saranno scattatecoperchio del vano slesso tirandolo in fuori (fig.El)                                               mantenendo  il valore d'esposizione determinato dalla                       portabatterialntroducete            nel             vano                                                 elem'enti                                                           i quattro                                                       per                                                                                           quindi 6                                                                   fotogramma                                                                                                   il primo                                                                                   -     misura                  rispettando                                      ("+"        AAdella                             le polarita                              e "-")    fotocamera                                                                                                           discrezione.                                                                      usarsi                                       una possibilitd                                                         con molta                                             daindicate, quindi riapplicate   il coperchio (fig.El)
Le pile o gli accumulatori Ni-Cd possono anche
essere prima sistemati nel coperchio e poi inseriti
nel vano portabatteria riapplicando  il coperchio
stesso (fig.ED.                                 www.butkus.us
                                               13
View original page 19Page 20 · Read text
Scafto delle fotografie                      Riawolgimento della pellicola
ll funzionamento del Mamiya Winder ZE dipende    1. Portate I'interruttore d'accensione in posizione
dal pulsante di scatto della macchina fotografica.     di esclusione e schiacciate il pulsante di sblocco
Ogni volta che si preme tale pulsante,  il sistema di     del riavvolgimento  (fig. tr)
trasporto motorizzato ta avanzare automaticamente   2. Ribaltate in fuori la manovella della manopola
la pellicola e ricaricare I'otturatore, sicch6 la foto-    di riavvolgimento e giratela in senso orario finch6
camera d subito pronta a scattare un'altra foto-   non avvertite che la sua resistenza diminuisce
grafia.                                                           (fig.9  ).
Se volete scattare una fotografia per volta, non   3. Aprite il dorso dell'apparecchio, prelevate da
avete che da levare il dito dal pulsante di scatto    quest'ultimo la pellicola impressionata e, se pre-
dopo ogni ripresa; il motore si ferma automatica-    vedete di continuare a lotografare, introducetevi
mente dopo aver fatto avanzare la pellicola fino     un caricatore di pellicola vergine.
al fotogramma successivo. Tenendo abbassato   il
pulsante di scatto, invece, la fotocamera e il motore    Funzionamento manuale
di trasporto rimangono in funzione per fotografare    La leva di ricarica della macchina fotografica puo
in serie continua a un ritmo di circa 2 fotogrammi    essere azionata manualmente anche se la foto-
al secondo.                                   camera monta  il Mamiya Winder ZE, purch6  l'inter-
                                                              ruttore di quest'ultimo sia in posizione di esclusione.
lndicatore di funzionamento
Ogni volta che scattate una fotografia,  il LED vi-   Smontaggio del Mamiya Winder ZE
sibile sul dorso del sistema motorizzato Winder ZE    1. Disinserite I'interruttore d'accensione.
lampeggia per segnalarvi che tutto funziona normal-   2. Fate rotare in senso antiorario la chiave di
mente e, impressionato  il fotogramma, la pellicola    bloccaggio fino a liberare il gruppo motorizzato
6 gid in posizione per lo scatto successivo. Se    dalcorpo macchina.
questa "luce pilota" resta accesa in continuazione,
significa che la pellicola 6 finita.

                                              t4
View original page 20Page 21 · Read text
Note:                                                     lndicatore di funzionamento: LED a luce lampeg-
1. Prima di fotografare coll'autoscatto, portate in             giante ("luce pilota").
posizione di esclusione il gruppo motorizzato per     lndicatore di fine pellicola: LED a luce continua.
evitare che la macchina continui a scattare foto-     Alimentazione  elettrica: quattro pile alcalino-manga-
grafie in serie dopo I'intervento iniziale dell'auto-         nese o accumulatori ricaricabili al nichel-
scatto.                                                 cadmio (Ni-Cd), misura AA.
2. L'interruttore d'accensione del Mamiya Winder    Numero di caricatori impressionabili con una batte-
ZE deve essere disinserito al momento di smontare      ria fresca (usando caricatori da 36 pose, a tempe-
il gruppo motorizzato dal corpo macchina.                   ratura normale):
3. Non cercate di far funzionare  il Mamiya Winder          almeno 6O caricatori con quattro pile alcalino-
ZE cortocircuitandone i  contatti elettrici mentre          manganese misura AA;
d staccato dalla fotocamera: provochereste  la          almeno 120 caricatori con quattro accumulatori
bruciatura del fusibile interno e pertanto il gruppo            Ni-Cd misura AA, per ogni ricarica.
motorizzato diventerebbe  inutilizzabile.                  Dimensioni: allezza 32,5mm, larghezza 139,5mm,
                                                              profonditd 36,5mm.
Datitecnici del Mamiya Winder ZE            Peso: 2109 (batteria esclusa).
Fotocamera motorizzabile: Mamiya ZE                   oTutti  i dati tecnici sono soggetti a modifica senza
Cadenza di scatto: lino a 2 fotogrammi al secondo,      preavviso.
         in serie continua o singolarmente.
Tempi d'otturazione  utilizzabili: da 1 a 1/1000  di
      secondo, piO la posa indeterminata "8" (con
     "B" si ha la commutazione automatica al
                        f unzionamento a singoli fotogrammi).
Comando di scatto: pulsante di scatto della foto-
       camera.

                                           www.butkus.us
                                               15
View original page 21Page 22 · Read text
Cura della batteria
1. Se prevedete di lasciare inutilizzato  il Mamiya   4. Non appena la funzione di trasporto della pelli-
Winder ZE per lungo tempo, levatene la batteria    cola comincia a rallentare, la batteria deve essere
per evitare fenomeni  di corrosione.                    cambiata o ricaricata in blocco (tutti e quattro gli
2. Si possono usare anche pile al manganese, ma    elementi contemporaneamente). Non mettete as-
in tal caso il numero dei caricatori impressionabili    sieme elementi di diversi tipi, n6 elementi nuovi
con una batteria fresca si riduce sensibilmente.   e altri piu vecchi (potrebbero verificarsi fenomeni
3.  ll rendimento delle pile e degli accumulatori     dicorrosione).
cala rapidamente alle basse temperature. Quando    5. La durata utile della batteria puo fluttuare entro
fa molto freddo d sempre consigliabile cominciare    ampi limiti a seconda della marca, del tipo e del
a fotografare con una batteria Ni-Cd caricata  di     periodo trascorso dalla data di fabbricazione, nonch6
recente; quanto alle pile alcalino-manganese,  cercate     della maniera in cui ve ne servite (continuamente
di ripararle dal freddo durante I'uso.                o saltuariamente), delle pellicole che usate e delle
                                                        temperature ambientali  in cui operate.


                                              16
View original page 22Page 23 · Read text
@                                                       camera bevestigen van de Mamiya                                            Onder de   Mamiya Winder ZE                                                    ZE                                                 Winder
      De nummers van de afbeeldingen  in de gebruiksaanwijzing     1. Zel de batterijschakelaar op "OFF" (fig.E).
       verwijzen naar de afbeeldingen op de achterflap van de     2. Breng de Mamiya Winder ZE op zijn plaats
        gebruiksaanwijzing.                                   onder de camera, de justeerpen zorgt daarbij
                                                        voor de juiste positionering (fig.@).
     De verschillende onderdelen (fig.E)               3. Bevestig de Winder onder de camera door de
        1. Justeerpen                                       vleugelschroef aan te draaien. Zet u nu de
        2. Filmtransportkoppeling                              batterijschakelaar op "ON", dan is de Mamiya
        3. Electrische contacten                         Winder ZE klaar voor gebruik (fig. B).
        4. Bevestigingsschroef                          Staat de camera op "AUTO" ingesteld, dan
       5. Deksel batterijcompartiment                  wordt bijgebruik van de Mamiya Winder ZEelke
        6. Sluiting batterijcompartiment               opname goed belicht, ook als tifdens een reeks
        7. Signaallampje  - LED                     opnamen de verlichtingscondities veranderen.
        8. Batterijschakelaar                        Ook is de automatische beliclitingsregeling met
        9. Bevestigingsvleugelschroef                   vastgehouden lichtmeting (AE Lock) mogelijk.
      10. Statiefmoer                                    ln dat geval worden echter alle opnamen ge-
          1 1. Ontgrendeling terugwikkelknop               maakt met de voor de eerste opname gemaakte
                                                                    instelling, Pas dit alleen toe als het beslist nodig      lnleggen van de batterijen                                                                                              is.
     Druk de sluiting van het batterijcompartiment
     omhoog en open het batterijcompartiment door    Onlspannen Yan de sluiter
      het deksel eruit te trekken (fig.El).'                                         De Mamiya Winder ZE wordt bediend door de
      Steek de batterijen in het batterijcompartiment     ontspanknop van de camera. Na het ontspannen     met plus (*) en min (-) polen als daarin aan-    van de sluiter transporteert de Winder de film
     gegeven: sluit het batterijcompartiment weer     automatisch en spant de sluiter weer voor de              (f ig.E).                                                   volgende opname.    Ook kunt u de batterijen eerst in het deksel
      zetten en deze dan als batterijhouder in het
      batterijcompartiment steken (fig.4).               www.butkus.us                                                  I7
View original page 23Page 24 · Read text
Voor enkelbeeld-opnamen  laat u zodra de sluiter       klok mee te draaien tot u voelt dat de weer-
ontspannen is de ontspanknop direkt los. De      stand plotseling wegvalt (fig.pl).
Winder transporteert de film dan 66n beeld en    3. Open de camera-achterwand, neem de be-
stopt automatisch.                                            lichte film uit de camera en leg erdesgewenst
Wordt de ontspanknop ingedrukt gehouden,      een nieuwe film in.
dan blijven camera en Winder werken en maken
met een snelheid van ca. twee opnamen per    Handbediening
seconde, een reeks opnamen.                     Wilt u, met de Winder onder de camera ge-
                                               schroefd, de film met de hand transporteren
lndicatie van de werking                    dan zet u de batterijschakelaar op "OFF" en
Bij elke opname zal de LED achterop de Winder    gebruikt u gewoon de filmtransporthendel.oplichten. Dit geeft aan dat alles normaal    De winder hoeft voor handbediening niet onder
funktioneert. Deze indicator licht op telkens als    de camera vandaan genomen te worden.
een opname wordt gemaakt.
                                          Losnemen van de Winder
Einde van de lllm                                  1. ZeI de batterijschakelaar op "OFF".
Heeft u de hele  f ilm belicht, dan stoppen camera    2. Draai de vleugelschroef tegen de wijzers van
en Winder automatisch. Het signaallampje  -     de klok in tot de Winder loskomt van de
LED - zal nu blijven branden wat aangeeft dat       camera.
het eind van de film is bereikt.
                                               Opmerkingen:
Terugwikkelen van de lilm                          1. Vergeet bij $ebruik van de zelfontspanner1. Zel de batterijschakelaar op "OFF" en druk      met de Winder ZE onder de camera ge-
  de ontgrendeling van de terugwikkelknop  in       schroefd, niet de Winder uit te schakelen
    (fig.El).                                   omdat anders de carnera bij het ontspannen
2. Wikkel de film terug door de terugwikkel-       van de sluiter meerdere opnamen zal maken.
   slinger van de camera met de wijzers van de     2. Verge'et ook niet de batterijschakelaar op


                                               18
View original page 24Page 25 · Read text
"OFF" te zetten als de Winder van de camera    Opmerkingen oYer de batteriien
   wordt genomen. Probeer niet de Winder te     1. Wordt de Mamiya Winder ZE langere tijd
   laten werken door de contacten van de losse      achtereen niet gebruikt, neem de batterijen
  Winder kort te sluiten. Dit zal de Winder      er dan uit om mogelijke beschadiging als
   onbruikbaar maken omdat de zekering in       gevolg van lekkage te voorkomen.
   het inwendige zal doorbranden.                 2. U kunt ook mangaanbatterijen gebruiken,
                                             maar het aantal films dat met een stel batte-
Technische gegevens                                     rijen kan worden getransporteerd is kleiner.
Geschikt voor camera: Mamiya ZE                3. De prestaties van de batterijen zijn bij lage
Transportsnelheid: tot ca. 2 opnamen per sec.,       temperatuur minder, gebruik daarom altijd
    continu of enke!beeld.                           geheel geladen Nicad-batterijen. Houd alkali-
Bruikbaar sluitertijdbereik: 1/1000 - 1 s. en B      mangaan batterijen tijdens het gebruik warm.
     (schakelt op B automatisch over op enkel-     4. Vervang altijd alle vier de batterijen tegelijk.
     beeld).                                       Gebruik nooit oude en nieuwe of batteriien
Bediening: Via de ontspanknop van de camera.      van verschillend merk door elkaar omdat
lndicatie van de werking: Oplichtende LED.         hierbij lekkage kan ontstaan.
Voeding: Vier 1,5 V alkali-mangaan of Nicad-     5. De levensduur van batterijen is afhankelijk
      batteri jen (AA-formaat)                       van het soort batterij, de opslagtijd na fabri-
Aantal films: (Bij gebruik van 36 opnamen films       cage, en hoe oud ze zijn, of ze continu of
   en bij normale temperatuur)                     van tijd tot tijd gebruikt worden, het gebruikte
    Alkali-mangaan batterijen (AA-formaat):        soort film en de omgevingstemperatuur.
    ca. 60 films of meer.
    Nicad-batterijen (AA-formaat):  ca. 120 films
    of meer.
Afmetingen: 139,5 x 36,5 x 32,5 mm (b x d x h).
Gewicht: 210 9., zonder batterijen.
o Wijzigingen voorbehouden zonder vooraf-
  gaande kennisgeving.
                                          www.butkus.us
                                               19
View original page 25Page 26 · Read text
'
                                          Montering av Mamiya Winder ZE pi kame-Mamiya Windet ZE                                                ran
 Siffrorna  i  bruksanvisningen hinvisar till  bilderna pt     1. Kontrollera att strombrytaren  iir avstdngd  (f ig.
 utvikningsidorna  lingst bak.                         E).
                                                                                                plats under kameran                                                Mamiya                                                            Winder                                                    ZE pA                                                               2. SdttBeskrivning (fis.ll1                                                                                                    (fig.El).                                                                   passa                                           genom                                                                      att                                                                                  in styrstiftet
   1 .  Styrstift                                               3. Skruva ddrefter fast Windern med fasts6ttnings-
 2. Frammatningskoppl ing                          skruvgreppet. Sett d6refter pA strombrytaren och
 3. Elektriska kontakter                     Mamiya Winder ZE dr nu klar for anvdndning 4.  Fastsdttningsskruv                                        (fig.fl1. Ndr Mamiya Winder ZE anvdnds och kame-
 5. Batterikammarlock                             ran dr instdlld p6 "AUTO", blir varje exponering
 6. Spdrr ftir batterikammarlock                   korrekt exponerad iiven om ljusforh6llandena
 7. Klarsignal                                Sndras under fotograferingssekvensen. Sekvens-
 8. Strombrytare                                      fotografering med instdllning "AE Lock" 6r Sven 9. Fastsdttningsskruvgrepp                            mojligt. Med denna instdllning blir alla bilder ex-
10. Stativgdnga                                   ponerade med samma ljusvdrde som forsta bilden
 1 1. Aterspolningsknapp.                              (anvdnds bara vid speciella tillfdllen).
lsdttning av batterier                         Avtryck
Skjut spSrren for batterikammaren upp6t och tag   Mamiya Winder ZE fungerar med kamerans av-
av locket genom att dra det rakt ut (fig.El).Sett    i    tryck. SA fort slutaren har exponerat drar Windern
batterierna och se till att (*) plus och (-) mjnus-   automatiskt fram filmen och spanner slutaren s5
polerna kommer emot motsvarande markeringar     att kameran 5r klar for ndsta exponering.
(fig.@1. Sett derefter p6 locket. Batterierna kan    Vid singelexponering:  slSpp avtrycket direkt efter
Sven placeras i locket innan dom sdtts in i batteri-    att slutaren 5r utlost. Windern matar fram filmen
kammaren (fig.41.                                         ett steg och stannar automatiskt,

                                            20
View original page 26Page 27 · Read text
Vid sekvensfotografering:  h6ll avtrycket nere, ka-    Manuell frammatning
mera/Winder fungerar nu automatiskt med upp till     Vill Du mata fram filmen manuellt ndr Windern 6r
2 bilder per sekund.                              monterad 6r det bara att stengo av strcimbrytaren
                                           och anvdnda kamerans frammatningsarm pE van-
Funktionsindikerihg                                    ligt sdtt. Windern behciver inte demonteras om
Efter varje exponering blinkar klarsignalen pA    filmen skall matas fram manuellt.
Winderns baksida och indikerar att allt fungerat
normalt. Klarsignalen skall blinka efter varje   Demontering av Mamiya Winder ZE
exponering.                                                     1. St6ng av strcimbrytaren
                                                              2. Vrid fastsettningsskruven  moturs tills Windern
Ndr filmen dr slut                                      sldpper fr5n kameran.
Ndr hela filmen 5r exponerad spdrras kameran och
windern automatiskt. Klarsignalen lyser konstant     Observera:
ndr  f ilmen dr slut.                                              1. Om Winderir 5r monterad pt kameran och Du
                                                         skall anvdnda sjdlvutlosaren mSste str6mbrytaren
Aterspolning av filmen                            stangas av. Om s6 ej sker kommer kameran att
1. Stdng av strcimbrytaren och tryck in 6terspol-    exponera flera bilder tills sjdlvutlijsaren g6tt 6nda
ningsknappen (fig. El).                                       ut.
2.Fell ut 6terspolningsveven pt kameran och veva     2. Kontrollera att strcimbrytaren  iir avstengd innan
medurs tills det borjar 96 l6tt. Filmen 6r nu tter-   Windern demonteras fr6n kameran. Fors6k aldrig
spolad (fig.91.                                         aktivera Windern genom att kortsluta kontakterna,                                             ndr den inte 5r monterad p€ kameran. Windern3. Oppna kameran, tag ur den exponerade filmen
och ladda med ny film.                             skadas och kommer inte att fungera p.g.a. att den
                                                   inbyggda sikringen 96r.

                                           www.butkus.us
                                            2T
View original page 27Related documents and language editions
From the M. Butkus archive. Original publisher and archive notices are retained.
Check the model and edition against your equipment.
PDF verified 2026-10-10.