Film cameras
MINOX M-D-C User manual
User manual for MINOX M-D-C. 12 pages in English. Read the original PDF, download or print a copy without registration.
12 pagesEnglish3.9 MB PDF
Loading your manual…Open PDF directly
Document details
- Brand
- Minox
- Model / document
- MINOX M-D-C
- Document type
- User manual
- Language
- English
- Pages
- 12
- File size
- 3.9 MB
- Category
- Film cameras
- Document date
- Not specified in catalog
Search available document text
Find a term, then jump to its page in the original PDF. Image-only pages may not be searchable; check the PDF for exact wording and diagrams.
Page 1 · Read text
www.butkus.us

                   Minox M D C


           MINOX M·D·C Instruction Manual


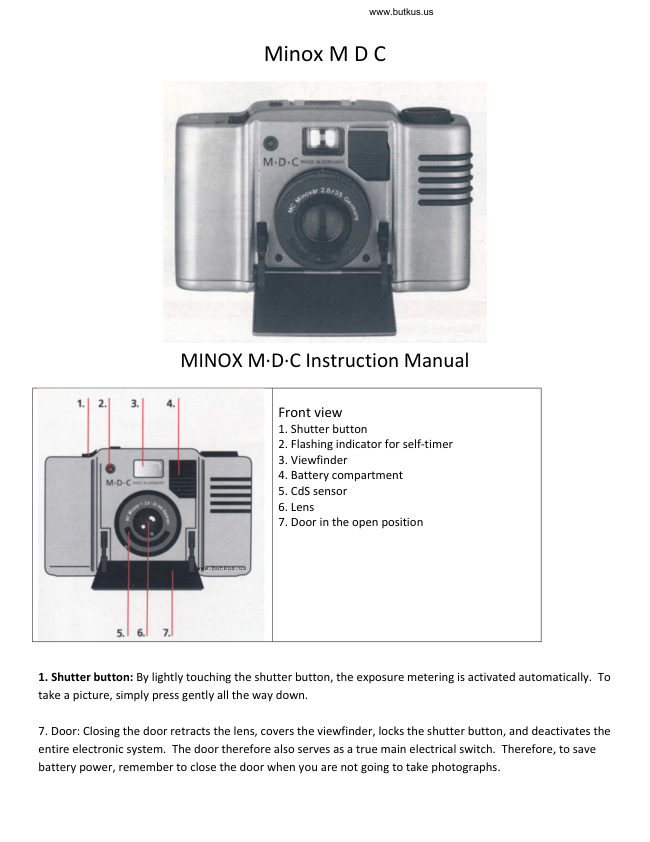
                                     Front view
                                                  1. Shutter button
                                                  2. Flashing indicator for self-timer
                                                  3. Viewfinder
                                                  4. Battery compartment
                                                  5. CdS sensor
                                                  6. Lens
                                                  7. Door in the open position


                                         www.butkus.us


1. Shutter button: By lightly touching the shutter button, the exposure metering is activated automatically. To
take a picture, simply press gently all the way down.

7. Door: Closing the door retracts the lens, covers the viewfinder, locks the shutter button, and deactivates the
entire electronic system. The door therefore also serves as a true main electrical switch. Therefore, to save
battery power, remember to close the door when you are not going to take photographs.
View original page 1Page 3 · Read text
www.butkus.us

Insert the battery


                                                         All of your camera's electronic components are
                                      powered by a lithium battery (maximum
                                         performance even at temperatures below 0°C).

                                           During breaks between photographs, close the
                                                front cover, thus saving unnecessary battery
                                                  drain.


                       www.butkus.us


Examples of usable lithium batteries:
• Duraceli PX 28 L
• Ucar L544 (PX 28L)
• Varta V 28 PX L

Insert the battery: Push the knurled front plate of the battery compartment upward. Pull the battery
compartment completely out. Insert the new battery with the positive terminal facing forward. Then replace
the battery compartment, complete with battery, and insert it into the camera until it stops.


Battery test:
Press the control button after dragging the film. The red dot in
the viewfinder and below the letter P remains lit for several
seconds, always maintaining the same brightness: the battery is
fine.


The red light doesn't light up: There is no battery in the camera, or it's flat, or the battery was inserted
incorrectly.
After 2-3 seconds, the red light becomes noticeably dimmer: the battery is flat and should be replaced as soon
as possible.

Insert the film


                                                 1) Or unlock the back (the red dot becomes
                                                          visible).
View original page 3Page 4 · Read text
2) Remove the back. Release the shutter,
                                    resetting the frame counter.


                                        3) Insert the cartridge


                                    4) Slowly operate the taking lever until the
                                     film stopper on the take-up spool opens. Pull
                                the film and insert it between the spool and
                                the film stopper.

www.butkus.us

                                    5) 8. Pull the drive lever just enough so that it
                                                is taut over the drive channel, covering the red
                                dot visible on the drive channel. If necessary,
                                  press the shutter release button.


                          6) Hook the back.


                          7) Lock the back by flipping the lever. The red dot is
                        covered. Press the lever again, shoot, and drag again.
                     The frame counter is at the 0 position.

                      ISO Scale: Set the sensitivity according to the film used.
                     The camera is now ready for action.
View original page 4Page 5 · Read text
www.butkus.us

                              Attach the back. Remove the film

                                          1. Drive system release button
                                          2. Tripod thread
           www.butkus.us                       3. Rewind crank


                       Press the film release button. Rewind the film. Unlock the back (the
                      red dot becomes visible). Remove the back and remove the magazine.


Setting the distance


                            Adjust the meter dial so that the number is between the two
                             points of the red index.

                          Example: the subject is 2 meters away.


Depth field


                          The depth of field (i.e., the area outside the set distance in
                           which the photograph is sharp) depends on the aperture: the
                               smaller the aperture (the smallest is 16), the greater the depth
                                of field. The larger the aperture (the largest is 2.8), the wider
                             the lens is opened for exposure. This results in a faster shutter
                             speed, given the same lighting conditions, but a smaller depth
                                of field.

                          The depth of field for each aperture can be read on the C.d.P.
                                 indicator (only with automatic aperture preselection - see
                               "Exposure"). Due to lack of space, f. 4 is represented by two
                              dots to the right and left of the index, while f. 2.8 is given by
                             the width of the red index (minimum C.d.P.).

Example: Depth of field from 2 to 3 m with the maximum aperture of 2.8 (red mark). Same setting as the
distance scale, but depth of field relative to the maximum aperture of 16: from 1.20 m to infinity.
View original page 5Page 6 · Read text
Exhibition
The Minox MDC offers two exposure modes:
1. Program Automatic Program
Automatic simultaneously determines how much the lens should be open for the exposure f (aperture) and
how long it should remain open (shutter speed). This is therefore the simplest, fastest, and most convenient
way to use the camera. However, there is no indication of the aperture, depth of field, or shutter speed set by
the camera, and therefore, there is no possibility of overriding them.
2. Aperture Priority
Automatic The automatic exposure mode will determine the correct exposure based on the currently set
aperture and automatically perform this function; a light press on the shutter button will display the set
shutter speed in the viewfinder. The depth of field is indicated on the lens barrel (see: "Depth of Field").


                              Set the aperture ring to P. A light press on the shutter button
                                     will allow you to see in the viewfinder, after opening the door
                         and operating the film advance system until it stops, a red dot
                                   lights up under the letter P.

                               This indicates that programmed autofocus is activated.


                          The program autofocus works within an operating range limited
                          from 1/500 of a second at aperture 16 (light value 17 with ISO
                                 film of 100/21°) to 1 second at aperture 2.8 (with ISO 1 00/21 or
                                          - Light value: 3).


With programmed automatic mode, you cannot influence the aperture and depth of field, but you still have
the minimum depth of field (corresponding to f/2.8. See "Depth of Field"), even in low light.


                             Long-time warning: If, in addition to the dot below the P, a
                           second red dot also lights up, of the diagonally hatched field
                             (on the right) this means that the set shutter speed is too slow
                               (slow shutter speed signal: shutter speed faster than 1/30 sec),
                           which is why you need to decide whether to use a flash or a
                                  tripod. When the program autofocus P is activated, both the
                               shutter speed indicator at the top of the viewfinder and the
                            overexposure warning (asterisk to the right, next to the
                         number 500) are not active.
View original page 6Page 7 · Read text
www.butkus.us

Photographing automatically at shutter speeds


                                                 Aperture-priority automatic exposure allows
                                        you to prefer (depending on the subject) a
                                               greater depth of field or a faster shutter
                                            speed. F/ 2.8, 4, 5.6, 8, 11, 16

                                              Set the desired aperture value on the aperture
                                                     scale.


                                                 Setting the aperture to a "full" value or an
                                             intermediate value activates—when not using
                                            the flash—the automatic exposure setting
                                          system called "aperture priority autofocus."
                                                 This automatic sets—according to the chosen
                                             aperture and the camera's film speed—the
                                               shutter speed that is appropriate, considering
                                            the brightness of the subject, to achieve
                                                correct exposure, within a range of possible
                                               shutter speeds from 1/500 sec to 1 second,
                                            with film of ISO 100/21 or


                        Aim the viewfinder at your subject and lightly press the shutter
                              button. A red dot lights up at the top of the viewfinder,
                                indicating the shutter speed the camera will use to expose the
                          frame when you press the shutter button again (for example,
                            "250" = 1/250 of a second).


Shutter speed is measured by pressing the shutter button, which is then stored in the camera's electronic
system.  If, after the first, light press, the shutter button (exposure metering) is not released, the red dot
indicating the shutter speed remains illuminated, but if it continues to move, the photo will be exposed with
the specific shutter speed that was stored.

Slow shutter speed warning: When measuring the shutter speed, the red dot below the dashed field and to
the left of the number 30 (1/30 sec) lights up: depending on the set aperture, the shutter speed is slower by
1/30 sec, and therefore—when working freehand—there is a risk of blurring due to camera shake when taking
the shot. Whenever possible, choose a wider aperture, use a tripod, and use a flash.
View original page 7Page 8 · Read text
Overexposure warning: When measuring the shutter speed,
                             the red dot below the asterisk, to the right of the number 500
                             (1/500 of a sec ), lights up: with the aperture you set, the
                           photo would be overexposed.  If possible, choose a smaller
                              aperture and measure the exposure again.  If, even with an
                              aperture of 16, the red overexposure warning dot does not
                              turn off, to take that photo anyway, you will need to use a gray
                                         filter mounted on the lens.


Storing exposure values
Automatic exposure metering takes into account primarily the central part of the frame, because this is where,
in most cases, the main subject of the photo is located. However, if for compositional reasons, the main
subject is shifted to the edges of the frame, it is advisable to use the memory lock.


                       Aim at the main subject of the photo so that it is in the center of
                          the frame, i.e., the viewfinder. Lightly press the shutter button;
                       one of the exposure meters in the viewfinder will light up, which
                      means that the camera has read the exposure.

Perform the measurement   DO NOT release the shutter button.
like this

                       Recompose the desired frame in the viewfinder, based on the
                                  field delimited by the bright frames. Gently press the shutter
                             release button all the way down.
                        The photo is taken.

...then frame and shoot

Proceed as indicated above ... then frame and shoot. Check that the indicator that illuminated in the
viewfinder when the shutter button (metering) was first pressed does not go out until the shutter button has
completed its travel and consequently exposed the frame. The stored value is erased the moment you release
the shutter button. Exposure values can be stored in both program and aperture-priority modes.
View original page 8Page 9 · Read text
www.butkus.us

Tower switch for backlighting


                           For shooting in difficult lighting conditions (backlighting, strong
                             side lighting), activate the backlight switch. Thus, you double the
                             shutter speed and the shadow area is brightened.


The backlight switch can be used in either program auto or aperture-priority auto. Setting the backlight switch
causes the light indicator in the viewfinder for the shutter speed actually set by the camera.

Self-timer


                    Move the small slider located on the right of the sighting eyepiece
                           to the left until it stops. A red field with a white "T" (=timer) will
                          appear.  If the self-timer is set, the shutter releases after about 10
                           seconds.

                       The light flashes with increasing frequency, indicating the passage
                            of time.


  www.butkus.us


Shooting with flash light
The Minox MDC flash shoe can accommodate any electronic speedlight with a centralized flash contact, not
just the special computer-controlled Minox electronic speedlights. Set the camera's aperture ring to a specific
aperture between 2.8 and 1.6 - read the instruction manual for the speedlight! - to avoid the risk of working
with the camera set to program automatic mode (P position on the aperture ring). Set the distance on the
camera as usual.  If the aperture has been set and the speedlight's electrical circuit is activated, the automatic
exposure control system for daylight shutter speeds will be deactivated; instead, the camera will set a fixed
shutter speed of approximately 1/1.25 of a second.
View original page 9Page 10 · Read text
Minox Speedlights for the MDC


                      Minox MF 35 ST
                           Small and powerful.
                        Guide number 1.8 with I2O 1.00.
                       Computer with two apertures and a power-saving circuit.


                      Minox MT 35
                       The professional.
                        Guide number 26 with I SO 1 00.
                        With variocomputer, energy-saving circuit, and swivel reflector.


Shooting with the tripod
The slow shutter speed warning in the viewfinder simply serves as a warning against the risk of camera shake
resulting from setting the camera to a shutter speed slower than 1/30 of a second, which is no longer
controllable by hand. In these cases, the camera is and remains in perfect working order, but it must be
placed on a firm base; best of all, mount it on a tripod. The Minox MDC is equipped with a 1/4" tripod thread.

Using a tripod: Screw the Minox onto the tripod using the threaded mount on the bottom of the camera body.
Slow shutter speed limit:
The longest exposure time allowed by the Minox MDC is 1 second, with 1000 ISO film 100/21 ; however, it varies
depending on the sensitivity of the film in the camera.


ISO                                        Maximum exposure time, approx.
25/1 5°                                          4 seconds
50/1 8°                                          2 seconds
100/21 °                                         1 second
                                                      1/2 second200/24°
                                                      1/4 second400/2]0
                                                      1/8 second800/30°
                                                    1/16 second1600/33°


                           Small and convenient. This is the Minox pocket stand; a three-
                          legged stand with a flexible trigger that can be inserted into one
                         another (thus forming a small monopod).
View original page 10Page 11 · Read text
www.butkus.us


                                                1. Gray filter and Lens hood with case (3.)
                                                2. Lens hood with case (3.)
                                                3. Case
                                                4. Close-up lens for MINOX (f=1.00)


                                             5. Pocket stand with case and built-in cable release
                                             6. Case ready for the Minox MDC
                                             7. Shoulder strap
                                             8. Stand for MINOX 35 equipped with Close-up lens
                                             9. Belt bag


Caring for your new camera
• Clean the optical parts only with special paper, special tissues, or a brush or blower.
• The film compartment and film window can only be cleaned with air.
• The battery may leak, so we recommend removing the battery from the camera during long periods of inactivity.
• A word of advice: change the battery every 2 years.

Technical features
Technical Specifications:
Type: MINOX MDC Camera.
Film: Type 135, 24 x 36mm format.
Lens: MINOX MC-Minoxar 2.8/35mm, made in Germany.
Focus: 0.9 m to infinity.
Depth of field display.
Aperture-priority autofocus.
Automatic exposure control: Electronic exposure control with two operating systems:
automatic shutter speed control with manual aperture pre-selection from 2.8 to 16.
Program autofocus with shutter speed and aperture control.
Shutter: Electronically controlled automatic shutter speed from 1/500 sec. up to 4 sec. at ISO
25 or 1/16 sec. at ISO 1600. With flash activated, shutter speed fixed at 1/125 sec.
View original page 11Page 12 · Read text
Shutter speed display in the viewfinder: Light-emitting diode indicators in the viewfinder for:
automatic shutter speed programming, overexposure warning, and slow shutter speed
warning.
Backlight switch: All shutter speeds are doubled in daylight.
Exposure lock: By partially pressing the shutter button.
Shutter release: Soft shutter release. Locked if the shutter door is closed or not fully opened.
Shutter release thread: Next to the shutter button.
Self-timer: Electronic, approx. 10 sec. delay, red indicator light, flashes during operation.
Viewfinder: Frame counter, illuminated frame, with shutter speed display.
Frame counter: Additional, resets automatically when opening the back cover, only if the
shutter is unloaded.
Flash connection: Flash shoe with hot shoe. Synchronization X. Automatic shutter speed
switching to 1/125 sec.
Tripod connection: 1/4" thread
Battery: 1 battery, type PX 28 L (alternatively PX 28).
Battery test: Test button, display in viewfinder.
Camera body: Aluminum. Dimensions: 10.3 x 6.4 x 3.4 cm.
Weight: approx. 215 g (with battery, without film).
Manufacturer: MINOX GmbH, Postfach 6020, D-6300 Giessen 1, Federal Republic of Germany
View original page 12
Related documents and language editions
From the M. Butkus archive. Original publisher and archive notices are retained.
Check the model and edition against your equipment.
PDF verified 2026-10-10.