Film cameras
Miranda EE-2 User manual
User manual for Miranda EE-2. 29 pages in English. Read the original PDF, download or print a copy without registration.
29 pagesEnglish2.0 MB PDF
Loading your manual…Open PDF directly
Document details
- Brand
- Miranda
- Model / document
- Miranda EE-2
- Document type
- User manual
- Language
- English
- Pages
- 29
- File size
- 2.0 MB
- Category
- Film cameras
- Document date
- Not specified in catalog
Search available document text
Find a term, then jump to its page in the original PDF. Image-only pages may not be searchable; check the PDF for exact wording and diagrams.
Page 2 · Read text
We feel very privileged that you have chosen our Miranda EE-2 camera. As a specialist manufacturer of single-
lens reflex cameras in Japan. Miranda Camera Co. has long been producing novel products of unique and
original design. Miranda's EE-2. your constant companion, is a 35mm, EE (electric-eye) single-lens reflex
camera, a concept which combines a through-the-lens light measuring system with a fully automatic exposure
control. It employs two ways of light measurement, one being the Average Light Measuring system and the
other, the Spot Light Measuring, each useful for its own specific application. The camera permits. besides EE
photography, also manual photography. The interchangeability of the pentaprism. lenses of superb resolving
power, accurate and smoothly-working shutter-mechanism, and other features - are the monopoly of only the
highest-grade camera. In order to make the best use of these qualities in your camera, you are advised to read
this manual through carefully before you take the first shot. You will be justifiably proud of the results.


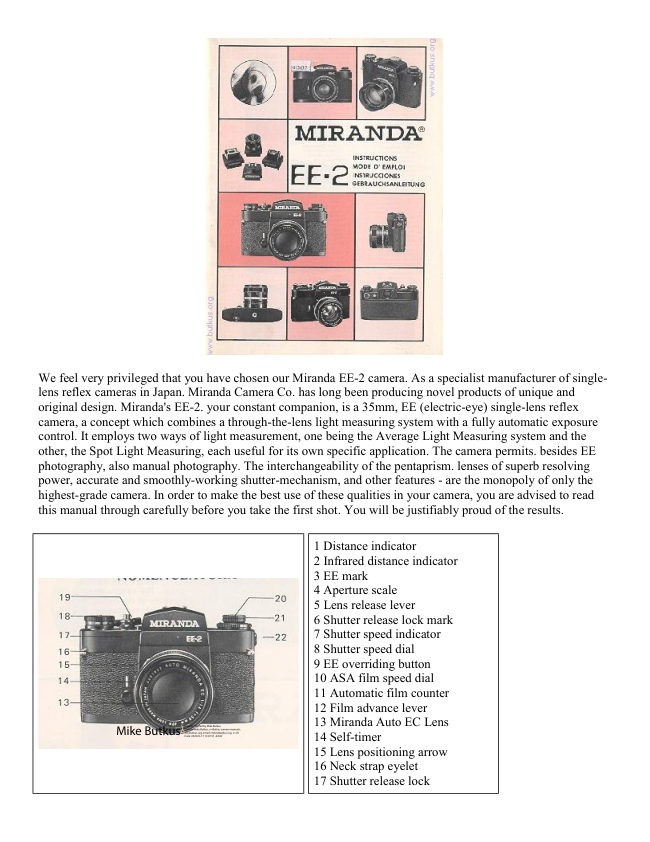
                                           1 Distance indicator
                                           2 Infrared distance indicator
                                           3 EE mark
                                           4 Aperture scale
                                           5 Lens release lever
                                           6 Shutter release lock mark
                                           7 Shutter speed indicator
                                           8 Shutter speed dial
                                           9 EE overriding button
                                           10 ASA film speed dial
                                           11 Automatic film counter
                                           12 Film advance lever


                                                                                                                                         Digitally                                                                                                                        signed                                                                                                                 by Mike                                                                                                                                    Butkus
                                                                                                       DN: cn=Mike                                                                                                                                     Butkus,                                                                                                                           o=Butkus                                                                                                                                camera manuals,           13 Miranda Auto EC Lens
                                                                                                                  ou=butkus.org, email=mike@butkus.org, c=US            Mike Butkus   Date: 2023.05.17 13:07:57 -04'00'                                           14 Self-timer
                                           15 Lens positioning arrow
                                           16 Neck strap eyelet
                                           17 Shutter release lock
View original page 2Page 4 · Read text
Holding the Camera 42
Setting the ASA Speed . . . . . . . . .14
                                      Using the Self-timer 44-45
Loading and Winding the Film 15- 17
                                           Interchanging Lenses 46-47
Setting the Shutter Speed 18- 19
                                      Miranda Auto EC Lens Series 47
How to Use ''A'' and ''S'' Light
Measurement 20-21                          Utilizing Flash Units 48-49

How to Read the Viewfinder 22-23         Rewinding the Film 50

Coupling Range of Meter 24-25             Interchanging the Viewfinder 51

EE Photography 26-27                    Taking Double Exposures 52

Manual Photography 28-29,35              Storing .......................................... 54,56

Miranda EE2 Metering System 30          Notes of Caution 57


SIMPLE EE-2 OPERATION A * B * C


                 Load the battery.

                     Set the film speed.

                 Load the film.


                  Advance the film to wind the. shutter.
View original page 4Page 5 · Read text
www.butkus.us


                   Determine and set the shutter speed.


                     Set the meter switch to A or S.


                     Set the Aperture Ring to down arrow (EE).


                Compose the picture
                 and focus.

                                             Release the shutter.


LOADING THE BATTERY


               A 1.3V mercury battery is provided for the Miranda EE-2 as the source of
                     power for its EE CdS meter. If the mercury battery is not inserted in the
                          battery chamber, the meter will not function. Before using the camera,
                    make sure that the mercury battery is properly inserted in the battery
                       chamber.

                     * Open the battery chamber of the camera by turning the cover
                         counterclockwise.

                     * Insert the mercury battery into the chamber with the plus (+) side facing
                        outwards. towards the cover, and replace the cover securely.

                     * If the plus (+) and minus (( - )) poles are reversed, the meter will not
                           function, although the misplacement will not affect the mechanism of the
                        camera.
View original page 5Page 6 · Read text
The mercury battery will provide sufficient power to work the meter for a duration of about one year. Its power,
however, drops sharply towards the end of its life. When the meter needle fails to reach the check mark, due to
the reduced power, replacement of the mercury battery is necessary.

The mercury battery may be chosen from any of the following:

Voltage 1.3V - Eveready EPX675, J IS H-C type. Mallory RM-675R, or equivalent.
 See this link on a Wein Air replacement battery.

When the camera is not in use. keep the power switch off to prevent waste of battery power. If the camera is not
used for a long time. it is advisable to remove the mercury battery from the camera.

(Caution) Do not try to disassemble or burn the exhausted battery.


                     Turn the FILM MEMORY DIAL until the type of film lines up with the
                 FILM MEMORY INDICATOR:

            B&W - black and white film
                 NEG. - color negative film (color prints)
                   POS. - color reversal film (35mm slides)


CHECKING THE MERCURY BATTERY POWER


                       After the mercury battery has been inserted properly into the battery
                     chamber, check the battery in the following manner:

                   * lift and turn the knurled ASA SETTING RING surrounding the
               SHUTTER SPEED DIAL in either direction and set the figure 100 to the
                         indicator of the FILM SPEED (ASA) INDICATION WINDOW.

                   * Turn the SHUTTER SPEED DIAL and set the 125 (1/125 sec.) to the
               SHUTTER SPEED INDICATOR.

                   * When using lenses, other than below mentioned, check the mercury
                        battery power after removing the lens.

                   * MIRANDA AUTO EC Lenses 50mm, f/l.4.

                   * AUTO MIRANDA E Lens 50mm, f/1.4.

                   * The diaphragm setting is unimportant in this connection.
View original page 6Page 7 · Read text
www.butkus.us


                       * When the power switch, located at the base of the film rewind crank.
                          has been turned to the checker position (C), the meter needle, visible in
                            the viewfinder moves to the check mark of the battery, indicating that
                            the voltage of the mercury battery is normal (See page 22 for how to
                           read the exposure meter in the viewfinder).

                       * The moment the battery checker is released, it returns automatically to
                            the Off position thus preventing a drain of power of the mercury
                              battery.


Film Speed Equivalents:
The exposure meter is calculated for films quoted with the ASA speed rating.
However. films indicated in other speeds can quite easily be converted to the ASA rating by utilizing the
following conversion chart.

SETTING THE ASA SPEED


                       Check the ASA number recorded on the 35mm film cassette.

                                Lift and turn the knurled outer ring of the shutter in either direction
                                until the desired figure comes directly opposite the red indicator, at
                              shutter speed"!".

                         Because of the working range of the exposure meter, at some positions,
                             the ASA ring cannot be turned. In this case, set the SHUTTER SPEED
                    DIAL to another position, or press the OVERRIDING BUTTON.

                            Intermediate settings on the FILM SPEED DIAL denote film speeds in
                             the illustration.
View original page 7Page 8 · Read text
LOADING AND WINDING THE FILM


                  ONLY load or unload film in the shade, never in the sunlight.

                      To open the back cover. lift the FILM REWIND KNOB all the way
                             up. The back cover will automatically swing open. and the film
                            counter will return to the starting position 'S'


                                Insert the film cassette into the film chamber as shown at left. Push
                              the FILM REWIND KNOB all the way down to its original position.
                                     If it doesn't go down, rotate it a little left or right. The film cassette is
                     now engaged by the FILM REWIND SHAFT.


                               Insert the film leader into one of the slits in the RAPID LOAD
                     SPOOL. Make sure the SPROCKET WHEEL engages one of the
                             perforations in the film leader.


                         Using the FILM ADVANCE LEVER. advance the film to check that
                           both top and bottom film perforations are engaged by the SPROCKET
                   WHEEL. Snap the back cover closed.
View original page 8Page 9 · Read text
www.butkus.us


Turn the FILM REWIND CRANK clockwise (in the direction of the
engraved arrow) until all the slack in the film cassette is taken up. This
occurs when there is resistance to further turning of the crank.


Wind the FILM ADVANCE LEVER. When it is being operated, the
FILM REWIND KNOB should turn in a direction opposite the
engraved arrow indicating that the film is moving properly


Wind the FILM ADVANCE LEVER and release the shutter a few
times until the pointer in the FILM COUNTER is aligned with the
second dot after S. Release the shutter.


Wind the FILM ADVANCE LEVER once more and the counter
should now read 1 . You are now ready for taking the first photo.
View original page 9
Page 10 · Read text
SETTING THE SHUTTER SPEED


                           Rotate the FILM SPEED SETTING RING until the desired shutter
                          speed on the SHUTTER SPEED DIAL lines up with the SHUTTER
                   SPEED INDICATOR. Note that the speeds are in fractions of a
                              second... 1/2, 1/4. 1/8, etc., and slow speeds 1 to 1/30 sec. are marked
                              in yellow. The RING click stops m both directions, but goes only as far
                            as 'as "B"' one way, and '1000'


                       The '"B" or" or bulb setting marked in yellow allows you to keep the
                              shutter open as long as you keep the SHUTTER RELEASE BUTTON
                            depressed. Your camera should be mounted on a tripod when long
                            exposures, 1/15 or longer, are used. A cable release should also be
                          used to avoid shaking the camera. For '"T"' exposures see G9, page 35.


                            Set the SHUTTER SPEED DIAL at the red 1/60 second for
                            synchronization with electronic flash units. See page 49 further
                               instructions.


                            Shutter speed can be freely changed before or after film advance. the
                              shutter dial does not turn beyond the EE coupling range. To turn it,
                             press the OVERRIDE BUTTON in the center of the SHUTTER
                   SPEED DIAL.
View original page 10Page 11 · Read text
www.butkus.us


                    By shifting your eye up and to the right of the VIEWFINDER
                    EYEPIECE the shutter speed is visible in the SHUTTER SPEED
                  WINDOW. This allows you to check the shutter speed without taking
                          your eye away from the rear of the camera.


HOW TO USE "A" (AVERAGE LIGHT MEASUREMENT)


                                Turn the CDS METER SWITCH to "A".

                                Average light measurement is a system to measure a fair
                                   average of the light coming in through the lens. 'A" is used in
                                     general photographic situations under favorable light
                                       conditions, shooting of landscapes and group subjects. The
                                          partial average light measurement system, incorporated in the
                       MIRANDA EE-2, has a special function by which the
                                     usually prevailing brightness from the brightness of the sky is
                                  excluded from the light measurement.


                                  Unlike other systems measurement, it does not cause a
                                    degradation of contrast. Just hold the camera, determine the
                                  composition and release the shutter.


AND "S" (SPOT LIGHT MEASUREMENT)


                        Or turn the CDS METER SWITCH to '"S".

                         The spot light measurement is a system to measure a part of the light
                          coming in through the lens. It produces wonderful effects on an
                          open sea. a wide expanse of mountains and fields. subjects with a
                                bright background, in against-the-light pictures. and in taking stage
                                pictures with a high light contrast. In such extraordinary cases of
                             photography, the determination of the exposure is normally rather
                                     difficult.
View original page 11Page 12 · Read text
With the MIRANDA EE-2 however. by merely setting the meter switch
                             to "S" you can obtain an accurate exposure without the need to adjust
                            the film speed or the diaphragm opening. When the "S" (spot light
                        measurement) is used, the multimicroprism/split-image area indicates
                            the light acceptance area.


HOW TO READ THE METER IN THE VIEWFINDER


                                  Marks A and "S"
                                                                  ''A'' is the mark indicating ''Average Light
                                           Measurement'' and "S" for "Spot Light
                                        Measurement. ''The arrow mark is coupled with the
                                          engraved "A" and "S" letting on the battery
                              SWITCH located beneath the FILM REWIND
                               KNOB. This indicates the type of light measurement
                                                  selected. (See pages 20 & 21 - How To Use "A" and
                                                 "S").

                                       Over-exposure Warning Mark
                                           This is the warning mark for over-exposure. When
                                               the meter needle reaches this mark. an accurate
                                          exposure cannot be obtained. Reset the SHUTTER
                               SPEED DIAL to a higher speed until the meter
                                            needle comes within the indicated correct exposure
                                               range.

                                        Fixed Point for Closed-down Light Measurement
                                     The red dot near "2" serves as a the F/1.8 mark. This
                                     mark also serves as the fixed point for closed-down
                                                    light measuring in manual, non EE photography
                                   when using a conventional type of Auto Miranda
                                                   lens. or a preset lens (See page 29).


Mark for Checking Battery Power
This mark (the full height of the digit "1" of '1.4") is for checking the mercury for battery power the meter. (See
page 12 for How To Use the Battery Checker).

Underexposure warning Mark
If the meter needle is within this mark, underexposure will result. Set the SHUTTER SPEED DIAL to a slower
speed to make sure that the meter needle comes within the indicated correct exposure range. Coupled with the
pin of the full-open F-value of the lens, this mark indicates the full F-value of the lens between f: 1.4 and 4.
View original page 12Page 13 · Read text
www.butkus.us

COUPLING RANGE OF METER


                         The coupling range is the range in which light can be measured by
                                the EE meter. The range varies according to the film speed and to
                                the maximum aperture of the lens used.

                         The meter's coupling range, according to film speed, is the field
                                indicated in the diagram in pink, outside of which coupling cannot
                           be obtained. Outside of this coupling range, the SHUTTER SPEED
                     DIAL cannot be turned and blocks. For instance, the shutter dial
                               stops at''4" (1/4 sec.) when ASA100 film is used.


When taking pictures at a shutter speed beyond the coupling range, turn the SHUTTER SPEED DIAL while
depressing the MANUAL OVERRIDING BUTTON located in the center of the shutter speed knob.

With the MANUAL OVERRIDING BUTTON depressed, the EE-function does not operate. The meter needle
moves according to the amount of light, but is not coupled with the shutter speed, with the result that no
accurate EE exposure is obtainable.

When the shutter speed is switched back to a speed within the coupling range, the MANUAL OVERRIDING
BUTTON is automatically unlocked and the EE-function becomes operational again.

Exposure Meter Coupling Range     CdS Cell EV Capability at ASA 100
View original page 13Page 14 · Read text
EE - PHOTOGRAPHY


                        The Miranda Auto EC and Auto Miranda E lenses feature completely
                            automatic diaphragm. Photography by full-open light measurement,
                    EE system (automatic exposure), is possible by merely checking the
                           markings in the viewfinder.


EXPOSURE CHART


                                   * Perform steps 'A' through 'G' on
                                      pages 8 and 9.

                                   * While looking through the
                                          viewfinder, adjust the focus. If
                                           the meter needle stays within the
                                          area of accurate exposure.
                                         depress the shutter button
                                        smoothly. In the event the needle
                                          of the meter stays within the
                                     warning mark for under-
                                        exposure, reset to a slower shutter
                                         speed: and if the needle of the
                                      meter stays within the warning
                                  mark for over-exposure. reset to a
                                               faster shutter speed.
View original page 14Page 15 · Read text
www.butkus.us


                              In taking pictures when a specific lens opening is of prime
                            importance, rotate the shutter speed dial until the meter needle
                               indicates the desired aperture. Make sure that the SHUTTER SPEED
                    DIAL clicks into a proper position as otherwise no correct shutter
                           speed can be obtained.

                         Never depress the shutter button until the meter needle comes to a
                           complete stop.

                     NOTE: For a deliberate under- or over-exposure. the meter reading
                          can be locked and maintained, as long as the shutter release button is
                          halfway held depressed. When looking through the viewfinder, the
                            needle locking may be observed.


MANUAL PHOTOGRAPHY


                          Perform steps "A" through "D" and "F" on pages 8 - 9.


                             Set the shutter speed (see p. 18).


                             Set the lens aperture (see D.39).
View original page 15Page 16 · Read text
When measuring light with a closed-down lens aperture for a special
   purpose or when manually shooting without the EE function,
   disengage the EE (   ) by turning the APERTURE :RING in a
   clockwise direction. Correct exposure can be determined by varying
    shutter speeds or diaphragm, until the needle superimposes the full
   open value mark in the viewfinder. Both Average Light Measurement
   and the Spot Light Measurement can be used for manual
   photography. Note: F/1 8 and F/3.5 are marked by a dot.


If you performed step 5a, then adjust the APERTURE RING until the
needle in the viewfinder reads the same as on the APERTURE SCALE.


When using the close-down metering mode, make sure you rotate the
PREVIEW LEVER down after each aperture adjustment otherwise the
reading will not be accurate. DO NOT keep the PREVIEW LEVER
down while adjusting the APERTURE RING. Turn the APERTURE
RING until the meter needle is aligned with the top edge of the red
UNDER-EXPOSURE WARNING MARK.


OR YOU CAN PERFORM THIS

If you performed step 5b. then adjust the shutter speed until the needle in
the viewfinder reads the same as on the APERTURE SCALE.

Note correct needle position for open and closed-down light metering
shown above.
View original page 16Page 18 · Read text
MIRANDA EE-2
TECHNICAL DATA

CAMERA TYPE: Compact 35mm single-lens reflex (SLR) camera with focal plane shutter, TTL meter, and
shutter speed priority EE control with manual override.

FILM FORMAT: 35mm - 24 x 36mm, 43.3mm film frame diagonal.

STANDARD LENSES: Miranda Auto EC 50mm/f 1.8 or 1.4. Angle of View: 46°

SHUTTER: Focal plane, T. B. 1-1/1000 sec., built-in self-timer with maximum delay of 10 seconds.

VIEWFINDER SYSTEM: Bright, interchangeable pentaprism viewfinder, magnification 0.92x with 50mm
lens at 00 field of view 96%. Meter needle, aperture settings, average or spot reading, under/overexposure
marks, battery check, and closed-down position visible in viewfinder field. Pentaprism has shutter speed
window. Alternate waist level. dual magnification critical focuser, and micro photo focuser available.

EXPOSURE METER SYSTEM: Light measuring at open aperture, built-in TTL CdS meter with full EE-
coupling. closed-down light measuring possible, light sensor behind the mirror, partial light measuring, switch
to spot light measuring. EE coupling range EV3- 18 at ASA 100 with 50mm f1.4 lens, shutter speeds 1/4 sec.-
1/1000 sec. The EE coupling can be disconnected when shooting at speeds outside its range by depressing the
override button located in the center of the shutter speed dial. Film speeds ASA 25-1600.

FOCUSING SYSTEM: Rapid, unique QIS (Quadrascopic Image System) rangefinder combining 360 degree
multimicroprism split-image center with ground glass ring, and matte Fresnel field.

LENS INTERCHANGEABILITY: Full EE coupling with Miranda Auto EC and Auto Miranda E series
lenses. Varying manual capabilities with other Miranda lenses. Dual Miranda mount: four-claw bayonet and
inside 44mm. thread mount.

FLASH SYNCHRONIZATION: FP and X, automatic synch to X at 1/60 sec., cordless hotshoe.

FILM ADVANCE/COUNT SYSTEM: Rapid-load spool, auto-resetting advance counter. winding angle 180°
film advance lever, plastic tipped. ratchet advance possible.

DIMENSIONS: 143 x 93 x 91mm ('u/50mm f1.8 lens) 5-2/3 x 3-2/3 x 3-9/16 inches.

WEIGHT: 975 grams (w/50mm f1.8 lens)/34.3 ounces.

POWER SOURCE: One 1.3 volt mercury battery (Eveready EPX675 or equivalent). Built-in battery checker.
* Specifications in this manual are subject to change without notice due to ongoing technological advances.
View original page 18Page 19 · Read text
www.butkus.us


                    When using the closed-down measuring mode make sure the
                  PREVIEW LEVER is held down. (See page 29).


                    When using the closed-down measuring mode with lenses OTHER
                 THAN Miranda Auto EC, Auto Miranda E, and Miranda Auto without
                             the small maximum aperture pin, align the meter needle in the
                           viewfinder with the fixed 1.8 red dot for correct exposure.


                         For 'T' (time) exposures, set the camera on a tripod and: ( 1 ) set the
                  SHUTTER SPEED at 'B', (2) depress the SHUTTER RELEASE
                   BUTTON. (3) and while holding it down, lock the shutter in place. To
                             release the BUTTON, simply turn the LOCK back full-right.


FOCUSING THE UNIQUE MIRANDA QIS WAY


                         For moving subjects use a fast (1/250 or higher) shutter speed. and
                     move your camera ("follow the action") with the subject. Ask your
                        Miranda dealer to recommend photographic literature that will explain
                                this and other photographic principles.
View original page 19Page 20 · Read text
This unique Miranda Quadrascopic Image System
                                         (QIS) rangefinder is a four way focusing system.
                                        hence Quadra (four) scopic (viewing).


                                    The QIS rangefinder screen is composed of a circular
                                              split-image dot and ring which splits any image.
                                                    vertical, horizontal, or oblique; a multi-microprism
                                             spot which checker's the image: a surrounding ground
                                               glass (matte) ring that blurs the image: and a matte
                                             Fresnel field that blurs the surrounding background.


MIRANDA QUADRASCOPIC IMAGE SYSTEM FINDER


                      This extremely versatile screen is bright, clear. and sharp. Its unique design
                  when coupled with a condenser built into the pentaprism makes especially
                        rapid and accurate focusing easy without the split-image ever blackening.
                   Under the most adverse conditions the rangefinder will only darken some-
                      what.

                     There is no other rangefinder like it.
View original page 20Page 21 · Read text
www.butkus.us


FOCUSING


                  To focus. look through the viewfinder and at the same time rotate the
                FOCUSING RING right or left as required.


                     For INFRA-RED black and white photography. First focus normally. Next,
                        turn the indicated distance on the DISTANCE SCALE so it is aligned with
                        the INFRARED DISTANCE INDICATOR (red dot and 'R') on the DEPTH
               OF FIELD SCALE. No adjustment is necessary for INFRA-RED color
                      photography.


                       Correct focusing is best achieved by first focusing behind the subject and
                       then adjusting forward until the image is in sharp focus.


DEPTH OF FIELD : APERTURE... VISUALLY


1. Film Plane 2. Subject's Distance 3. Large Aperture 4. Small Aperture 5. Subject 6. Small Depth of Field 7.
Front Depth 8. Rear Depth 9. Depth of Field 10. Large Depth of Field

Very frequently the composition of a picture can be enhanced by having the main subject in sharp focus while
the surrounding objects in the scene are soft and out of focus. This will de-emphasize distracting background
objects and concentrate the viewer's attention on the principal subject.
View original page 21Page 22 · Read text
PREVIEWING DEPTH OF FIELD
The Miranda EE-2 offers both full open and closed-down metering. When using the EE-2 in its closed-down
mode you will preview the depth of field while you are determining the proper exposure. In the full-open mode,
previewing depth of field, and determining the proper exposure are done independently.

Provision for DEPTH OF FIELD PREVIEW is made on the lens, not on the camera body. For this reason the
method for previewing the depth of field will vary with the lens mounted on the camera.

Miranda Auto EC lenses have a PREVIEW LEVER on the lower left.

Each Miranda Auto EC lens also features a DEPTH OF FIELD SCALE on the top of the lens. To read the
approximate depth of field, note the aperture number indicated on the APERTURE RING. The same numbers to
the left and right on the DEPTH OF FIELD SCALE point to the depth indicated on the DISTANCE SCALE.

For example: On the Miranda Auto EC 50mm F/1.4 lens as shown at left: when the aperture is at f/8 and the
subject is at 5 meters (16.25 ft), the depth of field extends from approximately 4 meters ( 13 feet) to 10 meters
(32 5 ft).

To visually see the depth of field, stop the aperture down (close diaphragm) by sliding the PREVIEW LEVER
downward.

DEPTH OF FIELD is the zone of diminishing, but still acceptable. sharpness in front of and behind the image
plane on which the lens is focused. Usually the front depth is smaller than the rear depth.

HOLDING THE CAMERA


HOW TO HOLD YOUR
CAMERA

                        To avoid blurred photos the camera must be held
                                  firmly. The sharpest pictures can be taken only when
                                 the camera does not move while the shutter is released.

                           * Firmly hold the camera with both hands.

                           * When the camera is utilized in a horizontal position,
                              comfortably brace your elbows against your body Rest
                                 the camera on your extended right thumb. Take a deep
                                  breath, and release half. Then while holding in the rest,
                            smoothly depress the SHUTTER RELEASE BUTTON
                              with the tip of your right index finger. The camera is
                                  further steadied by pushing the camera in towards your
                             nose with the last three fingers of the right hand. Your
                                        left hand should serve to focus and support the lens
                                    barrel.
View original page 22Page 23 · Read text
www.butkus.us


* When the camera is held vertically your right hand is essentially in the same position with the elbow braced
against the body. The left hand should either function as above or grasp the end of the camera gently pulling in.

* The camera should be mounted on a tripod and a cable release used when taking pictures with a telephoto lens
and/or at slow speeds (1/ 15 second or slower). It is also recommended for microphotography.


                        If you don't want to take a picture after winding the shutter, turn the
            SHUTTER RELEASE LOCK left towards the SHUTTER
             RELEASE LOCK MARK until it click stops. This prevents
                   accidental release of the shutter. To release the BUTTON simply
                    turn the LOCK back full-right.


USING THE SELF- TIMER


                   The SELF-TIMER is actuated by depressing the shutter button. The
                       operating time is adjustable from half-a-second to ten seconds. depending
                   upon how far the lever is turned. The lever may be set either before or after
                     advancing the film.


                   The SELF-TIMER can be set at any position of its run and thus lengthen or
                       shorten its operating time. Operation may be interrupted at any time by
                         resetting the lever to its original vertical position. In this case. the shutter
                     can be released as usual since the self-timer is not in operation. (However,
                       operate the self-timer once after completing the roll of film in the camera to
                         release the actuating spring of the self-timer mechanism).


                  At 1/15 sec. or at a slower shutter speed, hand-held shooting is apt to cause
                   camera shake. Be sure to use a sturdy tripod when shooting at slow shutter
                     speeds or B.

               When shooting at a slow shutter speed or with the self-timer using the EE
                     system, it is recommended that the accessory "cover plate" to the viewfinder's
                     eyepiece be used. or cover it with a hand as otherwise backlight may enter
                    through the eyepiece and affect the exposure.
View original page 23Related documents and language editions
From the M. Butkus archive. Original publisher and archive notices are retained.
Check the model and edition against your equipment.
PDF verified 2026-10-10.