Film cameras
Pentax K2 User manual
User manual for Pentax K2. 36 pages in English. Read the original PDF, download or print a copy without registration.
36 pagesEnglish3.8 MB PDF

Loading your manual…Open PDF directly
Document details
- Brand
- Pentax
- Model / document
- Pentax K2
- Document type
- User manual
- Language
- English
- Pages
- 36
- File size
- 3.8 MB
- Category
- Film cameras
- Document date
- Not specified in catalog
Search available document text
Find a term, then jump to its page in the original PDF. Image-only pages may not be searchable; check the PDF for exact wording and diagrams.
Page 3 · Read text
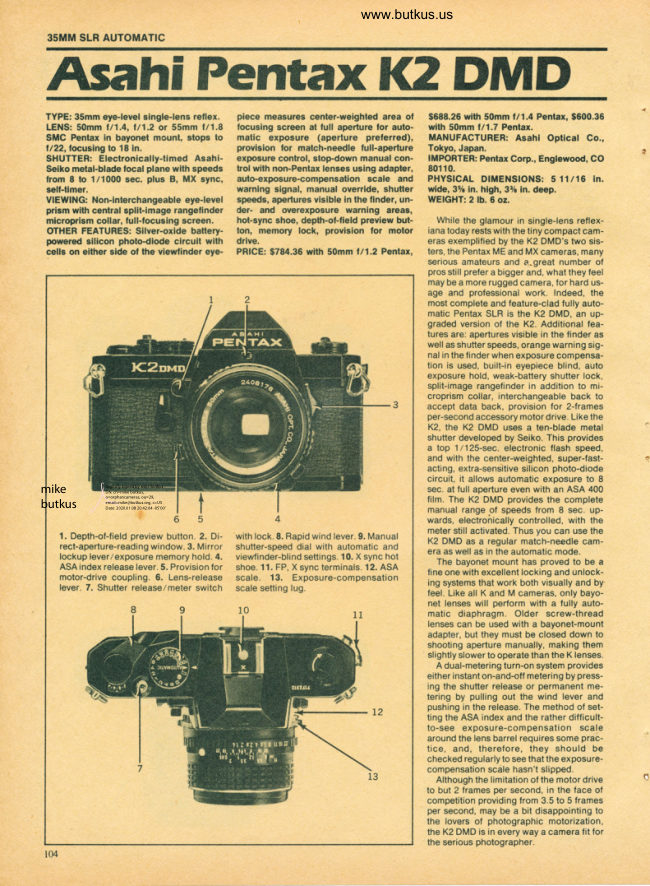
www.butkus.us


 Q Rapid-windlever                          @ Exposure counter
  o  srrutter releasebutton                       @ Strutter button lock lever
 @ Shutterspeeddial                         @ Shutter dial lock pin
 @ Shutterspeedindex                        @ Lens mounting guide bump
 Q) X contact hot shoe                         @ Diapfrragmring
 @ Accessoryshoe                           @ Distance scale
 e  Film rewindknob                                          $  Diaphragm/di
 0   f ilm rewindcrank                       @ Deptfr-of-fie

r 1
View original page 3
Page 4 · Read text
Digitally signed by Mike Butkus
                                                   DN: cn=Mike Butkus, o=Butkus camera manuals, ou=butkus.
                                                                org, email=mike@butkus.org, c=USMike Butkus           Date: 2024.06.25 22:41:05 -04'00'


    @  Stttp ring lug          @ rP f lashterminal              (p Battery chamber
    @  Oeptfr-of-field preview button   @ X flash terminal       @  f ilm chamber
    @  Lrnr releaselever        @ Rccessoryfitting groove      (D tripod receptacle
          g*posure factor dial    @                     @ Battery check button     @ Srrutterleaves
    @ Fo"using ring          @ Battbry check lamp      @ Film rail
    @  s.tt-timer tever         @ Film guider,ail       @ Film rewind button
   @ asR ring            @ Viewfindereyepiece     @   f ilm roller
   @ nSn ring lever         @ Sprocket          @ Back cover
    @  lVirrror lock-up lever       @ Film take-upspool      @ rilm pressureplate
                                                                                           2 o
View original page 4Page 8 · Read text
www.butkus.us   ffib'         q.I


                                  Reflex Mirror         Swing-up-and-back,instant-returntype, with
                                                          mirror lock-up lever,and specialshock absorbers
                                                               for minimum vibration
                                   Film Advance          Single-strokewind lever. 25'pre-advanceand
                                                  130'advance angles.
                              Exposure Counter     Automatic re-set.
                                 Film Rewind         Rapid-rewindcrank lifts clear of body.
                              Lens Mount          Pentax bayonet mount. Rotation : 65".
                               Exposure Meter         Si I icon-Photo-Diode-activated, apertu re-preferred
                                                    meter measuresthe entire area of ground glasswith
                                                emphasison central portion at full lens aperture.
                                                Match needlesfor correct exposure on manual.
                                                 Couplesdirectly to shutter, aperture and film speed
                                                           settings.Shutter speed and auto/manual setting
                                                             visible in viewfinder for exposure doublecheck.
                              Exposure Control     Exposurefactor control dial: 4x, 2x, "lx,1l2x,
                                                        1l4x for specific exposure control.
                             Power Source       Two 1.5V silver oxide batteries (Eveready576E
                                                           or Mallory MS76H).
                                Meter Switch          Meter is ON when shutter button is depressed
                                                      halfway. Also, when film wind lever is at its
                                                    pre-advanceangle and shutter button  is depressed
                                                      halfway, meter stays ON. Battery check button
                                                and lamp provided.
                             Dimensions          With 50mm f/1.4 lens: width 144mm (5.7") x
                                                     height 92mm(3.6") x depth 94mm (3.7"1.
                               Weight              9469 (33.7 ozs.) with 50mm f/l.4  lens.
                                           68Og Qa.2 ozs.) with no lens.             p
   o 5
                                                                          F : f t
View original page 8Page 9 · Read text
1 .
 Remove the rear lens and body
 caps.
 2.
 Match the red dot 6 on the
 camera body with the red dot
 @ on the lens. Insert the lens
 into the body and turn  it
 clockwise until the lens locks
 with a click.
 3.
 In the dark, when the red dots
 are diff icult to see,align the
 white plastic bump @ on the
 lens barrel with the lens release
 lever @ Uv touch. Then turn
 and lock as above.


4.
To detach, hold the camera
with your left hand. Depress          lf you have to put the lens down
the lens releaselever @ while      without the rear lens cap, place
turning the lens counter-                 it only on its front end, never on
clockwise with your right hand.   the rear.
                         When changing lensesoutdoors
                                  with film in the camera,avoid
                                    direct sunlight.

                                                      6 o
View original page 9Page 10 · Read text
www.butkus.us


Two silver oxide batteries are
packed separately.Be sure to
insert them into the battery
chamber before operating the
camera.                    ffi

                                                                  I N S E R T I O N
                          Open the battery chamber cover with a coin. Insert the two
                                     batteries into the battery holder of the cover as shown
                               above, each with (+) side facing up. For replacement, use
                              Eveready S76E or Mallory MS76H or equivalent.

                       CHECK
                             Under normal conditions, one set of batterieswill last about one
                                year or permit about 10,000 electronic shutter releases.To check
Do not push the check button      the life, push the battery check button.  lf the lamp next to the
too often, as it will exhaust the     button lights the batterieshave sufficient capacity. lf not, replace
 batteries.The battery is like a      the batteries.
phonographrecord. lt can be
damagedby skin acids. Handle
by the edgeswith a dry cloth
 before insertion into the camera.
The battery is not rechargeable.
Do not throw a dead battery
into fire, as it may explode.
 Also, keep it beyond the reach
 of small children.


o 7
View original page 10Page 11 · Read text
1 .
Load the film into your camera. (Page1O)
2.
Set the exposure factor control dial at " 1xf ' for normal exposure.
3'                                                                                  ( Pase 12)
Set the ASA  f ilm, speed. (Page 1 1 )
4.
Pre-selectthe aperture. (Page13)


5.
Set the shutter speed dial at AUTOMATIC. (Page14)


6.
Cock the rapid-windleverall the way until it stops.
View original page 11
Page 12 · Read text
www.butkus.us


7.
Composeand focus by turning the focusing ring.
                                                           ( P a g e1 7 )


8.
Slightly depressthe shutter button. The electric
circuit is now switched on. The meter needle
indicatesthe correct shutter speed. lf you want
a faster or slower speed, turn the diaphragm ring.
                                  (Pase14)


9.
When you depressthe shutter button completely,
the electronic shutter is releasedaccording to the
lengthof time determined by the bu ilt-in
electronic memory device.

o 9
View original page 12Page 15 · Read text
The scafe l4x,2x,  1x, 112x, 1/4x) indicates exposure factor. You get
                                 "normal"  exposure at 1x, while 1 l2x and 1/4x automatically
                              program the camera to deliver one half and one fourth the amount
                                        of light to the film. The 2x and 4x settings automatically double and
                               quadruple the light reachingthe film.


REMEMBER to set the dial at
"1x"  tor normal exposure.


                            Use this control only when necessaryto give intentional over- or
                              under-exposureswhile operating on "AUTOMATIC."  For example,
                                   set the dial at 4x or 2x when shooting againstthe light, and at 1l4x
                                    or 1l2x when shooting againstdark backgrounds.In addition, the
                                        dial can be set between the indicated positions to achieve more
                                    specific exposure control.


                                                                                   12.
View original page 15Page 16 · Read text
www.butkus.us


                                Set the shutter speeddial at the arrow symbol for AUTOMATIC.
                                Rotate the diaphragm ring to pre-selectthe desiredaperture such as
                                    follows:


                              F ine weath er                                                                     . f 18 -  il11
                               Cloudy weather                                                                 . f 1 4 - i l s . 6
                                                                  I ndoor                                                                               . il2  -  il2.8

                                 This is a rough guide to aquaint you with the automatic shutter
                                  operation. As you get used to  it, you will develop your own
                                  yardsticksfor aperture pre-selectiondepending on your subject and
                                  the lighting conditions.

                             The shutter speed is automatically determined, within the range of 8
                                       to 111000 sec.,depending on the amount of light passingthrough
                                  the aperture and the speedof your film.


o 1 3
View original page 16Page 17 · Read text
Set the shutter speeddial at "AUTOMATIC"   f or
 automatic electronicshutter operation. (When set
 on "AUTOMATIC"   , the exposure system is an
 aperture-preferredsystem. For a shutter-speed-
 preferredsystem,seeMANUAL SHUTTER AND
 L I G H T M E T E R I N G ,p . 1 6 . )

The electronic shutter of the K2 works
automaticallybetween 1/1000 and B sec.The
 black numbers seen in the viewfinder refer to
 fractionsof seconds-  1lGO,11125,etc. The white
numbers-  2,4 and 8 -  refer to 2 sec.,4 sec.,and
8 sec.

After cocking the rapid-wind lever, pressthe
shutter button slightly to switch on the electric
circuit. The meter needlein the viewfinder will
indicate the shutter speedwhich the camera has
selected.lf the needledoes not drop from 1OOO,
closedown the lens diaphragmone or more stops.
 lf the needlestill does not move, push the battery
check bqtton. When the batteriesare worn out, the
electronicshutter will not function. Moving the
shutter speeddial to 11125sec. or 1/1000 sec.will
allow you to continue photographing.(You will
have to determine aperture settingswithout the
light meter. Packed in with most types of 35mm
film is a data sheet of suggestionsfor determining
the correct exposure in a variety of situations.)
But you should carry spare batteriesand replace
worn-out batteriesimmediately.

                                                                                            1 4 o
View original page 17Page 18 · Read text
www.butkus.us


                                            Depressthe shutter button completely to shoot. As
                                                  long as the rapid-wind lever is not closed
                                                completely -  that is, as long as it is returned to
                                                                    its slightly open, pre-advanceposition -  the meter
                                                                 will stay on and the needlewill automatically
                                                       indicate the speed for the next shot. Once the
                                                  rapid-wind lever has been completely closed, the
                                              meter will be activated only as long as you are
                                               depressingthe shutter button.


                                           To prevent accidentalshutter.release,lock the
                                                    shutter button by moving the lock lever @ so that
                                                   the "L" becomesvisible.


                                       NOTE:  lf you should happen to depressthe shutter
                                                    button, while the shutter dial is set at
                                      "AUTOMATIC" and the lenscap is on, the reflex
                                                    mirror may fail to drop back down into place.
                                          To bring the mirror down, simply move the shutter
                                                        dial off "AUTOMAT|C."

o 1 5
View original page 18Page 19 · Read text
Your K2 camera is unique: it also offers manual
electronic shutter operation over the full 1/1000
 - 8 sec. range. This operation is useful for
shutter-speed-preferredshooting situation - when
you need full control over the shutter speed. To
use any of these speeds,depressthe shutter dial
lock pin @  , and turn the shutter dial from
AUTOMATIC  to the desired speed setting.


                                                                             www.butkus.us
When you are operating the shutter manually, the
blue needle in the viewfinder will indicate the
shutter speed you have selected. Depressthe
shutter button slightly and turn the diaphragm ring
until the black meter needlematches the blue
needle.


                                                                                1 6 r
View original page 19Page 21 · Read text
As a general rule, your camera should be held more firmly in the
left hand, which does not releasethe shutter. lf you hotd yotn
camera with the right hand -  the hand that releasesthe shutter -
this may cause camera movement. Often, blurred pictures are due to
camera movement.


Horizontal position A.               Vertical position B.                 Vertical position C.
Hold the camera firmlY with       Hold your camera tightlY to       Hold your camera tightlY to
your left hand, and draw Your     your forehead with your left       your forehead with Your left
arms close to Your body.          hand, and draw Your right arm     hand, raiseyour right arm and
                                 close to your body.             draw your left arm to Your
                                                                 body.


                                                                                1 8 o
View original page 21Page 22 · Read text
www.butkus.us


                                     After the final picture on the roll has been taken, the rapid-wind
                                    lever will not turn (Caution: do not try to force the lever),
                                   indicatingthat the film must be rewound. Lift up the rewind
                                  crank. Depressthe film rewind releasebutton and turn the rewind
                                crank as indicated to rewind the film into its cassette.Rewind
                                        until the tension on the crank lessens,indicatingthat the leader
                              end of the film has been releasedfrom the take-up spool. Pull out
                                  the film rewind knob (tfre back will open automaticafly), and
                             remove the film cassette.
                            A V O I D D I R E C T L I G H T W H E N L O A D I N G O R U N L O A D I N G
                              T H E F I L M .


o 1 9
View original page 22Page 23 · Read text
Depth of  f ield is the range between the nearest and farthest
distanceswhich are in focus at a given lens aperture.

lf you want to know how great the depth of field is at a certain
aperture, focus on a subject and look throug  he viewfinder while
depressingthe depth'of-field preview button       . Or, after focusing,
look at the depth-of-field guide on the lens. In the photograph
below, the distance scale is set at 5 meters . . . the lens is focused on
a subject 5 meters away. The calibrationson each side of the
distance index correspond to the diaphragm setting and indicate the
range of in-focus distance for different lens apertures.For example,
 if a f ens opening of  f l4 is to be used,the range on the distance
scalering covered within the figure 4 on the depth-of-field guide
indicatesthe area in focus at that lens opening. You will note from
the depth-of-field guide in the photograph that the range from
approximately 4 to 7m is in focus. Note that as the lens
apertureschange,the effective depth of field also changes.For
depths of field at different aperturesand distance,refer to the next
page.


                                              0
                                                    Distance( m )


                                           2Oo
View original page 23Page 25 · Read text
In normal picture-takingsituations, when you trip
the shutter, the reflex mirror swings up out of
the way. lt then automatically drops back down
into place. Inevitably, this causesa small amount
of vibration - and the longer the lens you use,
the more noticeablethe vibration will be.
To avoid this vibration, it is possibleto lock the
mirror up. (Note: Moving the mirror keepslight
from the viewfinder and exposure system, so
focusing and setting of the aperture must be done
before lock-up. Use manual exposure setting,
which, unlike AUTOMATIC, will not be affected
by mirror movement.Also, you should use a
tripod for this kind of shooting.)
Once everything is set, simply push up the lock-
up lever 6    . tfre mirror will now stay up even
after you trip the shutter. To releasethe mirror,
return the lock-up lever to its original position.
The reflex mirror can be locked up either before
or after you advancethe film.


                                                                          22o
View original page 25Page 26 · Read text
www.butkus.us


                                          The self-timerdelays shutter releasebetween 5 and
                                                 9 seconds,depending on how far counter-clockwise
                                            you have turned the self-timer@. (This can be done
                                            on either "AUTOMATIC"  or manual shutter speed
                                                      settings.However, when the camera is set on
                                       "AUTOMATIC", some stray light may enter
                                                through the viewfinder. To prevent this, we
                                       recommendusingthe inexpensiveoptional
                                                accessory,Viewfinder Cap.)

                                           To operate, turn the self-timer lever down until  it
                                                   stops. Depressthe shutter button and the self-
                                                  timer will start.

                                         The K2 self-timeralso has an interrupt function.
                                          Even af ter the self-timer has startedro run. you can
                                                  stop it by moving the self-timer lever back to its
                                            normal position. The remainingtime will tick away,
                                                   but the shutter will never be tripped. To re-startthe
                                                       self-timer,push the lever down again, and again
                                              depressthe shutter button.


o23
View original page 26Page 27 · Read text
The K2 has FP and X terminalsnear the f ilm
rewind knob, and a separateX contact on the
built-in hot shoe. The table on the next page
shows which flash contact, which shutter speed
and which flash bulb may be combined for
maximum lamp eff iciency. Unlessthese
combinationsare rigidly followed, there will be a
failure in flash synchronization.Note the "X"
setting is exactly at the 125 mark on the speed
dial. This indicatesthe highest shutter speedat
which electronic flash units may be used.
Use the hot shoe flash contact when using a
shoe-mount electronic flash like the Pentax
Autorobo which also has a flash contact on the
shoe bracket. When using the hot shoe, there is no
need to plug the flash cord into the X terminal
on the body front.
The hot shoe flash contact turns to "hot"
 (switched on) only when you insert a shoe-mount
electronicflash. lt remains"cold"
 (disconnected)even when using an electronic flash
with its cord plugged into the X terminal on the
body front. This eliminatesthe danger of electric
 shocks.


                                     24o
View original page 27Page 28 · Read text
www.butkus.us


There are basicallytwo types of flash bulb
attachmentson the market: clip-on types and
 bracket types. Either can be used with your
camera.The clip-on types are attached to the
 hot shoe and the bracket types are screwed
 into the tripod screw hole.
Use one of these three bulb typest M, MF or
FP. The correct terminal and the correct
shutter speed to use for each of these three
types are outlined in the table below.
Before attaching the flash unit to the camera,
you must remove the protective plug
 f rom the proper term ina| .
When not usingthe terminals,keep the
plugs inserted.


                                                                                             'r                                          1  1      1  1sHUrrER sPEED           -1=   l-   =1- J                             B                                                             l o o o 5 o o 2 s o  t z i 6 0 3 0 - 1 5 T - - 4 * 8 4 2 1
ELECTRONIC F LASH    X
               FP                       FP CLASSF LASH BU LB
                X                             M  . MF  . FP CLASS

o25
View original page 28Page 29 · Read text
lf you intend to take infra-red photographs,
remember to use the infra-red index marked with
an orange line on the depth-of-field guide.
First, bring your subject into clear focus.
Then determine the lens-to-subjectdistance from
the distance scale on the lens. Then match your
lens-to-subjectdistance to the infrared index by
turning the distance scaleaccordingly. For instance,
if your subject is in focus at infinity, turn the
distancering and move the infinity (o) mark to
the index.


                         coH


                                                                       26o
View original page 29Related documents and language editions

From the M. Butkus archive. Original publisher and archive notices are retained.
Check the model and edition against your equipment.
PDF verified 2026-10-10.