Film cameras
Pentax LX Direct scan User manual
User manual for Pentax LX Direct scan. 66 pages in English. Read the original PDF, download or print a copy without registration.
66 pagesEnglish21.7 MB PDF

Loading your manual…Open PDF directly
Document details
- Brand
- Pentax
- Model / document
- Pentax LX Direct scan
- Document type
- User manual
- Language
- English
- Pages
- 66
- File size
- 21.7 MB
- Category
- Film cameras
- Document date
- Not specified in catalog
Search available document text
Find a term, then jump to its page in the original PDF. Image-only pages may not be searchable; check the PDF for exact wording and diagrams.
Page 2 · Read text
WELCOME TO TI-IE WORLD OF PENTAX PHOTOGRAPHY!
Designed and engineered with the precision, reliability and
dedication to quality that has made Pentax a leader in photo-
graphy throughout the world, Your new Pentax LX 35mm
System SLR camera has the features and flexibility to meet
virtually any photographic challenge, and the accuracy of its
Integrated Direct Metering through-the-lens light measurement
is unexcelled.
From the fast paced realm of news photography to capturing
the breathtaking serenity of a panoramic mountain landscape,
from the quick action of sports to the demanding world of
macrophotography, from portraiture to candids, your Pentax
LX is the key which will enable you to reach new levels of
creativity and photographic excellence.
Whether you're a seasoned professional or just starting out,
a little extra time taken to read through the Owner's Manual
carefully will be time well spent. By familiarizing yourself
thoroughly with your camera you will not only learn of all the
benefits it has to offer, you'll also insure yourself years of
trou ble-free operation.
View original page 2
Page 5 · Read text
www.butkus.us  THE BENEFITS OF LX PHOTOGRAPHY


IDM Light Measurement                               Titanium Electro-Mechanical Shutter
The heart of the Pentax LX is the Integrated Direct    The LX camera features an extremely broad range of
Metering (lDM) system which employs a Silicon     shutter speeds. The titanium electro-mechanical shut-
Photo Diode to measure light directly off the film     ter mechanism delivers electronically-controlled step-
plane for superb accuracy in exposure control.      less speeds in the automatic mode from an amazingly
Incorporating a special pattern on the shutter curtain     fast 1/2000th second down to 125 seconds, provides
for high speed measurements and a unique secondary    manual speeds from 1/2000th second to 4 seconds,
mirror which transmits information to the LX view-    and features a special design which provides manual
finder almost to the precise moment of exposure, the     speeds from 1/2000th second to "X" even when the
IDM system of through-the-lens  light measurement     batteries fail (see page 1 1, 18).
assures accuracy even under the most difficult and                                        TTL Integrated Automatic Flash Controlchanging lighting conditions. The need for exposure                                                           Integrated Automatic Flash Control with the Pentax
compensation when using system accessories such as                                             AF-280T and AF-400T Flash Units makes flash pho-
focusing screens or interchangeable finders is virtual-                                                   tography exceptionally simple and accurate even with
ly eliminated.                                                  difficult bounce lighting or at close subject distances.
                                                  Because the IDM system measures light at the film I nterchangeable Finders and Screens                                                       plane, the LX works with TTL flash models to mea-The LX System includes a wide array of interchange-                                                   sure both ambient and electronic flash lighting forable viewfinders and focusing screens to meet the                                                exposure accuracy regardless of the lens aperture.challenge of any photographic situation. The unique                                               These units also feature automatic "X" synchroniza-FB-1 Systems Finder features optional viewing ac-                                                        tion and a visible exposure check and ready light incessories to create a viewing system within a system,                                                      the viewfinder when the capacitor reaches full chargeand the standard FA-1 Finder features a built-in TTL
"X" synch hot shoe which lets you take full advan-     (see page 38).
tage of the IDM light measurement system (See pages
46 to 49)

o4
View original page 5Page 6 · Read text
Rugged, Lightweight, Compact Design
     Designed to handle the most rugged and demanding
     professional assignments, the LX remains incompa-
     rably compact and lightweight among the 35mm SLR
    camera systems. lts specially contoured body design
     allows it to rest comfortably in your hands even with
    Motor Drive or Winder attached. Weighing only 803
    grams (28 ounces) with normal f 11.4 lens and stand-
    ard Finder, the LX is designed to go anywhere and
     capture the action with the ultimate in handling ease
    and carrying convenience. Special gaskets and linings
    at key points throughout the body make the LX
      extra durable and resistant to heat, sliock and mois-
      ture.
    The LX is backed by a comprehensive system of ac-
     cessories with more than 40 Super-Multi-Coated
     Pentax lenses and hundreds of attachments to meet
     virtually any picture-taking need. (see pages 56-59).


 I
  I
    II
     III
  I
  I
IL
View original page 6Page 8 · Read text
www.butkus.us


(D Shutter speed index
@ Hotshoe
@ Film rewind crank
(D f itm rewind crank/
   Back cover release knob
(D Crip mount socket
@ Accessory lug
(D Distance scale
@ Focusing ring
@ Depth-of-field scale
@ Aperture/Distance index
@ Aperture scale
@ Aperture ring
                     f lash contacts@ Auto
@ X-synch terminal
@ FP terminal
View original page 8Page 10 · Read text
@ Rubber grip
      (D Automatic advance
        co ntacts
    @Auto film rewind
        coupling
     (E Base plate
   @ Battery chamber cap                            www.butkus.us
   @ Tripod socket
   @ Fitm transport relay pin
     (D f itm rewind/
        Multiple exposure button
   @ Film transport rate
        control coupling
   @ Film transport coupler

 i   @nim of back cover
     @Roller

 I

II
View original page 10Page 11 · Read text
www.butkus.us


Donate:  www.PayPal.me/butkus     venmo:  @mike-butkus-camera  Ph. 2083
View original page 11
Page 12 · Read text
BATTERIES


                                         lnserting the Batteries
                            The electronic systems of your Pentax LX operate on two 1.5-volt mini-  @                batteries which are packed separately with your camera. To insert the
                                          batteries, first remove the battery chamber cap at the base of the camera        ffi             by inserting the edge of a coin and turning in the direction of the arrow.
                                  Place the two batteries in the chamber as shown making sure the posi-
                                          tive (+) sides face up.
                                   Replace the chamber cap and tighten securely.

                                    Battery Check
                                  After inserting the batteries it is often helpful to make a quick check to
                                  see if batteries are inserted properly and the camera's electrical systems
                                   are functioning. To check battery voltage, activate the camera's metering
                                system by pressing the shutter button partway and observe the viewfind-
                                er LED shutter speed display. The shutter speed LED will glowcontinu-
                                    ously if normal voltage is being supplied.

                          Low Battery Warning
                         When batteries become weak the viewfinder shutter speed LED will
                                 begin to flicker. Although all electronic systems will continue to func-
                                        r25       tion accurately until the display goes out completely, both batteries                                        x
                                         c0                                       30       should be replaced promptly to ensure uninterrupted operation of the
                                                t5                                             0        camera's e lectronic exoosu re controls.
                                             1
                                                                                         2I
                                        {s2s
                                                       Lr.3

o 10
View original page 12Page 13 · Read text
www.butkus.us


Operating the Camera Without Batteries
When the LED shutter speed display no longer lights, batteries are dead.   IMPORTANT! NEVER THROW                                                USED BATTERIES INTO FIREHowever, the LX camera incorporates an electro-mechanical shutter sys-                                          OR EXCESSIVE HEAT TO PRO.
tem which allows the photographer to continue taking pictures over a   TECT AGAINST EXPLOSION. AI-
broad range of shutter speeds even when the batteries no longer function  WAYS KEEP BATTERIES OUT
due to exhaustion or temporary failure from temperature extremes.   OF THE REACH OF CHILDREN.
Should battery failure occur while shooting within the camera's mechani-
cal shutter speed range (i.e., from 112000 second to "X") no interruption
of camera operation will take place. However, should batteries fail while                                                                                   Battery Care
operating in the "Automatic" exposure mode or within the electronically     Under normal operating conditions,
controlled shutter speed range (from 1/60 second to4 seconds) the mir-    the two 1 .S-volt  al kaline min i-bat-
ror will automatically lock up as a warning.                                         teries in your camera will last sever-
To continue picture-taking, simply turn the shutter speed dial to any of     al months. Should batteries require
the mechanically operated settings (112000 second to "X").                  replacement, replace BOTH at the                                                                  same time with equivalent 1.5 volt
                                                                                    alkaline or silver oxide mini-bat-NOTE: Should you wish to save the exposure being made when the       teri es.
mirror lock-up occurred, before changing the shutter speed dial, first cov-,    Keeping a spare set of batteries on
er the lens with the lens cap. Then, release the mirror as described above    hand can help you avbid the incon-
                                                                                                                     duringand press the film rewind/multiple exposure button at the base of the    venience of battery failure                                                                   busy pictu re-taking sessions, espe-camera. Advance the film and take the picture.                                                                                      cially when shooting in cold  cli-
                                                                          mates where failure due to extreme
                                                                        temperatures is not uncommon.
                                                                              Protect your camera from leakage
                                                               by removing the batteries whenever
                                                                        the camera will not be in use for
                                                                                     long periods of time.

                                                                                              11o
View original page 13Page 14 · Read text
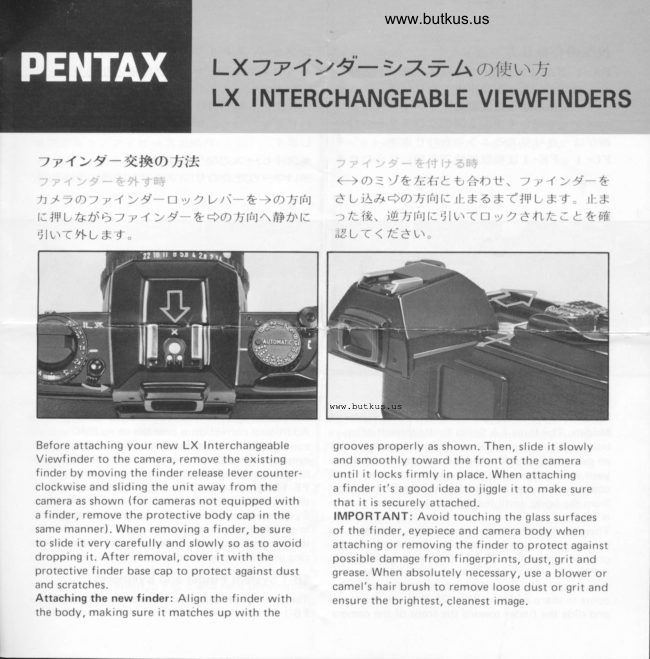
ATTACHING THE VIEWFINDE R


                             Your Pentax LX is a complete System 35mm 5LR which offers you an
                                     exceptionally wide variety of interchangeable viewfinders (see page 46).
                           Once you have selected the viewfinder best suited your picture-taking
                                       needs, attach it to the camera body as follows:
                          Remove the protective body cap by moving the finder release lever
                                   counter-clockwise and sliding the cap away from the camera body as
                               shown. Carefully remove the protective cap from the finder and align
                                the finder with the body, making sure both units are seated properly.
                                   Slide the finder toward the front of the camera body until it locks
                                     firmly in place. When attaching the finder, it's a good idea to jiggle it to
                              make sure it is locked securely in place.
                        To remove the finder on the camera for attaching a new finder, move
                              the finder release lever counter-clockwise and carefully remove the
                                    existing finder by sliding it away from the camera body slowly and
                                smoothly. Do not move too quickly to avoid dropping the finder on
                              your working surface and damaging it. Place the protective finder cap
                               on the finder to protect it against dust and scratches.

                         IMPORTANT: Avoid touching the glass surfaces of the finder, eyepiece
                          and camera body when attaching or removing the finder to protect
                                   against possible damage from fingerprints, dust, grit and grease. When
                                    absolutely necessary, use a blower or camel's hair brush to remove loose
                                     dust or grit and ensure the brightest, cleanest image.


o12
View original page 14Page 15 · Read text
www.butkus.us


Adjusting The Diopter Correction
Pentax FA-1 and F A'2 Interchangeable Viewfinders feature built-in
diopter correction for the focusing convenience of eyeglass wearers.
To adjust the degree of correction, first move the finder release lever
counter-clockwise  anci gently slide the finder away from the body until
the diopter adlustment screw is visible. With the finder in this position,
carefully bring the camera up to your eye and look at split-image center
spot in the center of the viewfinder. Using the tool packed with the find-
er, turn the adlustment screw until the border lines of the center spot
come in sharp and crisp. Remove the tool and slide the finder toward the
front of the camera body to once again lock it securely in place.


                                                       ffi


                                                                                                    13.
View original page 15Page 16 · Read text
MOUNTING THE LENS


After removing the rear lens and body caps, hold the camera firmly in
your left handand align the red dot @ on the camera body with the red
dot @ on the lens. lnsert the lens into the body chamber until it seats
against the lens mount and turn it clockwise until it locks into place
with an audible click. In dim light situations where it becomes difficult
to see the red dots, align the raised white node @ on the lens barrel with
                                                                                 de-the lens release @ by touch and continue mounting the lens as
scri bed.
When mounting longer lenses such as telephoto or zoom focal lengths,
it's a good idea to rest the camera body in the palm of the left hand.
This procedure provides a better balance and more convenient handling
during the mounling operation.
WHr:Nl CIIANGING I-ENSES OUTDOORS lVllll  Flt-i\4 lN ItlL CAM-            'iHEERA. TAKE    ADDED PRECAUTION OI] AVOIDING DIRICI
SUNt.IC]I]T.

Removing the Lens
To remove the lens, hold the camera in the left hand and press the Lens
release button 6 while turning the lens counter-clockwise with the right
hand.
TMPORTANT:  lf it becomes necessary to put the lens down without the
rear lens cap in place, make sure the lens rests only with the front ele-
ment down. Never put the lens down with the front element up.
View original page 16Page 18 · Read text
rTo avoid unnecessary delays when loading the film,   rWind the film by alternately advancing the rapid
  before starting it's a good idea to set the shutter dial     wind lever and firing the shutter release button
  to one of the faster manual settings, e.g. 112000th      until both top and bottom sprockets engage the film
  second. lf you must load film with the dial set to      perforations. When you are sure the film has en-
  "Automatic," remove the lens cap and aim the cam-     gaged properly, close the back cover and wind the
  era towards a bright light source to avoid excessive-      film rewind crank in the direction of the arrow to
  ly long shutter speeds when advancing the film.           take up any slack.
rOpen the camera back by lifting up sharply on the    rContinue advancing the film until. the exposure
  film rewind knob. Insert the film cartridge in the     counter registers "1." You can be sure the film  is
  film chamber and lock the cartridge in place by     moving properly through the camera by checking to
 returning the film rewind knob to its original      see that the film rewind knob rotates each time the
  position.                                                   rapid wind lever is advanced.
rDraw the film leader across the back and insert it
 into any of the white needles in the film take-up
 spool. Make sure the film is engaged properly on
 the spool by inserting the leader at least the width
 of one perforation.

o 16
View original page 18
Page 19 · Read text
SETTING THE FILM SPEED/MEMO HOLDEB                             www.butkus.us


To set the film speed, press the ASA dial lock release
and turn the dial until the ASA number of the film
being used is opposite the index mark. To ensure ac-
curacy, make sure the dial locks only in the click-stop
positions. The chart below represents the index mark-
ings on the LX film speed scale.

  61225                    50       100    200     400    800   1600  3200
   a.r.a8  10    16 20     32 40    4.. 64  80  aaa125 160  a..a250 320    500 640  a 10ooo  1250.   a 2000..  2500.      t


MEMO HOLDER
For added convenience, your LX features a film
memo holder which acts as a reminder of the film
type and number of exposures loaded in the camera.
Simply tear off the end of the film carton and insert
it into the holder frame.
                              c 135-3S


                                                                                               17.
View original page 19Page 20 · Read text
SETTING THE $HUTTER DIAL


To set your Pentax LX for automatic exposure con-     Electronical ly-Controlled Shutter Speeds
trol, rotate the shutter dial until the word "Auto-   Your Pentax LX provides electronically-controlled
matic" locks into place opposite the index mark    stepless shutter speeds in the "Automatic" mode
as shown. When manual control is desired, press   from 1/2000th second down to 125 sec. (At ASA
the shutter dial lock release and turn the dial until    100, f/1 .2) and electronically-controlled manual shut-
the speed setting you wish to use aligns with the    ter speeds from 1l60th second to 4 full seconds.
index at the click-stop position. Indices on the dial    These speeds are not functional without batteries or
from "2 o o o" to "2" represent fractions of a second   when battery failure occurs.
 (i..., 1/2000th second to 112 second) while '(1"
through "4S" represent full second increments. The    Mechanically-Controlled Shutter Speeds('X"     index setting corresponds to 117 5th second   At shutter speed settings from l/2000th second to
for synchronization with electronic flash units not   "X" and at the "B" (Bulb) setting, the shutter oper-
providing "dedicated" flash capability with the LX    ates mechanically without the need for battery pow-'
camera (see page41  ).                                       er. These speecj settings should be used in the event
                                                             battery failure interrupts normal camera operation.


o 18
View original page 20Page 21 · Read text
ACTIVATING THE METER                                             www.butkus.us


The LX provides you with the option of activating    the dial lock releasefMD exposure check button. \Nhen
the exposure meter in two ways: 6 with the shutter    pressed this activates the meter and lights the view-
button and @ with the dial lock release/MD exposure    finder display for up to 25 seconds the same as the
check button.                                           shutter button. Whether you use the shutter button
Shutter Release Button                                or the MD exposurecheck button for normal exposure
For general shooting, it is simplest to activate the     is optional. However, to activate the meter and check
meter for exposure checks using the LX's feather-   the exposure when using the LX in conjunction
touch shutter button, which also serves as a meter   with the motor drive or winder, always use the MD
"on" switch. By pressing the shutter button lightly,    exposure check button This is because the shutter
both the exposure metering system and viewfinder    stroke is shorter than normal when the motor drive
LED display are activated and remain on up to 25   and winder are attached and use of the shutter
seconds, after which the meter and display will    button in this instance may cause premature shutter
automatically turn off to prevent excessive battery      re   I ease.
d rai n.                                                 Shutter Release Lock
Meter Activation/Exposure Checks with Motor Drive    Slide to the left to lock shutter button and meterins
and Winder                                              system, slide to the right to unlock.
You can also activate the LX's exposure meter using

                                                                                                    19.
View original page 21Page 22 · Read text
FOCUSTNG---:-

The Pentax LX comes equipped with the standard
SC-21 split-image/microprism  focusing screen which
provides a split-image center spot surrounded by a
microprism collar on a matte field. The SC-21 is fully
interchangeable with eight other focusing screen
models to provide focusing versatility capable of
meeting almost any picture-taking need (see page 49).
When using the split-image center spot simply turn
the lens focusing ring until the broken image in the
center spot in the viewfinder aligns as one.
When using the microprism collar surrounding the
center spot, rotate the lens focusing ring until the
"shimmering" effect in the collar area seems to
d isappear.
The matte field is quite handy for focusing in rapidly
changing conditions where there simply isn't time to
use either the split-image spot or microprism collar
or for focusing with long telephoto lenses having
small apertures. To focus, turn the focusing ring on
the lens until the image on the matte field appears
sharp and crisp.
View original page 22
Page 24 · Read text
SHOOTING AUTOMATICALLY


             Whenever time is limited and light is changing rapidly, you'rc sure to find
             the automatic exposure control capabilities of thc Pentax LX a useful
            and welcome feature. Because the LX incorporates a direct off-the-film
             plane light measurement system, rcadings are made continuously to en-
              sure uncanny accuracy even under the most difficult lighting conditions.
            For macrophotography and portraiture wherc depth-of"field control is
             extremely critical, the apcrturc-preferred system of automation provides
              the maximum in flexibility, easc of opcration and conv0niencc. Thc LX
                   is equally responsive, however, in fast action situations where by simply
             opening the Iens to its widest aperturc, thc camcra automatically  selects
            the fastest possible shutter speed lighting will allow to capture those
                 fleeting moments.
           To operate the Pentax LX in the automatic exposure control mode, first
               rotate the shutter dial until the word "Automatic" locks in olace oo-
              posite the index mark. Set the lerrs f/stop you desire on the camera
               lens and activate the mctering system by pressing lightly on the shutter
                release button. (if using motor drive or winder, check theexposure with
              the dial lock release/l\4D exposure check button) The LX will then read
             the amount of light striking the film plane, select the precisc shutter
             speed required for a proper exposure from the continuously variable
  E           range of 112000th second down to 125 seconds during normal tempera-
  a            tures. The approximate speed selected is indicated on the viewfinder
     2I             display. Speed selected by the camera can be changed by merely selecting
                                                                                    page  2sls         a different f/stop or by using the exposure compensation dial (seeLI,B          24).To take the picture, press down firmly and smoothly on the shutter
                releasc button.
View original page 24Page 26 · Read text
USING THE EXPOSURE COMPENSATION DIAL

 Although the center-weighting of your LX camera's   The dial, located beneath the film rewind knob,
 metering system is designed to provide accurate ex-    permits you to override the automatic exposure set-
 posure measurement under the majority of lighting    ting by a full 12 EV (i.e., two full f/stops over or
 conditions, when using the camera in the automatic    underexposure) in 1/3 increments. The dial is in-
mode you may find that a degree of exposure adjust-    dexed at 4X (2 f/stops increase), 2X (one f/stop in-
 ment is desirable. This is particularlv true in scenes     crease), 1 l4X (2 f/stops decrease) and 1 l2X (one f/
 with extremely contrasty backgrounds or foregrounds,    stop decrease) with click stops at each 1/3 increment.
 or where special creative effects can enhance the over-
 all quality of the photograph. The exposurc compen-   Normal Position: For normal automatic exposure
sation dial allows you to make these adiustments     control, make sure the dial is set to the "lX"  posr-
quickly and easily.                                           tion. The Dial locks firmly in this position to prevent
                                                           accidental movement.
                                         When the dial is off the "1X" index, a red flag will
                                                appear in the upper right-hand side of the camcra
                                                           viewfinder as a reminder.


        www.butkus.us
,\L\V.\YS SLT Ti lf: tj\POSt Iil  ('o\11'1,\5 \ I l()\
i)1.\t B\{.K l(-t Illi,  i\  POSlli()\ Lii:l()R.1, Ri:.
                                                                                                                         1. T t R\ l\(,     f O \Oi<\1..\L- \l   l( J\] \  i l(    (.)f'[: ii
 iiitlr.
.24
View original page 26Page 27 · Read text
www.butkus.us


                                                                                        1l2X

BACKLIT SUBJECTS: When shooting a subject   EXPOSU RE COMPENSATION RANGE
against a bright background such as a window, bright   While the range of the exposure compensation  dial
sky, sand or snow, the camera meter will tend to     is sufficient to allow exposure compensation at all
underexpose the subject. To compensate, press the    film speeds featured in the camera's film speed range,
dial lock release and change the dial towards the    with extremely fast and extremely slow films, com-
2X or 4X position depending on the degree of ad-    pensation is not available for the plus.and minus set-
ditional exposu re desired.                                   tings indicated by the black dots below.
FRONTLIT SUBJECTS: When your subject is spot-     FILM SPEED      EXPOSURE COMPENSATION
lighted against a dark background such as on a stage,
the meter will tend to overexpose subi'ect details    ASA 12         2X  .rX 1l2X   1l4Xcreating a washed-out appearance. To compensate,                                              ASA 25 - 800   4X 2X  lX  1t2X   1t4Xpress the dial lock release and change the dial to-                                           ASA  ] 600wards the 1l2X or 1l4X position depending on what
                                              ASA 32OOdegree of underexposue is necessary or desirable.
View original page 27Page 28 · Read text
MANUAL EXPOSURE CONTRCIL

                                    In the manual exposure mode your Pentax LX provides rapid response
                                        through-the-lens metering combined with an extensive manual shutter
                                   speed range from 1/2000th second to 4 full seconds. To set the LX for
                                 manual exposure control, press the shutter dial lock release and move
                                 the dial from the "Automatic" position. The shutter speed selected by
                                     the dial will be displayed in the camera viewfinder by a blue flag at ther-]                                  right-hand side of the scale.
                                      Metering With Pre-set Aperture
                                     In situations where depth of field is critical, it's a good idea to pre-set
                                   the aperture when metering. Once you've turned the lens aperture ring
                                          until the desired f/stop appears in the viewfinder aperture window, acti-
                                   vate the meter and viewfinder display by pressing the shutter release
                                              lightly. To set the correct shutter speed for a proper exposure, rotate the
                                       shutter dial until the blue flag algins with the speed recommended by the                      A
                       2000          meter via the glowing LED. A red LED atthe top or bottom of the scale
                         t000                        500           indicates that the f/stop-speed combination is out of the camera's meter-
                               2rffi          ing range and should be changed accordingly.
                          t25
                           x                         00          Metering With Pre-set Shutter Speed
                           30       When fast action calls for pre-setting the shutter speed, rotate the shut-                                t5                                          ter dial until the blue flag in the viewfinder aligns with the shutter speed                                                            0(                                  index desired. Activate the viewfinder display by lightly pressing the
                                                             2I          shutter release and rotate the aperture ring until the LED along the
                           2s          shutter speed scale aligns with the pre-selected speed. A red LED at the                           4s
                                LT.B         top or bottom of the scale indicates that the speed-f/stop combination
                                                   is out of the camera's metering range and should be changed accordingly.
 o26
View original page 28Related documents and language editions


From the M. Butkus archive. Original publisher and archive notices are retained.
Check the model and edition against your equipment.
PDF verified 2026-10-10.