Film cameras
Pentax TWO SIDED User manual
User manual for Pentax TWO SIDED. 21 pages in English. Read the original PDF, download or print a copy without registration.
21 pagesEnglish4.8 MB PDF

Loading your manual…Open PDF directly
Document details
- Brand
- Pentax
- Model / document
- Pentax TWO SIDED
- Document type
- User manual
- Language
- English
- Pages
- 21
- File size
- 4.8 MB
- Category
- Film cameras
- Document date
- Not specified in catalog
Search available document text
Find a term, then jump to its page in the original PDF. Image-only pages may not be searchable; check the PDF for exact wording and diagrams.
Page 3 · Read text
. .                                      -Hood lock
Hood  for  focusing  finder  glass
High speed shutter did
Film winding & shutter cocking knob
Exposure coun!er did
Shutter release button         1-
Slow speed  shutter  dial
Lens
Fdm rewinding knob
Rear Cover lock
Eye-level view finder
Synchronizer terminal F
Synchronizer ternrinal X
Distance scale ring
Diaphragm-     -   adjusting ring   /"1
Pre-set adjusting ring                1Pre-set diaphragm index           -
View original page 3
Page 6 · Read text
PREVENT LOOSENING OF FILM            F1    WHILE LOADING FILM                                  I
       Set the rewinding clutch at A, and  turn the film                 As you wind the film, the film rewinding
       rewinding knob clockwise until a slighz resistance
         is felt to prcnent loosening or warpage of the film.               knob automatically turns anti-clockwise. When-
                                                                 ever loading a film cartridge, it is recommended
                                                                      that you check whether the rewinding knob
    Although the film loading has now been                  turns anti-clockwise when turning the winding
completed, the length  of the  film which was                  knob.  When the rewinding clutch  is not  set                                  I                                                                      at the proper position, or when the film is offdrawn out  of the cartridge while loading can
                                                                the sprockets or the take-up spool, the film may
not be used for picture taking;  SO,  turn the                                                                not be transported  to the right direction.
film winding knob @ and release the shutter
                                                                        Always remember:-
button @ alternately twice.  Set the figure 0                          Stop w~ndingthe fiIm when you feel a tight resrs-
                                                                                    tance as the film is at its end.
on the exposure counter dial @ to  the index                                                    I f you keep windrng the film agarnsr the resistonce,
                                                                                  the film w i l l come  off the cartridge, and  i t may
by turning the cnunter.                                                       no8 be rewound into the canridge.    I f the film has
                                                                               been wound off the cartrrdge,  rt should be removed
                                                                         from the camera in a dark room.
View original page 6Page 7 · Read text
-      -                                        .   -After the last exposure, turn the rewinding clutch @ on the
                          base  of theAcamera towards R  to free the sprockets.  Lift  the
     C   head.  of -the rewinding knob @ only half  of its length and turn  it                                      -                                                           Before focusing through the focusing       I  clockwise.  The exposed portion of the film on the take-up spool     l-1        Bnder glass, be sure that the shutter
                              will be rewound into the cartridge. When the film has been rewound,               has been cocked  first.                        you  will feel the knob  lighten or a sudden blank as  the leader "".d# Remove the lens protector cap, and erect the       I                                                    4 1
                       end of the film comes off the take-up spool.  Then open the back,                   focusing finder hood by pushing up the hood
                                                                                                                    Focusing will be made by obserling                          thorounhlv  null out the rewinding knob and remove the~.-.tartridge- ~~ ----  --                    lock a.
                                                                                                                the image on the focusing glass while turning                        lrom me camera.                                   I I                                                                                                                the distance scale ring @.  When the image on
                                                                                                                the focusing glass becomes clearest, an accurate
                                      After unloading film, turn the rewinding clutch                                            focusing will be obtained, and the same image
                               from R to &a original position A.  The removed                                                   will be produced on the film plane as the shut-
                                        cartridge should be put in o proper container to                                                    ter is released.
                                      prevent iU exposure l0  l y h l .                                                To ensure accuracy in focusing, a magnifier
                                             @ is attached  to  the  rear  finder hood.  The
                                                                                                                magnifier may  be  set  parallel to the focusing
                               When loading or udoading                                                glass by holding the nipple on top of the mag-
                                                     fllm; avoid dired sun light.                                                          nifier.  When observing through the magnifier,                             l
                                                                                                     keep your eye close to the magnifier.
View original page 7Page 8 · Read text
, ,
                                                                                                                                                                                                                        -                                                                                 .
DISTANCE SCALE                     The  distance  scale ring  of 50 mm Y 3.5 lens  is                                At distance 15 it. with 50 mm lens
AND                                      Lalibrated in foot 2.5,  3, 3.5, 4, 5, 7, 10, 15, 25, 50 and               and at the following diaphragm setting, the range of
                                                     infinity, while the 58mm F 2.4 lens has a closer addi-                   distance shown below is in the same depth-of-field.DEPTH Of                                                tional 2 ft. calibration.  As the clearest image is shown   11
FIELD GUIDE                                     on the focusing glass, the distance scale index indicates
                                            the  distance to the object.  The figures 3.5, 8 and 11
                                              in case of 50mm F 3.5  lens, and  2.4,   5.6,  8, 11, 16,
                                    and 22 in case of 58mm F 2.4  lens, inscribed on both                On each of our TAKUMAR lenses, different depth-
                                             sides of the distance scale index mark "A" show the                     of-field guide numbers are shown according to its focal
                                             lens aperture, and are used as Depth-of-Field Guide.                      length.
                                                                                                               Hence, when taking two or more objects of different                                           Every lens has a depth-of-field:  When a certain
                                            object falls in correct focus, some range  in the fore-                    distance,  it  is necessary to adjust the diaphragm piro-
                                     and background of the object also appear in the same                   perly in order to bring these objects simultaneously in
                                                                                                                    focus as illustrated by the photograph.                                                focus.  This guide shows  that  at  a  certah' distance
                                    and disphragm setting, the range of distance scale dial                   With ASAWFLEX, you can clearly ske what is in
                                         covered by the two same figures of the lens aperture                  the depth-of-field on the focusing glass,  You will also
                                     on both sides of the index mark "A" can be obtained   .               see the extent  of  blurs that  will be produced on the
                                              in a clear image on the film.
View original page 8Page 14 · Read text
ASAHIFLEX  is equipped with FP and X
chronizer terminals.  Be cure that you U
correct flash bulb at the correct terminal.

FP TERMINAL (Time lag : 15 mls)
    Always use FP (:lass flash bulbs at this
terminal.         B:          '                                               To obtain satisfactory synchronization with electronic
    Connect  the plug  of  the  flash cord  t # @ ; ,                                                                                                       i                               l                                            flash,  it is preferable to set the shutter speed slower than
this FP terminal and use FP bulbs.  The      '&''I                    -                                                                                                           1/25 of a second.     -
flash  will synchronize a1 speeds from 1/25     X TERMINAL (Time lag : Zero)                                                                                                                                              S           ;:$JK7:
to 1'500.                                         At this terminal, F class bulbs, X class                                    nigh6When timeusingora insynchronizeddark placer,flashyouat daytimecan alwaysas wellobtainas ata
     When timing ar 1 25 seconds. a larger size bul         bulbs and strobe lights may be used accord-                                       brighttaken again86picture theOS mainshotpr,lighc.by the photograph  even when
        of longer flash rime is preferable.                   ing to the following table.


                                                                                                                                                                     Token with synchronized A a r ~
View original page 14Related documents and language editions

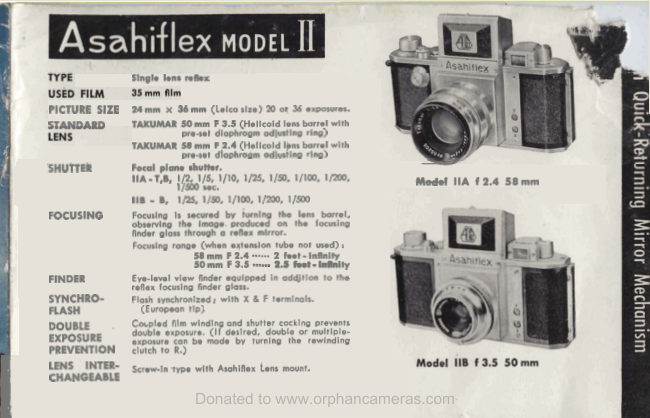

From the M. Butkus archive. Original publisher and archive notices are retained.
Check the model and edition against your equipment.
PDF verified 2026-10-10.