Sewing machines
Remington 1875 Family — User manual
User manual for Remington 1875 Family. 46 pages in English. Read the original PDF, download or print a copy without registration.
46 pagesEnglish16.8 MB PDF
Loading your manual…Open PDF directly
Document details
- Brand
- Remington
- Model / document
- Remington 1875 Family
- Document type
- User manual
- Language
- English
- Pages
- 46
- File size
- 16.8 MB
- Category
- Sewing machines
- Document date
- Published 1875
Search available document text
Find a term, then jump to its page in the original PDF. Image-only pages may not be searchable; check the PDF for exact wording and diagrams.
Page 5 · Read text
THE REMINGTON

FAMILY SEWING MACHINE


       AND ATTACHMENTS.


 ILLUSTRATED INSTRUCTIONS

           FULLY EXPLAINING THEIR OPERATION AND USE.


      PRINCIPAL OFFICE AND MANUFACTORY, ILION, N. Y.


        CITIZEN OFFICE, ILION, N. X.
                            1875.
View original page 5Page 7 · Read text
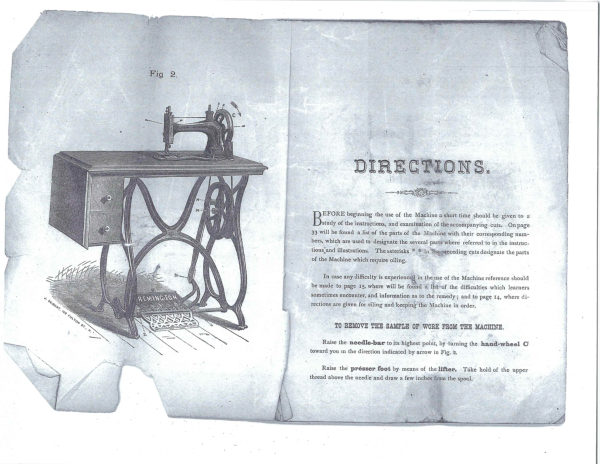
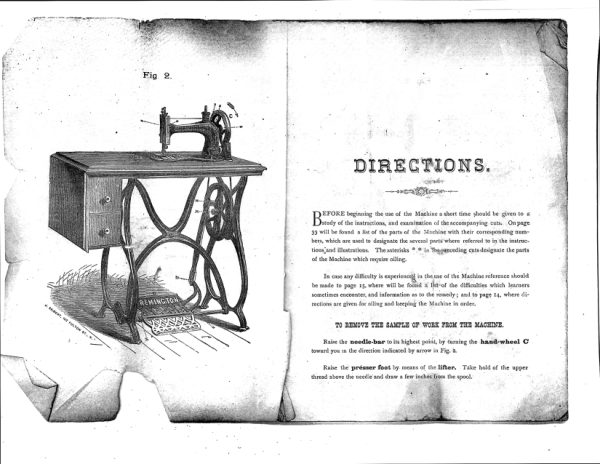
Fig. 2.


            86


VIEW OF THE UNDER SIDE OF MACHINE WHEN TURNED BACK
               ON THE TABLE.
View original page 7Page 11 · Read text
DIRECTIONS.


   Read carefully these instructions, and refer to the three
 preceding cuts, numbered 2, 3 and 4, and the cut of parts
 on page 36. Every part of the machine is lettered and num-
 bered. The letters are referred to in the Direction and part
 of the numbers. Observe how the machine is threaded when
 you receive it, then turn the machine until the needle-bar (95)
  is raised to highest point. Raise the lifter (69) and take out the
 sample of sewing from under the presser-foot (63), by drawing
  it from you towards the front end of the machine. Then pro-
  ceed to clean and oil the machine.


                 TO OIL THE MACHINE.


    The ** on cuts 2, 3 and 4 indicate the parts to be oiled.

  The hole indicated by O in Fig. 3, in rear of the front end of the

  arm is made to oil the cam and roller. Turn the machine slow-

ly until the roller appears in sight through the hole, then oil it.

  The face of the shuttle (58) should be oiled at least once a day

 when in constant use. Oil slightly the points of the bobbin

  before it is placed in the shuttle. Throw the belt off the band-
View original page 11Page 12 · Read text
wheel A on the stand, and turn the machine back on its hinges
and oil all the parts indicated by the * * as shown in Fig. 2.
Then turn the machine back in its place, put on the belt, remove
the shuttle (58), and run the machine rapidly a moment, then
wipe off all the superfluous oil with a piece of rag or cotton
waste. Be sure that every part is clean before youcommence
to sew. If the machine runs hard at any time while in use, it is
certain that some place has not been oiled. If it runs hard
after standing idle for some time, use a little paraffine oil or ben-
zine in the usual way and run rapidly, wipe clean, then oil with
the best prepared sperm oil, which should always be used. To
make sure of good oil, buy it from some of the Company's
offices or authorized agents.


             TO OPERATE THE TREADLE. (E)

   Place the center of the foot (one or both) directly over the

cross-piece upon which the treadle B rests, so that both heel

and toe may be used in turning the machine; then take hold of

 the balance-wheel (C), and turn it over towards you, allowing the

 foot to move freely with the motion thus imparted, and continue

 the motion of the foot by a pressure of the heel and toe alter-

 nately until a regular motion is acquired • and until this is done,
 sewing should not be attempted.


                 TO SET THE NEEDLE.

   Turn the machine until the needle-bar (95) rests at its
 highest point, then with the screw-driver loosen the nut on the
View original page 12Page 13 · Read text
II
 needle-clamp (52), then hold the needle between the thumb and
 finger of the left hand (with is long groove towards the front
 end of the machine), and place its point down through the hole
 in the throat-plate (72) until the eye of the needle is even with
 the top of the throat-plate, then turn the balance-wheel (C)
 slowly towards you until the needle-bar moves downward to

 admit of your guiding the shank of the needle into the groove

 under the needle-clamp (3I); bring the needle-bar (95) down

 until the gauge mark (a distinct line cut on the front side of the

 needle-bar near its top) comes even with the top of the face-

 plate (103), then tighten the nut on needle clamp. Observe that

 the needle passes through the hole in the throat-piece without

 touching either side. If it touches, take hold of it near its point

 and press it gently in the opposite direction until it enters the

 center of the hole in the throat-piece.


               TO WIND THE BOBBIN.


   Raise the presser-foot with the foot-bar lever (69), remove the
 shuttle (58), loosen the screw (36) and shove the spooler (108)
forward so that the spooler-pulley will press against the hand-

 wheel (C), then screw the spooler fast, place the spool of thread

to be wound from on its spindle (29), and place the bobbin in

 the spooler (108). To secure the end of the thread preparatory to

winding, place it between the head of the bobbin and the socket at

the right hand; proceed to operate the treadle as in sewing,

letting the thread pass gently between the thumb and fore-finger

of the right hand, which should be held about fifteen inches from
View original page 13Page 14 · Read text
I2

and on a line with the spooler, so that the thread may be prop-
erly, evenly and tightly wound upon the bobbin; or it may be
wound equally well by holding the spool between the thumb
and forefinger of the right hand. Much depends upon the
proper winding of the bobbin.

              TO THREAD THE SHUTTLE.

  Take the shuttle between the thumb and forefinger of the left
hand with the point to the right. Place the bobbin within the
shuttle by putting one end in the hole or center, towards the
point; then press the other end down the groove in the blunt
end until the point of the bobbin enters the center hole in the
shuttle, always placing the bobbin so that the thread will draw
from its under side; pass it out (towards you) through the lower
long slot and back through the upper long slot; then through
the hole opposite, and nearest the blunt end of the shuttle; then
through as many holes as shall be necessary to produce the ten-
sion required; but last, in every case, through the hole nearest the
point of the shuttle, either outward or inward. In the latter case
pass it out through the long slot, and, in all cases, lastly, under
the thread-guide or spring on the side of the shuttle.


              TO THREAD THE NEEDLE.


   Pass the thread from the spool through the eye (43) at the top

of the face-plate, then under and between the disks (49 and 50)

on the front of the face-plate, then up over the thread guide (32)

on the upper end of the needle-bar (95) by snapping it under
View original page 14Page 15 · Read text
13

 the little spring on the guide into the groove, then under the

 upper guide-spring (42, on the lower part of the face-plate) and

 over the end of the slack-lever (65), then under the lower spring

(42 ½), (this is done very quickly and without passing the end of

the thread through any holes) then snap the thread under the
 little spring on the needle-clamp (31), and lastly through the
eye of the needle.

             TO REGULATE THE TENSIONS.

   After threading the shuttle, try the tension by drawing the

thread towards the blunt end. If it draws as tightly as it will

bear without breaking, it is right for goods of firm texture.

Thin, soft goods require a looser tension. To obtain more or
less tension, pass the thread through more or less holes, as de-
scribed above.
  The tension on the needle-thread is obtained by turning the
thumb-nut (53) on the front of the face-plate over toward the
operator; take hold of the thread just above the needle and
draw it downwards from the spool, and continue to turn the
thumb-nut until the thread draws as tightly as it will bear
without breaking. For thin, soft goods, the same rule applies

for the needle as for the shuttle tension.
              TO COMMENCE SEWING.

   Place the shuttle within its carrier (87), leaving adout three

inches of thread projecting, and close the slide. Then draw
about three inches of the upper thread through the eye of the
needle, and with the left hand hold the end, leaving it slack from
View original page 15Page 16 · Read text
14
the hand to the needle, while you turn the wheel gently towards
you, until the needle moves down and up again to its highest

point, in order to bring the shuttle thread up through the hole

in the throat-plate; then gently draw the needle thread, and the

shuttle thread will appear through the hole in the throat piece,

when the two threads should be laid to the left across the feed
points (71); then place the fabric beneath the needle, lowering
 the presser-foot (63) upon it, and operate the treadle. After a
few stitches are formed, stop and examine them. Should there
be loops projecting, or a straight thread upon the lower surface,
turn the thumb-nut (53) on the face-plate, so as to tighten the ten-

sion on the needle thread. If the thread lies straight upon the

upper surface, turn the thumb-nut from you, to loosen the tension

of the needle thread. The secret of perfect sewing lies in the ad-

justment of the tension of the needle thread, so that it will

be equal to that of the shuttle, and the adjustment of either may

be regulated as before described.

              TO REMOVE THE WORK.

   Allow the needle to rest at its highest point, taking hold of
 the thread just above the needle, and draw from the spool about
 three inches slack; then raise the presser-foot, and with the left
hand draw the fabric from the left side upward about three
inches; then cut both threads.

         TO ALTER THE LENGTH OF STITCH.

   Directly at the right of the operator, at the base of the arm

 (D) will be found a thumb-nut (51) acting on a lever (70) for
View original page 16Page 17 · Read text
I5
adjusting the length of the stitch. To lengthen the stitch, the
thumb nut must be loosened, and the same moved down towards
the bed (E) of the machine. The reverse of this movement will
shorten the stitch. After getting the length of stitch required,
screw the thumb-nut down.

               GENERAL REMARKS.

   At the top of the machine, back of the needle-bar, will be

found a screw (35), by turning which to the left increases, and

to the right decreases, the pressure of the foot-bar. Heavy

goods require more pressure than light goods. The presser-foot,

hemming-gauge, braider, and corder-foot, are attached to the

foot-bar (98) by means of a screw (10).

   The belt (F) which communicates motion to the machine should
always be tight enough to move the machine without slipping,
and no tighter than is requisite to perform that office. Should
 it become too loose, unscrew the nut of the wheel-stud (105) in
the frame, and lower the wheel a little, then tighten the nut. If
 this does not tighten the belt sufficiently, cut a piece out of the
belt, and hook it together again.


  THE CAUSE OF A MACHINE NOT WORKING PROPERLY

Will be found, in almost all cases, in the improper setting of the
needle, the use of poor thread, or of that which is too large for the
needle, or in the wrong adjustment of the tensions.
  The FIRST THING TO EXAMINE when you are in difficulty is,

whether your needle is good, and correctly set.
View original page 17Page 18 · Read text
16


   If correct, the eye must be on a level with the throat-plate

 when the mark on the needle-bar is level with top of the

 face-plate. The short groove must be towards the shuttle-race,

 and the needle must pass through the hole in the throat-plate

 closest to the side towards the shuttle.

                  MISSING STITCHES.

   Should there at any time be skipped or long stitches at inter-

 vals, it is owing to the needle being set too high or too low, or its

 having become bent away from the shuttle, or its being too small

 for the thread in use, and sometimes to the point of the shuttle

 becoming accidentally blunted; though it is possible that the

 machine may skip stitches when sewing lime-dressed goods, in
which case, wash the goods, or rub the surface where it is to be
sewed with hard white soap.

               BREAKING THREADS.
  When the machine breaks the upper thread, the needle is too
fine for the thread, or the tension is too tight, or you may be

using a large needle and thread with the fine throat-plate, the

hole being so small that the needle cannot pass through without

cutting or chafing the thread against the sides.

   Should the shuttle-thread break, make less tension on it by

passing it through less holes. If you are

              SEWING HEAVY GOODS,

Put on the throat-plate with the large hole, and lengthen the
stitch in proportion to the thickness of the goods.
View original page 18Page 19 · Read text
I7
   In sewing soft twisted silk and linen thread, sometimes there
will appear small loops on top of the work; it is always owing
to the needle being too fine, or the point being bent or too deli-
cate. In the latter case, take a fine file or hone and smooth the

point of the needle until the difficulty is remedied.


         TWIST, LINEN AND COTTON THREADS.


   Do not use poor threads.  Any good threads will work well,

but you must not expect to make a smooth, even stitch with

poor, rough thread. The thread sold by us is better than can

be bought of outside parties, andcosts about the same, when

purchased from us or our agents, as that sold by others.Per-

sons living at a distance from an agency, can send by mail, en-
closing us the money, and we will fill orders promptly by mail

or express.

   The wheel must always be turned towards the front.

  The presser-foot, hemmer or braider, must never be put down
while the machine is moving, without paper or cloth on the
feed points, When sewing with very coarse or uneven thread, the
needle may be set about one-sixteenth of an inch lower. If the
machine moves hard, take out the shuttle, and see if it relieves
it, as it may be dirty or dry; and if not, there must be want of
oil on some of the principal moving parts.
  When the day's work is over, clean your machine thoroughly.
Before you resume work, oil it carefully as directed. After oil-

ing the machine run it swiftly for a minute or two, then wipe off
View original page 19Page 20 · Read text
18


the surplus oil. These are the two essentials for the preservation

of the Sewing Machine.

                TO MAKE HEM-STITCH.

   Fold blotting paper which can be readily torn until you get

thickness corresponding to the opening desired in the hem

stitching; put one of the pieces of goods under the paper and

the other above; put all under the foot, and sew through all,
taking care to slack the upper tension as much as possible with-
out leaving loops below. After being sewed, both pieces will
be doubled back and forth, to crease them well, exactly on the
 line of stitches; then fold all four edges in the same direction,

 and hold firmly while you tear out the paper; then remove the
 other half of the paper, and open the hem stitching, one edge of
 each; or either piece may be cut and passed through the hem-
mer, or a row of stitching can be passed alongside the hem
 stitch, and the double edge finished off as you choose.


                 TO TURN A CORNER.

   Raise the presser-foot when the needle is at its lowest point;
turn the goods and proceed. The wheels must always be turned

towards the front.


      TO GATHER AND SEW ON AT THE SAME TIME.


   Put on the braider, and place the automatic braider (self-sewer)
 in the place of the common guide; pass the ruffle through the
 automatic guide; put the band or dress on the ruffle, but "not
View original page 20Page 21 · Read text
19
through the guide. Let down the braider. Tighten the upper
tension as much as the thread will permit; lengthen the stitch
according to the fineness or coarseness of the gathering desired;
put the machine in motion, and hold the band or dress so that

it cannot move as fast as the ruffle, taking care, however, not to

draw it back after it shall have gone ahead. The more the

upper piece of the sewing is held, the more the ruffle will be

gathered.

                      TO BIND.
  Raise the needle to the highest point, take care that the
needle enters fairly the slot in the binder, draw in the ribbon as

far as the needle, place the cloth between the doubled end, and

bring up the guide—but not to bind the ribbon against the
binder. There are binders of three different kinds for cloths of
different thickness.
  Persons sending orders for silk, thread and needles, by mail
or otherwise, must always send the money with the orders.

                      NEEDLES.

   Machine Needles can be sent safely any distance by mail.

 Price per dozen, 75 cents.

                    EXTRAS.
  We send with each Family Machine, one Hemmer, one
 Braider, one extra Throat-Piece, one Screw-Driver, one Guide
and Screw, one Wrench, six Bobbins, one Oiler, one dozen
Needles, one copy of Directions.
View original page 21Page 23 · Read text
2 I


                   TO HEM.

  After fastening the hemmer to the presser-bar, in the place of

the presser-foot, pass the edge of the cloth into the hemmer in

the manner shown in the illustration (Fig. 5), drawing the end

of the material through the hemmer as far as the needle-hole.

Let down the hemmer and run the machine. Keep the edge of

the cloth slightly elevated with the fore finger, so as to keep the

mouth of the hemmer filled, as shown in the illustration (Fig. 5).

If learners find any difficulty in inserting the cloth in the hem-

mer, they may draw a thread through the corner of the material

after folding the beginning of the hem, and draw the thread into
the hemmer from below. Pull on the thread, keeping it and the
cloth stretched, and the latter will be drawn into place properly
folded for the hem.
View original page 23Page 25 · Read text
23


           TO FELL WITH FOOT HEMMER.


  Make your seam and trim one edge of the material nearly

down to the stitching, leaving the other edge, which is to be

felled, about five-sixteenths of an inch wide. This should be

trimmed so as to be uniform its entire length. Introduce the

edge into the hemmer and hold it in position with the fingers,
as shown in the illustration (Fig. 6). If the edge be properly
trimmed and of the right width, it will not be necessary to
guide the edge with the fingers.
View original page 25Page 27 · Read text
25


            TO BRAID WITH FOOT BRAIDER.

   In place of the presser-foot fasten the braider to the foot-bar.
Pass the braid through the hole and under the wire spring on
the braider. Place the.cloth under the braider and let it down
on it as shown in the illustration (Fig. 7). Then commence to
sew, turning or guiding the cloth so that the needle will follow
whatever pattern may be marked upon it.
View original page 27Page 29 · Read text
27


             THE REMINGTON TUCKER.

  Place the tucker on the machine so that the pin through slot

of bed plate will fit in the hole near centre of machine bed.

Fold the goods by hand for the first or lowest tuck, then place

the goods under the tucker-bow and turn the hinged guide

between the folds of cloth. Turn the machine until the needle

descends into the goods at the proper distance from the folded

edge, then move the edge gauge of bed piece up to the edge

of the goods; then turn the thumb screw until the tucker is
held firmly in its place. When in proper position the lip on
spring gauge will rest on the presser-foot. When tucks are
made so that the edge of the last tuck will come even with the
stitching of the previously made tuck, the guide hook should be
three times the distance from the edge gauge of bed piece that
the gauge is from the needle. This is easily seen by looking
at the scales on the tucker. After one tuck is sewed, break
over the seam laying the tuck smooth, slide up the hook to
regulate the width of space, always passing the last tuck made
through the hook.
View original page 29Page 30 · Read text
Fig. 9.


                     THE CORDER.

   In place of the presser-foot attach the corder to the foot-bar,

and use it as shown in the illustration (Fig. 9), using the same

cord that is commonly used for cording.
View original page 30Page 31 · Read text
Fig. 10.


                THE REMINGTON QUILTER,

                    TO QUILT

   Attach the quilter to the presser-bar above the presser-foot,

as shown in the illustration (Fig. 10). The guide-foot can

be adjusted to or from the needle by loosening the thumb-screw

that holds it in place. The foot-guide can be reversed so as to

act on either side of the needle.
View original page 31Page 32 · Read text
Fig. 11.


  THE JOHNSTON AND TOOF RUFFLERS.

           (Fac-simile of work performed by them.)

  These Rufflers are the finest working and most useful attach-
ments applied to the Sewing Machine.They gather any desired
fulness without any change of Thread, Tension or Pressure.
Full instructions accompany this attachment.
View original page 32Related documents and language editions
From the ISMACS International. Original publisher and archive notices are retained.
Check the model and edition against your equipment.
PDF verified 2026-10-11.