Sewing machines
Remington Number 3 — User manual
User manual for Remington Number 3. 16 pages in English. Read the original PDF, download or print a copy without registration.
16 pagesEnglish11.8 MB PDF
Loading your manual…Open PDF directly
Document details
- Brand
- Remington
- Model / document
- Remington Number 3
- Document type
- User manual
- Language
- English
- Pages
- 16
- File size
- 11.8 MB
- Category
- Sewing machines
- Document date
- Not specified in catalog
Search available document text
Find a term, then jump to its page in the original PDF. Image-only pages may not be searchable; check the PDF for exact wording and diagrams.
Page 1 · Read text
ie

iN

ie

DIREGHONS.
eae

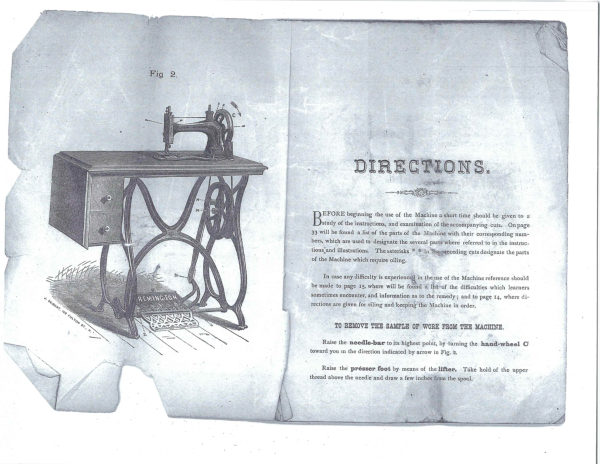
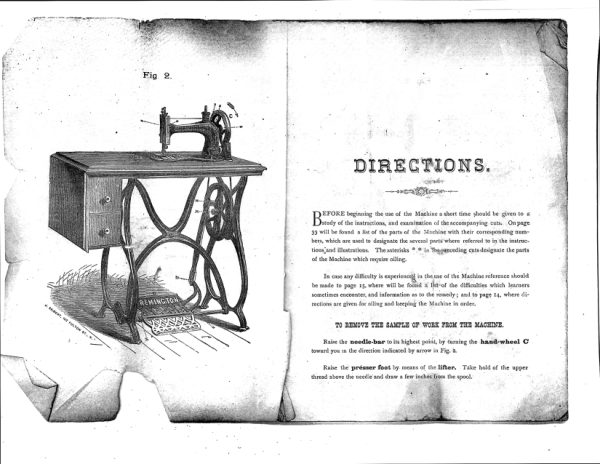
EFORE beginning the ise of the Maghinea short tine shouldbe given to «
See eae ak ene aah rae aoe
39 will be fund a lit of the pats of the Stacie with their corespondling nome
bers, which are used t designate the several par¥where referred to in the instruc.
tionsandilstrations Theastersks * ®tnhgdeceding eats designate the parts
‘of the Machine which require oiling. 3

In cate any difcalty is experienc] in thense ofthe Machine reference should
‘be made to page 15, where will be found a list-of the difficulties which learners
sometimes encounter, and information as to the remedy; and to page 14, where di-
rections are given forsiling and keeping the Machine in order.

‘10 REMOVE THE SAMPLE OF WORK FROM THE MACHINE.

Raise the needle-bar to its highest pohit, by turning the hand-wheel C
toward you m the direction indicated by arrow in Fig. 2

Raise the présser foot by. means of the lifter, Tike hold of the upper
thread above the needie'and draw a few inché®!fiei the spool.
View original page 1
Page 2 · Read text
a 8

Draw the work out gently to the left

keeping the upper thread in the noteh ix
the presser-foot so as to avoid bending the

needle,

70 OPERATE THE TREADLE.

Toosen the hand-wheel so it will run freely on the shaft as described on
Page 8 under the head of Winding the Bobbin.

Place the center of the foot (one vt both
which the treadle B
Machine,

) directly over the eross-piece upon
rests, $0 that both heel and toe may be used in turning the

Nie,
Take hold of the top of hand-wheel © and turn it toward you in the direc
‘on shown by the arrow in Fig. a, allowing the foot to move freely with the motion

thus imparted, and continue the motion of the foot by a pressure of the heel and

toe alternately until a regular motion is acquired. Until this is done sewing shouta
not be attempted,

10 wilt TEs BOBBIN.

With the thumb and forefinger of the right hand

draw out the stud on the
back of hand wheel C, connecting the whee}

the shaft

Raise the presser-foot, Pull back the slide. Remove the shuttle, Take
‘out the bobbin,

Place the bobbin in the spooler, catching the end of thread between head of
Dobbin and socket at right hand. Operate the treadle as in sewing, letting the
thread pass gently between the thumb and forefinger of the right h
should be held about fifteen inches from and on a line with the spooler,
thread may-be wound evenly and tightly upon the bobbin,

the proper winding of the bobbin,

sand, which,
so that the
‘Much depends upon,

9

‘10 THREAD THE SHUTTLE.

sr of the left hand.
‘Take the shuttle between the thumb and forefinger of

rig. 3. ce Bobbin i ts

Lit tonsinpeing to yo'ton own in Fi 2 nba in
veg Ponts treud ha eles the eof sheila ove
vere ot hough the hole io tonatonspring, 2

guide spring on the side of shuttle,

Notes hove Ws ch fae Shuttle bas eon further
he sin print the-threading of the Shuttl
te. Since the above

sited, by cating notches throng ehich Uke thread may be slipped ato the holes
plified, ing

is

|
View original page 2
Related documents and language editions
From the ISMACS International. Original publisher and archive notices are retained.
Check the model and edition against your equipment.
PDF verified 2026-10-11.