Film cameras
Ricoh Mirai 105 User manual
User manual for Ricoh Mirai 105. 25 pages in English. Read the original PDF, download or print a copy without registration.
25 pagesEnglish2.0 MB PDF
Loading your manual…Open PDF directly
Document details
- Brand
- Ricoh
- Model / document
- Ricoh Mirai 105
- Document type
- User manual
- Language
- English
- Pages
- 25
- File size
- 2.0 MB
- Category
- Film cameras
- Document date
- Not specified in catalog
Search available document text
Find a term, then jump to its page in the original PDF. Image-only pages may not be searchable; check the PDF for exact wording and diagrams.
Page 2 · Read text
(WEBMASTER: I don't do much for the "point and shoot" cameras. A lot of the images are just scans of the
pages
If the images are too small, look at the PDF file made from this page. You can ZOOM a PDF file.

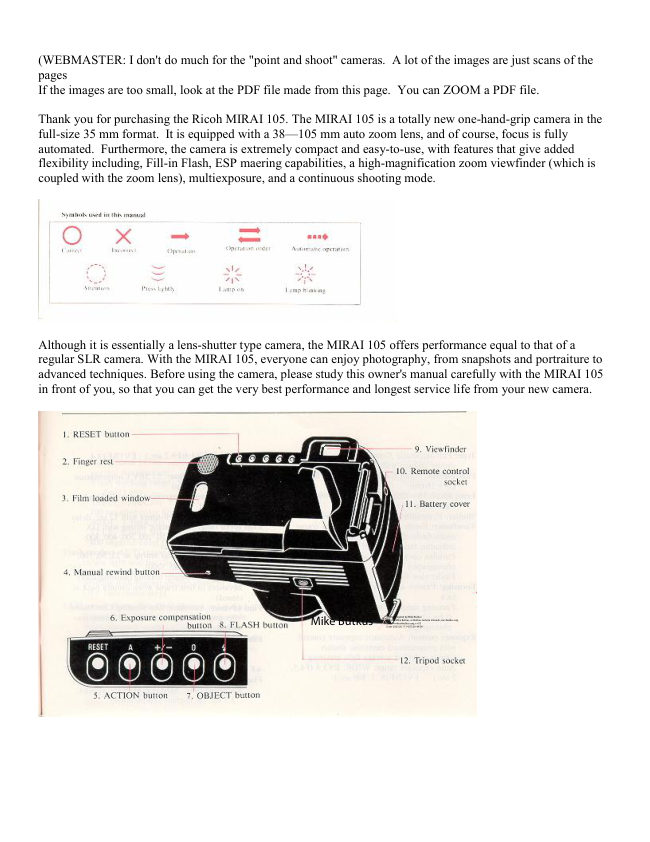
Thank you for purchasing the Ricoh MIRAI 105. The MIRAI 105 is a totally new one-hand-grip camera in the
full-size 35 mm format.  It is equipped with a 38—105 mm auto zoom lens, and of course, focus is fully
automated. Furthermore, the camera is extremely compact and easy-to-use, with features that give added
flexibility including, Fill-in Flash, ESP maering capabilities, a high-magnification zoom viewfinder (which is
coupled with the zoom lens), multiexposure, and a continuous shooting mode.


Although it is essentially a lens-shutter type camera, the MIRAI 105 offers performance equal to that of a
regular SLR camera. With the MIRAI 105, everyone can enjoy photography, from snapshots and portraiture to
advanced techniques. Before using the camera, please study this owner's manual carefully with the MIRAI 105
in front of you, so that you can get the very best performance and longest service life from your new camera.


                                                                                                                                                                                                                                                                                                                                                 Digitally signed by Mike Butkus
                                                                                                                                                                                                                                                             DN: cn=Mike Butkus, o=Butkus camera manuals, ou=butkus.org,
                                                                                                                                                                                                                                                                c=US                                            Mike Butkus           email=mike@butkus.org,Date: 2023.05.17 14:57:30                                                                                                                                                                                                                                                                                                                                                                      -04'00'
View original page 2Page 3 · Read text
www.butkus.us


Preparations before taking pictures  ...3
  Loading batteries  ...4                                 Using fill-in flash ...28
  Checking the batteries  ...5                              Taking photographs IV ...30
Taking photographs I  ...6                                Auto-zoom photography ... 31
  Loading the film  ...7                                       Multi-exposure photography ...33
  Taking photographs ...10                              Remote Control socket ...35
  Unloading the film ...14                           To take better photographs ...36
Taking photographs ....15                            Zoom lens ...37
  Using the focus lock ...16                                 Autofocus (AF) ... 39
  Taking a continuous series of shots ...17                    Exposure ...41
  Using the self-timer ...18                                  Viewfinder displays ... 44
  Macro photography ....20                       LCD panel and mode
  Photographing distant objects ... 22                         buttons ...46
  Exposure compensation ...23                             Using the accessories ...48
  Using the RESET button ...24                          Care and Storage ...50
Taking photographs III ...25                                Questions and answers ... 52
  Flash auto photography ... 26                               Description of controls ...54
  Flash OFF mode When you don't want the flash to fire ...    Specifications ...56
27


Preparations before Taking Pictures
View original page 3
Page 4 · Read text
Loading Batteries
Do not use incorrect batteries or mix new and old batteries at the same time.


Checking the Batteries


* The LCD display cut-off after 90 sec. to conserve battery power.
When the power switch is set to OFF. the lens zooms to the WIDE position.
View original page 4
Page 6 · Read text
Taking Photographs


                                     the red line goes to the "autofocus frame"


Press the autofocus button halfway to focus
The button can be pressed in two steps; autofocus operates when the button is pressed to the first of these
steps. When the subject is in forcus the AF lights in the viewfinder.
When the AF blinks, try focusing again because teh subject is not in focus.
* The shutter cannot be released with the "AF" blinking.
View original page 6Page 7 · Read text
www.butkus.us


Press the shutter release button fully. Immediately after the shutter is released, the film is automatically wound
by one frame, and the exposure counter advances one frame.


In low light conditions: the red AF Illuminator is activated automatically to determine the correct focusing
distance. (Maximun operating distance: approx. 4 m (13 ft). Shooting range: Autofocus operates with teh
subject at a distance of 1.3 M (4.3 ft.) to INFINITY. When the subject is closer thatn 1.3 m (4.3 ft.) AF will
blink in the viewfinder, and the shutter will not be released.
However, the shutter may sometimes be released erroneously when the subject is extreamly close to the camera.


When using a combination strap, be carful that the neck strap or strap of the lens cap does not obstruct the lens
or flash. Do not cover lens with your fingers.

Unloading the Film


When you reach the end of the film, it is automatically rewound. Press the rewind button to rewind the film
before you have completely shot the roll.
* The final reading of the exposure counter prior to rewinding may be ore than the number of exposures
specified for the film.


                   When rewinding is completed, the sound of the motor operating will stop and the
(film icon) will blink. * Once the winding is finished, the film must be removed before any other operations are
possible.
View original page 7Page 8 · Read text
Taking Photographs II

Using the Focus Lock
The MIRAI 105 is provided with various functions that add greater versatility to photography. In this section,
the operation of each of the camera's various features will be described, explaining how to use them most
effectively.
* Mode buttons cannot be cancelled after being set, even if the power is switched off.
Be careful when changing the mode used for shooting. Use the reset button to return to the normal shooting
mode.


Aim the camera to center your subject within the autofocus frame. Press the shutter release button lightly to
lock the focus on the subject you want. When focused, AF will light in the viewfinder. Maintain the pressure
on the shutter release button, re-aim the camera to obtain the required composition.


* When the focus is locked, the exposure is also fixed (AE lock).
Press the shutter release fully to take the photograph.

Taking a Continuous Series of shots

You can shoot continuously at'::a: speed of 1.3 frames (1 frame every approx. 2.5 seconds when the flash is
used. Refer to page 26 for the flash working range when in the continuous shooting model
View original page 8
Page 9 · Read text
www.butkus.us

Press the ACTION button so that the mode (three boxes) indicator on the LCD panel starts blinking.


The camera will shoot repeatedly as long as the shutter release button is depressed.
* The focus and exposure will be locked to the settings corresponding to the first frame of the series' so be
careful when shooting a moving subject or other subject where light levels and subject distance varies.

Using the Self-timer


 Press the shutter release fully to start the self-timer. The AF Illuminator lights. The shutter will fire in 12
seconds. The AF Illuminator will start blinking 2 seconds before the shutter is released. After use, press the
ACTION button to cancel the mode.

*The self-timer can be cancelled at any time before the shot is taken by performing any of the following
operations:
(1) Pressing the ACTION button
(2) Sliding the power switch to OFF
(3) Pressing the RESET button
To avoid incorrect exposure in the selftimer mode, ensure that strong light does not enter through the
viewfinder.
View original page 9
Page 10 · Read text
Macro Photography
Macro Photography allows photographs to be taken with the subject as close as - 1 m (2.6 ft) to the camera.


Press the OBJECT button and set the mode to - flower - blinks.


The lens zooms to the full telephoto position, and -flower- will be indicated in the viewfinder. At this time, the
field of view slightly shifts towards the lower left of the viewfinder to compensate for the parallax condition in
macro photography
(See p. 44).


Press the shutter release button. * In macro photography, zooming is not possible.
View original page 10
Page 11 · Read text
www.butkus.us


Shooting range: Macro photography is possible when the subject is at a distance of from 0.8 m (2.6 ft) to 1.3 m
(4.3 ft) from the front surface of the lens. When the subject is out of this range "AF" will blink in the
viewfinder, and the shutter can not be released. However, the shutter can sometimes be released incorrectly
when the subject is extremely close to the camera.

Photographing Distant Objects

When shooting in this mode, the focus is fixed at infinity.
Use this position when shooting fireworks in a night sky, clouds, mountains, etc., for optimum sharpness on
distant subjects.


Press the OBJECT button and set the mode to - mountains- will blink.

Press the shutter release button.
* In the - mountain- mode, the shutter is released even though"AF"does not light.

Exposure Compensation


To control the exposure, press the + / button until the desired compensation value is indicated.


The compensation varies between—1.5 EV and + 1.5 EV in steps of 0.5 EV every time the button is pressed.
The compensation indicator on the LCD panel will blink to show the selected compensation.
View original page 11
Page 12 · Read text
(1) - 1.5EV                     (2) + or - 0EV               (3) + 1.5EV


Using the RESET button


 If you have made a mistake in setting -any controls, etc., press this Reset: button to return to the standard
shooting mode.

The continuous shooting, macro mode, distance mode, M.E. and exposure compensation modes, the flash
(lighting bolt) and flash off (lighting bolt with OFF) and the auto zoom will be released.
Then the standard mode will be set.

Taking Photographs III (Flash Photography)
The MIRAI 105 has an extended range of flash functions

Flash Auto Photography

 In the flash auto mode, the flash fires automatically in low light condition and when the subject is backlit. This
is the normal operating mode.


 lights in the viewfinder to inform you that the flash is ready to fire.

Press the shutter release button fully. If the button is pressed before the (lighting bolt) lights, the flash won't
fire.
Make sure the (lighting bolt) is lit before taking the picture.
* After the film is wound, it takes approx. 3.5 see to charge the flash.
View original page 12
Page 13 · Read text
www.butkus.us

Shooting range guide

ISO  WIDE                TELE
100    4.3 feet - 13 feet              4.3 feet - 13 feet
400    4.3 feet - 26.2 feet            4.3 feet - 26.2 feet

Flash working range in the continuous shooting mode


ISO  WIDE                TELE
100    4.3 feet - 9.8 feet              4.3 feet - 9.8 feet
400    4.3 feet - 19.7 feet            4.3 feet - 19.7 feet

Flash OFF Mode
When You Don't Want the Flash to Fire

Use this mode in a museum, etc., where flash photography is prohibited, or when you are shooting night scenes
and you don't want the flash to fire.


Press the FLASH button and set the flash mode to OFF. (lighting bolt OFF) blinks. The shutter speed can be
extended up to 2 sec. .
* In low lighting conditions, the shutter speed may be slow. Use a tripod, etc., to prevent shaking the camera.


 Using Fill-In flash
View original page 13
Page 14 · Read text
Example A: With backlighting, the person's face, etc., will be too dark.


Example B: When shooting a night scene, etc., which includes the background, only the person in the
foreground can be shot.


Make sure that the mark "AF" lights when the shutter release button is depressed halfway.
Then, press the shutter release button full.
Example A: By using the Fill-in flash mode, he subject will be properly lit by the flash.


Example B: A special feature of the Fill-in flash mode is the ability to shoot exposure' as slow as 2 seconds to
capture the background while the flash lights the subject.

* In the slow synchro mode, the shutter speed becomes slow. Use a tripod, etc., to prevent the camera from
shaking.
View original page 14
Page 15 · Read text
www.butkus.us

Taking Photographs IV

The MIRAI 105 has the functions which rank with those of an AF SLR camera such as auto zoom and double-
exposure.
In this section, photography techniques using those advanced techniques will be explained.


Auto Zoom Photography


Press the OBJECT button to set the mode to close person or far person icon.
* In Auto-zoom mode it is not possible to use the zoom button.

Press the shutter release button. The zoom operates automatically, and the shutter will be released.
When shooting a portrait of a person above the waist, the close person icon should be set (blinks when set).


For the person's whole body to fill the picture the full person incon should be set (blinks when set).


Working distances:
With close person icon shoot the subject in the range of 1.3 - 3 m. (4.3 ft—9.8 ft)
With full person icon shoot the subject in the range of 3 m (9.8 ft) 8 m (26.2 ft)
* Outside the ranges shown in the illustrations on the above the person may not have the specified size in the
photograph.
View original page 15
Page 16 · Read text
Multi-exposure Photography


Determine the required composition, and press the shutter release button (for the second exposure)
When the second exposure is finished, the film will be advanced to the next frame, and the M.E. will be
canceled.
View original page 16
Page 17 · Read text
www.butkus.us


This example was shot with the camera held upside down for the first exposure.

Remote Control Socket

This camera is equipped with a Remote Control Socket. A 50 cm electronic cable release cord and a 10-meter
extension cord, are available from Ricoh as options for use in remote control photography.


Insert the cord into the Remote Control Socket.

Set the camera, aim at the subject and gently press the remote control switch. The natural expressions of
subjects can now be captured from a distance.

* Before inserting or pulling out a cord into/from this socket, side the power switch off. When power switches
in on position, the shutter might accidentally be released.


To Take Better Photographs

If you want to take more satisfactory photographs and master more advanced photographic techniques, it is
essential to fully understand the various mechanisms in the camera and their functions. When you understand
the operations described up to this point, read this section to learn the more advanced techniques necessary to
make
full use of the MIRAI 105.

Zoom Lens

The MIRAI 105 is equipped with a 38—105 mm zoom lens. A zoom lens is a lens whose focal length changes
when part of the lens moves. In the case of the MIRAI 105, any focal length between 38 mm and 105 mm can
be selected. The user, without moving, can change the composition by zooming and, with the lens set the
telephoto position, can select a single person in a crowd. In this way, the MIRAI 105 makes extremely flexible
photography possible and is equivalent to a camera with a number of interchangeable tense. In practice,
zooming can add immense pleasure to photography.
View original page 17
Page 18 · Read text
The zoom operation is performed using the zoom button on the top the camera body. "WIDE" stands for wide-
angle, and "TELE" for telephoto. When the "TELE" side is pressed, the lens moves forward towards the
maximum telephoto of 105 mm and when the "WIDE" side is pressed, it moves back towards the widest angle
of 38 mm. On the top of the zoom lens, there are 38, 50, 70, 105 and MACRO indications; use these as a guide
when zooming.


38mm:
This is a wide-angle shot which means that the zoom lens was moved back into the camera. With this
setting, because the angle of view is wide and the depth of field is greatest, sharp photographs with clear
perspective and contrast can be obtained.

50 mm:
The image is almost the same as that seen with the naked eye. At 50 mm, you can take a great portrait
of 2 people or other subjects that would not look natural in a wide angle shot. With this focal length, many
photographs can be taken over a wide range of applications, from snapshots and portraits to landscapes.

85 mm or more:
When the lens is set to the maximum focal length of 105 mm, magnification is approximately three times
greater than at 38 mm and you will be able to obtain genuine telephoto photographs. In contrast to wide-angle
shots, the perspective is narrow, and the depth of the field becomes more shallow. Because the depth of field is
not so great, objects in front of or behind the subject being photographed will be out of focus; make use of this
in composing your photographs. Try taking close-ups with the telephoto setting. The telephoto lens is especially
useful for sports photography and taking photographs of animals without disturbing them. Telephoto can make
snapshots and portraits more interesting by using its shallow depth of field. When taking telephoto shots, be
sure to hold the camera securely so that it does not shake.

The three pictures (( 1), (2) and (3)) on the left are examples taken with the photographer zooming while
standing still
and the pictures clearly illustrate the differences obtained with different settings The three pictures on the right
are
examples of when the dimensions of the subject are not changed. From these examples, you can easily see the
difference in the relation between the subject and the background.
View original page 18
Page 19 · Read text
www.butkus.us

Angle of view:
This is the shooting and viewing angle of the lens, you zoom to adjust the composition, in your
photograph. When the angle of the view is greater (WIDE), the wide angle view is seen. When the angle
is narrower, you have shifted to wards the telephoto (TELE).

Depth of field:
This is the range within which objects will be in focus. Outside this range, nearer to the camera or
further from it, objects will be out of focus. The shorter the focal length of the lens and or the larger the
"f" number, the greater the depth of field.


Autofocus (AF)

he Autofocus (AF) mechanism automatically adjusts focus. With it, the camera measures
the distance to a subject and adjust the lens so that the subject is in focus. In the MIRAI 105,
focusing is done by a newly-developed "Phase-Difference" detection system. In this system,
light from the subject is picked up by a special sensor and any inconsistencies (phase
differences) in the image are used by a microprocessor chip to calculate the best focus setting.
Since the lens used in the MIRAI 105 is very accurate, correct focusing is even more accurate
and accomplished by just aiming the lens at the subject. When there is no light reflected
from the subject, for example in a dark room, focusing is performed using a beam of light
from the camera (the AF-illuminator).
Autofocus is designed so that the object in the center of the picture frame is correctly
focused. However, sometimes you may want a subject that is not in the center of the frame to
be in focus; for such cases, the MIRAI 105 is also equipped with a focus lock mechanism. 39
For example, when your subject is at the edge of the picture frame, not in the center, first
move the camera slightly so that the subject is in the center of the autofocus frame, then
 press the shutter release button halfway to focus. While keeping the button pressed, recompose the picture, and
press the button fully. (See "Using the Focus Lock'' on p.l6). By doing this, photographs with any required
composition can be taken. In addition, at the time the focus is locked, the exposure is also determined
automatically and locked (AE lock).


Subjects with which autofocus is difficult Although the MIRAI 105 can focus in almost any situation, there are
certain conditions, such as those illustrated below (on the left), in which it may not be possible to obtain the
correct focus. The AF in the viewfinder will usually blink to warn you during these conditions; however, in
situations (4), (5) and (6), the green AF in the viewfinder may light even though the lens is incorrectly focused.
In any of these situations. you can try focusing on a subject at a similar distance and then, using the focus lock.
View original page 19
Page 20 · Read text
Exposure

Programmed exposure:
One of the basics of photography is exposure. Exposure refers to the amount of the light which strikes the film.
The correct amount of the light, or correct exposure is controlled according to the film speed (indicated on the
film package, such as ISO 100 or ISO 200), the shutter speed and aperture. Many cameras are now equipped
with a programmed exposure function so that the correct exposure can be obtained easily without any guess-
work or previous photography experience. With programmed auto exposure, the camera automatically sets the
most suitable combination of "f" stop and shutter speed for subjects at any brightness level. As a result, the
correct exposure will be obtained almost immediately. It's an automatic exposure system that means you'll never
miss the opportunity to take a photograph. All the photographer has to do when holding the camera is to
concentrate on aiming it correctly and press the shutter release button. For example, when you change from a
dark to bright subject, the camera adjusts itself to maintain the correct exposure. Anyone can take photographs
without worrying about making a mistake.


Program chart:
The chart shown here is a program chart when the focal length is 38 mm and 105 mm. When the subject is
brighter than EV 11 for wide-angle shots and EV 12 for telephoto shots, the aperture and shutter speed change
simultaneously. When the subject is darker. the aperture opens fully and the shutter speed changes. Naturally
the program takes any zoom setting into consideration and sets the aperture and shutter speed which are most
appropriate for every shot. So that camera shake is less of a problem. the shutter speed will not be — slower
than 1/40 sec. for wide-angle shots and 1/100 sec. for telephoto shots. When the subject is darker and requires a
slower shutter speed. the flash fires automatically: in the fill-in or flash-off mode. stays open for as long as
needed-up to a long 2 sec. automatically.


Multi-exposure:
'Multi-exposure" refers to a technique in which images are superimposed by releasing the shutter twice without
advancing the film.
In the case of the MIRAI 105, you can easily take double exposures by pressing the ACTION button. By doing
this,
even when the shutter is released, the film won't advance to the next frame until the shutter has been released
for the
second exposure. We recommend combined use of exposure compensation and the Hash for applications of this
type.
View original page 20
Page 21 · Read text
www.butkus.us

Exposure compensation:
With the MIRAI 105, the exposure can be compensated from -1.5 EV to + 1.5 EV in 0.5 EV steps, by simply
pressing the exposure compensation button marked + / - . For instance, when shooting a back lit subject that's
too far away for the flash to be effective, the exposure should be compensated to the positive side (more light)
so the subject doesn't look too dark in the photograph. When the background is dark and details can't be seen
and only the subject is bright, the exposure should be compensated to the negative side (less light).

Viewfinder Displays:
The MIRAI 105 has a viewfinder system which minimizes parallax and which is coupled with the zoom lens at
every setting. This viewfinder is different from those used with conventional compact cameras, employing a
system that shows a corrected and magnified image using the real image obtained through the lens. This high-
performance viewfinder shows about 85?o of the image that will appear in the photograph, which makes it
extremely similar to the viewfinder of an SLR camera. This means the viewfinder shows exactly what will
appear in the photograph. The viewfinder's high magnification is made possible by newly developed optical
technology. The image in this viewfinder is large, bright and clear making this camera still easier to use.

Parallax in macro photography:
In macro photography, with the camera very close to the subject, the image seen in the viewfinder of a
conventional compact camera and the actual image on the photograph sometimes seem very different. To avoid
this, the viewfinder frame of the MIRAI 105 is adjusted by the camera according to the subject's distance,
minimizing any actual photograph. In this case, the autofocus frame is not in the center of the viewfinder, so the
focus lock function should be used for accurate autofocus.
View original page 21
Page 22 · Read text
LCD Panel and Mode Buttons:
The MIRAI 105 has an LCD panel which displays information about the camera's operation, the amount of
power left in the battery and the number of shots you've taken. This display provides easy to understand
information while showing how to operate the camera correctly. These indications remain visible for 90 seconds
after each operation is performed. After they go out, if an operation is repeated, the indication is displayed
again. After the power is switched off, any modes which have been set are held in the camera's memory, for use
next time. The following information is displayed.


Using the Accessories
View original page 22
Related documents and language editions
From the M. Butkus archive. Original publisher and archive notices are retained.
Check the model and edition against your equipment.
PDF verified 2026-10-10.