Flashes & lighting
Ricoh Speedlite Px User manual
User manual for Ricoh Speedlite Px. 28 pages in German, French, Spanish. Read the original PDF, download or print a copy without registration.
28 pagesGerman, French, Spanish1.3 MB PDF
Loading your manual…Open PDF directly
Document details
- Brand
- Ricoh
- Model / document
- Ricoh Speedlite Px
- Document type
- User manual
- Language
- German, French, Spanish
- Pages
- 28
- File size
- 1.3 MB
- Category
- Flashes & lighting
- Document date
- Not specified in catalog
Search available document text
Find a term, then jump to its page in the original PDF. Image-only pages may not be searchable; check the PDF for exact wording and diagrams.
Page 1 · Read text
www.butkus.us


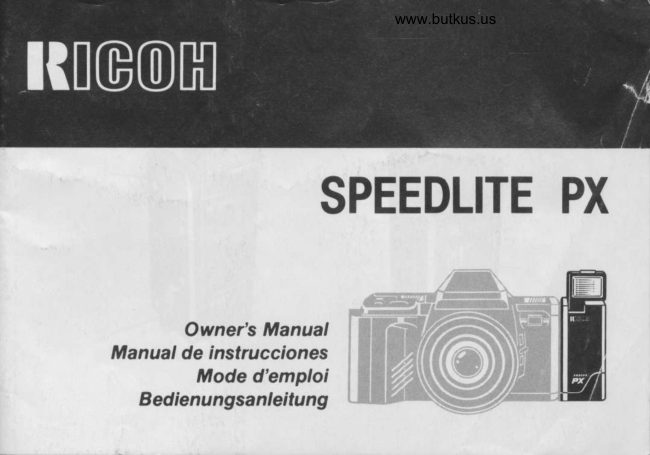
        SPEEDLITE PX


       Owner's Manual
Manual de instrucciones
       Mode d'emploi
   Bedienungsanleitung
View original page 1Page 4 · Read text
Bitte spenden Sie 2,50 Euro, um diese Website über E-Bay zu unterstützen ... www.PayPal.me/butkusView original page 4
Page 7 · Read text
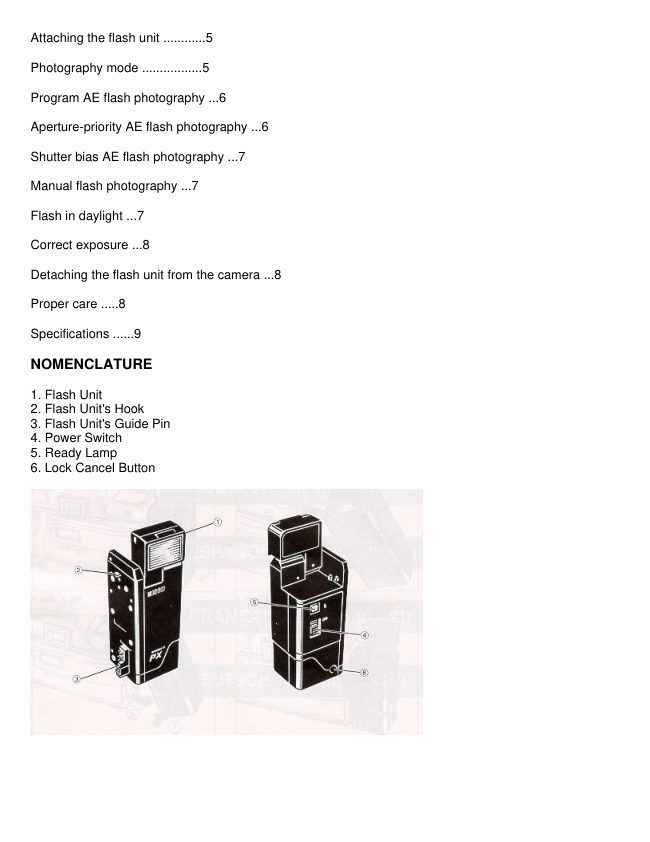
NOMENCLATURE                    ATTACHING THE FLASH UNIT TO
1. Flash Unit                       THE CAMERA
2. Flash Unit's Hook                                Attach by hooking the flash unit's hook onto the
3. Flash Unit's Guide Pin                          cameras holder@, then by pressing the unit's guide
4. Power Switch                                      pin into the camera's guide hole until it clicks into
5. Ready Lamp                                       place @. (Fig. 1)6. Lock Cancel Button

                              PHOTOGRAPHY MODE
BATTERY                                        When the  f lash unit is used with the XR-M. XR-X. the
The flash unit is recharged by batteries installed in the     shutter speed and f-stop number are automatically set
camera.                                      when the camera is set to program AE photography.
* When the outer   f rame of the @ symbol blinks in     Flash photography is by a direct metering system and
   the LCD Panel of camera body, don't use the flash.     light is measuring off the film plane to control the
   After replacing with new batteries, you can use the     flash duration.
   flash unit.
* Generally, the performance  of batteries drop in cold
   conditions. When the   f lash unit is used at a tem-
   perature lower than 0"C (32" F), warm the batteries
  and insert them into the camera iust before
   shooting.
View original page 7Page 9 · Read text
Shutter Blas AE Flash Phoiography            FLASH IN DAYLIGHT
1. Set the shutter speed to 1/60 sec. or lower.                                             The subject is affected by strong background  light2. Set the f-stop Ring to "P':                                           when taking pictures in back light. Dark pictures (face,3. Set the desired program mode.
*  lf you set the shutter speed to 1/125 sec. through      etc.) may be produced. Properly  lit pictures can be ob-                                                         tained by using flash even in daylight, this is known   1/2000 sec., the shutter speed is automatically set                                                 as "Fill-Flash':   to l/100 sec.  lt is designed to prevent underexposed                                                               1) Set the camera to the program AE flash photogra.   DiCtures.                                                  phy mode.
                                                          2) Turn the Power Switch on to pop up flash unit.Manual Flash Photography                                                          3) When the flash is fully charged, the Ready Lamp1.   Set the           shutter                speed                                             lower.                        to l/60                                   sec. or                                                                 lights                                                                 up,                                                         and                                                                    the Flash                                                                   Ready                                                                                                  Indicator                                                                                             (                                                                                                                  t      )        pre-set  The2.               shutter                   speed                                     is shown                                    by                                                                                             in                                         the indica-        lights                                                          up                                                                                                             picture                                                                                                                   pr6vid-                                                                                                      inder.                                                                           the Viewf                                                                         Then take
   tor in the Viewfinder. A second indicator blinks to       ing that you do not see an overexposure  ()) mark.
   indicate a "Suggested" speed at a given f-stop.      * For synchronized  flash photography  in daylight, the
3. When the f-stop Ring is turned and the Shutter       daylight fill flash indicator wilt tight.
  Speed Indicator and the blinking indicator showing    * At the sei photography mode, when there is suffi-
   correct exposure overlap each other. This indicates       cient external lighting for a properly.exposed pic-
   that correct exposure is ser.                              ture, the intensity of the flash will be 1/4 as* Depending on the picture-taking conditions, there      compared to when the  f lash is the only light source.
  may be eclipsing when the following lenses are    * The photography range of fill flash is about twice
   used.                                               the distance displayed when in the program AE
   1) When zoom lenses (except 35-70 mm) are                  f lash photography mode.
     used at a wide angle up to 50 mm.
  2) When wide-angle lenses up to 35 mm are used.
View original page 9Page 10 · Read text
www.butkus.us
CORRECT EXPOSURE               PROPER CARE OF YOUR FLASH
The Flash Ready Indicator blinks in the Viewfinder for   * Even  i{ you do not use the flash for an extended
about one second when the flash shot is made with        oeriod of timq  it should be tested from time to time
the correct exposure.                                             in order to properly maintain the condenser.
                                            * A high voltage  is generated  in the circuitry. lt is very
                                                   dangerous to take it apart or to touch the inside of
DETACHING THE FLASH UNIT                   the  f lash unit. lt should be taken lo a camera deal-
FROM THE CAMERA                              er or a recognized Ricoh service station for all
                                                                   reparrs.
While pressing the lock cancel button O, pull the unit    * Avoid exposing the  f lash unit to dust, humidity, rain,
in the direction of the arrow @. (Fig.   )                   seawatel  etc.
                                            * Do not leave it in hot or humid condition such as
                                                                  direct sunlight as this will cause mallunction of the
                                                           flash unit.
                                            * Clean lhe body of the flash unit with a dry soft
                                                                   cloth. Be especially carefull not to dirty the contact
                                                                points. Never use solvent such as thinner. benzine.
                                                                        eIc.
View original page 10Page 11 · Read text
SPECIFICATIONS
Type:                    Thyristorized TTL direct Automatic flash unit
Gulde Number:        12 (lSO 100, m)
Recycling Time:        Aboul 3 sec.
Coverage Anglo:        45' on vertical and 60' on horizontal 35 mm wide angle lens
Power Sourcq        By batteries installed in the camera
Dlmenslons:         32 (W) x 73.5 (H) x 31.5 (D) mm
Weight:               70 g
View original page 11
Page 13 · Read text
NOMENCLATURA                  MONTAJE DEL FLASH
       1. Flash                                        Monte el flash en la ca,rnara insertando su gancho en
       2. Gancho                                                      el soporte de la cdmara @. Para  f i.iarlo apriete el pa-
       3. Pasadore de posicionamiento                       sadore de oosicionamiento en el orificio de oosiciona-
       4. Interruotor de alimentaci6n                        miento de la camara hasta que encaje en su lugar @.       5. Lampara de flash preparado                             (Fls. 1)
       6. Bot6n de cancelaci6n
                              MODO DE FOTOGRAFiA
      PILAS
                                                   Cuando se use el  f lash con la XR-M o la XR-X, la velo-
        El flash se recarga con las pilas Instaladas en la    cidad del obturador y valor de diafragma se ajustan
        camara.                                            automaticamente para fotografia de AE programada.
       * No emplee el flash cuando parpadea el marco ex-    La fotografia con flash se realiza mediante un siste-
           ternodel Simbolo G  enel oanelvisualizadordel    ma fotom6trico  directo y la luz se mide fuera del pla-
           cuerpo de la camara Podra utilizar el flash despu6s     no de la pelicula oara controlar la duraci6n del destello
         de haber reemplazado las pilas por otras nuevas.     del flash.
       * Por lo general, el rendimiento de las pilas se redu-
          ce a bajas temperaturas. Cuando deba utilizar el
           flash en lugares con temperaturas de menos de
           0'C, caliente la pilas e ins6rtelas en la camara ius-
           to antes de fotografiar.


I                                                                                                                                     11
View original page 13Page 15 · Read text
Fologratla con flash de AE en base al oblurador    FLASH CON LUZ DIURNA
1. Ajuste la velocidad del obeturador a 1 /60 de seg. o                                                      El ob.ieto queda afectado por fuentes contraluces  mes lenta.                                               cuando tiene una luz potente detres. Pueden salir fo-                             diaf2. Ajuste            el               anillo                   del                     ragma                           a la posici6n "P'i                                                          tos oscuras (cara, etc.). fudre obtener fotos correcta-                   programa   Ajuste         modo3.            el                               deseado.                  del
* Si 4usta la velocidad del obturador a 1 /1 25 a 1 /2000    mentelo cual expuestasse denominaempleando"flash deelrelleno:flash durante el dia,  de seg., la velocidad del obturador se aiustare a                                                               1) Ajuste el modo de fotof raf ia de AE programada con   1/100 de seg.                                                                flash o.   Est6 disefrado para para sl/itar fotos subexpuestas.                                                          2) Conecte el interruptor de la alimentaci6n para ac-
                                                                        tivar el flash.Fologralia con flash manual                                                          3) Cuando el flash est6 completamente cargado, se
1. Ajuste la velocidad del obturador a 1/@ de seg. o      enciende la lempara de  f lash preparado y el indica-
   velocidad         mas                  lenta                                                             dor                                                                        flash preparado                                                        de                                                                                                det                                                                                                                    visor.                                                                                       Entonces                                                                           (  |      )                preaiustada   La velocidad2.                               del obturador  la muestra                                                         podra                                                                                que                                                           tomar                                                                                    no aparezca                                                                                                                                        la                                                                                                   la foto suponiendo
   el indicador del visor. Parpadea un segundo indica-      marca de sobreexposici6n  (>).
  dor para indicar  la velocidad 'Aconsejadaf para una    * Para fotografia con flash en sincronizaci6n con luz
   abertura diaf ragmAtica dada.                          diurn4 se enciende el indicador de Jlash de relle-
3. Cuando se gira el anillo de aberturas, el momento      no con luz diurna.
  en que se sobreponen el indicador de la velocidad    * fun el modo de fotogratia ajustadq cuando hay su-
   del obturador y el indicador que parpadea, indica        ficiente luz exterior para obtener una foto correc-
  que se obtendra una exposici6n correcta             tamente expuesta, la intensidad del destello sere
* Dependiendo de las condiciones,  las tolografias       de la 114 comDarandola con la del destello tenien-
  pueden resultar deslucidas cuando se empleen los      do el flash como fuente 0nica de iluminaci6n.
   objetivos siguientes:                           * El margen fotogrefico del flash de relleno es apro-
   1) Objetivos zoom (excepto de 35-70 mm) emple-      ximadamente el doble de la distancia indicada en
     ados con un angulo amplio de hasta 50 mm.            el mode de fotograf  ia de AE programada con llash.
  2) Obietivos gran angular de hasta 35 mm.


                                                                                              13
View original page 15Page 16 · Read text
www.butkus.us
 EXPOSICIoN CORRECTA             CUIDADOS ADECUADOS
 El indicador de flash preparado parpadea en el vlsor   * Aunque no emplee el flash duranto periodos largos
 durante un segundo aproximadamente cuando se ha      de tiempg debere probarlo de vez en cuando para
tomado la foto con exposici6n correcla.                 mantener correctamente el condensador.
                                             * Se genera alta tensi6n en el circuito. Es muy pe.
                                                                      ligroso extraedo o tomarel interiordel flash. DeberA
EXTRACCIoN DEL FLASH DE                       llevarse a una tienda de c6maras o taller reconoci-
LA CAMARA                                 do por Ricoh para cualquier reparaci6n.
                                              No exponga                                                                                           el  f lash al polvo, humedad, lluvi4 agua                                             *Mientras presiona el bot6n de cancelacl6n d€ bloqueo                                                              mar, etc.                                                             del
O, tire del  f lash en la direcci6n de ta  f lecha O. (Fig. 4)    * No lo deie en lugares calientes o hfmedos, como
                                                 pueda ser bajo los rayos directos del sol, porque
                                                           podria producirse mal funcionamiento  del flash.
                                            * Limpie el exterior del flash con un pano seco. Ten-
                                                    ga especialmente cuidado en no ensuciar los pun-
                                                                  tos de contacto. No emplee nunca solventes como
                                                 puedan ser disolvente, bencina etc.


14
View original page 16Page 17 · Read text
ESPECIFICACIONES
      Tipo:                      Flash automatico de medici6n TTL directa tiristorizado
     N0mero guia:              12 (100 ISQ m)
     Tiempo de rocarga:        Aprox.3 segundosI    Angulo cubierlo          45" en el plano vertical y 60' en el horizontal, obietivo gran angular de 35 mm
      Allmentaci6n:           Con las oilas instaladas en la camara
                                            x 73,5 (Al) x 31,5 (Prf) mmj     Dlmensiones:             32 (An)
      Peso:                7og


 I
 I
 I


                                                                                                            15
View original page 17Page 18 · Read text
www.butkus.us
  NOMENCLATURE                 POUR FIXER LE FLASH AU BOITIER
       1.  Flash                                         Pour installer le flash sur I'appareil, engager le cro-
     2.  Crochet                                         chet se trouvant sur le flash dans son recepteur sur
       Broche du flash                                             I'appareil @, puis introduire la broche du flash dans
     4.  Interrupteur d'alimentation                             la prise sur I'appareil et pousser iusqu'a enclenche-
      Temoin du flash                              ment @. (Fig. 1)
     b.  Bouton de d6verrouillage
                                    PRISE DE VUES
   PILES                                     Quand le flash est utilis6 avec le XR-M ou le XR-X,
    Le recharge du flash est effectu6e par les plles 6qul.    les 169lages de la vitesse dbbturation et de la dis-
    pant I'appareil photo.                                    tance Jocale se font automatiquement si I'appareil est
                                                                programme.   * Si le cadre exterieur du symbole G  clignote sur     regl6 sur
        le panneau de t6moins de I'appareil,  le flash n'est    La prise de vues est effectuee d I'aide d'un systCme I      pas suffisamment charg6. Changer les piles.      de mesure directe de la lumibre qui commande la   I   * En g6n6ral, l'efficacitd des piles diminue par temps    dur6e de declenchement du flash.         troid. Lorsque la tempdrature est inf6rieure  et 0"C                                                                  I
        (32'F), chauffer les piles et les insdrerdans le flash
       iuste avant utilisati6n.


-L                                                                                                        17
View original page 18Page 20 · Read text
www.butkus.us
    D6cloncftemeni automatique, r€glage de lbbluratsur    UTILISATION DU FLASH EN LUMIERE
    1. R6gler la vitesse dbbturation sur '1160 s ou moins.   DU JOUR
    2. R6gler la bague des distances focales sur "P".
    3. Choisir le programme.                             Lorsque la source de lumidre est plac6e dans le dos
   * Si la vitesse dbbturation est reglee entre 1/125 s    du sujet, un effet de contre-.iouf risque de se produire.
       et 1/2000 s, elle sera automatiquement de 1/'100 s.    L€ flash, meme en plein .iour, permet de contre-
      Le flash est congu pour 6viter toute image sous-     balancer cet effet. On oarle dans ce cas de "Flash
      exoos6e.                                                    d'appoint':
                                                               1) Regler l'appareil sur d6clenchement automatique
   R6glage manuel                                  du flash programme.
                                                           2) Mettre le flash en fonction en repoussant son    1. R6gler la vitesse dbbturation sur 1/60 s ou moins.                                                                   interrupteu r d'al imentation.
    2. Lavitesse dbbturation choisie est indiouee dans     3) Quand le flash est parlaitement charge, un t6moin        le viseur. Un autre temoin clignote pour indiquer
                                                                                                                                                                                                                                           ).      la vitesse "Sugg6rdd' pour la distance focale         Alors,s'allumeprendresur lela flashphoto etsi dansla marquele viieurde surexposi-1 t
       choisie.                                                     tion (>) n'est pas pr6sente.
    3. Faire tourner la bague des distances focales pour    * Lorsque les prises de vues sont effectu6es en        taire                           le            colncider                      temoin de vitesse                                          dbbturation                                                                et        lumiere du iour avec le  f lash synchro,  le temoin de                                Le reglage       celui          du temps                        d'exposition.                                                est alors                                                                flash d'appoint lumiere du .jour s'allume.
       termin6.                                     * Dans le mode photo choisi, si la lumiere exterieure   * En fonction des conditions de orise de vues.  il se        est suffisante pour permettre une exposition cor-      peut qu'il se produise un coupure d'image lorsque                                                                      recte, I'intensit6 du flash sera le quart de celle
       les obiectils suivants sont utilis6s.                   normalement obtenue quand le Jlash est la seule       1) Ob.iectifs zoom (35-70 mm except6) utilises en                                                          source de lumiere.        grand angulaire jusque 50 mm.                                                * La distance maximale du "Flash d'appoint" est      2) Grands angulaires jusqu'a 35 mm.                                                                      d'environ deux fois celle indiqu6e quand lappareil
                                                             est en mode flash AE programmd.


                                                                                                  19
L
View original page 20Page 22 · Read text
www.butkus.us
CARACTERISTIQUES
Type:                     Flash automatique direct TTL a thyristors
Nombre guida:             12 (lSO 100 m)
Duree da recyclago:        Environ 3 s
Angle de couverture:       45' e la verticale et 60' a I'horizontale avec grand angle de 35 mm
Alimentalion:              Par les piles 6quipant I'appareil photo
Dimensions:              32  (l) x 73,5 (h) x 31,5 (p) mm
Poids:                70g


                                                                                                       21
View original page 22Page 24 · Read text
www.butkus.us
BEZEICHNUNGEN DER TEILE         ANBRINGEN DES SLITZCERATS
1.   Blitzgeret                                        Der Haken des Blitzgerats wird an den Halter der Ka'
   Haken des Blitzgerats                         mera O gehakt, und dann wird die Ftihrungsstift in
3.  Ftlhrungstift                                   das Fohrungsloch am Kameragehause gesteckt, bis
4.  Schalter zum Einschalten                      es richtig einrastet. @ (Abb. 1)
5.  Bereitschaf tslampchen
o.  Verriegelungs-L6seknopf
                                  FOTO.BETRIEBSART
                                        Wenn das Blitzgerat mit dem XR-M oder dem XR-XBATTERIE                                                   verwendet wird, werden VerschluRzeit und Blenden-
Das Blitzgerat wird von den in der Kamera eingeleg-     zahl automatisch  eingestellt, wenn die Kamera aul
ten Batterien aufgeladen.                           Automatik geschaltet ist.
* Wenn der auRere Rahmen des Symbols   in    Die Blitzfotografie wird tiber ein direktes MeRsystem
  der Flussigkristallanzeige auf dem Kamerage-     gesteuert, und Licht wird von der Filmebene gemes-
  hause blinkt, nicht den Blitz verwenden. Wenn     sen, um die Blitzdauer zu regeln.
  neue Batterien eingelegl sind, kann der Blitz ver-
  wendet werden.
* Die Batterieleistung nimmt bei Kalte ab. Wenn das
   Blitzgerat bei Temperaturen unter 0"C verwendet
   wird, die Batterien aufwarmen und erst kurz vor der
  Aufnahme in die Kamera einlegen.


                                                                                  23
View original page 24Page 26 · Read text
www.butkus.us
VerschluRzeitvorwahl.Blitzautomatik             BLITZFOTOGRAFIE BEI TAGESLICHT
1. Die VerschluRzeit auf l/60 s oder niedriger  ein-    Das Motiv wird durch starkes Gegenlicht gestdrt, wo-
   stellen.                                           durch ungewunschte dunkle Stellen (2.B. bei Gesich-
2. Den Blendenring auf "P" stellen.                       tern) entstehen. Durch Verwendung des Blitzgerats
3. Die gewr.inschte Programm-Betriebsart einstellen.     bei Tageslicht (,,Aufhellblitz") werden diese dunklen* Wenn die VerschluBzeit auf 1/125 s bis 1/2000 s ein-    Stellen richtig ausgeleuchtet.   gestellt ist, wird die VerschluRzeit automatisch auf    .1/100                                                  1) Die Kamera auf Programm-Blitzautomatik  stellen.
       s gestellt.                                     2) Den Ein-Schalter einschalten, so daR das Blitzge-   Damit soll Unterbelichtung vermieden werden.                                                                 rat herausspringt.
                                                          3) Wenn das Blitzgerat voll aufgeladen  ist, leuchtet
Manuelle Blilzfotogralie                              das Bereitschaftlampchen  auf, und die Blitzbereit
                                                                                  leuchtet im Sucher auf.1. Die VerschluBzeit auf 1/60 s oder niedriger ein-       schaftsanzeige (  |   )   stellen.                                                     Jetzt konnen Aufnahmen gemacht werden, voraus-
2. Die vorgegebene  VerschluBzeit  wird durch die An-       gesetzt daB keine Uberbelichtungsmarkierung (>)
  zeige im Sucher gezeigt. Eine zweite Anzeige       erscheint.
   blinkt, um eine "empfohlene" VerschluBzeit bei je-    * FUr synchronisiertes  Blitzen bei Tageslicht leuch-
  der Blendenzahl anzuzeigen.                              tet die Anzeige  fr.ir Aufhellblitz auf.
3. Wenn der Blendenring gedreht wird und die Ver-    * Bei der eingestellten Betriebsart wird die Blitzstar-
   schluBzeitenanzeige und die blinkende Anzeige        ke, falls ausreichend Licht vorhanden  ist, auf ein
  den gleichen Wert anzeigen, ist richtige Belichtung        Viertel des Wertes reduziert, der eingestellt  wird,
   eingestellt.                                                       falls das Blitzgeret die einzige Lichtquelle ist.
* Je nach Aufnahmebedingungen  konnen Bildtei-    * Der Fotograf ierbereich des Aufhellblitzes  ist etwa
   le verdunkelt werden, wenn die folgenden Objek-       zweimal so lang wie die angezeigte Entfernung,
   live verwendet werden:                         wenn das Programm   fr..ir Blitzautomatik eingestellt
   1) Zoomobjektive (mit Ausnahme von 35-70 mm)          ist.


                                                                                  25
View original page 26Page 27 · Read text
RICHTIGE BELICHTUNG              PFLEGE DES BLITZGERATS
 Die Blitzbereitschaftsanzeige im Sucher blinkt etwa    * Auch wenn das Blitzgerat langere Zeit Uber nicht
eine Sekunde lang, wenn die Blitzaufnahme mit rich-       verrwendet werden soll, sollte es von Zeit zu Zeit
tiger Belichtung gemacht wird.                             getestet werden, um die Kondensatorleistung zu
                                                                    erhalten.
                                             * In der internen Schaltung des Blitzgerats wird
ABNEHMEN DES BLITZGERATS              Hochspannung ezeugt. Es ist sehr gefiihrlich, das
Den Verriegelungs-Loseknopf  drticken @ und das Ge        Blitzgerat zu offnen oder die Innenteile zu berr.ih.
rat in Pfeilrichtung hochziehen €). (Abb.4)                 ren. Alle Reparaturen mlissen vom Fachman im                                                    Kamerageschaft oder beim Ricoh-Kundendienst
                                                           durchgefrihrt werden.
                                             * Das Blitzgerat vor Staub, Feuchtigkeit, Regen, Salz-
                                                   wasser usw. schritzen.
                                             * Das Blitzgerat nicht bei heiRen oder feuchten Be-
                                                    dingungen wie in direktem Sonnenlicht liegenlas-
                                        sen. Dadurch kOnnen Betriebsstorungen
                                                          entstehen.
                                             * Das Gehause des Blitzgerats mit einem trockenen
                                                         feuchten Lappen reinigen. Besonders darauf ach-
                                                             ten, nicht die Kontaktpunkte zu verschmutzen.
                                                     Niemals Losungemittel wie Farbverdtinner, Benzol
                                                                   etc. verwenden.


26
View original page 27Page 28 · Read text
www.butkus.us
TECHNISCHE DATEN
Typ:                   Automatisches  Thyristor-TTl-Direkt'Blitzgerat
Blitzleitzahl:          12 (lSO 100)
Blitzfolge:           Etwa 3 s
AusleuChtwinkel:   45. vertikal und 60" horizontal mil 35 mm Weitwinkelobjektiv
Energiequelle:       Batterien in der Kamera
Abmessungen:     32 (B) x 73,5 (H) x 31,5 (T) mm
Gewicht:             70 g


                                                                                        27
View original page 28Related documents and language editions
From the M. Butkus archive. Original publisher and archive notices are retained.
Check the model and edition against your equipment.
PDF verified 2026-10-10.