Film cameras
Rollei SL35 ME User manual
User manual for Rollei SL35 ME. 24 pages in English. Read the original PDF, download or print a copy without registration.
24 pagesEnglish1.1 MB PDF
Loading your manual…Open PDF directly
Document details
- Brand
- Rollei
- Model / document
- Rollei SL35 ME
- Document type
- User manual
- Language
- English
- Pages
- 24
- File size
- 1.1 MB
- Category
- Film cameras
- Document date
- Not specified in catalog
Search available document text
Find a term, then jump to its page in the original PDF. Image-only pages may not be searchable; check the PDF for exact wording and diagrams.
Page 2 · Read text
Inhalt                      Seite   Gontents                 Page

Einzelteile und Funktion          2    Controls and components ......   n.
Film einlegen                    4    Loading the film               24
Filmempfindlicfrkeit einstellen ..  4    Setting the f ilm speed           24
Batterie einlegen                 5        f nserting the batteries           25
Belichten mit Zeitautomatik       5    Exposure with automatic        25
Belichten ohne Zeitautomatik          I    Exposure without automatic      28
Entfernung einstellen           10   Focusing                      30
Die Aufnahme                 12   The exposure                  32
Film entnehmen ..             13   Unloading the film             33
Objektiv wechseln              14   Changing the lens  .            34
Nahaufnahmen                 14   Close-ups                     34
SachgemiBe Pflege            15   Care of the camera             35
Abhilfe bei Bedienungsfehlern .. 16   Handling faults and remedies  .. 36
Daten und Zahlen              18    Facts and figures              38


Contenu               Page   Indlce                   Pagina
Ef6ments et fonctions           42    Parti e funzioni   . ..            64
Chargement du film             44   Caricamento dell'apparecchio .. 66
R € g fa g e d e  l a s e n s i b i l i t e  . . . . . .  4 4   R e g o l a z i o n ed e l l a s e n s i b i l i t a . . . 6 6
Mise en place des piles         45       f ntroduzione delle pile          67
Exposer avec automatisme      45   Esposizione in automatismo     68
Exposer sans automatisme      48   Esposizione senza I'automatismo 72
Rdglage de la distance          51   Messa a fuoco                 74
La prise de vue                 53   La ripresa                     76
D6chargement du  f ilm           55    Prelievo della pellicola         78
Changement d'objectif          55   Cambio di obiettivo            78
Photos de sujets rapprochds     55    Riprese ravvicinate             78
Entretien                      56   Cura e manutenzione           78
Caract€ristiques techniques     57    Dati tecnici                   79
 l n c i d e n t se t r e m d d e s           . . . . . .  e 2   D i f e t t i e r e m e d i   . . .              8 5


Indlce                 P6gina  Inhoud                  Bladzijde
                              86   Onderdelen en funktie         108
                              88   Film inleggen                  1 1 0
                              88    Filmgevoeligheid instellen      1 1 0
                               89    Batterijen inzetten              1 1 1
                              89    Belichten met de automaat   ...  1 1 1
                              93    Belichten zonder de automaat .. 114
                              95   Afstand instellen               1 1 6
                               97   De opname  .                   1 1 8
                              99    Film uitnemen                 1 1 9
                               99    Objectief venlrisselen          120
                              99   Opnamen van dichtbij          120
                            100   Onderhoud                    121
                                  i01    Verhelpen van bedieningsfouten 122
                             106   Technische gegevens           124
View original page 2Page 5 · Read text
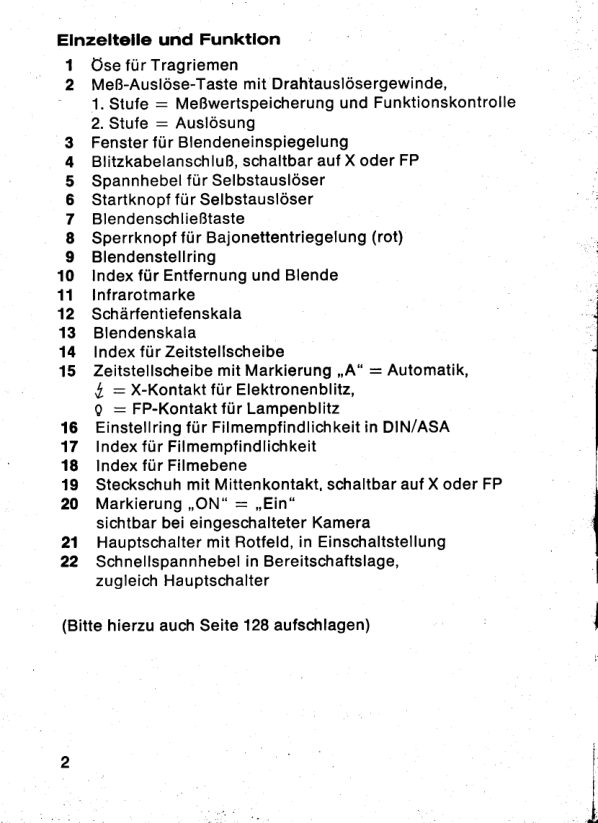
Controls  and components
 1  Neck strap lug
 2  Measuring/ releasingbutton with cable releasesocket,
    1st step :  rn@fi]orymeasurementand operationalcheck
   2nd step _ releasing
 3  Aperturescale port
 4  Flashcable terminal,X or FP selectable
 5  Self-timertension lever
 6   Self-timer start button
 7  Stop down pin
 8  Locking button of bayonetmount (red)
 9  Aperture ring
1 0  Apertureand distance index
1 1  Infraredindex
1 2  Depth of field scale
13  Aperturescale
14  Shutterspeed index
1 5  Shutterspeed dialwith symbols: "A" = Automatic,
     J = X-terminalfor electronicflash,
        I    :  FP-terminalfor flash bulb
1 6  Film speed setting disc with ASA/DlN scale
1 7  Film speed index
18  Film plane index mark
19  Hot shoe. X or FP selectable
20  "ON'r mark,visible with camera switchedon
21  Main switchwith red signal,in "ON" position,
    also main switch
22  Rapid film advantage lever in ready position,
    also main switch

(See also page 128)


22
View original page 5Page 6 · Read text
23 Rewind knob with crank
   24 Eyepiecemask
   25  Viewfindereyepiece
   26 Framecounter
   27 Filmholdingclip
   28  Film chamber
   29 Transportsprocket
   30 Take-upspool
   31  Distancescale in feet and meters
   32 Focusingring
   33  Filteror lens hood thread
   34  Batterycompartmentcover
   35 Rewind release
   36 Tripod bushr/+"
   37  Batterycompartment
   38+ Red dot on camera bayonet
  39+ Red dot on lens bayonet
   40" Instantaneousexposurerange
       *   41 Time exposure range
   42* LED red signal
       *  43 LED greensignal
       *   44      Top red mark :  shutter speed limit and
      overexposure indication
   45* Exposuremeter pointer
   46* Shutterspeedscale
   47* Bottomred mark:  shutterspeed limit and
       u nderexposure indication


    * = not illustratedI     * = ---7Fig. B


                                                                                                                                                                            lllh
                                                             23, .         $ip

                                                                                                                             r.:!               .: rrf:iil;                                                                          i  : ,.i
View original page 6Page 7 · Read text
Loadlng  the  fllm    (do not load in direct sunlight)
Pull out rewind knob 23 until camera back springs open. Fix
end of film leader under one of the holding clips 27. Pull the
cassetteacrossthe film track and insertit in the film chamber23
(knob 23 must be pulled out again as far as it will go, and now
be pushed down into the camera again to its original position
 if necessaryrotateslightlywhile pushing).The take-upspool 30
must be rotatedby turning the milled ring until the perforations
at both edges of the film are engagedby the teeth on the trans-
port sprocket 29. Now close the camera back and press firmly
until it locks with a click. Alternatelyoperate the rapid film
advancelever 22 and the shutter releasebutton 2 until number
 "l "appearsin the frame counter26 belowthe index.
As soon as a number is visible in the frame counter window 26
this indicatesthat there is a film in the camera:loadingcontrol.
lf the frame counter moves on, the film has been advanced:
film advancecontrol.


Setting  the  film speed
The film speed in ASA or DIN is given on the film packingor in
the accompanying instructionsfor use. Pull up the setting
disc 16 and turn until the film speed requiredis engagedagainst
index17.


24


                         ,,-:.1-t-*,  ,  ,                                                     + ; .      - l
View original page 7Page 8 · Read text
Inserting  the  batteries
  Undo screw on cover 34 by turning anti-clockwisewith a coin.
  Wipe the new batteries on both sides with a cloth to remove
  any oxide deposit. Insert four new batteriesin accordance with
   Fig. F in batterycompartment37; only hold them by the edges,
  do not touch the front or back. Engage cover 34 and tighten
  screwwithoutusingforce.
  Suitablebatterytypes: silver oxide batteries1.5 V, e. g. Mallory
  MS 76 H, Varta 7301or equivalentbatteriesof other makes.
   After inserting the batteries move rapid film advance lever 22
   to ready positionto switch on the meter and the releasing.Take
  up first step on button 2; green signal 43 (or red signal 42)
  +  Fig.B indicatessufficientbatteryvoltage.This voltage indi-
  cation also takes place automatically each time a picture is
  taken.
   Battery life is 1to 2 years; a yearly battery change is recom-
  mended. New batteries are obtainablefrom all photographic
   dealers.During extended idle periods keep the battery outside
  the camera; before refitting clean as described above. Always
  remove spent batteries.In very cold weather first warm up the
   batteryto body temperatureand insert it immediatelybefore use.           1
  lmportant: Batteriesshould always be renewed in sets of four,
  neversingly!
i                                                                         flr
  Exposure   with  automatic    control
                                       lm  Engage shutter speed dial 15 with green symbol "A" against
  index 14. Move rapid film advance lever 22 fully anticlockwise
  and allow to spring back: camera is now switched on, mark
  "ON" and red signal on main switch 21 become visible.Open
  eyepiecemask 24by turning clockwise.                                                                                                                                                                                        lfr  l
   lmportant: The meter is only operative with the automatic
   shutter control switched on in setting "A" and is inoperative
                 r/rooo r/so  on  l,  Q, B and     to   s€Gsittings.
                                               25 ;

                                                                                                                                              --l:                                                  I . L i i                                                                                                                                         -    .J,+L.E
View original page 8Page 9 · Read text
42
                                                   43
                                                   44                               I                                                                                                                                                 II
                                                          46         t9
                                                         47

                                                        Fig. B
Open aperture measurement
only with lenses for Rollei SL 35 M/SL 35 ME and lenses for
Rollei SL 35/SL 350 with aperture simulator: do not depress
stop down pin 7.
Working aperture measurement
with all other lensesand when using adapters,extensiontubes
or bellows:depressthe stop down pin 7.
An incorrect positionof the stop down pin is indicatedby the
red signal 42 (when button 2 is pressed down to its first step),
the meter is then switchedoff.
Aperture preselection
according to brightness,film speed and subject: e. g. f/11-16
for bright daylight in summer, pictures on the beach and in
mountains,or for high-speedand very high-speedfilms from
200-3200ASA; f/8-16 for subjects with considerable depth of
tield; t/2.8-5.6 for fast mowing subjects and sporting events;
t/1.8-2.8for restricted depth of field: 'il4-B for slow to medium
speed films from 25-160 ASA; f/1.8-4 tor weak available tight,
interiors,mist and rain.
Checking meter pointer position
The meter pointer 45 indicatesthe shutter speed automatically
set at the preselected aperture. This shutter speed can be
altered by turning aperture ring 9; for hand-heldshots it must
be between r/rs and 1/rooosec in the instantaneausexposure
range 40 above the black bar.
26


                                           .- :    .'     .  t-.oi**,-,..      -,.fr.,
View original page 9Page 10 · Read text
T
     lf even after selecting the widest aperture the pointer remains
                                             r/rs   in the time exposurerange 41 between   and 4 sec, hand-held
  shots are no longer possible;the picture must be taken with
  the camerasupportedor preferablyfrom a tripod.
  The black figures on the scale 46 are fractions of a second,
  the lowestthreefigures,however,representingfull seconds.
  The top red mark 44 (above 1/rooosec) is a warning against
  overexposure;selecting a smaller aperture will restore the
  pointer to the permissiblemeasuring range. The bottom red
  mark 47 (below 4 sec) is a warning against underexposure,
  permissibleexposure conditions are restored by selecting a
   largeraperture.
  Checkinglight conditions
  Press button 2 down to its first step: green signal 43 =  suffi-
   cientlight,red signal42 :  insufficientlight,
  The apertures selected are reflected through port 3 and are
   visible above the viewfinder image, when Rollei lenses have
  been fitted directly into the camera bayonet.With Rollei wide
  angle lenses having focal lengths of 15, 16 and 18 mm; when
  using adapters,extension tubes or bellows as well as with
   lensesof other makes the aperturescan only be read off outside.
  from the lens mount itself.
  Note:
  Under averagelighting conditions,the exposure measurement
   will set the correct shutter speed. Gorrectionis advisiblewith
  backlightshots or with very high contrast subjects: after expo-
  sure measurement,retain first pressureon shutter release,then
  approachthe subject with the camera until the main subject
    fills the finder view. Set the aperture,then return to the original
  viewpointfor the shot itself- or take a readingfrom an object
  similarto the main subject (if necessarythe back of your own
  hand),of normal brigthnessrange and under the same condi-
   tions. Read the aperture, then take the picture with the setting
  obtained.
  Exposurewith fixed shutter speeds
   e. g. for very rapid movements,sports events etc.: rotate aper-
  ture ring until meter pointershows the desiredspeed.Keep this
                                               27
View original page 10Page 11 · Read text
time on memoryr depress button 2 half-way until green signal
       appears, frame the subject and then press release button fully
       down.
       Note: ln order to avoid unnecessarybatterydrain during long
         idle periods,the exposure meter should be switched off : switch
         off meter switch21 with rapid film advancelever,thus masking
        the red "ON" signal.
       Exposure  without  automatic   control
       Exposureswith flash
       According to the type of flash used set the requiredflash symbol
         to index 14 with the shutter speed dial 15: for electronicflash
        units use the flash symbol t  , for units with flash bulbs type AG,
     XMs B, M 3 etc. the bulb symbol Q ; in both cases the shutter
       speed is rlo sec. Fit flash unit either into hot shoe 19 or attach
        with a bracketto triood bush 36.
       For flash units with center contact (no cord) connectioncan be
      madedirectlywith the camerausingthe hot shoe 19.
       For flash units without center contact plug the flash cord into
       terminal4.
      The aperture to be set is obtained from the subject distance
      and the flash guide number (see instructionmanual for flash
         unit).
       Exposureswith manual speed selection$ffi
         for setting fixed speeds are also possible by switching off the
      speedautomation:
        First of all measurethe exposureas usual in "A" setting,note
       preselectedaperture and shutter speed set. This shutter speed/
       aperturecombinationcan be altered in steps with shutter speed
        dial 15 and aperturering 9 until the requiredspeed is obtained.
     When doing so, one aperture click stop also correspondsto
       one shutter click stop: e. g. f/8 to 11 = 1/tzsto r/oosec.
        lmportant: Make certain that the available light does not alter
      between measurementand exposure-  if this is the case repeat
       the measurement!
       28                            j
View original page 11Page 12 · Read text
Useof manualshutterspeedselection:
Shotswhich require a sufficientlyfast shutter speed to capture
movement(snapshot,sport, traffic, children, animals etc.) or
where camera shake is to be avoided (shots from moving
vehicle,train,ship, aircraft,on mountaintours etc.).

Exposurein the case of battery failure
Determinecorrect exposure with separate exposure meter or
second camera, in an emergency estimate or take from the
film instruction leaflet. Set aperture and shutter speed with
ring9 and dial 15.

lmportantafter all shots without automatic control
Resetshutter speed dial to "A" to be ready for further exposure
usingthe automaticcontrol.
                        It
                               ln


                                       n
                                                                                                                                                                                                                                                     'I
                                                                                                                                       .4
View original page 12Page 13 · Read text
F i g . C                                                 Fig.D
Focusing
Look through the viewfinderand sight the subject if possible
on a verticalor horizontaledge or line so that it runs exactly
throughthe center of the finder.By turningthe focusingring 32
the line which appears distorted in the central diagonal split
image rangefinder is straightened-+ Fig.C. The correct distance
has now been found whereby the unsharp line on the ground
glassscreenand in the microprismspot is sharplydefinedat the
sametime.
The distanceset can be seenon scale31 againstindex10.
Subjects without straight lines or edges can be focused with
the microprismspot or on the ground glass screen -> Fig.D.
Spectaclewearers may use a correction lens made up by any
optician(lens mount Order No. 977 21O).
With infraredfilm
(of maximum sensitivityat a wavelengthof 800 nm) first focus
as describedabove.Then read the distanceagainstthe index10,
mount the infrared filter and reset the distance read against
the infrared index 11.
30
View original page 13
Page 14 · Read text
Fig.E


       1,8  2r8  4


Apertureand depth of field
Preselect the aperture by turning the aperture ring 9.' The
f-numberrequired must be oppositethe index 10. The setting
of the aperture depends on the depth of field required: The
smaller the f-number the larger the lens aperture and the
smallerthe depth of field.
The depth of field can also be checked on the ground glass
screen in the viewfinder:by pressingthe stop down pin 7 the
diaphragm is stopped down to the preselectedvalue and thus
makes it possible to adjust the sharpness to the requirements
to the desired part of the photograph.When the stop down pin 7
is pressed again the diaphragm springs back to full aperture
and is automatically stopped down to the preselected value
when the shutter is released.
Reading from the depth of field scale: here the aperture marks
(correspondingto the preset lens aperture on the scale 12, to
each side of the index 10), point to the depth of field zone on
the focusing ring 32 (circle of confusion z:50  p  / 0.002 in;
further stoppingdown is necessaryfor utmost sharpness).
Example in Fig. E: 50 mm lens f/1.8, stopped down to f/8 and
focused to 10 ft, depth of field from approx. 7 ft to 18 ft.
Reading from tables: Exact values for all lenses are given in
the Rolleidepthof f ield table "35 mm SLR".
                                             31

                                 ',:-"i,*:q"                                            *,1o,',,-,.1,",.-..,',:-
View original page 14Page 15 · Read text
The exposure
 Frame center of picture or important picture area in the view-
finder and press button 2  tully down (green signal in view-
finder  :  correct automatic exposure, red signal = danger of
underexposure).
The mirror swings up, the diaphragm closes down to the preset
lens aperture and the focal plane shutter travels at the con-
trolled shutter speed. Then the mirror returns immediately to
its position and the diaphragmsprings back to full lens aper-
tu re.
When the diaphragm stop down pin 7 is pressed in, the dia-
phragm always remains at the set value after releasing and
tensioning(indicatedby the red signal,using lenseswith aper-
ture simulator).
When the shutter has been released the camera must be ten-
sioned for the next exposure. When doing this always swing
the rapid advance lever 22 through as far as it will go.

Exposureswith self timer
Press lever5 upwards as far as it will go.
On pushing the start button 6 in the direction indicated by the
arrow, about 6 sec elapse before automatic exposure; during
this time the lever returnsto its initial position.
Time exposures (shutter setting "8") are not possible with the
self timer.


Exposureswith filter
Screw filter into lens thread 33 without the use of force. The
through-the-lenslight metering system means that the filter
factor is adjustedautomatically.
Furtherdetailsare given in the filter table in the Rollei publica-
tion "Accessories35 mm SLR".
32
View original page 15
Page 16 · Read text
Exposureswith lens hood
are recommendedat all times: the lens is plotected from direct
light sources, water splashes and raindrops, and picture
brillianceand sharpnessare improved.
Accordingto lens focal lengththe followinghoods are used:
rectangularlens hood for 25 mm focal length,
folding lens hood for 35-50 mm (with slightly reduced effect up
to 135mm) focal length,
screw-inlens hood for 85-135mm focal length,
extendinglens hood for 200 mm focal length.
The mark on the rectangularlens hood must be in alignment
withthe index'10.
Simultaneoususe of filter and lens hood is possible.For further
detailssee the Rolleipublication"Accessoires35 mm SLR".

Exposures with lenses of other makes
When metering cover up port 3 to avoid under exposure by
stray light (especiallywith low light and/or lenseswith chrome
finish).           Fr-,41,,t',,                 v'


Unloading  the  film
By pressingthe release35, unlock the rewind locking mechanism
and turn the rewind crank 23 in the directionof the arrow until
the frame counter26 has reachedits initial positionand a slight
resistance is felt (film has detached itself from the take-up
spool). Only now open the camera back by pulling up the
rewind knob 23 and removethe film cassette.
                                              33


                                                                                                                                             s:,:
View original page 16Page 17 · Read text
Ghanglng  the  lene
 Before removing or attacfiing the lens be sure that the dia-
phragm stop down pin 7 is not pressed in.
Push in the locking button 8, release the lens from the camera
bayonet by turning anti-clockwise.Fully open diaphragm of
interchangeablelens and insert so that the red dots are in
alignment,then lock by turningclockwiseuntil engagement.


Close-ups
Extensiontubes and bellows
These are attached to the camera as already described with
changing lenses. ln the same way, the lens is attached to the
front bayonet.
The tubes can be used in combination, or attached to the
bellows focusingdevice.
M 42 intermediate adapter, Rollei retro-adapter, microscope
adapter and macro-lens adapte'r-> Rollei publication "Acces-
sories35 mm SLR".
Measure the exposure only with pressed-in stop down pin Z
(working aperture measurement).The index 18 indicates the
positionof the film plane.


34

                                             atU "*-"  ' .,"  "'     .
View original page 17Page 18 · Read text
Care of the camera
   and accessories maintains their value and reliablity for many
    years.

    Cleaning
    of the camerashould be done regularlyat appropriateintervals
   I  accordingto use: dust the camera and accessoriesinside and
   outsidewith a soft sable brush and a rubber blower.Clean the
 *  outerparts with a soft dry cloth, glass surfaces with lens clean-
    ing tissue.Never polish the mirror and never touch the inside
   componentsor the rubber blinds of the focal plane shutterwith
   the fingers. Clean the everrady case, holdall case and lens
   casesby blowingand brushingout.

   RolleiService
   with many approved workshops throughout the world provide
   servicingin all countries:
   These'Rollei dealers and the sp,ecialiststrained at o'ur factory
    will take expert care of your camera and provide help and
   adviceon all questionsof photography.

    Serial number
   Every camera carries on its base a serial number. Every lens
   also has its number. We advice you to make a note of these
   numbers so that you can establish your ownership in the case
    of loss or a misunderstanding.

*


                                               35
View original page 18Page 19 · Read text
Handllng  faults and remedies
Fault                       Possible cause
Meter pointer             Rapidwinding leverstill in rest position      F
does not respond
                           Preselected aperture outside indicator range   Pa
                            Batteriesexhausted,not insertedor wrongly
                             inserted,batteryvoltage indication ignored    n
                                                               F
                         Stop down pin depressed                   a
                        Lens incorrectlyfitted
Meter needle remains       Preselectedaperture outside indicator range
in top or bottom red area
Shutter does not release    Winding lever only partly tensioned          F
                             Self timer lever only partly tensioned          F
Picture underexposed       Electronic flash used with Q setting          L
or partly exposed
                      FP flash bulbs used with J setting

                          Flash terminal not set
Picture underexposed      Wrong exposure measurement                          t\
                           Stray light entry through viewfindereyepiece
                                 in strong sidelight
Picture under-             Automatic control not switchedon
or overexposed           Measuringlimit ignored
Whole film under- or      Wrong film speed set
overexposed
Whole film unexposed       Film not advanced due to faulty loading or
                         because torn
lmage partly or             Subject movement:exposure time too long
completely unsharp        moving subject
                      Camera shake: exposure time too long for
                       hand held shot
Rewind knob dods not       Film wrongly loaded
turn. frame counter
inoperative                Film torn

Rewind release fails to      Excessiveexploitationof film length,
engage, considerable       Film entirely wound off
resistanceduring film
advance
View original page 19Page 20 · Read text
Notes
   Pulloutrapidwinding lever into ready           -+ page 25
   position
:  Selectlarger or smaller aperture                -+ page 26
  Changeor (correctly)f it batteries;               -+ page 25
  notebatteryvoltage indication
  Pressin stop down pin only with working        -+ page 26
  aperturemeasurement
   Fullyopen lens diaphragm before inserting      -+ page 34
)  Preselectsmaller or larger arperture            -+ page 26
                                                         --> page 24   Fullytension rapid winding lever
                                                  -+ page 32   Fullytension lever
   Useelectronicflash with 3 position only        0 terminal fires too early
                                                   -+ page 28
  UseFP flash bulb with 0 position only          J terminal fires too late
                                                  -> page 28
  Setshutterspeed dial to  l. or Q position        +  page 28
  Measurebrightnessof main subject             "> page 27
r Useeyepiececup especiallywhen wearing      -+ page 30
  soectacles
  Engageshutter speed dial on "A"                -+ page 25
  0bservemeasuringlimit in viewfinder           -+ page 26 and 27
  Setf ilm speed correctly                                '-> page 24

  ,Loadfilm correctly, advance smoothly but       Film advance control                                                            --> page 24  nottoo fast
>r Preselectlarger aperture to permit faster       + page 26
  shutterspe6d
  Preselectlarger aperture or support camera     -+ page 26 and 27
  or use tripod, note time exposure indication
                                                            --> page 24  Loadfilm correctly
  Removetorn piece of film, trim new leader        --+ page 24
  andre-thread
  Donot use force to advance film, keep                  lf film is torn out of
  rewind release pressed in and rewind film        cartridge: open back in
  somewhat,then finish lever stroke                 total darkness only,
                                           rewind film by hand and
                                        wrap up lightproof

                                                                                                                                                                              arirl
View original page 20Page 21 · Read text
Facts  and  figures
Type: 24 x 36 mm single lens reflex camera with automatic
speed control and manual override operating by aperture pre-
selectionand exposure measurementthrough the lens at full
aperture.
Equipment:Rollei bayonet mount for interchangeablelenses,
accessoryshoe with center contact, rapid film loading system,
focal plane shutter with rubber blinds, rapid winding and
release lock, double exposure and blank frame lock, self-
locking stop down pin, backlight correction button integrated
in shutter release,self timer with startingbutton, cable release
thread, forward-counting self-zeroing exposure counter with
film loading and film rewind control, 1/r" lripod bush, carrying
strap eyelets.
Exposure measurement:Through-the-lenssystem with silicon
photo diode, center-weightedfull field measurement;according
to lens type open aperture measurementor working aperture
measurement.Film speed setting trom 25-3200ASA/ 15-36 DlN,
measuring range with 100 ASA / 21 DIN film 1-16,000cd/m2
with 50 mm f/1.8 lens; automaticelectronicshuttercontrol with
aperture preselection,powered by 4 x 1.5 V silver oxide batte-
ries in camera base, switched on by rapid winding lever and
shutterspeeddial,double switch-onindication.
Viewfinder system: Pentaprism,instant return mirror. Focusing
screen with diagonal focus indicator, microprism ring and
ground glass screen with Fresnel lens. Aperture indication,
shutter speed indication,top and bottom setting range limit
indication,time exposure warning mark; LED green signal as
automaticand memory measurementindication,LED red signal
as setting range limit and indicationof aperturestop down pin
position;batteryvoltage check indication.
Viewfindereyepiecewith mask and fittingfor eyepiececup and
c,orrectionlens. Laterallycorrect and parallax-free finder image.
Focal plane shutter: Automatically controlled shutter speeds
                                        1lrcoo-1lso1lrcoo-4                                            sec and B;       sec, mechanicallyset shutter speed
38

                                                 , r ;::::;    ...  - ..r:;;:l;^,,rii+.ilrt. '.   :::J:;::
View original page 21Page 22 · Read text
selectableX and FP flash synchronizationat r/lo sec for hot shoe
 andflash cord terminal.
 Dimensions:approx. 146 x 92 x 99 mm I 53/+x 35/sx37le in. with
 50 mm f/1.8lens.
 Weight:approx.895g /3151eoz. with 50 mm f/1.8 tens.
 Interchangeablelenses: see page 40.
 Accessories:
 Lenshoods;
 Rectangular/Type A for 25 mm tl2.8lens -
 Screw-inI fype B for 35 mm f/1.4 lens -
 Screw-in/Type C for 85 mm f/1.4 lens -
 Screw-in/Type D for85 mmtl2.8and 135 mmfl4lenses-
Folding/ Type E for 35 mm 112.8,50mm t11.4and 50 mm f/1.8
 lenses; with slightly reduced effect also for 85 mm t12.8 and
135mm f/4 lenses.
 Filters medium yellow, green, orange, light red, UV, R 1.5;
neutraldensity- 2, neutraldensity- 3, infrared;
polarizingfilter,soft focus attachment.
Rollei retroadapter,adapter for extreme close-up lenses,micro-
scope adapte,r,M 42 / Pentax Prakticathread adapter.
Set of extensiontubes 7.8 - 15 - 30 - 50 mm with aperture auto-
mation,bellowswith apertureautomation.
Eyepiece cup, correction lens mount, lens and camera body
caps, eveready case, combination case, lens case, carrying
strapwith non-slipshoulderpad.


Technicalmodificationsand inclusionof accessoriesreserved.
                                                   39


                                      . . . . .        r "    - x * . 1 * .    * . . . t t :       , *
View original page 22Related documents and language editions
From the M. Butkus archive. Original publisher and archive notices are retained.
Check the model and edition against your equipment.
PDF verified 2026-10-10.