Sewing machines
Singer 192 Spartan — User manual
User manual for Singer 192 Spartan. 4 pages in English. Read the original PDF, download or print a copy without registration.
4 pagesEnglish1.0 MB PDF
Loading your manual…Open PDF directly
Document details
- Brand
- Singer
- Model / document
- Singer 192 Spartan
- Document type
- User manual
- Language
- English
- Pages
- 4
- File size
- 1.0 MB
- Category
- Sewing machines
- Document date
- Not specified in catalog
Search available document text
Find a term, then jump to its page in the original PDF. Image-only pages may not be searchable; check the PDF for exact wording and diagrams.
Page 1 · Read text
Instructions For Using
t SPARTAN* SEWING MACHINE 192

Needles and Thread—
Use needles 15 x 1, in sizes 11, 14, 16 and 18. /

You will obtain the best stitching results from
your sewing machine if it is fitted with a

SINGER needle. baa)
Thread should be selected according to the

fabric to be stitched. Needle must be of correct y F,
size for thread to pass freely through eye rut _t
of needle. [FLAT

4 IDE |
To Set the Needle— \ § |

|

i

@ Raise needle bar to its highest position.

@ Loosen needle clamp thumb screw and Y
insert needle (flat side to the right) up into |
needle clamp as far as it will go.

@ Tighten needle clamp screw. Fig, 1. To Ser the Needle

r

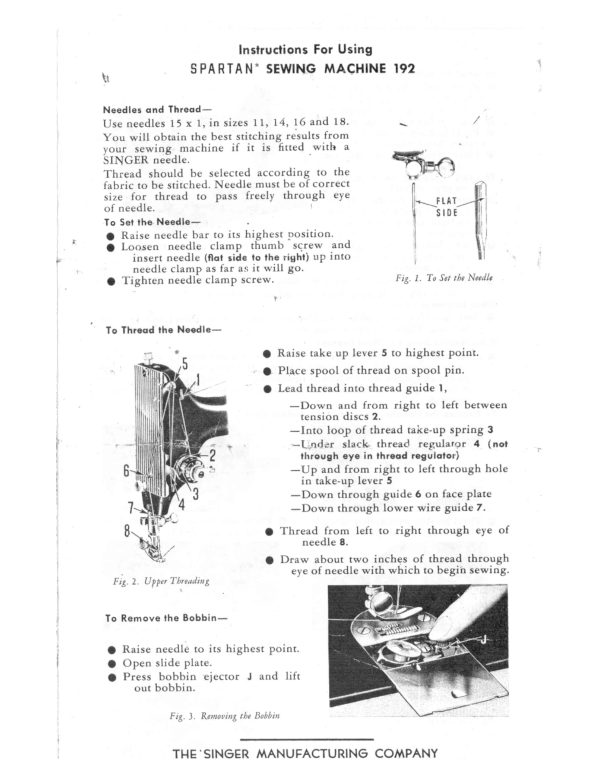
To Thread the Needle—

@ Raise take up lever 5 to highest point.
@ Place spool of thread on spool pin.
@ Lead thread into thread guide 1,
—Down and from right to left between
tension discs 2.
—Into loop of thread take-up spring 3

—Lnder slack thread regulator 4 (not
through eye in thread regulator)

—Up and from right to left through hole
in take-up lever 5

—Down through guide 6 on face plate
—Down through lower wire guide 7.

@ Thread from left to right through eye of
needle 8.

@ Draw about two inches of thread through

eye of needle with which to begin sewing.
Fig. 2. Upper Threading

To Remove the Bobbin—

@ Raise needle to its highest point.
@ Open slide plate.

@ Press bobbin ejector J and lift
out bobbin.

Fig. 3. Removing the Bobbin

THE SINGER MANUFACTURING COMPANY
View original page 1
Page 2 · Read text
To Wind the Bobbin—

@ Hold hand wheel K with left

hand, and with right hand,

loosen stop motion screw L.

Place bobbin 4 on spindle.

@ Press bobbin winder 5 down

against hand wheel.

@ Place spool of thread on

spool pin.

@ Lead thread through guide 3
on arm of machine.

@ Pass thread through lower
notch of guide 6 from front
to back and through upper
notch from back to front.

@ Lead thread from right to
left through hole in left
side of bobbin.

@ Hold end of thread and start machine.

Fig. 4. Winding the Bobbin

(End of thread will break off

after a few coils have been wound on bobbin.)

When Bobbin is Full—

@ Stop machine, lift bobbin winder away from hand wheel and remove
bobbin. Tighten stop motion screw L

If the Bobbin Does not Wind Evenly—

@ Loosen screw which holds thread guide 6 tobed and move guide to right
or left as required. Then tighten screw. If pressure of bobbin winder
pulley M against hand wheel is insufficient for winding bobbin, loosen
screw N, press bobbin winder pulley against hand wheel and tighten

screw N.

To Replace the Bobbin and Thread the Bobbin Case—

@ Hold bobbin so that thread leads
off in direction shown.

w

Fig.7.

@ Draw thread between case and
tension spring until it reaches
notch 2.

@ Pull about 3 inches of thread
across bobbin.

To Prepare for Sewing—

@ Turn hand wheel over toward
you so that needle enters
throat plate and brings up the
bobbin thread.

@ Place bobbin in case and draw

=")

Y

thread into slot 1

Fig. 8.
@ Close slide plate, allowing

thread to enter notch in slide
plate.

Bei
Fig. 9. Drawing Up the Bobbin Thread
View original page 2
Related documents and language editions

SingerPDF
Adjuster's for the Singer Model 20
Service manual
19 pages · EnglishRead →

SingerPDF
Singer 101-4 & 101-12
User manual
56 pages · EnglishRead →

SingerPDF
Singer 101-4 & 101-12 (black and white scan)
User manual
54 pages · EnglishRead →

SingerPDF
Singer 115
User manual
36 pages · EnglishRead →

SingerPDF
Singer 127 & 128
User manual
18 pages · EnglishRead →

SingerPDF
Singer 12K
User manual
12 pages · EnglishRead →

SingerPDF
Singer 15
User manual
36 pages · EnglishRead →

SingerPDF
Singer 15-125
User manual
38 pages · EnglishRead →

SingerPDF
Singer 15-22
User manual
13 pages · EnglishRead →

SingerPDF
Singer 15-30 / 15-87 & Generic 15 Class (rotated for printing)
User manual
14 pages · EnglishRead →

SingerPDF
Singer 15-30 / 15-87 & generic 15 class machines
User manual
14 pages · EnglishRead →

SingerPDF
Singer 15-86
User manual
24 pages · EnglishRead →
From the ISMACS International. Original publisher and archive notices are retained.
Check the model and edition against your equipment.
PDF verified 2026-10-11.