Toy sewing machines
Singer Model 20 (1914, life-size scan) — User manual
User manual for Singer Model 20 (1914, life-size scan). 2 pages in English. Read the original PDF, download or print a copy without registration.
2 pagesEnglish10.8 MB PDF
Loading your manual…Open PDF directly
Document details
- Brand
- Singer
- Model / document
- Singer Model 20 (1914, life-size scan)
- Document type
- User manual
- Language
- English
- Pages
- 2
- File size
- 10.8 MB
- Category
- Toy sewing machines
- Document date
- Published 1914
Search available document text
Find a term, then jump to its page in the original PDF. Image-only pages may not be searchable; check the PDF for exact wording and diagrams.
Page 1 · Read text
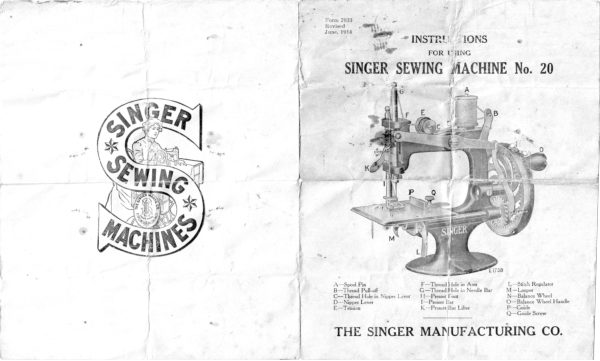
"INSTR! IONS
) a
We FoR tine

K SINGER SEWING MACHINE No. 20
*y we t sone,

; aoe {oh

THE SINGER MANUFACTURING CO.
View original page 1Page 2 · Read text
i

Nesiles

*

The needles used in Ma.hine No. 20 are of Class and
Variety 24x 1; the size of necille best to be used with cotton
threads Nos. 60 to 86 is No. 14 but finer or coarser needles can
be obtained for other sizes of thread; it must be remembered
that the thread must pass freely through the eve of the needle
to ensure good re=ults. ¢

To Set v.2 Needle

Loosen the needle set screw, take out the old needle, and
push the shank of the new one yp into the needle bar as far as it
will go, having the long groovelin the blade at the left, and the
flat part of the shank at the right; fasten it firmly with the set

serew. 4 A es
To Thread fhe Machine

“ace the spool of thread {on the spool pin (A), pass the
end oi the thread toward you through the two holes in the
pull-off (B), to the left_and down through the hole (C) in the
nipper lever (D), draw it to the left under the end of (D), and
‘over between, the tension dises (E), up through-the hole (F) in
the arm near the needle bar, through the hole (G), near the
upper end of the needle bar, down and from left to right through
the eye of the Reedle. \

To $ew

Raise the presser bar and presser foot by turning up the
presser bar lifter (K), place the work under the necdle in the
position in whieh you wish to commence stitching; let down the
presser foot (H) upon it; hold the end of the thread loosely by
the left hand until the needle bat has descended and risen again
onee, then hold it jérnuy until ir stitches are made, after

which it may be placed under thp presser foot, and the stitching
continued; the halance wheel mbst turn over fm you.

To Remove pe Work

Stop the machine with the/needle at its highest point,
raise the presser foot by presser{ bar lifter (K) and draw the
work out back from you, brea}ing the thread in so doing;
this fastens the thread, but the seam can be readily pulled
out if the end of the thread is withdrawn from the last loop on
the under vide, and pulled upon.,

Tke Tension

‘The tension on the thread is automatic and rarely requires
alteration; the thread is held between the nipper (D) and the
tension (E). except when the needle is at its highest point when
it is released afd sufficient thread drawn for ea@h succeeding
stitch; if necessary the tension can be changed by turning the
tension thunrb “aut to the right or left. 7

To Change the Length of Stitch

‘Te stitch regulator is lever (L); whon moved backward ar
from you the stitch is made longer, and toward you, shorter.

_ The Guide

The guide (P) is used for making a seam patallel with, and
at a certain distance from the edge of the work; it is used only
for straight or convex edges. Jet it at the reqhired distance
from the needle and fasten firmly by thumb serew (Q). It may
be removed entirely if not required for use.

To Oil the Machine

\_‘The machine should be eile occasionally with the specially
prepared sewing machine oil sold for this purpose at all Singer
shops; a small drop of oil at the ¢nd of a broom splint, or a small
splinter of wood, should be appl.ed at each place where a part of
the mechanism moves through o° against another part while the
machine is in motion. .
View original page 2Related documents and language editions

SingerPDF
Adjuster's for the Singer Model 20
Service manual
19 pages · EnglishRead →

SingerPDF
Singer 101-4 & 101-12
User manual
56 pages · EnglishRead →

SingerPDF
Singer 101-4 & 101-12 (black and white scan)
User manual
54 pages · EnglishRead →

SingerPDF
Singer 115
User manual
36 pages · EnglishRead →

SingerPDF
Singer 127 & 128
User manual
18 pages · EnglishRead →

SingerPDF
Singer 12K
User manual
12 pages · EnglishRead →

SingerPDF
Singer 15
User manual
36 pages · EnglishRead →

SingerPDF
Singer 15-125
User manual
38 pages · EnglishRead →

SingerPDF
Singer 15-22
User manual
13 pages · EnglishRead →

SingerPDF
Singer 15-30 / 15-87 & Generic 15 Class (rotated for printing)
User manual
14 pages · EnglishRead →

SingerPDF
Singer 15-30 / 15-87 & generic 15 class machines
User manual
14 pages · EnglishRead →

SingerPDF
Singer 15-86
User manual
24 pages · EnglishRead →
From the ISMACS International. Original publisher and archive notices are retained.
Check the model and edition against your equipment.
PDF verified 2026-10-11.