Film cameras
Argus C-44 User manual
User manual for Argus C-44. 33 pages in English. Read the original PDF, download or print a copy without registration.
33 pagesEnglish6.2 MB PDF

Loading your manual…Open PDF directly
Document details
- Brand
- Argus
- Model / document
- Argus C-44
- Document type
- User manual
- Language
- English
- Pages
- 33
- File size
- 6.2 MB
- Category
- Film cameras
- Document date
- Not specified in catalog
Search available document text
Find a term, then jump to its page in the original PDF. Image-only pages may not be searchable; check the PDF for exact wording and diagrams.
Page 1 · Read text
This manual is for referenceand historical purposes,all right* reserved.
                     This page is copyright@ by-M.-Bulkus*NJ.
                rhispasemav*'0",*f,.li"oli::*:5,1J*H':$";m:fftrssionortheproducer

             On-line cameramanuallibrary - www.orphancameras.com
This is the full text and images from the manual. This may ta
        the PDFfile to downloaddependingon yourconnectiontype
  If you find this manual usefulohow about a donation of $3 to: l
Ave.oHigh Bridge, NJ 08829-1701and send your e-mail addresr
Most other placeswould charge you $7.50 for a electronic copy
                                  to read Xerox copy.
 This will allow me to continue to buy new manuals and pay th
                                         It'll make you feel better, wonrt it?
                          If you use Pay Pal or wish to use your credit card,
                        click on the securesite on my main page.
View original page 1Page 4 · Read text
www.orphancameras.com

c.o,r,panionabreafq      Li S  C'44                                r\_


      The new Argus C44, with  its built-in  convenience                              8|lilTfltTS:
      and versatility,   is America's  finest 35mm
      camera and the perfect companion  for every                           FunctionalParts..           3,4
        picture-taking  assignment.                                                                   L o a d i n g .             . . . . . . . . 5 - 7
      The following  pages describe the steps in                                                                       Color-maticSettings.        8        picture-taking   with  the C44. Reading these
        instructions   will assure complete success                               Shutter,ApertureSettings... . .. 9,10
        with  your  very  first  roll  of film.
                                                                     Focusing,HoldingCamera    11
      Beeause Argus produets are eonstantly  being
       improved,  tttinor changes in appearance of                     D e p t h o f F i e f d . .. . . . . . . . 1 2
       the product may not be included  in this                               ColorExposureGuide.       . . .13-14
        instruction  book. A letter  or card addressed:
       sal,Es sERvrcE DrvrsroN, ARGUSCAMERAS,                              Black& WhiteExposureGuide.. . 15-16
     ANN ARBoR, Mrcr{rcAN, will  bring angwers to                                                               FlashPhotography.. . . . .. ......17-20       questions about the use of your C44 cameta
        or other Argus equipment.                                         lnterchangeableLenses.. .. .. .. .2I-26
View original page 4Page 5 · Read text
F

    functional   parts


        To help you become familiar  with  your C44
        Camera, the functional  parts are indicated
         here for easy reference. Familiarity   with
         these names before loading and operating  the
        camera will help you become acquainted
          with   it  easily.


       BODYtEt{SMOUNT
       VIEWFINDERWINDOW
         REWINDKNOB                         o
                                                                 -\.        RANGEFINDERDIAt
       ACCESSORYSHOE
         FILMPTANEII{DEX
       EXPOSURECOUNTER
         WINDINGKNOB

  3
\-
View original page 5Page 7 · Read text
la*'(


   $c>adfing

      I                 ?
      Remove  camera  from  case by           Turn  the wind knob  until   it            Place  a  cartridge   of  fresh
       unsnapping     front     flap   and            stops, then rotate the take-up         35mm  film  in  the  film  com-
        loosening   screw  on  bottom.             spool with your thumb so that             partment,  turning  the rewind
      Remove  camera  back by turn-             the  flat  surface  of  the  spool           knob     if  necessary  so  that
                                "open"           and the small roller are facing             cartridge  seats properly   (up        ing  locking   device   in
         direction  and  sliding  back   off.            up, as in  illustration.                     against top  of compartment).
View original page 7Page 8 · Read text
www.orphancameras.com
!'1DO YOU P!.AN TO TAKE A TnlP? Or photograph some special event?  If  so, you s
  two of film, including some flash pictures. This \MiUacquaint you with your new can
  ment  of  spoiling  an important   picture  through  lack  of  familiarity.

 4                5
  Thread   fiIm  so  that   three           Press shutter release and turn            Place  back  against  camera
  perforations  of film are under          wind knob about  half a turn             with sides engaged in grooves.
  small  roller, as in illustration.                until  end  of  film  folds back             Slide  back  up   into   closed
  Perforations should be engaged           against itself, as in illustration.              position, turning locking device
 on  sprocket,  which   is  con-         Be sure fiIm remains engaged              in direction  opposite to arrow
                                                               "teeth."                         to lock back tightly  closed.  nected to exposure counter.            on sprocket


                                                                                                                   S$1"i6+1
                                                                                                                                                                                                rii
View original page 8Page 9 · Read text
7                                     unloading
Turn wind knob until   it stops,          The  exposure  counter   dial         When end of  fi.Im  ls reached,
press shutter release, and again          must be set each time you re-             film must be rewound back into
turn wind knob  until   it stops.             load. After  fresh fiIm has been             film  cartridge. Pull wind knob
These two winds take up film           advapced  into  position,  press           completely up and rotate  it 1Z
leader and advance fresh film            counter dial down and turn  to            turn backwards. Using rewind
into   position.  Winding   film          20 (for a 2O exposure roll)  or to           knob,rewind  film  until counter
also cocks  the  shutter,  pr€-          0 (for a 36 exposure roll). The              dial has stopped rotating. Con-
venting double exposure. Since              dial makes a complete revolu-             tinue to turn knob a few extra
shutter   will  be cocked each             tion each time you wind  the            revolutions   to be sure film  is
time  film  is wound, be careful               film, and automatically  stops             entirely   in   cartridge.  Open
not  to  press shutter  release             at  the  mark  indicating   the           back, remove  film  cartridge,
before you are ready  to take          number  of exposures remain-          and  have  film  developed  as
your  first  picture.                          ing on the film.                       soon as possible.
View original page 9
Page 12 · Read text
www.orphancameras.coml  r
                                                                    ,t|              t :
                                          I
                            '"."rf

          A P E R T U R E                             S H U T T E R

The  amount   of  light  passing  through   the                 The length  of time  the shutter  is open to
lens  while  the  shutter   is open  is controlled                    admit   light  when  you  press the  shutter
by  the  aperture   setting    (f:stop).   In   the                    release is controlled  by  the  shutter  speed
Argus  C44,  you  have  a  wide  choice   of                         dial. Numbers on the dial indicate fractions
settings,  ranging  from  the smallest  opening,                        of a second and are selected by  rotating
f:22,   to  the  largest  opening,   f:2.8.  Each                     the dial to bring the desired number directly
f:stop  admits   twice  as much   light  as the                    over the index dot when looking  from  the
preceding  one.  For  example,   f:5.6  admits                     top of the camera. ALwAys sET THE sHUTTER
twice  as much   light  as  f:8.  The  triangular               SPEED DIAL DIRECTLY ON THE NUMBER.
pointer  between   f:5.6  and  f:8  on  the  aper-                  Areas in between do not provide  accurate
ture  ring  indicates   f:6.3,  an intermediate   or                    intermediate speeds.
half-stop   setting.  The  aperture   ring  of your                                                  "B",       "clicks"                                      When the dial is set at       the shutter  witlC44             into  position   at each marked                                                           remain open as long as the shutter  release
setting.  Ffowever,    it may  also be set at any                                                                                    is held down,  permitting   time  exposures.intermediate    position.
                                                     To  avoid movement  when making  longer
To  set  aperture,   rotate  aperture   ring   until                    exposures, the camera should be on a tripod
desired  f:number    is  directly  opposite  index                      or other steady support and a cable release
pointer  on lens  barrel.                                     used to operate the shutter.
                                                                        "stop"The   aperture   also  controls   the  range   of                To        movement  broadside  to  the
sharp focus in your  pictures.  Small  apertures                   camera, use the  fastest shutter  speed and
(e.g. f:22)  give  a deep  zor:.e of sharp  focus,                          try swinging your camera with  the subject.
while   large  apertures    (e.g.  f:2.8)   give  a                              (It is easier to "stop"  subject action moving
shallow   zor:re of sharp  focus  (see page  L2).                       directly toward  or away from the camera.)


                                                                                                                                                                                                                                                                                                               . .r,*;{i
View original page 12Page 14 · Read text
www.orphancameras.com


                depth   of  f$efid


                               The aperture  setting  not only  controls  the amount  of light
                                                                                 "depth                                           that reaches the film,  but  also determines           of field,"
                                   which  is the range of sharp focus in front  of and
                                 beyond the subject focused upon.
                               The illustrations  on this page show you the difference
                                              in range of sharp focus when the smallest and largest
                                      apertures are used at the same distance settings. The
                                camera in the illustration   is focused on 8 feet. By reading
                                 between identical   f: numbers on the depth  of field scale,
                                 you see that  if f:22is  used, the range ofsharpness extends
                                    from 4 feet to infinity.  When  f:2.8  is used, everything
                                    from 7 to 9 feet is in focus.
                               By turning  the rangefinder  dial you can watch the depth
                                           of field for any one aperture change as the distance scale
                                   changes. Consulting  the handy depth  of field scale helps
                                            find the best combination  of aperture and distance setting.


                                                                               T2
View original page 14Page 15 · Read text
beautiful  colc>n transparencie


Sunlight  shining  directly on the picture subject from behind the
photographer  is generally the best lighting  for outdoor  color pictures                                                                                                                                                         ,tti:,:.1,,rltliJ.  .  . and the best time  of day is mid-morning  or mid-afternoon.  The             f
lower angle of mortting  or afternoon sun enhances scenic shots with
longer dramatic shadows. Directly  overhead, the sun causesshadows to be uninteresting  and very black. They can be troublesome               f
when shooting pictures of people.
Pictures taken in the shade with  the proper warm-toned  filter are                                                             :.ffi
oftgn pleasing, and here flash can be used to supplement  available
light. The use of an ultraviolet  (haze) filter  is recommended in
mountains  or at the beach, but never use a filter designed for                                                                              *black-and-white  film with  color film,
Theexposureguideonpage14\Miuhelpyoutoselectthecorrect
apertureandshuttersettingsfora,Uera'geoutdoorpicturesubjects             I
(nearby people, gardens, houses, light and dark objects in about                              il',1                                                                                                                       ,'r',
equal proportions).  Close lens one stop from chart setting  for light      ,'  ,
subjects (distant scenery, marine, beach and snow scenes, tight        ,i:"1"'.,.,
color objects dominating).  Open lens one stop more  for d,ark subi     ;,'.:.'
people in dark  clothing,  dark  foliage, flowers, animals and buUdit gs,
View original page 15
Page 16 · Read text
www.orphancameras.com
                                          Scenic shots like this one
                                   mahe excellent subjects
                                                        for color slides.


    A lisht-colored subject against                                        Use a blue flashbulb to
    a dark background always                                                            lighten the shadow side of a
    makes q,n effectiueshot.                                                           back-lighted subject.


FILM                           ShutterSpeed      BrightSun        HazySun       CloudyBright     CloudyDull

SuperAnscochromeDaylight                                                                                                                                                      f :5.6
EktachromeDaylight                                                                                                                                                                 f :2.8
AnscochromeDaylight
EktachromeTypeF*                                              between        between
                                                                4 & 5 . 6         2 . 8 & 4AnscochromeFlashType*( Hill,)
KodachromeDaylight                             between        between
(orindoortypewithfilter*)                            5 . 6 & 8         4 & 5 . 6

n85Q-typecorrectionfilters must be usedwith indoortype colorfilms exposedin daylight.Consultmanufacturer'sinstructir
+*Use"CL0UDYBRIGHT"aperturesettingand the nextslowershutterspeedsetting,                                              L4
View original page 16Page 17 · Read text
black  and   \ /hite  photos


Modern   black  and  white   film,  coupled   with  the  fine  lenses  of
your  Argus  C44,  will  produce  perfect  photographic    results,  but  checking
composition   before  snapping   the  shutter   always   results   in
                                                                                                                  }d{pictures   of  more  dramatic    interest.   Try   framing   the  scene  with
some nearby  foreground,  and  include  people when  you  can  to add
human   interest.  Watch   for  that  unusual   angle  from  which   to
shoot  the  picture,   or  try  a close-up  using  a neutral  background    to
place  emphasis  on  your  picture   subject.

Pictures  taken  indoors  with   existing   tight  are  very   lifelike,  and
                                         "cinch".modern   fast  fiIms make  these a           Outdoors,   fi.lters  will
dramatize   clouds  and  can  also  be used  to  brighten   foliage  or
produce  moonlight    effects.

Action  always  adds  interest   to any  photo,  and  the  easiest way  to
                            "head                     "pose"stop  action   is  to  shoot    it          on".  When  you            individuals
or  groups,  give  them  something   natural   to  do and  have  your  camera
pre-set  so you  can snap  the  pictures   quickly.

You  needn't  be  afraid   to  experiment   with  the  rules.  Shoot  scenes
that   interest  you  at any  time  of day  or  night     .  .  . the new  films
can  take   it,  and  you'll  be excited  with  the  results!
View original page 17Page 18 · Read text
www.orphancameras.com
                                                  "head-on"                                         Shoot
                                                     to stop action


                                                                   Frame your picture
 Use filters for                                                                                                       for a feeling of depth dramatic cloud effects


FILM                       ShutterSpeed      BrightSun        HazySun       CloudyBright     CloudyDull

KodakTri-X
AnscoUltraSpeedPan                                                                                                                                                                                           f :5.6KodakPlus-X
AnscoSupreme

KodakPanatomic-X


0penthe lensonestop morefor dark subjects;closethe lensone stopfor light subjects.
Whenusingfilters,or if subjectis shadedfrom the sun,largeraperturesmustbe used.
Alwaysconsultinstructionspackedwith your film or filters.
                                                                                         16
View original page 18Page 19 · Read text
attaching   flash  gun


                                           4
:       rgus  C44  fash       When   inserting   batter-        Be  sure  flash  unit  does        Lock  flash  unit  on cam-
 rnit   is designed to  ac-          ies, be  sure  to  position          not  have  a  flash  lamp         era  by   pressing  down
                    "C" tommodate two size             the left-hand   cell top-up            in     it   before   attaching           firmly   on   the   locking
             batteries  or       and  the  right-hand    cell          unit   to  camera.   Turn          lever.  Check  unit  occa-1'photoflash
 r B-C power  unit. To       top-down.  Photoflash           locking  lever  on base of         sionally    while   makingI
1install batteries, remove         batteries  should  be  re-          unit  upward  and  slide         flash  pictures   to  make
 ;he back of the battery         placed after four months'         bottom   flanges  of  flash        sure  lock   is  tight.   Per-[
!ii^r"  by  grasping   it  at        use or as soon as 50  to          unit   forward    into   the          fect  electrical  contact   is
,iihe sides and  pulling        60  flash  exposures  have        camera   accessory  shoe      made  through   elements
 ;lirectly',1       outward.              been made.                     as far as they   will  go.             in mounting   device.
 .,
I '.'-\
View original page 19Page 20 · Read text
www.orphancameras.com


                   C'
  The  side-to-side  move-       Any  midget-base  flash
Jment    of  the  flash  syn-               I a m p m a y  b e  u s e d .
  chronization   selector  to         Align  studs on base of
-'(M"+         (20 millisecond  de-       lamp with slots in reflec-
           "X"   lay)  or       (zero delay)          tor   socket  and  push
-permits    use  of  several       lamp  in as far as  it  wilt
  types  of  flash  equip-       go while supporting  bat-
_ment    at  various  shutter          tery  case  with   other
  speeds.  (Consult  Guide        hand. Do not turn lamp
  on page 20).                       after  insertion.

                                                    continued
View original page 20Page 23 · Read text
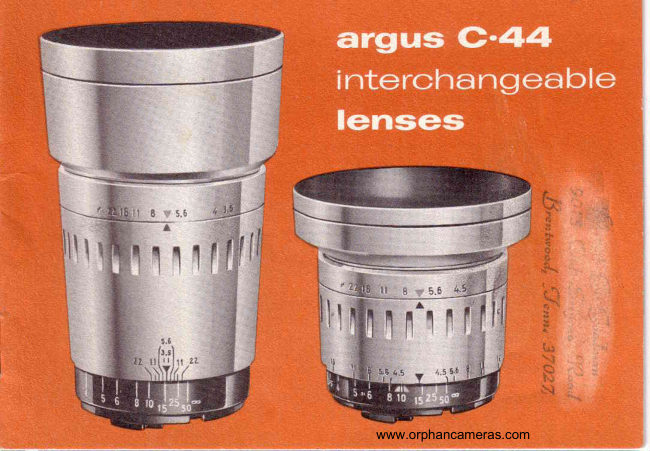
interchangeabte
     lenses

              fnstantly  interchangeable Argus Cintagon lenses provide
             the right  focal length  for every picture and let you take  full
           advantage  of the versatility   built  into your C44 camera. With
           Argus C44 35 mm Wide Angle and 100 mm Telephoto Lenses
           added to your camera kit, you won't miss a single
            photographic  opportunity!
           The standard 50 mm lens and both accessory lenses are
            hard coated and color-corrected, assuring you professionatly
            sharp black-and-white  negatives and brilliant  color slides. These
             precision Cintagon lenses feature a rig:id bayonet-type
           mount  like those of the world's most expensive cameras,
             enabling you to interchange them quickly and easily.
                                                     "click-stop"            Easy-to-read depth-of-field scales,             aperture
                                                                  "universal"              settings, and the Argus Color-matic  system of
              settings for simplified  picture-taking  are some of the other
           advanced features of these specially designed lenses.
                Built-in  lens hoods keep the direct rays of the sun from
                striking  the lens and also serve as retaining  rings to hold
                 filters and supplementaryclose-up  lenses.


i
L    2L
View original page 23Page 25 · Read text
interchangeable     lenses,  cont.                                                             i:f,,


        The ease with which the Argus
        C44 lenses are interchanged wiU
         an.aze you. A push of a button and a
           twist  of the wrist remove the lens  . - -                               \.:}".
          the simple alignment  of red dots,
           insertion  of lens, and another  twist
           of the wrist locks the lens securely in
          place. It's  automatically  coupled
           to the rangefinder.
        To protect  the delicate mechanism
           of the shutter, NEVER LEAvE cAMERA
         WITHOUT  A LENS OR COVER ON  IT.
         AIso avoid changing lenses in bright
           sunlight. When the accessory lenses               R E M O V A T
         are not being used, they should be
          stored in their leather carrying  cases.                     Turn  rangefinder   dial  so  that  THE DrsrANcE
         tO INSERI FILTER,grasp diaphragm                             s'cer.p rs sET AT rNFrNrrv  (oo). Hold camera in
          control  ring, unscrew lens hood,                                        left hand so that rangefinder  dial  ancl body lens
         drop  filter  in front  of lens, and screw                    mount are free to turn  during  uncoupling  opera-
        on lens hood again. Both Wide                                     tion. HoId  lens barrel  with  right  hand.  While
         Angle and Telephoto Lenses accept                              right thumb  is pushing up on lens lock release,
         Series VI  (LrA'diameter)   fiIters                              give  lens  barrel  a  quarter-turn    to  the   left
                                                                         (counter-clockwise)  and  lift  lens out.        and supplementary  close-up lenses.


,t.l :  23
View original page 25Page 26 · Read text
www.orphancameras.com


                                                                                                                                                                                                                                           'il


 I N S T A T L A T I O N

To prepare the body lens mount  to receive                    Insert  lens barrel  carefully  into  the body  lens
any  of the  three  lenses, turn  the range-                 mount,  fitting  the notch on the black  ring over
finder  dial  to  bring  the  red  dots  in  the                  thb square projection  in the body  lens mount.
mount  opposite each other. Then prepare             When the lens is fully  seated, turn   it to the right
the lens barrel  for installation  by turning                   (clockwise) as  rln  As  rr  wrLL  Go, about a
the black distance scale to  infinity   (o"),                    quarter-turn.   Allow  rangefinder  dial and body
aligning the two red dots in the base of the                   lens mount  to turn  freely. Lens locks securely in
lens barrel. (See illustration).                                  place, automatically  coupled to the rangefinder.


                                                                                     24
View original page 26Page 27 · Read text
argus   vari mb$ffi p(}\/Ver
   vievvfi nder


      The  precision   optical  system  of  the new  Argus  Variable
      Power  Viewfinder   gives you  a choice  of three  magnifications
                                                                 "seen"        of  the  field  of  view,  corresponding   with   the  areas          by
       your 35mm  wide  Angle, 50mm  standard,  and 100mm
       Telephoto   Lenses. A  built-in   parallax  adjustment
      compensates   for  differences   that  would  otherwise   occur
      between  the  fields  of view  of the lenses and  viewfinder     .
             it  tilts  the  lens system  within   the  viewfinder  so that  you
      see precisely  what  your  lens sees at any  distance.
      To mount  the  viewfinder  on your  C44,  slide  its mounting
        foot  into  the camera's  accessory  shoe. Focus  through
       the  buitt-in   rangefinder-viewfinder     of  the  camera.


25
View original page 27Page 28 · Read text
www.orphancameras.com
with the 5omm Stondsrd Lens        . Set the
small dial on the left side of the unit so that
     "focal                  "50"the        length" number         is opposite
the white dot. The larger dial on the right
side is for parallax correction. Set  it at the
distance  indicated  on  the  distance  scale
after  the camera has been focused.


whh rhe 35mm Wlde Angle Lens. . . Set the
               "35"small  dial  to      and the  larger  dial  to
the  distance you  are from  your  sub3'ect.             TO TAKE FIASH PICTURESWHENTHEVARIABTEPOWER
The infinity  setting  1." ) is used for distant               VIEWFINDERlS USED, mount  flash  unit  on the C44
subjects     when your  subject  is closer                   Flash  Extension   Bracket.  The  bracket   is  held
than 15 feet, set the  correct foot-number                          in  place  by  the  C44  case screw  or by  a tripod
opposite the white dot.                                          screw. To attach  bracket,  loosen screw on bottom
                                                                                of  leather  case and  slide camera  part-way   out.
                                                                             Slip  bracket   into  slot  in end  of case, and  place
                                                                     hole  in  bracket  over  end  of  safety  screw.  Siide
                                                           camera  back  down   onto  screw,  and   tighten.
                                                           Mount   flash  unit  on camera,  and  plug  cord  intowirh rhe  I OOmmTelephoto Lenc    .  . Set the
        "100"                                                     socket   in  Variable   Power   Viewfinder.   To  usedial  to       and adjust  the parallax-cor-
rection  dial. The  illustrations  at  left show                    Flash  Extension   Bracket   on  the  C44  without
you how your subject will look through the                    using  leather  case, case screw may  be removed
Argus  Variable  Power  Viewfinder-not                           to hold  bracket  on camera.  as illustrated.
masked down,  but  magnified  to  the  full
proportions  of  the  viewfinder.
                                                                                  2e
View original page 28Page 29 · Read text
specifications


       PICTURESIZE: Lo x LK6' transparencies in 2" x 2"     FLASH: Lock-on  type,   fits  accessory shoe on
        mounts;  or  3r{'   x  4Lk'  standard  black  and     camera and accessory mounting  bracket;  syn-
         white  prints.                                          chronized through  mounting  contacts;  auxiliary
                                                           bayonet  terminal  provided   for  connection  to         FILI$ SIZE:35mm, roll cartridge.
                                                          secondary flash when using B-C power unit;  5'
        [ENS: 50mm  (2') Argus Cintagon  f:2.8  color-      polished  reflector  with  bayonet  type  socket  for
         corrected, coated anastigmat;  diaphragm  open-      midget  base  flash  lamps;  push- button  lamp
         ings from  f:22;  rangefinder-coupled  automatic       ejection.
         focusing, 3  ft.  to  infinity;   hyperfocal  distance:     IENS ACCESSORIES:Built-in    filter   retainer   for
         57' 8o at f:2.8; field covered: 27o x 40o angular      Series V  (134'  diameter)   filters  and  supple-
          at  infinity;  resolving power: L2A Hnes per milli-       mentary  lenses.
        meter  at center of  field. Bayonet-type  mount;                                               OIHER FEATURES:Die-cast  metal  body  with          depth-of-field  scale on lens barrel.                                                                     leather-grain  and satin metal  trim,  5%'  x 3Y8"
       SHUTTER:Behind lens type; gear-controlled speeds      x  324",  weight  26  az.;  automatic  exposure
         at L/LO, Lf 25, L/1O, L/LOO,L/SOOplus bulb  (B);       counter;   Color-matic   settings   for   aperture,
        body  release, threaded  for ASA  cable;  auto-       shutter speed and distance for average subjects
         matically  cocked  with  film  wind  action;  syn-        in bright  sun; double exposure prevention;   tri-
                   66M"        chronized  for                             (20 millisecond  delay) and      pod socket; leather eveready carrying case with
        66X"               (zero delay)  flash equipment,  including       shoulder strap. Accessories include interchange-
          electronic  flash units.                                   able lenses and Variable Power Viewfinder.

  27
It\\                                                                                                                                                                                                                                                                                                                                                                                                                                                                                                                                                                                                                                                                                                                                                        - >   l I
View original page 29Related documents and language editions
From the M. Butkus archive. Original publisher and archive notices are retained.
Check the model and edition against your equipment.
PDF verified 2026-10-10.