Flashes & lighting
Vivitar 265 Flash User manual
User manual for Vivitar 265 Flash. 54 pages in German, English. Read the original PDF, download or print a copy without registration.
54 pagesGerman, English2.1 MB PDF

Loading your manual…Open PDF directly
Document details
- Brand
- Vivitar
- Model / document
- Vivitar 265 Flash
- Document type
- User manual
- Language
- German, English
- Pages
- 54
- File size
- 2.1 MB
- Category
- Flashes & lighting
- Document date
- Not specified in catalog
Search available document text
Find a term, then jump to its page in the original PDF. Image-only pages may not be searchable; check the PDF for exact wording and diagrams.
Page 1 · Read text
www.orphancameras.com
Vivitar
265
 Owner'sManual
 Gebrauchsanleitung
 M od ed ' emp lo i
 Manualdel propietario
View original page 1
Page 2 · Read text
www.orphancameras.com
Foldout this flap -
 Also,fold out the back coverflap.The illustrationson
 bothflapswill helpyou followthe instructionsas you read
 thisOwner'sManual.Englishlanguageinstructions
 beginon insidefrontcover.
Klappen Sie diese Seite nach auBen aus -
 . . . und lassenSie sie ausgeklappt,wenn Sie die
Gebrauchsanleitunglesen.Tun Siedas gleicheauch
 mit der letztenSeite.So habenSie es leichter,sich an
denAbbildungenzu orientieren,auf die in den
verschiedenenKapitelnder Anleitunghingewiesenwird.
DerTeilin deutscherSprachebeginntauf Seite14.
D6pliezce rabat-
D6pliez6galementle rabatau dos de la couverture.Les
illustrationsfigurantsur les deux rabatsvousaideront
a vousconformeraux instructionsdu Moded' Emploi.
Les instructionsen languef rangaised6butentii la
page25.
Abra este aleron -
Abratambienel aleronde la cubiertatrasera.Las
ilustracionesen ambosaleronesle servirande ayuda
paraseguirlas instruccionesa medidaque va leyendo
este    Manual           del proprietario.                      Las                            instrucciones                                   en                   iIengua      espafrola            empiezanen                               la p6gina                                  37.
View original page 2
Page 3 · Read text
www.orphancameras.com


    Additional SafeguardsWhen Using Vivitar
   SB-OAC Adapter (optional Accessory)
    1. Do not operateyourf lashwith a damaged
    cord.
     2. Keepcord awayfrom hot surfaces.
     3. Arrangecordso it cannotbe trippedoveror
    accidentallypulledf rom its electricaloutlet.
     4. Alwaysunplugcordwhennot in use.Never
    yankf romoutlet.Graspand pullto disconnect.
     5. lf you needto usean extensioncord,be
    sureio useonewhichhasa higherratingthan
    theflash.Cordsratedfor lessamperagecan
    overheat.
  SAVE THESE
i) INSTRUCTIONS
View original page 3Page 5 · Read text
www.orphancameras.com


Mike Butkus                                          DigitallyDN:c=USDate:cn=Mike2024.04.21signedButkus,by17:24:28Mikeo=ButkusButkus-04'00'camera manuals, ou=butkus.org, email=mike@butkus.org,
View original page 5
Page 8 · Read text
www.orphancameras.com
Before you begin . . .
About Your Flash
Your new VivitarModel265 Auto/ThyristorElectronic
Flashfeaturesa unique"zoom" opticallightingsystemto
deliverproperlightingcoveragewhenusingcamera
lensesfrom 24mmto B5mmin focal length.Thyristor
energysavingcircuitryprovidesfast recyclingand more
f lashesper set of batteries.And, withthe Model265's
fastspeed(1/750to 1/30,000of a second),you can
"treeze"action,allowingyou to captureeventson f ilm
as theyare reallyhappening.Your new VivitarModel265
ElectronicFlash-  the accurate,reliableway to great
flashpictures. . . "automatically."                              (
                                                                        (
GettingAcquainted                                                 (
. . . Caretullystudy this Owner'sManual.Keep it with the          (
flashfor a guidewhenquestionsarise.                            (
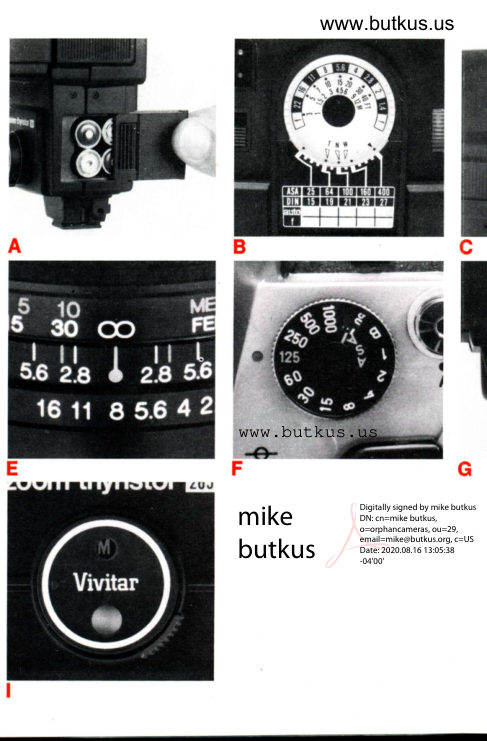
. . . Familiarrzeyourselfwith your f lash.Checkoverthe           (CalculatorDialand controls.
                                                                       (. . . Shoola roll of film. Experiment.Make somelests.
Findout how to use yourf lashmosteffectively.                  (
View original page 8Page 9 · Read text
www.orphancameras.com
   Description of Controls
      Zoom FlashHead   O
       Sensor  @
      ModeSelectorSwitch   O
   O  Open FlashButton
   O  MountingFoot
        SettingIndicator  @
      AC AdapterReceptacle   O       (AC Adapteris optionalaccessory,not included)
   (@ CalculatorDial
]i    g  ReadyLight
       On-OffSwitch  @
   O  BatteryCompartmentCover
       MountingFootLock Lever  @
        ShutterCordSocket  @
  @ 24mmWide-AnglePanel
        ShutterCord  @
View original page 9Page 10 · Read text
PowerSourceswww.orphancameras.com
 Yourflashoperateson four 1.5vortAA arkarinebatteries
 as a standardpowersource.lf you'll be usingyour flash
 a lot you shouldconsidertwo othersources.liney may
 be moreeconomicalfor you than alkalinebatteriei
  in the long run.)NickelCadmiumbatteries(sizeAA),
  in additionto beingrechargeable,also providea tasier
 recyclingtime.Thereare severalbrandsof NiOads
 currentlyavailable,afong with supplementarycharging
 units.Or, there'sthe VivitarSB-6 AC Adapter.The
 adapter,availablef rom your Vivitardealer,enablesvou
 lo use electricaloutretsas an arternatesourceof oower.          (
                                                             s
 Alkaline Batteries                                           r
 To prepareyour flashfor batteryoperation_                                                           ( t
                                          R
                                                                             l
 1I                                                            re
 Insertthe Batteries                                 y(
 (A) Slideopen the BatteryCompartmenter.                  I
 (B) lnsertlour 1.5 V AA atkaline batteries.Foilow the          Y(
positioningdiagramsinside the compartment.               sy
(C) Rep;lacethe cover. (See photo "A")                     U S
                                                Yc
Thereare somesimpleproceduresto followfor getting          is
the most out of your flash and batteries.First,at,iaystirrn
your unitoff rightafteryou'vefinishedusingit, and
l.eavethe ReadyLight @ glowing.Secondly,when
storingyourflashfor a periodof time,removethe
batteriesto preventdamagefrom batterycorrosion.         Pc
                                                                            froWhendo you replacethe batteries?Whenthe Readv                                                               to
                                                                                             t
View original page 10Page 11 · Read text
www.orphancameras.com
Lightfailsto glow after30 secondsor whenyou can't
hearthe "whining"soundafterthe f lashis switchedon.
rrz
"Form" the Capacitor
("Form"the capacitoronce a monthto keepyourf lash                                                   Hrat peakoperatingefficiency.)
(A) Turnyour f lashunit on @ .
(B) Allowingthe ReadyLight @ to glow about 10
secondsalter each f lash,fire your unit 5 timesby
pressingthe Open FlashButton @.
(C) Turnthe unit oft (for the time being),leavtngthe
ReadyLightglowing.

The Calculator Dial
Yourf lashhasa CalculatorDial @ whichis a handy
referencefor f iguringexposures.The diallightsup when
youswitchyourf lashon. (Seephoto"8")

The Zoom Flash Head
Yourf lashfeaturesa unique"zoom" opticallighting
systemwhichdeliversproperlightingcoveragewhen
usingcameralensesf rom 24mmto 85mmin focallength.
Youset the Zoom FlashHead q1lto the positionwhich
is closestto the focallengthof your lens.(Seephoto"C")
          W I D E -  3 5 m m
             N O R M-  5 0 m m
             TELE - B5mm
Positionsare markedon the SettingIndicatorO, going
fromWIDEin the closedposition,to NORMin the middle,
to TELEin the extendedposition.
View original page 11Page 12 · Read text
www.orphancameras.com
The 24mm Wide-Angle Panel
The 24mmWide-AnglePanel@ snapsoverthe frontof
the Zoom FlashHead q1-lfor usingsuperwide angle
lenses.The attachmenfis designedto be used with the
Zoom FlashHeadin the WIDEpasition.


Set the Zoom Flash Head
O to the position which comes c/oseslto the tocal
 lengthof your lens.
Automatic Operation
The Sensor
Yourflashhasa Sensor@ witha built-incomputer.The
 sensormeasuresthe lightreflectingoff the subject
 duringthe exposure.Be surethat nothingcoversor
 obstructsthe sensorwhenyou'reshootingin the
 automaticmodes.(Seephoto"D")
 Operating Modes
Thereare two automaticoperatingmodes-  BLUEand      E
                                                                                                                                                                                                                                                                                                                                                                                                                                            I 1 R E D .                                                                                                                                                                                                                                                              I

                                                                                                                                                                                                                                                                                             I  I r The BLUEmodegivesyou the mostdepthof f ield
 whilethe REDmodegivesyou lessdepthof tieldand         a
 the maximumautomaticoperatingrange.
 Automatic Operating Ranges
  Zoom         Flash Head       ELUE Mode             RED Mode               (        Position
  (2tlmm Wide-Angle    3 ft. ro  5ft. (0 9 m to 1.4 m)   4 lt. lo    I  ft. (1.2 m to 2.8 m)
         Prnall     WIDE          3 fr. lo  9 ft. (0.9 m ro 2.8 m)   4 ft. to 18 ft. (1 .2 m to 5.5 m)   s
     NORM         3 ft. to 11 fr. (0.9 m to 3 3 m)   4 ll. ro 21 It. (1.2 m to 6.5 m         (
     TELE          3 ft. to 13 ft. (0.9 m to 3.9 m)   4 ft. to 26 tl. (1 .2 m to 7.8 m)     s
View original page 12Page 13 · Read text
www.orphancameras.com
-T
Setthe Calculator Dial @
Lineup the T, N, or W (Tele, Norm,or Wide) marking on
thediatwiththe scalemarkingf or the ASA(DlN)
numberfor the f ilm you're using.(NOTE:The arrowto
therightof "W" is the 24mm Wide-Anglesetting')lt
you.,Asl(DtN)number isn'ton the scale,set the dial to
thec/osesfASA(DlN) number'     3
Fc
Selecteitherthe BLUEor RED
OperatingMode
 in thecolumn, and notethe correspondingf -stop' Now,
 f indthef-sropnumberon the dial above'The maximum
 automaticoperatingdistancetor the mode you've
 selectedwill be indicatedunder the t-stopnumber'
EXAMPLE:You'reusing ASA100 (DlN 21) tilm and your
 llashin the NORM(" N" ) position.You selectthe BLUE
modetoranf.stopsettingottB.Yourmaximumautomatic
 operatingdistancewould be 1 l teet (3.3 n).

 rro
Set the Mode Selector Switch
@ to the color of the automaticoperatingmode You've
 selected.(SeePhoto"D")
View original page 13Page 14 · Read text
www.orphancameras.com
 (
Set your CameraControls
(A) Setyour camera lens to the f -stop which corresponds
with the automaticoperatingmode you've selected.
(Seephoto"E")
(B) Setyour camerato the correct shutterspeed for
synchronizationwith electronicf lash.(Reterto your
camerainstructionsfor the proper speed.) (See
photo"F")

Mountyour Flash
(A) Move the MountrngFoot Lock Lever V  allthe way
to the lelt (unlockposition).lnsert the MountrngFoot
@ into the accessoryshoe on the cameraand tighten
by moving the MountingFoot Lock Leverto the right          1
until it clicks into the "LOCK" position.(See photo "G")          (
(B)Your tlash hasa built-inhot shoe contact.lt your        2
cameradoes not havea hot shoe,connectthe shutter       u
                                                                                                    +1 .Ccord @ to your tlash ,.!j and to your camera's "X"
synch termtnal(Seephoto "H") . (Referto your camera
instructionsfor specific tnformattonregardingyour          3
camera's t I ash synchronization.)                                                    o
                                                    4
                                                                                                                                                                                                                                                                      lL rLv
You'reReady!                                 5
Turnyour f lash unit on @ , check the camera f ocus,        E
wait for the Ready Light to glow and you're all set to take               d l
tlashpictures automaticallywithoutmaking any further            pl
setfings.                                                            n
                               8
View original page 14Page 15 · Read text
www.orphancameras.com
ManualOperation
Thereare situationswhich may requireusingthe
"manual"operatingmode("M"). Forexample:using
yourflashat distancesbeyondthe maximumautomatic
operatingrange,usinga specific f -stopsettingfor depth
offieldcontrol,or speciallightingtechniqueslike"'fill-in"
andmultipleflashlighting.
DistancesBeyond the Maximum Automatic
OperatingRange
Whatif you'reusinghigherspeedf ilms and want to
photographat distancesbeyondthe maximumautomatic
operatingrangeof 26 feet?You can figurecorrect
exposuresfor theselongerdistancesby usingthe
standardformulathe CalculatorDial markingsare based
0n.
            guidenumber                                                           :  f-stopsetting
                f lash-to-subjectd istance
1 -  Setthe ModeSelectorSwitch@ to the "manual'l
("M") position.(Seephoto"1")
2 -  Findthe guidenumberaccordingto the filmyou're
using,and Zoom FlashHeadpositionsetting,from the
tableon page 11.
3 -  Findthe flash-to-subjectdistance.(A quickway
withmostcamerasis to focus,then checkthe focus
distancescaleon the cameralens.)(Seephoto"E")
4 -  Computethe f -stopusingthe formula.(Roundoff
to the nearestf-stop.)
5 -  Setyour cameralens.
EXAMPLE:You'reusingf ilm withan ASAof 100(DlN21)
andyou'veset the Zoom FlashHeadto the WIDE
 position.Fromthe tableon page11, you findthe guide
 numberis74 (22).The f lash-to-subjectdistanceis 37
View original page 15Page 16 · Read text
www.orphancameras.com
feet (1'l m). This dividesout to 2. You wouldset your
cameralensto f2.
Selective Depth of Field Gontrol
Supposeyou wantto use yourflashat an f-stopother
thanthoseindicatedfor automaticoperation.This is
especiallyusefulwhen usinga zoom lens becauseyou
can lake advantageof variablefocal lengthsfor "f raming'
the scenewithoutchangingthe flash-to-subjectdistance
and therebyalteringthe exposure.
1 -  Setthe ModeSelectorSwitch@ to tne "manual"
("M") position.(Seephoto"1")
2 -  Set the CalculatorDial @ . Line up the markingon
the dial (7, N, or W) with the scale marking tor the ASA
(DlN) numberfor the film you're using.(NOTE:Thearrow
to the right ot "W" is the 24mm Wide-Anglesetting.)lt
your ASAnumber isn'ton the scale,set the dial to the
closestASAnumber.Now, find the f-stopyou desireon
the dial. Setyour tlash up at the distanceindicated under
the f -stopnumber.(See photo "8")
EXAMPLE:You'reusingASA 100 (DlN21) filmand your
flashin the TELE("T") position.You wantto set your
lensto f 11.You wouldset your f lashup at the corres-
pondingflash-to-subjectdistancewhich is 10 feet (3 m).

Final Note
Stopin and visityourVivitardealer.He can showyou
accessoriesfor yourf lash,plus provideyou withtips on
electronicflashphotography.He'sthereto helpyou.
View original page 16Page 19 · Read text
Bevor Sie lhr GerHt zur Hand nehmen
Einiges vorweg
lhr neues Vivitar Auto/Thyristor-Elektronenblitzgerdt
Modell 265 ist mit einem neuartigen "Zoom"-Licht-
system ausgestattet, damit das Licht des Blitzes der
Brennweite lhres Objektivs angepaBt werden kann. Der
Ausleuchtwinkel ist  f ur die Objektiv-Brennweiten 24mm
bis B5mm ausgelegt. Das Thyristor-Energiespeicher-system sorgt  f ur eine schnelle Blitzfolge und mehr Blitze   t:
pro Batteriesatz. Mit seiner enorm schnellen Leuchtzeit                 i
(11750 bis 1/30.000 Sekunde) kann genau der richtige                       I
Augenblick einer Szene "eingefroren" werden. lhr neues                 ,
                                                                                                                                                              f ur          ;                         Vivitar 265Elektronen-Blitzgerdt                                                                                                                                                                                                                                                       i                                                           . .-. unddasdasrichtige"auto-Geriithervorragende Blitzaufnahmen
matisch".


                                                                                                                                                                                                                                                                                                                                                                                                                                                                                                                                               IMachen Sie sich mit dem Gerdt vertraut  . .  .
 .. . indem Sie die Gebrauchsanleitung sorgf altig lesen'   3
Bewasren Sie diese beim Gerat auf, damit Sie im
 Zweifelsfal le nachschlagen konnen.
 ... indem Sie vor der ersten Aufnahme das Gerat und
 die beschriebenen Funktionen ausprobieren.
 . . . indem Sie einen Probef ilm machen. Experimentieren
 und testen Sie, damit Sie die vielseitigen Moglichkeiten
 des Gerates kennenl'ernen.
View original page 19Page 20 · Read text
Beschreibung
Q Zoom-Reflektor
@ Sensor
@ nutomatik/Manuell Schalter
@ Testknopf (Offenblitz)
@ AufsteckfuB
@ Brennweiten-lndex
@ AnschtuB fur Netzgerat
      (Netzgeriit als separates Zubehor lieferbar)
@ elendenrechner
@ Bereitschaftsanzeige
@ rtrulnus-schatter
@ Deckel des Batteriefaches
@ Verriegelung fur AufsteckfuB
@ AnschluBbuchse fur Synchronkabel
@ Weltwinkel-Vorsatz 24mm
@ Synchronkabel
Energiequellen
Die Standard-Energiequelle  lhres Blitzgerdts sind 4
Alkali-Batterien A 1,5 Volt. Wenn Sie lhr GerAt oft
benutzen, sollten Sie zwei weitere Energiequellen  in
Betracht ziehen, da diese uber einen langeren Zeitraum
hin voraussichtlich wirtschaftlicher  sind: 1. Nickel-
CaCmium-Akkus. Diese wieder auflad baren Zellen
ergeben auch eine schnellere Blitzfolge. Wdhlen Sie
bitte unter dem reichhaltigen Angebot verschiedener
Akku-Hersteller das lhnen angenehme Fabrikat mit dem
dazu gehorigen LadegerAt selbst aus. 2. Vivitar SB-6

                                     14
View original page 20Page 21 · Read text
Netzgerdt            Dieses   Netzgeriit.                             es,-  lhrbeiGeratlhremvonVivitar-Hdndlerjeder  zu                 ermoglicht    erwerben  ublichen Steckdose-      aus zu betreiben.

  Alkali-Batterlen

                                                                                                                                                                                                                                            .  Vorbereitung lhres Blitzgerdts fur Batterie-Betrieb  . .
                          F
                                                                                                                                                                                                                               i

                                                                                                                                                                                  I
   1t
 Einsetzen der Batterien
  A) oftnen Sie das Batteriefach, indem Sie den Deckel
  g) seitiich schieben.
  B) Setzen Sie 4 Alkalibatterien d 1 ,5 Volt ein. (Beachten
   Sie t0r die richtige Polung die Zeichnung rm Batterie-
  lach).
  C) Schieben Sie den Deckelwieder zu. (Siehe
  Abbildung "A")
 Um die beste Leistung aus Blitzgeriit und Batterien zu
  erzielen, beachten Sie bitte, daB Sie das Gerat nach
  Gebrauch ausschalten. (Die Bereitschaftsanzeige @
  sollte jedoch vor dem Ausschalten aufleuchten). Wenn
  Sie lhr GerAt uber einen langeren Zeitraum nicht
  benutzen, entnehmen Sie die Batterien, damit Korrosions-
  schaden vermieden werden.
 Wann muB die Batterie ausgewechselt werden? Sollte die
  Bereitschaftsanzeige nach 30 Sekunden noch nicht
  aufleuchten oder das typische "Singen" nicht zu horen
  sein, ist ein Batteriewechsel notig.

                                   15I
View original page 21Page 22 · Read text
rrz
Kondensator formieren
 (Zur Erzielung der Hochstleistung empfehlen wir, das
gemachtwerden  sollten), /assen aber die Bereitschafts-
A) Schalten Sie lhr Gerat ein ;@;.
 B)Die Bereitschaltsanzeige @ /assen Sie ca.10
Sekunden leuchten. Dann losen Sie den Blitz durch den
 Testknopt (! aus. Dtesen Vorgang wiederholen
 Sie 5 mal.
C) Schalten Sie das Geriit aus (wenn keine Aulnahmen
gemacht werden sollten), /assen aber dre Bereitschafts-
anzeige vorher ufleuchten.

Der beleuchtete Blendenrechner
lhr Blitzgerat besitzt einen beleuchteten Blendenrechner,
um die Daten auch bei schlechten Lichtverhdltnissen
leicht ablesen zu konnen. Mit dem Einschalten des
Gerats leuchtet auch der Blendenrechner auf. (Siehe
Abbildung "B")

Der Zoom-Reflektor
lhr Blitzgerdt verf ugt uber einen neuartigen "Zoom"  -
Reflektor, mit welchem Sie den Leuchtwinkel des Blitzes
dem Auf nahmewinkel der verwendeten Objektive
zwischen 24mm bis 85mm Brennweite anoassen konnen.
Den Zoom-Reflektor stellen Sie so ein, daB die Angabe
im Brennweiten-lndex dem nachstgelegenen Wert lhrer
verwendeten Objektiv- Bren nweite entspricht. (Siehe
Abbildung "C")
View original page 22
Page 23 · Read text
WIDE            NORM -  35mm50mm
            TELE -  BSMM                        -
Die Einstellungen sind auf dem Brennweiten-lndex @
markiert, und zwar ausgehend von WIDE in der zuruck-
gezogenen Stellung, NORM in der mittleren und TELE
in der ausgefahrenen Stellung.
Der Weitwinkel-Vorsatz 24mm
Bei Verwend  u ng von Su per-Weitwi n kel -Objektiven wi rd
der 24mm Weitwinkel-Vorsatz auf den Zoom-Ref lektor
gesetzt. Die Verwendung dieses Vorsatzes  soll in der
Stellung W  I DE ertolgen.
e\.,
Bringen Sie den Zoom-Reflektor
0 in die Position, die derverwendeten  Objektiv-
Brennweite am nachsten kommt.
Automatik-Betrieb
 Der Sensor
 lhr Blitzgerdt besitzt einen Sensor @ mit einem einge-
bauten Computer. Der Sensor miBt das vom Objekt
reflektierte Licht wdhrend der Aufnahme. Beachten Sie
bitte, daB er nicht wahrend der Aufnahme abgedeckt  ist.
(Siehe Abbildung "D")
Bedienung
 lhr Blitzgeriit hat zwei Automatikbereiche: einen
BLAUEN und einen ROTEN Bererch. Der BLAUE Bereich
ergibt eine groBe Tiefenschdrfe, der ROTE Bereich eine
geri nge Tiefenschar{e, jedoch e  i nen g roBe n Bl itzbereich.
View original page 23Page 24 · Read text
Automatik-Bereiche
   Einstellung des
 Brennweiten-lndex    Blauer Bereich  Roter Bereich
  Mit 24mm Weit'
  winkel-Vorsatz      0,9m bis 1,4m  1,2m bis 2,Bm
     WIDE              flOm   h s 2,Bm  1,2m bis 5,5m
    NORM         0,9m bis 3,3m  1,2m bis 6,5m
     TELE          0.9m bis 3.9m  1.2m bis 7.Bm
4
                                                 a)Gebrauch des Blendenrechners
Bringen Sie die Bezeichnung T, N, oder W (Tele, Norm
oder Wide) auf dre Zahl (DlN oder ASA), die lhrem
verwendeten Film entspricht. (Anmerkung: der rechts
von "W" stehende Ptetl kennzeichnet den Weitwinkel-
Vorsatz 24mm). Verwenden Sie einen Film, dessen
Empf indlichkeit nicht auf dem Blendenrechner vermerkt
ist, so stellen Sie ihn auf die ndchstliegende, niedrigere
Zahl ein.
6v,
Wdhlen Sie zwischen dem ROTEN
oder BLAUEN Bereich
und lesen Sie ooerhalb der gewdhlten Farbe den
entsprechenden Blendenwert ab. Den zur Verf ugung
stehenden automatischen Blitzbereich konnen Sie unter
dem Blendenwert ablesen.
Zum Beispiel: Sie verwenden einen Film mit 21 DIN und'
haben die Arbeitsstellung NORM ("N") gewiihlt. Bei
Verwendung des BLAUEN Bereichs wird lhnen hierfur
 die Blende B angegeben. Der automatische Blitzbereich
 betragt 3,3 m maxirnal.
                                  1B
View original page 24Page 25 · Read text
no
Bringen Sie den Automatik/
Manuell-Schalter
@ aut die Farbe, die lhrem gewdhlten Bereich
 entspricht. (Siehe Abbildung "D")
 -I
Stellen Sie lhre Kamera ein
 A) Jbertragen Sie die am Blendenrechner ermittelte
 Blende auf thr Obiektiv. (Siehe Abbildung "E")
 B) Stellen Sie die   f ir Elektronenblitz richtige Ver-
 schluBzeit ein. (Vergewissern Sie sich daruber in der
 Kamera-Gebrauchsanleitung). (Siehe Abbildung "F")


       i:
 ttr6
 Verbinden Sie lhren Blitz mit
 der Kamera
 (A) Fi.thren Sie den Sperrhebel des Auf stecktuBes @
 ganz nach tinks (aut). Setzen Sie den Aufsteckf uB @
 in den Auf steckschuh der Kamera und ziehen Sie an,
 indem Sie den Sperrhebel ganz nach rechts   f 0hren, bis
 er einklinkt (zu). (Siehe Abbildung "G")
 (il Besitzt lhre Kamera keinen Btitzschuh mit Mitten'
 kontakt, so verbinden Ste den Blitz mittels des Syn-
 chronkabels ti mit dem "X"-Kontakt lhrer Kamera
 (Siehe Abbildung "H")  . (Lesen Sie im Zweif elstall tn lhrer
 Kamera-Gebrauchsanleitung unter dem Kapitel  " Blitz-
 lotogratie" nach)
                                 19
View original page 25Related documents and language editions
From the M. Butkus archive. Original publisher and archive notices are retained.
Check the model and edition against your equipment.
PDF verified 2026-10-10.