Film cameras
Vivitar V3300SE User manual
User manual for Vivitar V3300SE. 7 pages in English. Read the original PDF, download or print a copy without registration.
7 pagesEnglish0.3 MB PDF
Loading your manual…Open PDF directly
Document details
- Brand
- Vivitar
- Model / document
- Vivitar V3300SE
- Document type
- User manual
- Language
- English
- Pages
- 7
- File size
- 0.3 MB
- Category
- Film cameras
- Document date
- Not specified in catalog
Search available document text
Find a term, then jump to its page in the original PDF. Image-only pages may not be searchable; check the PDF for exact wording and diagrams.
Page 3 · Read text
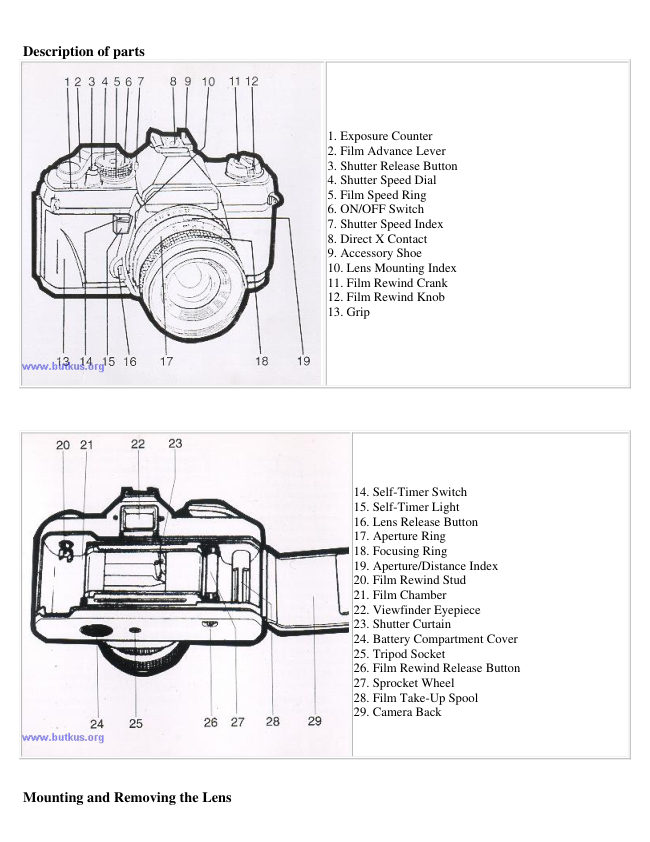
Mounting the Lens
First. remove the camera body cap by turning it counter-clockwise Then align the red dot on the lens barrel with the
Lens Mounting Index on the camera body, fit in the lens and turn it clockwise until it locks in place with a click.

Removing the Lens
While pressing in the Lens Release Button, turn the lens counter-clockwise as tar as it will go, then pull it out toward
the front. Once the lens has been removed, be sure to put the lens front cap and rear cap on the lens and the body cap
on the camera's lens mount to protect them.

•  While mounting and removing the lens, do not touch the lens glass or the inside of the camera the film will
advance one frame and the shutter will be cocked at the same time Unless it is fully turned, the shutter cannot be
released.
                                                                                                                   Digitally signed by Mike Butkus
                                                                                      DN: cn=Mike Butkus, o=Butkus camera manuals, ou=butkus.org,
                                                                                             email=mike@butkus.org, c=US       Mike Butkus                Date: 2023.05.18 09:46:38 -04'00'

. If you are changing the lens with film in the camera, take care to prevent light from entering the inside of the
camera.

Battery Installation

Two 1.5V alkaline batteries (LR44) or 1.55V silver oxide batteries (SR44) are needed to provide power for the
camera's exposure meter.

1. Remove the Battery Compartment Cover by turning it with a coin.

2. Insert the two batteries inside the battery holder with the plus (+) side facing up. Then replace the holder in the
compartment and tighten its cover.

Battery Check

Check the batteries with the LEDs in the viewfinder. If an LED (red or green) turns on when the Shutter Release
Button is pressed halfway in, the batteries are in good condition. If no LED turns on, they are exhausted and must be
replaced. Be sure to replace the two batteries at the same time. Because the batteries are used to power only the
exposure meter, the camera operates even if they are exhausted or there are no batteries in it.

Film Loading

Use 35mm cassette film. Always load and unload film in subdued light, never in direct sunlight.

1 Open the Camera Back by pulling the Film Rewind Knob all the way out.

2. Install the cassette in the film chamber and push down the Film Rewind Knob. If it does not return smoothly to its
original position, push it down while twisting it back and forth.

3. Pull out the film tip and insert it into any one of the slots in the Film Take-Up Spool.

4. Operate the Film Advance Lever slowly to advance the film. Make sure the Sprocket teeth catch the perforations,
and close the Camera Back.

5. Fold out the Film Rewind Crank and turn it gently in the direction of the arrow to take up film slack.

6. Wind the Film Advance Lever and depress the Shutter Release Button. Repeat this operation until the Exposure
Counter shows "I ". The film is advancing properly if the Film Rewind Knob turns while you wind the
Film Advance Lever.
View original page 3Page 4 · Read text
Film Advance Lever
By turning the Film Advance Lever as far as it will go, the film will advance one frame and the shutter will be cocked
at the same time Unless it is fully turned, the shutter cannot be released.

Exposure Counter
The Exposure Counter will advance each time the Film Advance Lever is wound and will return to °S when the
Camera Back is opened It displays the letter "S" and the numbers 1, 4. 6 up to 36 The numbers 12 20, 24 and 36 are
marked in orange to indicate the end of film in commercially available film cassettes

Setting the Film Speed
To obtain correct exposure, it is important to set the film speed correctly The speed of the film you are using is
printed on the film box.
To set the film speed lift up the Film Speed Ring and turn it until the desired ISO speed comes opposite the index
mark  (   )
The ISO speed settings on the Film Speed Ring are as follows

Focusing the Lens
Focusing is done with a split-image focusing center, microprism collar and a surrounding matte screen

Focusing with the Split-Image
Turn the Focusing Ring until the two segments of the image divided by the horizontal line in the split-image center
fall in line if the two segments are not aligned your subject is not in sharp focus.

Focusing with the Microprism Collar and Matte Screen
Turn the Focusing Ring until your subject in the microprism collar or The matte screen appears sharp It is not in sharp
focus if the image appears wavy on the microprism or blurred on the matte screen

Shutter Speed and Aperture
Setting the Shutter Speed
The shutter controls the time during which light reaches the film. If the Shutter Speed Dial is turned to a one-step
higher number (from 125 to 250, for example), the amount of exposure will be reduced by half, if it is turned to a one-
step lower number, the amount of exposure will be doubled The numbers "1", "2  " 1000" on the dial represent 1,1/2
... 1 / 1000 second, and the letter "B" stands for 'bulb', used for long exposures as explained below, To set the shutter
speed, turn the Shutter Speed Dial and set the number you want opposite the index. Be sure to set it at the click
position.

Bulb Exposure Photography
If an exposure time longer than 1 second is required, set the Shutter Speed Dial at "B". The shutter will remain open
as long as the Shutter Release Button is kept depressed. To prevent camera shake, mount the camera on a tripod and
trip the shutter with a cable release (optional equipment).
View original page 4
Page 5 · Read text
Setting the Aperture
The aperture controls the amount of light that reaches the film. If the Aperture Ring is turned to a one-step higher
number (from 4 to 5.6, for example), the amount of exposure will be reduced by half; if it is turned to a one-step
lower number, the amount of exposure will be doubled. The aperture not only controls the amount of light but also
allows you to control the sharpness of areas in front of and behind the subject, as explained later in the section "Depth
of Field". To set the aperture, turn the ring and set the number you want
(with click) opposite the Aperture/Distance Index. Intermediate settings can also be used.

Exposure Setting
Your camera features a center-weighted metering system which measures the light intensity with emphasis on the
subject in the center of the viewfinder. It also measures the brightness in the surrounding area.
The camera operates on manual exposure. First, set the film speed. You can then use any appropriate combination of
shutter speed and aperture to obtain correct exposure. If you press the Shutter Release Button halfway in, the exposure
meter will switch on and an LED will turn on in the viewfinder to indicate exposure. The LED will turn off as soon as
you take your finger off the button.
As the exposure meter is based on a center-weighted system, always place your subject in the center of the viewfinder
for light metering.

Correct Exposure
Only the green circle LED turns on. If the green LED and a red + or - LED turn on at the same time, it means slight
over- or underexposure. but you can go ahead and shoot. However. if you are using a shutter speed of 1 /30 sec or
slower, mount the camera on a tripod to prevent camera shake or use flash photography instead.

Overexposure
Only the red + LED turns on It means your subject is too bright. Stop down the aperture (I e set a higher number) or
use a faster shutter speed to turn on the green LED

Underexposure
Only the red - LED turns on It means your subject is too dark. Open up the aperture (set lower number) or use a
slower shutter speed to turn on the green LED

Taking Pictures
1 . Set the shutter speed and aperture.
Turn the Shutter Speed Dial and Aperture Ring to set your desired values.

2. Focus the lens and frame your subject
While looking through the viewfinder, turn the Focusing Ring to focus and compose your picture

3. Check the exposure and shoot.
Press the Shutter Release Button halfway in and check if the green LED turns on in the viewfinder It if turns on, take
your picture by pressing the Shutter Release Button all the way in

Film Rewinding
If you reach the end of the film, the Film Advance Lever will no longer operate Do not force it. Check the Exposure
Counter to make sure the end of the film is reached, rewind the film back into its cassette and unload the cassette
Send the exposed film for processing as soon as possible To rewind the film
t Press in the Rewind Release Button located on the camera bottom. You need not keep pressing it
2 Fold out the Film Rewind Crank and turn it in the direction of the arrow. Stop winding after you feel a sudden
release of tension, then open the Camera Back and take out the cassette
View original page 5
Page 6 · Read text
Exposure Compensation
If there is a significant difference in brightness between the main subject and its background, you will
not be able to get correct exposure in the normal metering procedure In this case exposure compensation is necessary

Taking Back lighted Subjects
It you are taking a back lighted subject, or if a bright background occupies a large area of the picture frame (e. g.
portraits with a bright sky or sea in the background, subjects standing against a window, etc ). your subject will turn
out underexposed and dark In such cases give twice or four times as much exposure so that it is correctly exposed

Example:
If the cameras exposure meter indicates f/16 and 1/250 sec to get correct exposure. make compensation as follows
Compensation with the Aperture Ring
For 2x exposure compensation, turn the ring from f/ 16 to f 11, and for 4x compensation turn it to f/8
Compensation with the Shutter Speed Dial
For 2x exposure compensation, turn the dial from 1 /250 sec to 1 /125 sec. and for 4x compensation to 1/60
Taking Spotlighted Subjects
It a dark background occupies a large area of the picture frame (e g spotlighted subjects on a stage) your subject will
turn out overexposed and light. In such cases reduce the amount or exposure to half of one-fourth so that it is
correctly exposed.

Example:
If the camera's exposure meter indicates f/4 and 1 /60 sec_ to get correct exposure, make. compensation as follows
Compensation with the Aperture Ring
For 1/2x exposure compensation, turn the ring from f/4 to f/5.6 and for 1/4x compensation turn it to f/8
Compensation with the Shutter Speed Dial
For 1 /2x exposure compensation, turn the dial from 1160 sec. to 1 /125 sec . and for 1 /4x compensation to 1 /250
Self-Timer
Pull up the Self-Timer Button until the red mark appears, then press the Shutter Release Button. The Self-Timer Light
will turn on for the first 7 seconds, then it starts blinking for the last 3 seconds before the shutter is released. Upon
finishing, remember to pull down the Self-Timer Button to its normal position.

Main On/Off Switch
When the camera is not in use, turn the Shutter Speed Dial to align "OFF" with the Shutter Speed Index, for
prevention of battery consumption due to accidentally pressing the Shutter Button halfway, or keeping the shutter
circuits on when putting the camera into its case. Please note the remaining stops on the Shutter Speed Dial are equal
to "ON" condition.

Flash Photography
If you are taking indoor or nighttime pictures, use a compact flash. It will give you beautiful flash pictures. The
camera has an X-contact hotshoe which allows flash synchronization at shutter speeds of 1/60 sec. or slower. You can
use any type of cordless electronic flash.

Depth of Field
When the lens is focused on a subject, that will turn out sharpest in the picture. However, the zone of sharpness
extends over a certain distance in front of and behind the point the lens is focused on. This is known as the depth of
field of a lens and it varies as follows
1 The smaller the aperture, the greater the depth of field, and vice versa.
2. The longer the camera-to subject distance, the greater the depth of field, and vice versa.
3. The zone of sharpness behind the point the lens is focused on is greater than that in front of it
4. A lens with a shorter focal length has a greater depth of field than one with a longer focal length.
View original page 6
Page 7 · Read text
Depth of Field Scale
You can check the zone of sharpness on the Depth of Field Scale of your lens. If you are using a 50mm normal lens
and have set the distance at 5 m and aperture at f/16, you will see on the Depth of Field Scale that the zone of
sharpness extends from about 2.7 m to infinity.

Camera Care
• Do not leave the camera in a hot place (e.g in direct sunlight, in a closed car, etc.) for too long a time, because
excessive heat may adversely affect the film, batteries or camera mechanism. If the camera has become too hot, allow
it to cool to normal temperature before use.
•  After shooting seaside scenes, clean the camera very carefully. Sea breezes may cause corrosion of the camera
mechanism
• Remove dust and dirt on the lens and viewfinder eyepiece with a soft lens brush or blower brush. Remove finger
marks by wiping off lightly with lens tissue. In case the mirror is soiled, dust off lightly with a lens brush. Always
take extra care to avoid scratches.
• Do not subject the camera to abrupt temperature changes, because moisture can condense inside the camera and
cause faulty electrical contact
• To clean the camera body, wipe it clean with a soft cloth. Never use benzine, thinner or other solvents.
•  If you are not likely to use the camera for an extended period of time, remove the batteries and store it away from
heat and moisture.
•  Before you take your camera on a trip or for special events, be sure to check beforehand that it functions normally.
• Keep in mind that the picture area that will appear on a certain size of print may be slightly smaller than that of the
negative.

Battery Precautions
•  Silver-oxide batteries will last about one year, and alkaline batteries about six months. However, their service life
differs depending on their capacity at
the time of purchase, the ambient temperature an, how often you take pictures.
•  Generally, the battery performance decreases temporarily at low temperatures (under about 0°C/32°F). When
taking pictures in cold weather, it is recommended to use new batteries and warm the camera before shooting. The
batteries affected by cold temperatures will function properly again if they return to normal temperature.

Shutter: Vertically running focal plane shutter
Shutter Speeds: B (bulb). 1 to 1/1000 sec. (12 steps)
Flash Synchronization: X contact hotshoe (synchronizes at 1/60 sec or slower)
Self-Timer: Electronic with about 10 sec. delay.
Shutter Release: Mechanical
Exposure Metering: Through-the-lens, full-aperture. center-weighted light metering with SPD cell, manual exposure
with LED display, metering range EV1-19 (with ISO 100 film and 50mm f11.7 lens); ISO 12-1600 film speed range;
exposure meter switch is activated by pressing shutter release button halfway in
Exposure Meter Power Source: Two 1.5V alkaline (LR44) or 1.55V silver-oxide (SR44) batteries Viewfinder: Eye-
level pentaprism finder: 92% field of view and 0.91 X magnification (with 50mm lens set at infinity).
Focusing Screen: Split-image/microprism.
Viewfinder Information: Display of correct exposure, over- and underexposure with 3 LED's, flash signal indicating
that flash is fully charged Film Advance: Lever with 130" stroke and 20" stand-off.
Film Rewind: Film rewind crank.
Exposure Counter: Additive, auto reset.
Dimensions: 135 (W) x 84.5 (H) x 50 (D) mm.
Weight: 445 g (without batteries).

Specifications and design subject to change without notice.
View original page 7
Related documents and language editions
From the M. Butkus archive. Original publisher and archive notices are retained.
Check the model and edition against your equipment.
PDF verified 2026-10-10.